Welcome to the Tigase Administration Guide.
1. Tigase Release Notes
Welcome to Tigase v7.1.5! This is a maintenance release for Tigase v7.1.3 with a number of fixes and updates. Although this guide will forego changenotes for previous releases, we are including major changes and new features list from that version since there are some customers who will be upgrading from older versions directly to v7.1.4.
1.3. Tigase v7.1.4
1.3.1. New Minor Features & Behavior Changes
-
#8061 allow manual storing persisting configuration items for selected components, please refer to Persisting component’s items configuration for more details
|
Important
|
It’s essential to persist items before upgrading to Tigase XMPP Server 8.0.0! |
-
Improve service reliability (applies to installations with enabled ACS clustering strategy, please see Licensing for more details)
1.3.2. Fixes
-
#8086 Improve detecting incorrect payload while configuring room affiliation/roles
1.3.3. Tigase v7.1.3
Fixes
-
#6363 Fix missing namespaces in packets sent as responses for adhoc commands.
-
#6408 Fix issue with multiple XML stanzas sent in single WebSocket frame.
-
#6521 Fix ordering of recents queries - always use timestamps for comparison in Unified Archiving component.
-
#6657 Fix missing index on tig_ma_jids in Unified Archiving component.
1.3.4. Tigase v7.1.2
New Minor Features & Behavior Changes
Input Buffer algorithm changed
The algorithm charged with resizing the input buffer size has been reworked. The new algorithm now takes less steps to shrink the input buffer to an appropriate size. This has improved memory usage under operation, and leaves Tigase XMPP Server with a smaller footprint when idle.
TLS Buffer size reduced
As the input buffer has gotten smaller, so has the TLS buffer. We are now able to utilized 2k per connection instead of an allocated 16k (and 2k thereafter). This significantly reduces the amount of memory needed to run Tigase, and will benefit both high and low activity servers.
1.3.5. Tigase v7.1.1
AMP plugin has had some updates
Offline message retrieval has been slightly changed to use different methods. If you are using the below configuration:
sess-man/plugins-conf/http\://jabber.org/protocol/offline/amp-repo-class=tigase.archive.unified.db.JDBCFlexibleOfflineMessageRetrievalRepository
sess-man/plugins-conf/amp/amp-repo-class=tigase.archive.unified.db.JDBCFlexibleOfflineMessageRetrievalRepository
Replace it with these settings to use proper retrieval method.
sess-man/plugins-conf/http\://jabber.org/protocol/offline/amp-repo-class=tigase.archive.unified.db.JDBCFlexibleOfflineMessageRetrievalRepositoryWithRecents
sess-man/plugins-conf/amp/amp-repo-class=tigase.archive.unified.db.JDBCFlexibleOfflineMessageRetrievalRepositoryWithRecents
1.3.6. Tigase v7.1.0
Tigase v7.1.1 includes changes made for v7.1.0, so below is included major changes and highlights for v7.1.0 of Tigase. The lists of specific fixes will not be included in this documentation.
Major Changes
Tigase has undergone a few major changes to our code and structure. To continue to use Tigase, a few changes may be needed to be made to your systems. Please see them below:
HTTP Component renamed
The HTTP component has been renamed, if you still have the old tigase.rest.RestMessageReciever in your init.properties file, please update the component name to:
tigase.http.HttpMessageReceiverNew JDK v8 required
As Oracle has dropped support for version 7 of its Java runtime environment and developer kit, we have moved to version 8 of the JDK. Furthermore, some new features and fixes for Tigase Server now require the use of JDK v8 or later. Please upgrade your Java packages from this link.
Changes to Database Schemas
Tigase has undergone a number or database schema changes, the current versions being main database schema v7.1 and pubsub schema v3.2.0. If you are upgrading to v7.1.0 from a previous version of Tigase, it is recommended you visit this section in the documentation to prepare your new installation.
Presence Plugin Split
The plugin handling all presence processing has been split from one plugin (Presence.java) into separate plugins: - PresenceAbstract.java handles most common presence-related methods, and is also used by the following two plugins. - PresenceSubscription.java to handle subscription presence processing like for roster updates. - PresenceState.java to handle initial presences from new logins.
New Features & Components
New HTTP API
Tigase now features an HTTP API that not only allows web client chat, but administrators can change settings, manage users, and even write and run scripts all from the comfort of a browser window. Furthermore, commands can be passed through this interface using REST to create and run custom scripts and commands. We plan on expanding on the look and feel of this interface as time goes on, but in the meantime enjoy the real-time XMPP experience now with a user-friendly GUI.
New Admin HTTP interface
Tigase now comes with its own build-in web XMPP client! It can be accessed from http://yourhost.com:8080/ui/. For more details, see the Admin UI guide.
Added support for XEP-0334
XEP-0334 is now supported. See this section for details.
Kernel Bean Configurator has been Improved
Added aliases for bean properties to allow for a 'high level' of configuration. Instead of using
component/bean-name/property=value
The following easier to use method will work
component/property=value
Support for XEP-0352
Client State Indication is now enabled by default on Tigase XMPP Servers. Details here.
One Certificate for multiple Vhosts
Tigase now allows for wildcards in setting server certificate per Vhosts. See more in this section.
Maximum users setting for MUC
Administrators can now set that maximum number of users allowed on specific MUCs. See MUC Room Configuration.
HTTP Rest API Support
Tigase now supports REST commands via HTTP, they can be sent from ad-hoc commands, a web interface, or other REST tools. See documentation for more.
Empty Nicknames
Tigase can now support users with empty nicknames. See this for details.
Offline Message Limits
Tigase now has support to enable and change Offline Message Limits as handled by AMP. Documentation here.
Offline Message Sink
A new way to store offline messages has been implemented, it may not replace standard offline messages, but can be used in other ways. Documentation here.
Adding Components to trusted list
Components can now be added to trusted list and will be shared with all clustered servers. #3244
Tigase Mailer Extension now Included
Tigase Mailer extension is now included in distributions of Tigase server. This extension enables the monitor component to deliver E-mails to and from specified e-mail addresses when monitor are triggered. For more information see monitor mailer section.
EventBus implemented
Tigase now has a simple PubSub component called EventBus to report tasks and triggers. More details are available Here.
XEP-0191 Blocking Command Support added
Blocking Command support has been added to Tigase, all functions of XEP-0191 should be implemented. See Admin Guide for details.
Stream management now has new settings available for stream timeout
Maximum stream timeout and default stream timeout times can now be set in init.properties. Details of these two settings can be found here.
JVM Default configuration updated
Default tigase.conf file has been updated with the following change in JVM options:
PRODUCTION_HEAP_SETTINGS=" -Xms5G -Xmx5G " # heap memory settings must be adjusted on per deployment-base!
JAVA_OPTIONS="${GC} ${EX} ${ENC} ${DRV} ${JMX_REMOTE_IP} -server ${PRODUCTION_HEAP_SETTINGS} -XX:MaxDirectMemorySize=128m "
As the comment says, we recommend adjusting the heap memory settings for your specific installations. #3567
Java Garbage Collection Settings have been improved
After significant testing and investigation, we have improved the Java GC settings to keep memory usage from becoming too high on systems. #3248
For more information about JVM defaults and changes to settings, see our Documentation.
New Rest API added to obtain a JID login time
GetUserInfo command has been expanded to obtain user login and logout times in addition to standard information. See this section for full details.
New init.properties properties
--ws-allow-unmasked-frames=false
Allows for unmasked frames to be sent to Tigase server VIA Websocket and not force-close the connection when set to true. RFC 6455 specifies that all clients must mask frames that it sends to the server over Websocket connections. If unmasked frames are sent, regardless of any encryption, the server must close the connection. Some clients however, may not support masking frames, or you may wish to bypass this security measure for development purposes.
--vhost-disable-dns-check=true
Disables DNS checking for vhosts when changed or edited.
When new vhosts are created, Tigase will automatically check for SRV records and proper DNS settings for the new vhosts to ensure connectivity for outside users, however if these validations fail, you will be unable to save those changes. This setting allows you to bypass that checking.
Connection Watchdog
A watchdog property is now available to monitor stale connections and sever them before they become a problem. More details here.
Web Installer Setup Page now has restricted access
The Web Installer Setup Page, available through http://yourserver.com/8080/setup/ now requires an admin level JID or a user/password combo specified in init.properties. See the Web Installer section for default settings. See Component Properties section for details on the new property.
Offline Message Receipts Storage now Configurable
Admins may now configure Offline Message Receipts Storage to specify filters and controls as to what they want stored in offline messages. See more details here.
Account Registration Limits
In order to protect Tigase servers from DOS attacks, a limit on number of account registrations per second has been implemented. See this link for configuration settings.
Enable Silent Ignore on Packets Delivered to Unavailable Resources
You can now have Tigase ignore packets delivered to unavailable resources to avoid having a packet bounce around and create unnecessary traffic. Learn how here.
Cluster Connections Improved
Cluster commands now operate at CLUSTER priority, giving the packets higher status than HIGH which otherwise has caused issues during massive disconnects. New Configuration options come with this change. The first being able to change the number of connections for CLUSTER packets using the following init.property setting:
cl-comp/cluster-sys-connections-per-node[I]=2
Also a new class which implements the new connection selection interface, but uses the old mechanism where any connection can send any command.
cl-comp/connection-selector=tigase.cluster.ClusterConnectionSelectorOld
Cluster Connections Testing Implemented
Watchdog has now been added to test cluster connections by default. Watchdog sends an XMPP ping to all cluster connections every 30 seconds and checks to see if a ping response has been received in the last 3 minutes. If not, the cluster connection will be dropped automatically. Global watchdog settings will not impact cluster testing feature.
Cluster Map implemented
Tigase can now generate cluster maps through a new API. See the development guide for a description of the API.
New Licensing Procedures
With the release of Tigase XMPP server v7.1.0, our licensing procedures have changed. For more information about how to obtain, retain, and install your license, please see this section.
Message Archive expanded to include non-body elements
Message Archive can now be configured to store messages that may not have body element, this option is explained in this section.
New Ability to Purge Data from Unified Archive
Data from Unified Archive or Message Archive can be automatically or manually purged depending on age or expired status. Information on configuring this is available here.
Server Statistics Expanded
Server Statistics for Tigase XMPP Server have been expanded, and now will print at the close of a server session, or may be obtained in the normal way. Note that some statistics have changed since previous versions, and may have different formatting. See the Statistics Description section of the Administration guide for all current server statistics.
Force Redirection
It’s possible now to redirect connections on one port to be forced to connect to another port using the force-redirect-to setting. Details here.
Dual IP installtions
Tigase now has a Dual IP setup which can now use a separate internal and external IP and use a DNS resolver for the connection redirection. Setup instructions are Located here.
Error counting
It is now possible to conduct error counting and collect it from statistics. This feature is explained in more detail here.
New Database Disconnections Counter
3 new statistics were added to basic-conf to help monitor database connection stability, and how often the XMPP Server needs to reconnect to the database. The list of new statistics are listed here.
New Known Cluster Statistic
A new statistic has been added to cl-comp displaying the number of connected Cluster Nodes if there are more than one. Displayed as an INFO level statistic.
New Documentation Structure
There has been a lot of changes and fixes to our documentation over the last few months. If you have links to any of our documentation, please update them as the filenames may have changed.
Full XML of last available presence may be saved to repository
A more detailed last available presence can now be made from some configuration changes, along with a timestamp before the entire presence stanza is saved to the repository. More information is available here.
Setting available to enable automatic subscriptions
Tigase supports enabling automatic presence subscriptions and roster authorizations. For more information on these settings, check the Automatic Subscriptions section.
Stacktrace on Shutdown
Tigase will now dump the stacktrace upon shutdown by default. For more information, check this description.
New logic handling re-delivery of packets
Previously, Tigase would retry delivering command packets that failed to send after a brief delay of 60 seconds. This new method can provide relief in situations where command packet queues can get full. The new logic works like this: The delay for retries, after the first delay of 60 seconds will increase by a factor of 1.5, so the 2nd retry will then be 90 seconds, and then 135 and so on, until the retry limit has been reached (default is 15). Included in this is a new setting for setting the retry count, available here.
2. About Tigase XMPP Server
Tigase XMPP Server is an Open Source and Free (AGPLv3) Java based server. The goals behind its design and implementation of the server are:
-
Make the server robust and reliable.
-
Make the server a secure communication platform.
-
Make a flexible server which can be applied to different use cases.
-
Make an extensible server which takes full advantage of XMPP protocol extensibility.
-
Make the server easy to setup and maintain.
2.1. Robust and reliable
This means that the server can handle many concurrent requests/connections and can run for a long time reliably. The server is designed and implemented to handle millions of simultaneous connections.
It is not enough however to design and implement a high load server and hope it will run well. The main focus of the project is put in into testing. Tests are taken so seriously that a dedicated testing framework has been implemented. All server functions are considered as implemented only when they pass a rigorous testing cycle. The testing cycle consists of 3 fundamental tests:
-
Functional tests - Checking whether the function works at all.
-
Performance tests - Checking whether the function performs well enough.
-
Stability tests - Checking whether the function behaves well in long term run. It must handle hundreds of requests a second in a several hour server run.
2.2. Security
There are a few elements of the security related to XMPP servers: secure data transmissions which is met by the implementation of SSL or TLS protocol, secure user authorization which is met by the implementation of DIGEST or SASL user authorization and secure deployment which is met by component architecture.
Secure deployment Tigase software installation does not impact network security. Companies usually have their networks divided into 2 parts: DMZ which is partially open to the outside world and the Private network which is closed to the outside world.
If the XMPP server is to provide an effective way of communication between company employees regardless if they are in a secure company office or outside (perhaps at a customer site), it needs to accept both internal and external connections. So the natural location for the server deployment is the DMZ. However, this solution has some considerations: each company has normally established network users base and integrated authorization mechanisms. However, that information should be stored outside the DMZ to protect internal security, so how to maintain ease of installation and system security?
Tigase server offers a solution for such a case. With it’s component structure, Tigase can be easily deployed on any number machines and from the user’s point of view it is seen as a one logical XMPP server. In this case we can install a Session Manager module in the private network, and a Client Connection Manager with Server Connection Manager in the DMZ.
Session Manager connects to DMZ and receives all packets from external users. Thus is can securely realize users authorization based on company authorization mechanisms.
2.3. Flexibility
There are many different XMPP server implementations. The most prevolant are:
-
Used as a business communication platform in small and medium companies where the server is not under a heavy load. For such deployments security is a key feature.
-
For huge community websites or internet portal servers is, on the other hand, usually under very heavy load and has to support thousands or millions of simultaneous connections. For such a deployment we need a different level of security as most of the service is open to the public.
-
For very small community deployments or for small home networks the key factor is ease to deploy and maintain.
Architecture based on components provides the ability to run selected modules on separate machines so the server can be easily applied in any scenario.
For simple installation the server generates a config file which can be used straight away with very few modifications or none at all. For complex deployments though, you can tweak configurations to your needs and setup XMPP server on as many physical machines as you need.
2.4. Extensibility
The world changes all the time as does user’s needs. The XMPP protocol has been designed to be extensible to make it easy to add new features and apply it to those different user’s needs. As a result, XMPP is a very effective platform not only for sending messages to other users, it can also be extended for sending instant notifications about events, a useful platform for on-line customer service, voice communication, and other cases where sending information instantly to other people is needed.
Tigase server has been designed to be extensible using a modular architecture. You can easily replace components which do not fulfill your requirements with others better fitting your needs. But that is not all, another factor of extensibility is how easy is to replace or add new extensions. A great deal of focus has been put into the server design API to make it easy for other software developers to create extensions and implement new features.
2.5. Ease of Use
Complex computer networks consisting of many servers with different services are hard to maintain. This requires employing professional staff to operate and maintain the network.
Not all networks are so complex however, most small companies have just a few servers for their needs with services like e-mail and a HTTP server. They might want to add an XMPP server to the collection of their services and don’t want to dedicate resources on setup and maintenance. For such users our default configuration is exactly what they need. If the operating system on the server is well configured, then Tigase should automatically pickup the correct hostname and be ready to operate immediately.
Tigase server is designed and implemented to allow dynamic reconfiguration during runtime so there is no need to restart the server each time you want to change configuration settings.
There are also interfaces and handlers available to make it easy to implement a web user interface for server monitoring and configuring.
3. Quick Start Guide
3.1. Minimum Requirements
Before you begin installing Tigase server onto your system, please make sure the minimum requirements are installed first:
- Java Development Kit v8 or later - We recommend Oracle JDK. OpenJDK may work, but some features might cause errors.
-
Administrator access - We recommend that you install Tigase Server from a user login with administrator access.
3.2. Contents
This is a set of documents allowing you to quickly start with our software. Every document provides an introduction to a single topic allowing you to start using/developing or just working on the subject. Please have a look at the documents list below to find a topic you are looking for. If you don’t find a document for the topic you need please let us know.
3.3. Installation Using GUI Installer
If you don’t want to install Tigase using a manual method, you can use the GUI installer. It not only copies server files to preferred place, but also assists with configuration of the most important parameters and database setup. Therefore we recommend this as the way to install Tigase.
3.3.1. Prerequisites
Before you can start the GUI installer you will need to have working Java environment. Although installer only requires JRE (Java Runtime Environment), server needs the JDK (Java Development Kit). Please do note that currently minimal JDK version Tigase is capable to run on is 1.6. If you don’t have JDK installed it is the right moment to do it. Visit the Java downloads site From the list of available packages select newest JDK version (if you don’t have a specific need to use J2EE then choose a package without it). After configuring JDK you can download the Tigase GUI installer and start the server installation process. It is also important to set the JAVA_HOME environment correctly.
3.3.2. Download the Installer
You can always find the newest Tigase packages in the download section. When you enter the page, you will be presented a list of files to choose from. You may be confused at the beginning as there are lot of choices, but all Tigase binary packages have conventional names, which help to differentiate them easily. They are of form tigase-server-x.y.z-bv.ext where 'x', 'y', 'z' and 'v' are version numbers and they change from a release to release. Ext is the file extension which in the case of our GUI installation program is .jar. We recommend you to download the latest version (highest version number) of the server as it contains latest functions and improvements
3.3.3. Run the jar File
On most systems installing JRE or JDK creates a default association which allows to run the .jar file by just double clicking on it. However if nothing happens when you do it there is a way to do it manually. Perform the steps in the following order:
-
If you are on Windows system you can use the command prompt to run the installer directly using the java command.
-
Click on the Start menu and choose Run… (You can also use the Win+R shortcut).
-
You will be presented with a dialog box where you can enter a command. Type "cmd" (or "command" in the case of windows version older then 2000) and submit the window. If you are on a Linux system, you can use a terminal. It should be easily discoverable as it is a standard tool on this platform. Find and run it.
-
-
Command prompt / terminal will appear. You will be able to check a whether your Java environment is working. To do it type the
java -versioncommand and press Enter. If the message says that the command is not recognized then your Java installation may be corrupt or not configured properly. For correctly setting up JRE/JDK including setting the JAVA_HOME environmental variable please check documentation provided on the JDK download site. Also when the command succeeds please check if the printed version number fulfills Tigase requirements. When many versions of JDK/JRE are installed on one machine java command will need to be invoked with the full path it is placed on.
-
When you have no doubt that you can run the correct Java launcher, you may start the installer i.e. for the file tigase-server-4.1.0-b1315.jar downloaded to the c:\download directory type the following command:
java -jar c:\download\tigase-server-4.1.0-b1315.jarThis command should start the installer or print an error message explaining what is the cause of problem.
3.3.4. Starting the Installation
Please note that this tutorial covers only the basic installation mode. Some screens have been omitted because they contain advanced options which are not shown in simple installation mode. Others such as progress of copying files and summary info on the other hand are self explanatory and will also not described.
3.3.5. JDK Selection

This screen is only shown when JDK has not been selected automatically. When your JAVA_HOME path is properly set, it will be auto-detected saving you some configuration time. If you are reading this step and still don’t have JDK installed, then go back to the prerequisites section where you can find some info on how to prepare your system for Tigase installation. Sometimes your system will be configured in a way that prevents detection of JDK path. This often happens when you install JRE after installing JDK. You will have to find JDK directory yourself. It is by default installed in the Program Files\Java directory of your system drive.
3.3.6. Installation Type Selection
Recommended practice is to choose both installation and configuration of the server as manual configuration is more complicated, time consuming and error-prone.
3.3.7. Introduction To the Server
This screen shows some information about Tigase which may help you understand what it is and how it can help to take advantage of the XMPP protocol. It is important that you read all information’s appearing on the installer screens, as they contain valuable hints and most recent information.
3.3.8. Choice of Base Directory

This is the point where you choose where do you want you server to be installed. Recommended path should not contain spaces, as it may be reason of some strange path problems. In the case of installation on Windows it should be installed on a short path because there is a limit of path lengths. Also note that on Windows Vista there may be some problems with making the server work while installed in the Program Files directory, related to the working of UAC mechanism, so better don’t install it there. If you don’t want are unsure about where to place the server, you can always leave the default selection.
3.3.9. Packages selection
Next important step is package selection. Note that some choices are grayed out and you cannot change them as they are essential. Packages consist of documentation, database drivers, sources of the server and some extras. When you select an item, you will be presented with a short description of it’s content.
We recommend that you install documentation. It contains valuable resources which may be very helpful in administration and general use of the server.
If you have a working database platform that you want to use for storing all important user information in, just select appropriate db drivers. If you don’t have a database engine, you can use the included derby database along with also included drivers.
If you are a developer and you want to be able to check how the server is working or if you want to help with the development, you can install also the included source codes.
3.3.10. Basic Server Configuration
On this screen you will find most important basic configuration options. As this guide covers only non-advanced set up - disable the advanced configuration checkbox.
From here you can select which components will be installed. For most installations the default selection will be most appropriate. You can expand the list to check if any of the other options will better suit your needs.
It is very important that you enter your domain name correctly here.
-
On Linux like system you can use the hostname command and extract the domain part from the output. If you use the -f parameter then you will get the fully qualified domain name.
-
On Windows use the standard System control panel applet. You will find your domain (computer name) in the Computer name tab.
On the other hand if you want to use Tigase virtual domain support and you have your DNS system configured properly, then you can put your virtual domains list here. Just separate them by comma characters. For example if your server is seen from the outside as veloci.tigase.org, mammoth.tigase.org and tigase.org then you can use Tigase instance as if it were three separate instances. In reality it will be one server, however admin@veloci.tigase.org will be a different user then admin@tigase.org. This feature allows to use one server to separate user groups, for example ones from different organizations.
When you have your domain name just enter it in the domain text box. Next parameter will be the JID of server administrator. Standard practice is to use admin, however you may choose any name you like. For example for domain tigase.org the full admin name would be admin@tigase.org. Just stick your chosen name and domain together using the @ character as separator.
Using this information your XMPP admin will be automatically added to the database, so after installation you can just login into the server without registering admin first manually.
You should also select a database which will be used for storing user info. Default is the Derby database, if you don’t need anything special just leave it as it is. Just select a new password as the default one is easy for a hacker to guess.
Important notice: Tigase installer does not contain the actual databases, only drivers allowing db access. The only exception is Derby database, which is included in JDK. It is automatically configured by installer, in case of other databases you will need to configure them by yourself.
3.3.11. Verification of Database Connection and Performing DB Tasks
When you switch to this screen an automatic test of database configuration will be started. It consists of few steps which will be executed in order. After testing connection and configuring schema, admin users will be added.
What to do if any of the tests will fail?
-
If you decided to use your own database, check if you entered correct password and whether your database is running.
-
If you use the embedded Derby database then probably your problem is more complicated. An error may indicate a bug in the installer. You may report it to one of Tigase developers.
If you cannot go beyond this step after trying to resolve database problems you may try manual installation mode.
3.3.12. Finishing Installation
When you perform all those steps altogether with choosing Start Menu location and other basic actions you will be informed that installation process is complete. You can now use your Tigase server. There are some post installation actions you may want to perform. They are briefly presented below.
3.3.13. Running the Server
Part of the installation process is the selection of Tigase base directory. This is where you can find all important server files. The installer will create some configurable shortcuts in the Start Menu. You can navigate to the menu and use it to start the server. To run the server manually:
-
On a Linux system you may start the server using the tigase file found in the scripts sub-directory of Tigase server base directory. You will need to select the type of linux you have, debian, gentoo, mandirva, or redhat, and use the script located in the init.d folder. In the root server directory type the following command:
./scripts/{OS}/init.d/tigase start etc/tigase.confOf course if you have a custom config file then change last command appropriately.
-
On a Windows platform you can use a bat file to run the server. There is a run.bat file in the Tigase root directory. Just double click it in Explorer or run it from command line to start the server. A window with server log output will pop-up.
3.3.14. Installation as a Service
On Windows you can install Tigase as a service. To do it use the InstallTigaseService.bat batch file found also in server root directory.
In this mode service will be running in background and will be controllable from the Services management snapshot. To launch the tool right click on the Computer icon on the desktop. Choose the Manage action. It will run the Computer management graphical configuration program. On the left side choose the Services item. You will be shown with a list of services. Here you can find Tigase service when it will be installed.
To uninstall Tigase service use the UninstallTigaseService.bat file from Tigase server root directory.
3.4. Installation Using Web Installer
When Tigase XMPP Server starts up, it looks for the default configuration file: etc/init.properties. If this file has not been modified you can run the web installer. Which will step you through the process of configuring Tigase. If you are installing Tigase in a Windows environment, please see the Windows Installation section.
3.4.1. Download and Extract
First download Tigase XMPP Server and extract it. You can download the official binaries, or the latest and greatest nightly builds.
$ wget http://build.tigase.org/nightlies/dists/latest/tigase-server-dist-max.tar.gz
$ tar -xf tigase-server-dist-max.tar.gz
$ cd tigase-server-<version>
Please do not run as root.
3.4.3. Verify Tigase is Running
You should see a list of listening ports.
$ lsof -i -P
COMMAND   PID   USER   FD   TYPE   DEVICE SIZE/OFF NODE NAME
java    18387 tigase  141u  IPv6 22185825      0t0  TCP *:8080 (LISTEN)
java    18387 tigase  148u  IPv6 22185834      0t0  TCP *:5222 (LISTEN)
java    18387 tigase  149u  IPv6 22185835      0t0  TCP *:5223 (LISTEN)
java    18387 tigase  150u  IPv6 22185836      0t0  TCP *:5290 (LISTEN)
java    18387 tigase  151u  IPv6 22185837      0t0  TCP *:5280 (LISTEN)
java    18387 tigase  152u  IPv6 22185838      0t0  TCP *:5269 (LISTEN)
3.4.4. Connect to the Web Installer
Some points before you can connect:
This setup page is restricted access, however for first setup there is a default account set to setup Tigase: Username: admin Password: tigase
This combination will only be valid once as it will be removed from init.properties file on compleation of setup process. After this point the setup page will only be accessable using the following:
-
JID accounts listed as administrators in --admins line in init.properties
-
Username and password combinations added to init.properties file manually, or at the last page in this process.
Point your browser to http://localhost:8080/setup/ unless you are working remotely. Then you can use the domain name, or IP address. I used http://tpub.xmpp-test.net:8080/setup/ for this guide.
Enter the username and password above to gain access.
3.4.5. Step Through the Installation Process
You will be greeted by the following "About software" page.
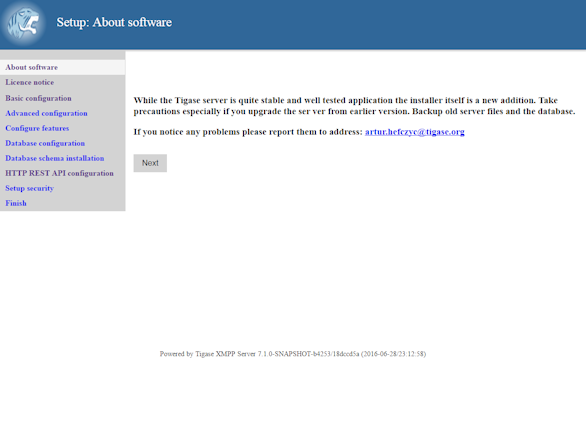
Read it and then click "Next"
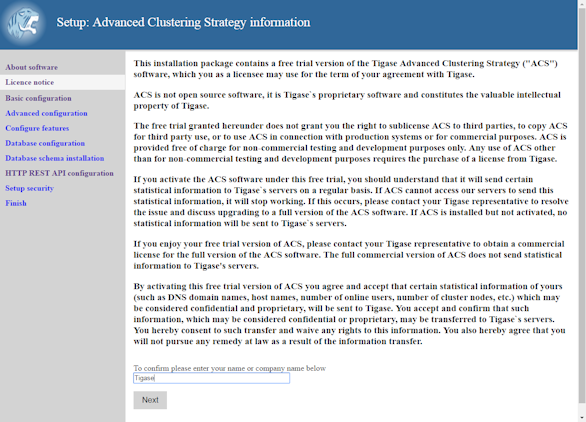
Here is some information about our commercial products and licensing. Please read though the agreement, type your name or company and click "Next".
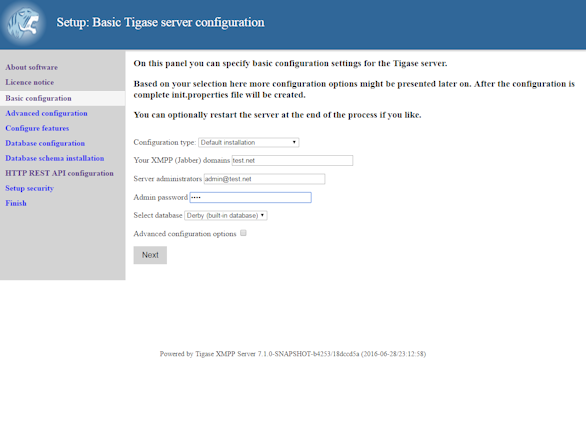
This page will look over your default configuration settings, these include the type, Domains you wish to use, and gives you a chance to specify an administrator for the domain. Also, you will be selecting what type of database Tigase server will be using.
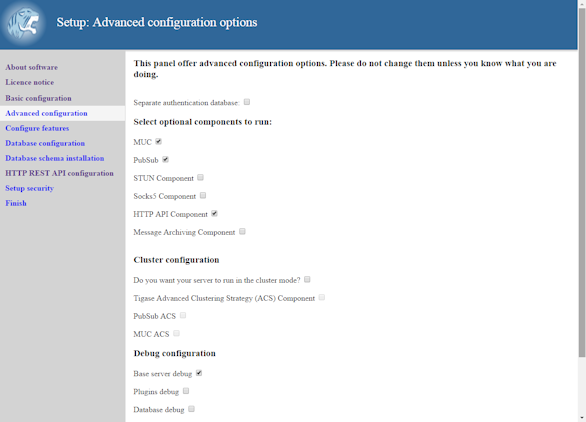
The Advanced configuration page. Select what components and configurations you need.
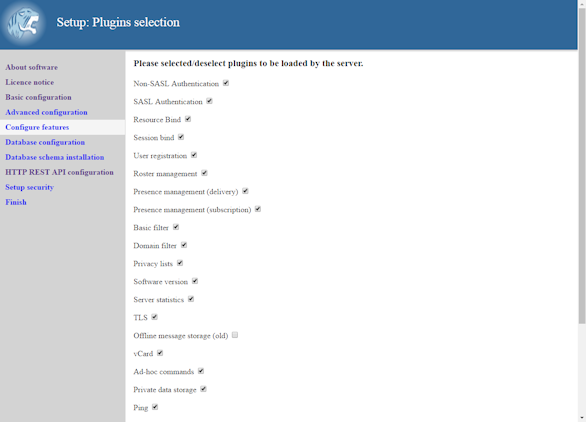
Plugins which will be loaded by the server, most plugins are enabled by default.
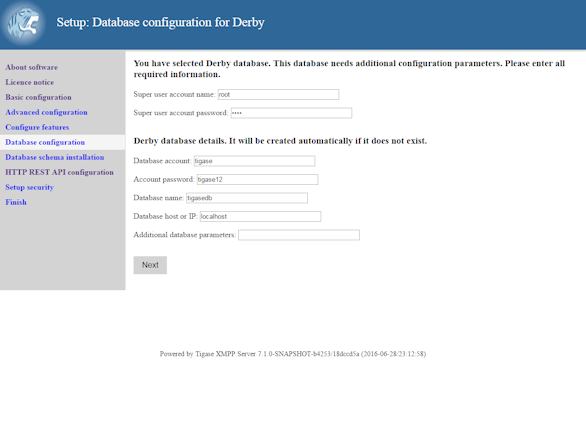
This is where the database schema is installed. BE SURE TO SPECIFY SUPER USER ACCOUNT AND PASSWORD
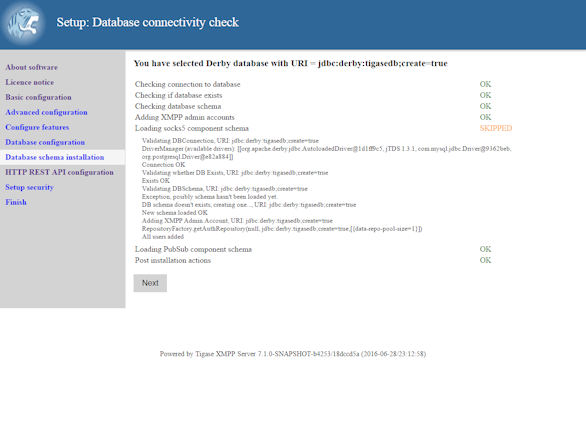
You should see a page like this after a successful database setup. This page will reveal any issues with your database setup such as invalid URIs, passwords, and schemas.
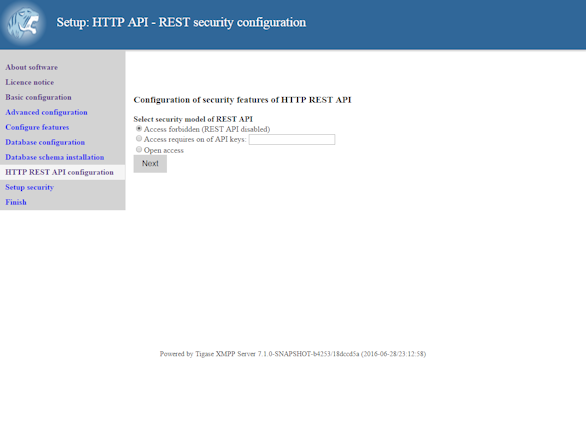
Next a page asking if you’d like to provide an API Access Key to access HTTP REST commands. It is highly recommended that you either specify an API key or block access. Open API keys allow any REST command to be interpreted by the server.
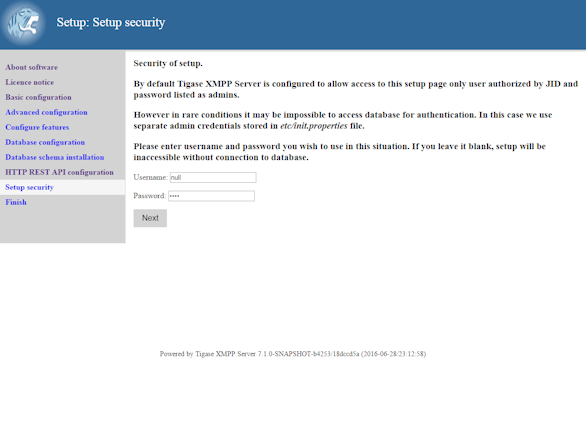
The Setup Access Page will be locked from the admin/tigase user as specified above. This is your chance to have the setup pages add a specific user in addition to admin accounts to re-access this setup process later. If left blank, only JIDs listed in admin will be allowed to access.
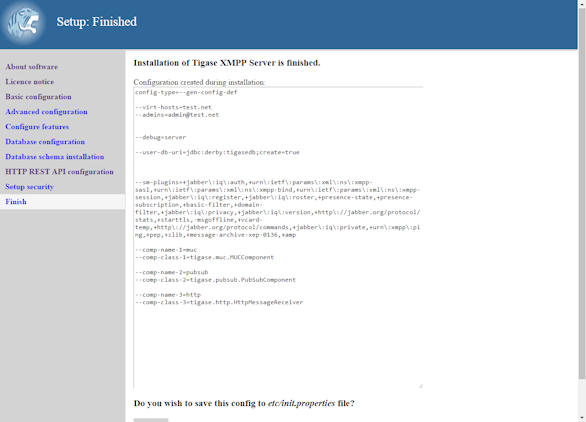
The installation is complete and this is what the init.properties file will look like. If you have a custom setup, or would like to put your own settings in, you may copy and past the contents here to edit the current init.properties file. Click "Save" to write the file to disk.
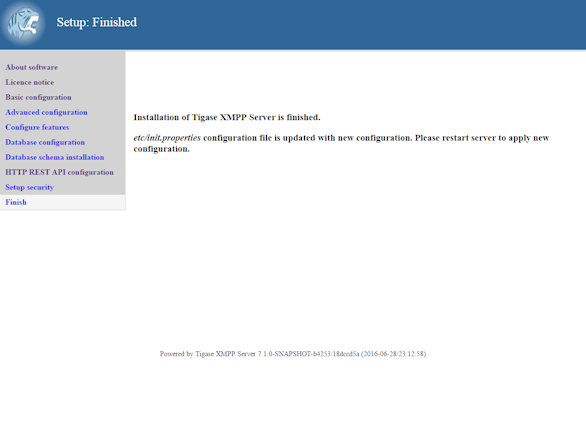
You have now finished the installation, proceed to the next step to restart the server.
3.4.6. Restart the Server
It is recommended at this point to stop the server manually and restart it using the proper script for your OS. From the Tigase base directory enter
./scripts/tigase.sh stop

./scripts/{OS}/init.d/tigase start etc/tigase.conf
where {OS} is your type of Linux, gentoo, debian, mandriva, or redhat
To further fine tune the server you should edit etc/tigase.conf. Ensure JAVA_HOME path is correct, and increase memory if needed using JAVA_OPTIONS -Xmx (max), and -Xms (initial). You will need to direct Tigase to read settings from this file on startup as follows.
Everything should be running smooth at this point. Check the logfiles in logs/ if you experience any problems.
3.4.7. Windows Instructions for using Web Installer
There are a few steps involved with setting up Tigase with the web installer in a Windows environment. Please follow this guide.
First step is to extract the dist-max archive in it’s entirety to the intended running directory. Once there, run the Setup.bat file inside the win-stuff folder. This will move the necessary files to the correct folders before Tigase begins operation.
From here, you have a few options how to run Tigase; run.bat will operate Tigase using a java command, or run.bat which will start Tigase using the wrapper. You may also install Tigase and run it as a service.
One this setup is finished, web installer will continue the same from here.
3.5. Installing Using Console Installer
3.5.1. Installation Using the text-mode Installer
When you install Tigase server on a desktop machine or a server having a graphical user interface - you can use the GUI Installer. However servers are often administered using SSH text-mode connection because of low bandwidth requirements or user preferences. Due to popular demand, the Tigase development team has decided to implement a console installer for the server.
Note! The console installer is only available for Tigase server version 4.1.5 and later.
Requirements and Important Notice
Before trying the installer please keep in mind:
-
This is first - alpha rate version of the text-mode installation - meant to install the server and do some basic configuration. We will be very happy to see bug reports and overall feedback about this feature. Please send your remarks to Artur Hefczyc or Mateusz Fiolka.
-
You will still need to perform some additional steps before running the installer. The main requirement is to download and install Java JDK v1.6 or newer. This guide is aimed at advanced users - thus downloading and configuring JDK is left to the reader. You can find more info at the Java downloads site.
3.5.2. Download the Installer
You can always find the newest Tigase packages in the download section. When you enter the page, you will be presented a list of files to choose from. All Tigase binary packages have conventional names, which help to differentiate them easily. They are of form tigase-server-x.y.z-bv.ext where 'x', 'y', 'z' and 'v' are version numbers and they change from a release to release. Ext is the file extension which in the case of our console installation program is .jar. We recommend you download the latest version (highest version number) of the server as it contains latest functions and improvements.
3.5.3. Run the jar File
In terminal (SSH or Windows cmd prompt if you use on) type:
java -jar nameOfTheDownloadedJarFile.jar -console3.5.4. Installation Steps
Now you are ready to to install the server.
Some tips for working with the console installer:
-
Please remember to write down your JDK location because you will need to type it during the installation process.
-
Installer consists of number of screens which relate to different configuration aspects. Most of the panels end with a question whether you want to redisplay the panel or quit installer. When you make a mistake you will be probably asked later if you want re-enter the data again.
-
To quit the installer use standard termination key specific to your platform. For example on a Linux system it is the Ctrl+C key combination. Keep in mind that if you quit the installer after it copied some files - it may leave them in the place and you might have to remove them manually.
-
In current version the installer is of beta quality and using advanced configuration is not recommended. It might work, however it is not much tested and will be improved later.
Initial Screen
On this screen you will find server version info which will be useful if you would to suggest something to Tigase developers.
Welcome to the installation of Tigase XMPP (Jabber) Server X.Y.Z!

The homepage is at: http://www.tigase.org/
press 1 to continue, 2 to quit, 3 to redisplay
JDK Selection
Your system may contain more then one JDK installation, thus you will have to make an explicit decision which one to use. Currently console mode installer doesn’t contain any auto-detection code nor validation. You will have to enter the path correctly or you may have problems with running the server. For example on Ubuntu Linux you can find the JDK in the /lib/jvm/java-6-sun directory. For the current Tigase server JDK of version at least 1.6 is required.
The installed application needs a JDK. A java run-time
environment (JRE) will be not sufficient.

Enter path: /lib/jvm/java-6-sun
Actions Selection
Choose whether you want to configure the server in addition to install it.
*** Select what you want to do next:

On this panel you can specify whether you want to install
only or configure already installed server or to do both. If
you are just installing a server on your machine it is a
good idea to do both steps.


The wizards you want to execute
Installation of the Tigase Server
[on, off]
on
Configuration of the Tigase Server
[on, off]
on
Installer Info
Introduction to the installer.
Please note!

While the Tigase server is quite stable and well tested
application the installer itself is a new addition. Take
precautions especially if you upgrade the server from
earlier version. Backup old server files and the database.

If you notice any problems please report them to address:
Artur Hefczyc

press 1 to continue, 2 to quit, 3 to redisplay
Server Info
If you don’t know what exactly Tigase server is, you can find some basic introduction on this screen.
Tigase XMPP (Jabber) server ver 4.1.5-bDEV


About

Copyright (C) 2004 Tigase.org. <http://www.tigase.org/>

Tigase Jabber/XMPP Server is
Open Source and Free  (AGPLv3)
Java based server. The goals behind the design and
implementation of the server are:


Make the server robust and reliable.
Make the server secure communication platform.
Make flexible server which can be applied to different use
cases.
Make extensible server which takes full advantage of XMPP
protocol extensibility.

--- Press ENTER to continue ---

Make the server easy to setup and maintain.


Installation, configuration and compilation

The most recent documentation on all these topics is always
available in the project website: www.tigase.org. Please
refer to the website for all the details and always up to
date guides.

You would probably want to start with Quick Start:
http://www.tigase.org/content/quick-start documentation.

The website also contains lots of other useful information
like load tests results, user discussions and on-line support
and help always available to you.

This is 4.1.5-bDEV release of the server. Please include the
exact version number in all correspondence regarding the
server.


press 1 to continue, 2 to quit, 3 to redisplay
Server License
This is a license that you have to agree to use Tigase server. Please read it carefully. Take note, that in this manual only part is shown in order to decrease guide length.
Please read the following license agreement carefully:


GNU General Public License - GNU Project - Free Software
Foundation (FSF)


GNU GENERAL PUBLIC LICENSE
Version 3, 29 June 2007

Copyright (C) 2007 Free Software Foundation, Inc.
 Everyone is permitted to copy and distribute verbatim copies
 of this license document, but changing it is not allowed.

Preamble

...
... Fragment cut out
...


You should also get your employer (if you work as a
programmer) or school, if any, to sign a "copyright
disclaimer" for the program, if necessary.  For more
information on this, and how to apply and follow the
AGPL, see --- Press ENTER to continue ---

<http://www.gnu.org/licenses/agpl-3.0.en.html>.

The GNU General Public License does not permit incorporating
your program into proprietary programs.  If your program is
a subroutine library, you may consider it more useful to
permit linking proprietary applications with the library.
If this is what you want to do, use the GNU Lesser General
Public License instead of this License.  But first, please
read

<http://www.gnu.org/philosophy/why-not-lgpl.html>.

1. I accept the terms of this license agreement.
2. I do not accept the terms of this license agreement.
Choose number (1-2):
1
press 1 to continue, 2 to quit, 3 to redisplay
Server Location Selection
Enter where you want the server to be installed. If you have administrator rights you can place it in a standard location where all your applications reside. If you don’t have write permissions for this place, you can always install the server in your home directory.
Select target path
[/home/user/tigase] /home/user/tigase-server

press 1 to continue, 2 to quit, 3 to redisplay 1
Selection of Packs to be Installed
Some packs are optional and you can disable/enable them. In the following screen they have an [x] option before them. To switch their state enter item number and ENTER. When done press d and ENTER.
Select the packs you want to install:

1 => Base, The base files
2 => Unix Files, Files needed to run the server on Unix like systems
3 => [x] Docs, The documentation
4 => [x] Extras, Extras libraries, MUC, PubSub...
5 => [x] Derby Database, Derby database and JDBC driver
6 => [x] MySQL Database, MySQL JDBC driver (MySQL has to be
installed separately)
7 => [x] PostgreSQL Database, PostgreSQL JDBC driver
(PostgreSQL has to be installed separately)
8 => [x] SQL Server Database, SQL Server JDBC driver (SQL
Server has to be installed separately)
9 => [ ] Sources, The server source files, tools and
libraries sources are not included
r => Redisplay menu
d => Done

Choose action: d
press 1 to continue, 2 to quit, 3 to redisplay
Installation
During extracting and copying server files to their target you will be presented with the process progress.
[ Starting to unpack ]
[ Processing package: Base (1/9) ]
[ Processing package: Unix Files (2/9) ]
[ Processing package: Windows Files (3/9) ]
[ Processing package: Docs (4/9) ]
[ Processing package: Extras (5/9) ]
[ Processing package: Derby Database (6/9) ]
[ Processing package: MySQL Database (7/9) ]
[ Processing package: PostgreSQL Database (8/9) ]
[ Processing package: SQL Server Database (9/9) ]
[ Unpacking finished ]
Basic Configuration
This panel contains most important configuration options for the Tigase server. You can choose which components should be configured to be used when running server, add XMPP admin users and enter their password (many admins, comma separated, initially having the same password). Choose different password from the default one. Then select preferred database. If you don’t have a standalone DB which you would like to use, you can choose the included Derby DB.
Important notice: Tigase installer doesn’t contain the actual databases, only drivers allowing db access. One exception is Derby database, which is included in JDK. It is automatically configured by installer, in case of other databases you will need to configure them by yourself.
*** Basic Tigase server configuration
On this panel you can specify basic configuration settings
for the Tigase server.

Based on your selection here more configuration options
might be presented later on. After the configuration is
complete init.properties file will be created.

You can optionally restart the server at the end of the
process if you like.


0  [x] Default installation
1  [ ] Default plus extra components
2  [ ] Session Manager only
3  [ ] Network connectivity only
input selection:
0
Your XMPP (Jabber) domains [my-laptop]

Server administrators [admin@my-laptop]

Admin password [tigase]

0  [x] Derby (built-in database)
1  [ ] MySQL
2  [ ] PostgreSQL
3  [ ] SQLServer
4  [ ] Other...
input selection:
1
Advanced Configuration
Please note: in this version advanced configuration is not supported. Although it may work it has not been tested and thus is not recommended. Please enter off to not use it.
Advanced configuration options
[on, off]
off
press 1 to continue, 2 to quit, 3 to redisplay
Database Configuration
Depending on which database you selected, you will be presented with related options to configure its connectivity options. As you will see, the parameters have default values.
*** Database configuration:

You have selected MySQL database. This database needs
additional configuration parameters. Please enter all
required information.


MySQL super user account will be used only to create and
configure database for the Tigase server. It will not be
used by the Tigase server later on.

Super user account name: [root]

WARNING: password will be visible while entering
Super user password: mysecretpassword
WARNING: password will be visible while entering
Retype password: mysecretpassword


MySQL database details. It will be created automatically if
it does not exist.

Database account: [tigase]

Account password: [tigase12]

Database name: [tigasedb]

Database host or IP: [localhost]

Additional database parameters: []

press 1 to continue, 2 to quit, 3 to redisplay
Database Checking and Preparation
After entering all database information an automatic test of connection and database setup is performed. If everything is ok the installer will try to convert database schema to required version and finally adds XMPP administrators to it.
Performing DB tasks

Checking connection to the database
Connection OK
Checking if the database exists
Exists OK
Checking the database schema
New schema loaded OK
Checking whether the database needs conversion
Conversion not needed
Adding XMPP admin accounts
Added admins OK
Installation Complete
Now you can run the server and use it!
Install was successful
application installed on /home/user/tigase-server
[ Console installation done ]
Running the Sever
You can start the server using the tigase file found in the scripts sub-directory of Tigase server base directory. There, select the type of linux you have, debian, gentoo, mendriva or redhat. In the root server directory type the following command:
./scripts/{OS}/init.d/tigase start etc/tigase.confWhere {OS} is your *nix operating system.
Of course if you have a custom config file then change last command appropriately. On a Windows platform you can use a bat file to run the server. There is a run.bat file in the Tigase root directory. Just double click it in Explorer or run it from command line to start the server. A window with server log output will pop-up.
3.6. Manual Installation in Console Mode
Our preferred way to install the Tigase server is using GUI installer and configuration program which comes with one of the binary packages. Please pick up the latest version of the JAR file in our download section.
In many cases however this is not always possible to use the GUI installer. In many cases you have just an ssh access or even a direct access in console mode only. We are going to provide a text-only installer in one of the next releases but for the time being you can use our binary packages to install the server manually. Please continue reading to learn how to install and setup the server in a few easy steps…
If you have an old version of the Tigase server running and working and you intend to upgrade it please always backup the old version first.
3.6.1. Get the Binary Package
Have a look at our download area. Always pick the latest version of the package available. For manual installation either zip or tar.gz file is available. Pick one of files with filename looking like: tigase-server-x.y.z-bv.tar.gz or tigase-server-x.y.z-bv.zip where 'x', 'y', 'z' and 'v' are version numbers and they change from a release to release.
3.6.2. Unpack the Package
Unpack the file using command for the tar.gz file:
$ tar -xzvf tigase-server-x.y.z-bv.tar.gzor for the zip file:
$ unzip tigase-server-x.y.z-bv.zipA new directory will be created: tigase-server-x.y.z-bv/.
Sometimes after unpacking package on unix system startup script doesn’t have execution permissions. To fix the problem you have to run following command:
$ chmod u+x ./scripts/tigase.sh3.6.3. Prepare Configuration
If you look inside the new directory, it should like this output:
 $ ls -l
total 316K
-rw-r--r--  1 265K 2008-12-15 22:24 ChangeLog
-rw-r--r--  1  37K 2008-12-15 22:24 License.html
-rw-r--r--  1 1.1K 2008-12-15 22:24 README
drwxr-xr-x  6  204 2009-02-03 13:25 certs/
drwxr-xr-x 22  748 2009-02-03 13:25 database/
drwxr-xr-x  3  102 2008-12-15 22:24 docs/
drwxr-xr-x  4  136 2009-02-03 13:25 etc/
drwxr-xr-x  3  102 2009-02-03 13:25 jars/
drwxr-xr-x 12  408 2009-02-03 13:25 libs/
drwxr-xr-x  2   68 2008-12-15 22:24 logs/
-rw-r--r--  1 1.5K 2008-12-15 22:24 package.html
drwxr-xr-x  7  238 2009-02-03 13:25 scripts/
At the moment the most important is the etc/ directory with 2 files:
 $ ls -l etc/
total 8.0K
-rw-r--r-- 1  97 2008-12-15 22:24 init.properties
-rw-r--r-- 1 333 2008-12-15 22:24 tigase.conf
A Small change in the tigase.conf file is needed. Find the line setting for JAVA_HOME:
JAVA_HOME="${JDKPath}"and replace ${JDKPath} with a path to Java installation on your system.
You need also to edit the init.properties file. It contains initial parameters normally set by the configuration program. As this is a manual installation, you will have to edit this document yourself. It contains already a few lines:
 $ cat etc/init.properties
config-type=--gen-config-def
--admins=admin@$HOST_NAME
--virt-hosts = $HOST_NAME
--debug=server
You have to replace $HOST_NAME with a domain name used for your XMPP installation. Let’s say this is \'jabber.your-great.net'. Your init.properties should look like this then:
 $ cat etc/init.properties
config-type=--gen-config-def
--admins=admin@jabber.your-great.net
--virt-hosts = jabber.your-great.net
--debug=server
You can also use multiple virtual domains if you want. Please have a look at the detailed description for --virt-hosts property in the init.properties guide and also more detailed information in the Virtual Hosts section of the Tigase Server guide.
You will also need to configure connection to the database. First you have to decide what database you want to use: Derby, MySQL or PostgreSQL. Then there are to more properties you have to add to the init.properties: --user-db and --user-db-uri. The first property specifies the database type you use and the second the database connection string. For simplicity let’s assume you want to use Derby database with files located in directory /var/lib/tigase/derby. 2 more lines need to be added to the init.properties file:
 $ cat etc/init.properties
config-type=--gen-config-def
--admins=admin@jabber.your-great.net
--virt-hosts = jabber.your-great.net
--debug=server
--user-db=derby
--user-db-uri=jdbc:derby:/var/lib/tigase/derby
This is enough basic configuration to have your Tigase server installation running.
3.6.4. Prepare Database
Normally the database is prepared for you during the installation process. Now you are on your own. As in section above we prepare your first installation to run with the Derby database. Creating and preparing the Derby database is actually quite easy if you use a helper script: ./scripts/db-create-derby.sh. The file might not be in your scripts/ directory if you have an earlier version of the package. Simply download it from the link provided if it is missing and put it in the scripts/ directory and execute it with the database location as the parameter:
$ ./scripts/db-create-derby.sh /var/lib/tigase/derbyThere will be lots of output but if there is no error at the end of the output it means your database has been created and it is ready to use.
NOTE: There might be filesystem access restrictions for the directory: /var/lib/ and you might want/need to select a different location.
3.6.5. Start the Server
You can start the server using the tigase file found in the scripts sub-directory of Tigase server base directory. There, select the type of linux you have, debian, gentoo, mendriva or redhat. In the root server directory type the following command:
./scripts/{OS}/init.d/tigase start etc/tigase.confWhere {OS} is your *nix operating system.
and you should get the output like this:
Starting Tigase:
nohup: redirecting stderr to stdout
Tigase running pid=18103
3.6.6. Check if it is Working
The server is started already but how do you know if it is really working and there were no problems. Have a look in the logs/ directory. There should be a few files in there:
 $ ls -l logs/
total 40K
-rw-r--r-- 1 20K 2009-02-03 21:48 tigase-console.log
-rw-r--r-- 1 16K 2009-02-03 21:48 tigase.log.0
-rw-r--r-- 1   0 2009-02-03 21:48 tigase.log.0.lck
-rw-r--r-- 1   6 2009-02-03 21:48 tigase.pid
The first 2 files are the most interesting for us: tigase-console.log and tigase.log.0. The first one contains very limited information and only the most important entries. Have a look inside and check if there are any WARNING or SEVERE entries. If not everything should be fine.
Now you can connect with an XMPP client of your choice. The first thing to do would be registering the first account - the admin account from your init.properties file: admin@jabber.your-great.net. Refer to your client documentation how to register a new account.
3.7. Windows Installation
Tigase server installation should be started with downloading the Tigase installer server from our download area. This guide describes installation procedure for the branch 3.x of the server so please pick up the latest version of the Tigase 3.x.
The Windows binary package is an executable file containing an installer. Run the file and the server will be installed and icons will be added to your Windows start menu. Locate the Tigase group in your menu and execute: "Install Tigase service" which will install the Tigase server as the system service and it will be automatically started whenever your system starts.
If you are going to use the Tigase server with MySQL database have a look now in the directory where the Tigase server is installed. There is a directory etc/. Have a look inside and find file called init.properties. Open the file with a text editor and make sure you added there 2 following lines:
--user-db=mysql
--user-db-uri=jdbc:mysql://localhost/tigasedb?user=tigase_user&password=mypass
The content of the file should look like the example screenshot below:

3.7.1. MySQL Database Installation
The section describes installation and configuration of the MySQL database to work with Tigase server.
Download the binary package from MySQL download area at mysql.com. Make sure you select executable proper for your operating system.
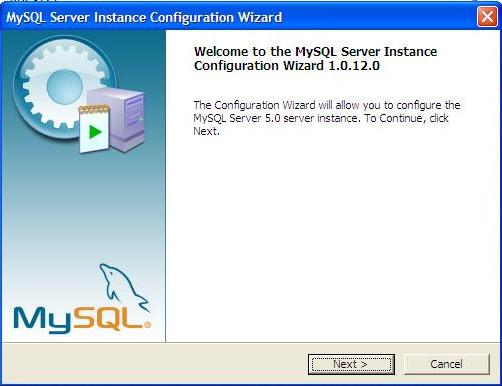
Run the installation program and follow default installation steps. When the installation is complete find the MySQL elements in the Windows Start menu and run the MySQL Configuration Wizard. Follow the wizard and make sure to check settings against the screenshots in the guide below.
In Welcome window just press 'Next'.(pic.1)
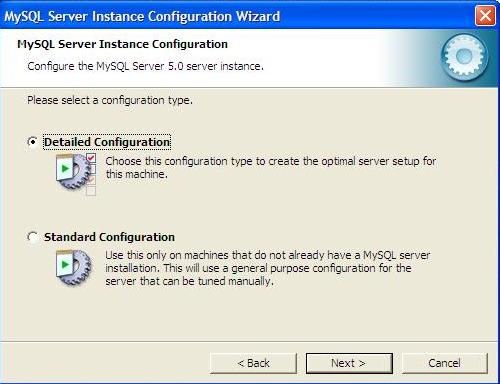
In the next window select option: 'Detailed Configuration' and press 'Next' (pic. 2)
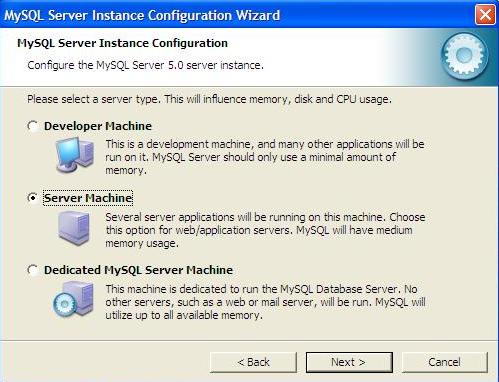
On the next screen select option: 'Server Machine' and press 'Next' (pic. 3)
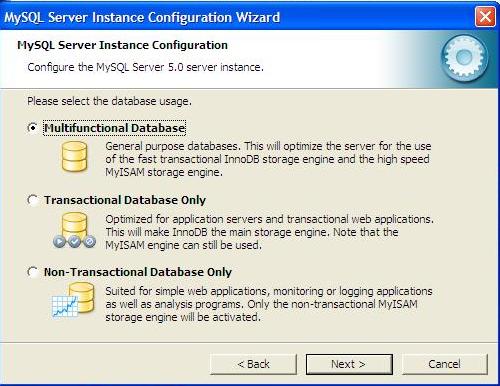
On the forth windows leave the default" 'Multifunctional Database' and press 'Next' (pic. 4)
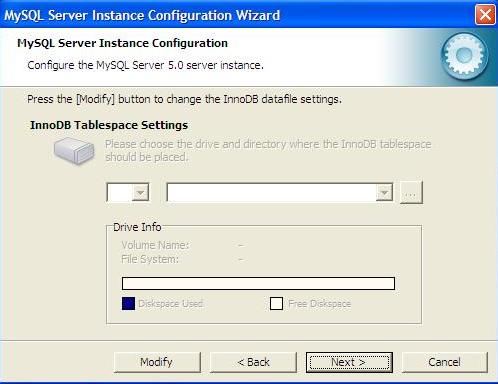
On the step number five just press 'Next' using defaults. (pic. 5)
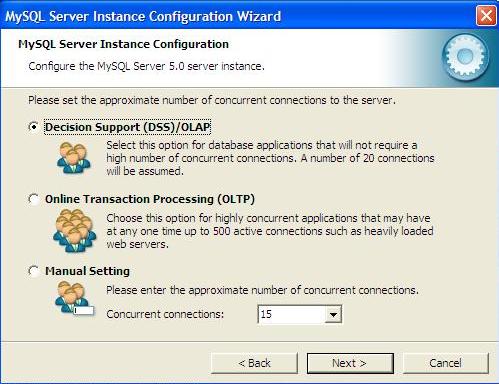
Again, on window 6 select the default - 'Decision Support (DSS)/OLAP' and press 'Next' (pic.6)
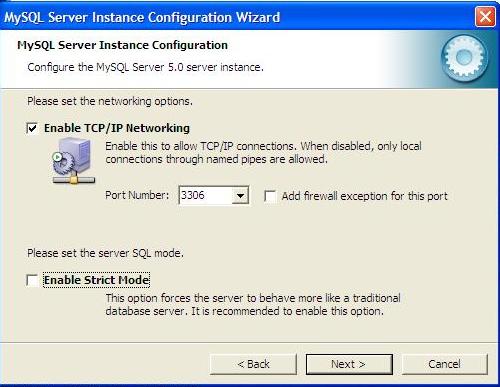
Make sure you switch OFF the 'Strict mode' and and press 'Next' (pic. 7)
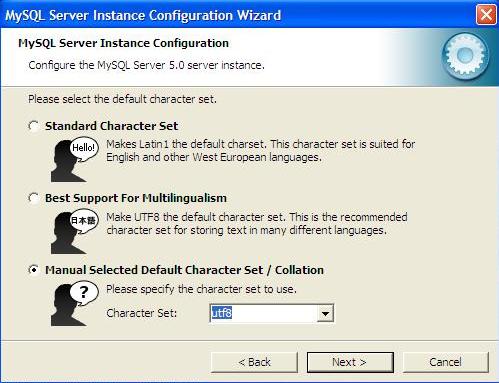
On the character encoding page select: 'Manual Selected Default Character set/ Collation' and 'utf8', press 'Next' (pic.8)
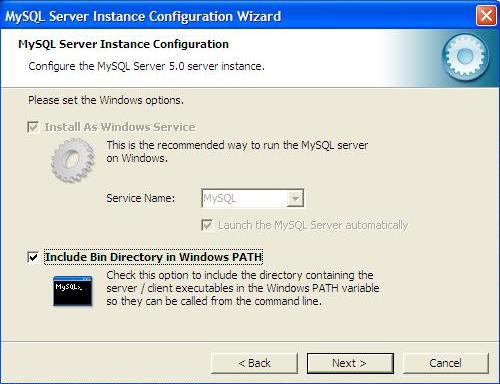
On next window select 'Include Bin Directory in Windows PATH' and press 'Next' (pic.9)
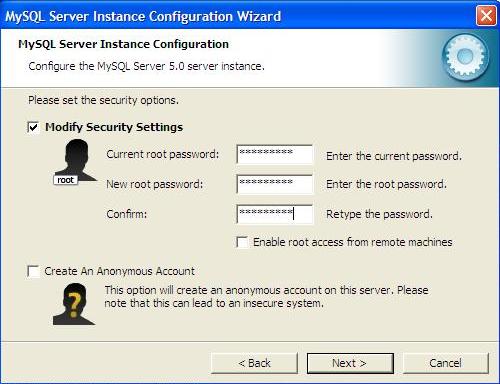
On this window just enter the database super user password and make sure you remember it. When ready press 'Next' (pic. 10)
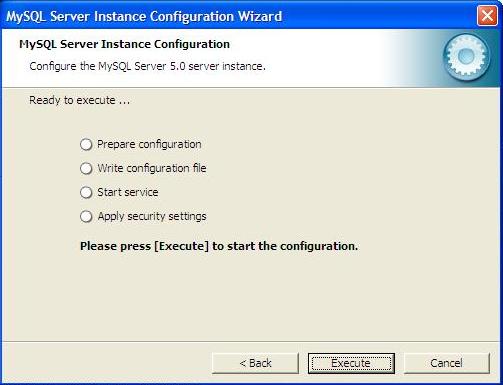
This is the last screen. Press 'Execute' to save the configuration parameters. (pic. 11)
When the configuration is saved you can repeat all the steps and change settings at any time by running: START ⇒ Programs ⇒ MYSQL⇒ MYSQL serwer machine⇒ MySQL Server Instance Config Wizard
Now we have to setup Tigase database. From the Start menu run the MySQL console and enter all commands below finishing them with <ENTER>:
-
Create the database:
mysql>create database tigasedb; -
Add database user:
mysql> GRANT ALL ON tigasedb.* TO tigase_user@'%' IDENTIFIED BY 'tigase_passwd'; mysql> GRANT ALL ON tigasedb.* TO tigase_user@'localhost' IDENTIFIED BY 'tigase_passwd'; mysql> GRANT ALL ON tigasedb.* TO tigase_user IDENTIFIED BY 'tigase_passwd'; mysql> FLUSH PRIVILEGES; -
Load Tigase database schema:
mysql> use tigasedb;
mysql> source c:/Program Files/Tigase/database/mysql-schema.sql;
There is a small configuration bug in the installation of Tigase version 3.x. If you look in the run.bat file in the Tigase directory you have to replace string inital.propereties with init.properties.
You can now restart your machine and all services including the MySQL database and the Tigase server should be running. Alternatively if you don’t want to restart your computer you can start both services manually if you know how to do it.
When the system is up and running you can connect with any XMPP client (Psi for example) to your server to see if it is working.
Now, you can tweak the server configuration further. Use the guide describing init.properties file for configuration details.
3.8. Tigase Server Network Instructions
One you have installed Tigase XMPP Server on a machine, you’re going to want to use it. If you are just using for local communications on a network behind a router, you’re all set. Enjoy and use!
However, if you want to have people from other computers outside your network connect to your server, you’re going to have to go through a few more steps to show your server out to the public.
|
Note
|
This guide is merely a recommendation of how to get a local server to be open to incoming communications. Any time you open ports, or take other security measures you risk compromising your network security. These are only recommendations, and may not be appropriate for all installations. Please consult your IT Security expert for securing your own installation. |
XMPP, being a decentralized communication method, relies on proper DNS records to figure out where and how an XMPP server is setup. Operating an XMPP Server will require you to properly setup DNS routing so not only can clients connect to you, but if you decide to run a federated server and enable server to server communication, you will need to do the same. If you already have a DNS server already, you should have little issue adding these records. If you do not have a DNS setup pointing to your server, you may use a free dynamic name service such as dynu.com.
3.8.1. A Records
You will not be able to use an IP Address or a CNAME record to setup an XMPP Server. While it’s not required, an A record can provide some other benefits such serving as a backup in case the SRV record is not configured right.
3.8.2. SRV Records
You will need to set SRV records both for client-to-server (c2s) communication and, if you plan to use it, server to server (s2s) communication. We recommend both records are entered for every server as some resources or clients will check for both records. For this example we will use tigase.org is our domain, and xmpp as the xmpp server subdomain.
SRV records have the following form:
_service._protocol.name. TTL class SRV Priority weight port target.
The key is as follows:
-
service: is the symbolic name of the desired service, in this case it would be xmpp-client or xmpp-server.
-
protocol: is the transport protocol, either TCP or UDP, XMPP traffic will take place over TCP.
-
name: the domain name where the server resides, in this case tigase.org.
-
TTL: a numeric value for DNS time to live in milliseconds, by default use 86400.
-
class: DNS class field, this is always IN.
-
priority: the priority of the target host with lower numbers being higher priority. Since we are not setting up multiple SRV records, we can use 0.
-
weight: the relative weight for records with the same priority. We can use 5.
-
port: the specific TCP or UDP port where the service can be found. In this case it will be 5222 or 5269.
-
target: the hostname of the machine providing the service, here we will use xmpp.tigase.org.
For our example server, the SRV records will then look like this:
_xmpp-client._TCP.tigase.org 86400 IN SRV 0 5 5222 xmpp.tigase.org
_xmpp-server._TCP.tigase.org 86400 IN SRV 0 5 5269 xmpp.tigase.org
3.8.3. Checking setup
If you have a cell phone on a separate network with an XMPP client, you can now try to login to test the server. If that is not handy, you can use an online tool to check proper DNS records such as kingant’s: https://kingant.net/check_xmpp_dns/ and it will tell you if anything is missing.
3.8.4. Ports description
Once your server is setup, you may need to open at least two ports. By default XMPP communication happens on ports 5222/5269, to which point SRV records. Other ports used by the server are:
-
3478(TURN or STUN, plain socket, TCP and UDP) -
5349(TURN or STUN, over TLS, TCP and UDP) -
5222(default XMPP socket port) -
5223(legacy XMPP socket port) -
5269(default s2s port, i.e.: federation support) -
5277(component protocol port, e.g.: for external components) -
5280(default BOSH port) -
5290(default WebSocket port) -
8080(HTTP API component port) -
9050(JMX Monitoring)
If for any reason you can’t use default ports and have to change them it’s possible to point SRV records those ports. Please keep in mind, that you have to open those ports for incoming connections in your firewall. In case you are using iptables you can use following command to include those ports in your rules:
iptables -A INPUT -p tcp -m tcp --dport 5222 -j ACCEPT
iptables -A INPUT -p tcp -m tcp --dport 5223 -j ACCEPT
iptables -A INPUT -p tcp -m tcp --dport 5269 -j ACCEPT
iptables -A INPUT -p tcp -m tcp --dport 5277 -j ACCEPT
iptables -A INPUT -p tcp -m tcp --dport 5280 -j ACCEPT
iptables -A INPUT -p tcp -m tcp --dport 5290 -j ACCEPT
iptables -A INPUT -p tcp -m tcp --dport 8080 -j ACCEPT
iptables -A INPUT -p tcp -m tcp --dport 9050 -j ACCEPT
Both ports should be setup to use TCP only. If for any reason you want to make service available for different ports you can:
-
change ports in Tigase configuration and update DNS SRV records;
-
forward those ports to default Tigase ports (this is especially useful under *nix operating system if you want to utilize ports lower than
1024while running, as recommended, Tigase service from user account - there is a limitation and user accounts can bind to ports lower than1024), for example usingiptablesrules (in following example we are making available Tigase SSL websocket port available under port443, which is usually opened in corporate firewalls):iptables -t nat -A PREROUTING -p tcp --dport 443 -j REDIRECT --to-ports 5291
3.9. Tigase Script Selection
As mentioned in each of the quick start sections, each distribution of Tigase XMPP server comes with a number of scripts that are customized for different versions of Linux.
| Operating system | init.d file path | Types of Operating Systems |
|---|---|---|
Debian |
|
Knoppix, Ubuntu (before v15.04), Raspbian or Duvian |
Gentoo |
|
CoreOS (before v94.0.0), Tin Hat Linux or other *too based systems |
Mandriva |
|
Specific init.d file for Mandriva Linux |
Redhat |
|
RedHat (before v7.0) and other RPM based linux derivatives like CentOS (before v.7.14), openSUSE (before v12.2) |
3.9.1. Configuration: For All Linux Distributions
Once you’ve located the appropriate distribution scripts (please take a look at the table above), copy it to your system’s init.d folder (usually it’s /etc/init.d/):
sudo cp $SCRIPT_FILE_PATH /etc/init.d/tigaseYou may also need to make it executable:
sudo chmod +x /etc/init.d/tigaseIt is recommended that you open the script files or configuration files as some have some parameters that you will need to specify.
Gentoo
The conf.d script must contain the following parameters:
TIGASE_HOME="/home/tigase/tigase-server"
TIGASE_USER=tigase
TIGASE_CONF="etc/tigase.conf"
The following should be configured:
-
TIGASE_HOME- Specifies the Tigase Server installation directory. -
TIGASE_USER- Specifies the user that will run the program. This should be a user with SU permissions. -
TIGASE_CONF- The location of tigase.conf file, relative to theTIGASE_HOMEdirectory.
Mandriva
Mandriva has a single init.d file, however it should be configured:
…
export JAVA_HOME=/usr/java/jdk1.8.0
export TIGASE_DIR=/opt/tigase/server/
tigase=$TIGASE_DIR/scripts/tigase.sh
prog=tigase
config=$TIGASE_DIR/etc/tigase.conf
…
The following should be configured:
-
JAVA_HOME- The location of your JDK Installation. -
TIGASE_DIR- Tigase Server installation directory. -
tigase- The location of your tigase.sh script. This should not need adjusting if you maintain the default file structure. -
config- The location of your tigase.conf file. This should not need adjusting if you maintain the default file structure.
pid file will be stored in /var/run/ser.pid
Redhat
Similar to Mandriva, you will need to configure the init.d file:
…
JAVA_HOME=/usr/lib/jvm/java/

USERNAME=tigase
USERGROUP=tigase
NAME=tigase
DESC="Tigase XMPP server"

TIGASE_HOME=/home/tigase/tigase-server
TIGASE_LIB=${TIGASE_HOME}/jars
TIGASE_CONFIG=/etc/tigase.conf
TIGASE_OPTIONS=
TIGASE_PARAMS=

PIDFILE=
TIGASE_CONSOLE_LOG=
…-
USERNAME- Username running Tigase, should have su permissions. -
USERGROUP- The usergroup of the username. -
NAME- OS name for Tigase program. -
DESC- Optional description. -
TIGASE_HOME- The location of your Tigase Server installation directory. -
TIGASE_LIB- The location of your Tigase Jars folder, you should not need to adjust this if you setTIGASE_HOMEproperly, and maintain the default file structure. -
TIGASE_CONFIG- The location of your tigase.conf file relative toTIGASE_HOME -
TIGASE_OPTIONS- Legacy options for Tigase, most are now handled in init.properties or tigase.conf. -
TIGASE_PARAMS- Parameters passed to command line when launching Tigase. -
PIDFILE- Location of Tigase PID file if you wish to use custom directory. Default will be located in /logs or /var/temp directory. -
TIGASE_CONSOLE_LOG- Location of Tigase Server console log file if you wish to use a custom directory. Default will be located in /logs directory, failing that /dev/null.
After you’ve copied the script, in order to install sysinit script you have to add it to the configuration:
/sbin/chkconfig --add tigaseService can be enabled or disabled service with:
/sbin/chkconfig tigase <on|off|reset>Debian
As with other distributions you should copy init.d script to the correct location. Afterwards it should be edited and correct values for variables need to be set:
…
USERNAME=tigase
USERGROUP=tigase
NAME=tigase
DESC="Tigase XMPP server"

TIGASE_HOME=/usr/share/tigase
TIGASE_CONFIG=/etc/tigase/tigase.config
TIGASE_OPTIONS=
TIGASE_PARAMS=

PIDFILE=
TIGASE_CONSOLE_LOG=
…-
USERNAME- Username running Tigase, should have su permissions. -
USERGROUP- The usergroup of the username. -
NAME- OS name for Tigase program. -
DESC- Optional description. -
TIGASE_HOME- The location of your Tigase Server installation directory. -
TIGASE_CONFIG- The location of your tigase-server.xml file relative (old configuration format) -
TIGASE_OPTIONS- command line arguments passed to Tigase server (which may include path toinit.properies(if correcttigase.confconfiguration will be found then it will translate toTIGASE_OPTIONS=" --property-file etc/init.properties " -
TIGASE_PARAMS- Parameters passed to command line when launching Tigase. -
PIDFILE- Location of Tigase PID file if you wish to use custom directory. Default will be located in/var/run/tigase/tigase.pidor under (in this case relative to tigase home directory)logs/tigase.pid. -
TIGASE_CONSOLE_LOG- Location of Tigase Server console log file if you wish to use a custom directory. Default will be located in /logs directory, failing that /dev/null.
Afterwards we need to install service in the system with following command:
update-rc.d tigase defaults3.9.2. Running Tigase as a system service
There are a number of benefits to running Tigase as a service, one of which is to ensure that the program will run even in the event of a power outage or accidental server restart, Tigase will always be up and running.
Once installation is complete, you should be able to start Tigase using the following command:
service tigase startTigase should begin running in the background. Since Tigase is now installed as a service, it can be controlled with any of the service commands, such as:
-
service tigase stop -
service tigase restart
3.10. Shutting Down Tigase
Although Tigase XMPP Server can be terminated by ending the process, it is preferred and recommended to use it’s own shutdown scripts instead. Not only does this allow for a proper purge of Tigase form the system, but allows for all shutdown functions to operate, such as ammending logs and completing statistics. To trigger a shutdown of Tigase server, the following command can be used from the tigase directory:
./scripts/tigase.sh stopYou may specify the config file if you want, but it will make no differences
This will:
-
Begin shutdown thread
-
Stop accepting new connections
-
Close all current connections
-
Collect runtime statistics
-
Write statistics to log
-
Dump full stacktrace to a file
-
Run GC and clear from memory
3.10.1. Shutdown statistics
Upon shutdown, statistics for the server’s runtime will be appended to the log file. For a description of the statsitics and what they mean, refer to the Statistics Description portion of the documentation.
3.10.2. Shutdown StackTrace Dump
To aid with troubleshooting purposes, the full stacktrace will be dumped to a seperate file located at $serverdir/logs/threads-dump.log.# Stacktrace logs will follow the same log file numbering scheme described in Log file description.
This feature is enabled by default, however you may disable this by adding the following to your init.properties file:
--shutdown-thread-dump=false4. Tigase Server Binary Updates
Most open source projects try to make sure that the nightly builds compile correctly so that these builds can be used. However, we at Tigase believe that these builds should be seperated until they are thoroughly tested and released. Although lots of installations out there we know of just run from our nightly builds, this puts an extra responsibility to make sure all code is functional and will constantly work. Therefore, our general approach is to run all basic functionality tests before each code commit to make sure it works correctly. This does not guarantee that there will never be a problem, but it is a precaution from preventing bad builds from arriving in the hands of our customers.
Some users on the other hand, like to be on the bleeding edge and regularly use our nightly builds exploring new code changes and playing with new features before they are put to a full release. Others prefer to stick to stable and fully tested public releases. Others however, want something from the middle, the most recent features, but bug fixes, something like a beta or a release-candidate state.
Should you choose to use the nighly builds, a few things you should consider: - Changes may be made to the code that can negatively affect performance. - Changes may be made to the code that can negatively affect security. We highly recommend testing these builds in your environments before upgrading.
With these considerations in mind, we provide nightly builds at this link which provides directories by date.
Standard naming format is tigase-server-x.x.x-SNAPSHOT-byyyy.* x.x.x is the major version the builds are working towards, with yyyy being the specific build. Note individual days may have the same builds as noted by the byyyy section of the file.
Just like the standard distributions, the builds are available with the following extensions: . .jar - Java installer version . .exe - Windows binary installer version . -javadoc.jar - Java installer for javadoc only . -dist.zip - Compressed binaries with no dependencies. . -dist.tar.gz - tarball compressed binaries with no dependencies. . -dist-max.zip - Compressed binaries with all dependencies. . -dist-max.tar.gz - tarball compressed binaries with all dependencies.
We also provide automated testing of each of our nightly builds for each supported databases. Tests are done with both functional and low memory parameters in mind, and are available at this link. These tests can provide a quick examination of function before upgrading your current build.
The latest Cluster tests are available at this link which shows performance and traffic use under strain using the latest available build of Tigase.
5. Configuration
When the user tries to setup the client for the first time he comes across 2 configuration files: tigase.conf and init.properties in the /etc folder. Here is a brief explanation what all those files are about and in other sections you can learn all the details needed to configure the server.
-
init.properties file is a simple text file with server parameters in form: key = value. When the XML configuration file is missing the Tigase server reads init.properties file and uses parameters found there as defaults for generation of the XML file. Therefore if you change the init.properties file you normally have to stop the server, remove the XML file and start the server again. All the settings from the init.properties are read and applied to the XML configuration. The properties file is easy to read and very safe to modify. At the moment this is the recommended way change the server configuration.
-
tigase.conf is the Tigase server startup configuration. It is actually not used by the server itself. It rather contains operating system settings and environment parameters to correctly run the Java Virtual Machine. It is only useful on the unix-like systems with Bash shell. If you run the server on MS Windows systems tigase.bat and wrapper.conf files are used instead. The tigase.conf file is read and loaded by the scripts/tigase.sh shell script which also scans the operating system environment for Java VM and other tools needed.
5.1. Tigase XMPP Server init.properties Configuration
init.properties is a slightly extended version of the Java properties file with (key, value) pairs.
Comment lines will have as it’s first non-white space ASCII character either '#' or '!'.
The key starts with first non-white space ASCII character and ends on either first white space ASCII character or either of '=' or ':'. Therefore if your key contains any of '=', ':' or white space characters you have to escape them with backslash \'\': \: or \=.
All examples below specify 'vhosts' as a key and 'test-a, test-b, test-c' as a value:
vhosts=test-a, test-b, test-c
vhosts : test-a, test-b, test-c
    vhosts     =     test-a, test-b, test-c
Possible types are:
-
[S] (or nothing) - Characters string: 'abcdef'
-
[s] - String array: 'abcdef, ghaijk, lmnopq'
-
[B] - Boolean: 'true' or 'false'
-
[b] - Boolean array: 'true, true, false'
-
[L] - Long number: 1234567890
-
[l] - Long array: '12334, 45435, 45645'
-
[I] - Integer number: 123456
-
[i] - Integer array: '123, 456, 678'
There are lots of parameters which have broader meaning than just one property. Some of them affect many configuration settings or can generate whole sections in the XML file. Most of them starts with \'--' double hyphen. Please note, each property put in the init.properties file starting with \'--' becomes a JVM system property (without \'--' at the beginning).
Reference the property guide for a description of properties.
Property name: --admins
Property name: --auth-db
Property name: --auth-db-uri
Property name: --auth-domain-repo-pool
Property name: --auth-repo-pool
Property name: --auth-repo-pool-size
Property name: --bind-ext-hostnames
Property name: --bosh-close-connection
Property name: --bosh-extra-headers-file
Property name: --cl-conn-repo-class
Property name: --client-access-policy-file
Property name: --cluster-connect-all
Property name: --cluster-mode
Property name: --cluster-nodes
Property name: --cm-ht-traffic-throttling
Property name: --cm-see-other-host
Property name: --cm-traffic-throttling
Property name: --cmpname-ports
Property name: --comp-class
Property name: --comp-name
Property name: --cross-domain-policy-file
Property name: --data-repo-pool-size
Property name: --debug
Property name: --debug-packages
Property name: --domain-filter-policy
Property name: --elements-number-limit
Property name: --ext-comp
Property name: --extcomp-repo-class
Property name: --external
Property name: --hardened-mode
Property name: --max-queue-size
Property name: --monitoring
Property name: --net-buff-high-throughput
Property name: --net-buff-standard
Property name: --new-connections-throttling
Property name: --nonpriority-queue
Property name: --queue-implementation
Property name: --roster-implementation
Property name: --s2s-ejabberd-bug-workaround-active
Property name: --s2s-secret
Property name: --s2s-skip-tls-hostnames
Property name: --script-dir
Property name: --sm-cluster-strategy-class
Property name: --sm-plugins
Property name: --sm-threads-pool
Property name: --ssl-certs-location
Property name: --ssl-container-class
Property name: --ssl-def-cert-domain
Property name: --stats-history
Property name: --stringprep-processor
Property name: --test
Property name: --tigase-config-repo-class
Property name: --tigase-config-repo-uri
Property name: --tls-jdk-nss-bug-workaround-active
Property name: --trusted
Property name: --user-db
Property name: --user-db-uri
Property name: --user-domain-repo-pool
Property name: --user-repo-pool
Property name: --user-repo-pool-size
Property name: --vhost-anonymous-enabled
Property name: --vhost-max-users
Property name: --vhost-message-forward-jid
Property name: --vhost-presence-forward-jid
Property name: --vhost-register-enabled
Property name: --vhost-tls-required
Property name: --virt-hosts
Property name: --watchdog_delay
Property name: --watchdog_ping_type
Property name: --watchdog_timeout
Property name: config-type
5.2. Startup File for tigase.sh - tigase.conf
Property file names for tigase.sh startup script is a second parameter for the startup script. It can be skipped if environmental variables are set in different location or in different way.
Config file for startup script simply sets number of environment variables with the location of required components. Possible variables to set in this file are:
-
JAVA_HOME - location of Java installation home directory. Must be set.
-
TIGASE_HOME - location of Tigase installation home directory. By default script try to find this location by searching directories from the location where the script has been run.
-
TIGASE_CONSOLE_LOG - file to which all console messages will be redirected if server is run in background. By default it will be: TIGASE_HOME/logs/tigase-console.log. If this file/directory is not writable by Tigase process all console messages will be redirected to /dev/null
-
TIGASE_PID location of the file with server PID number. By default it will be TIGASE_HOME/logs/tigase.pid.
-
JAVA_OPTIONS - options for JVM like size of RAM allocated for the JVM, properties and so on.
-
TIGASE_OPTIONS - additional options for Tigase server program. You can tweak initial parameters for your environment here.
Sample file to run Tigase with PostgreSQL database may look like:
ENC="-Dfile.encoding=UTF-8 -Dsun.jnu.encoding=UTF-8"
DRV="-Djdbc.drivers=org.postgresql.Driver"
JAVA_OPTIONS="${ENC} ${DRV} -server -Xms100M -Xmx100M "
CLASSPATH=""
TIGASE_CONFIG="tigase-pgsql.xml"
TIGASE_OPTIONS=" --property-file etc/init.properties "
Please note encoding settings. JVM by default uses encoding set in operating system environment. XMPP protocol, however uses UTF-8 for all data processing. So the ENC settings enforces UTF-8 encoding for all operations.
Another significant setting is \'CLASSPATH'. It is intentionally set to an empty string. The tigase.sh startup script builds the CLASSPATH on it’s own from files found in jars/ and libs/ directories. It is advised to set the CLASSPATH to the empty string because the Tigase server scans all available classes to find all components and plugins implementation. If the CLASSPATH contains lots of libraries which are not used anyway it can cause a long startup time and high system loads.
5.3. Linux Settings for High Load Systems
There are a few basic settings you have to adjust for high load systems to make sure the server has enough resources to handle a big number of network connections.
The main parameter is a maximum number of opened files allowed for the process to keep at the same time. Each network connection uses a file handler, therefore if the limit is too low you can quickly run out of handlers and the server can not accept any more connections.
This limit is set on 2 levels - on the kernel level (fs.file-max) and on the system level (nofile).
Another kernel property which can be important in certain configurations (like transports installations or when you use proxy for Bosh connections) is: net.ipv4.ip_local_port_range. This parameter can be set the same way as the fs.file-max property.
5.3.1. fs.file-max
The fs.file-max kernel property is set via sysctl command. You can see current settings by executing the command:
# sysctl fs.file-max
fs.file-max = 358920
If you plan to run high load service with large number of server connections, then this parameter should be at least as twice big as the number of network connections you expect to support. You can change this setting by executing the command:
# sysctl -w fs.file-max=360000
fs.file-max = 360000
5.3.2. net.ipv4.ip_local_port_range
You can see current settings by executing the command:
# sysctl net.ipv4.ip_local_port_range
net.ipv4.ip_local_port_range = 32768        61000
You can change this setting by executing the command:
# sysctl -w net.ipv4.ip_local_port_range="1024 65000"
net.ipv4.ip_local_port_range = 1024 65000
5.3.3. TCP_keepalive
According to blog.kolargol.eu or www.gnugk.org/ some keepalive settings should be changed to improve reliability.
# sysctl -w net.ipv4.tcp_keepalive_time="60"
net.ipv4.tcp_keepalive_time = 60
# sysctl -w net.ipv4.tcp_keepalive_probes="3"
net.ipv4.tcp_keepalive_probes = 3
# sysctl -w net.ipv4.tcp_keepalive_intvl="90"
net.ipv4.tcp_keepalive_intvl = 90
5.3.4. /etc/sysctl.conf
The above commands let the system remember new settings until the next system restart. If you want to make the change permanent you have to edit the file: /etc/sysctl.conf and add the property at the end of the file:
fs.file-max=360000
net.ipv4.ip_local_port_range=1024 65000net.ipv4.tcp_keepalive_time=60
net.ipv4.tcp_keepalive_probes=3
net.ipv4.tcp_keepalive_intvl=90
It will be automatically loaded next time you start the server.
Command:
# sysctl -pCauses the /etc/systcl.conf to be reloaded which is useful when you have added more parameters to the file and don’t want to restart the server.
5.3.5. nofile
This is the property used by the system limits. For example running the command ulimit -a shows you all limits set for the current user:
# ulimit -a
core file size          (blocks, -c) 0
data seg size           (kbytes, -d) unlimited
file size               (blocks, -f) unlimited
pending signals                 (-i) 38912
max locked memory       (kbytes, -l) 32
max memory size         (kbytes, -m) unlimited
open files                      (-n) 40960
pipe size            (512 bytes, -p) 8
POSIX message queues     (bytes, -q) 819200
stack size              (kbytes, -s) 8192
cpu time               (seconds, -t) unlimited
max user processes              (-u) 38912
virtual memory          (kbytes, -v) unlimited
file locks                      (-x) unlimited
To make it even more interesting and more complex, there are 2 types of system limits: soft limit which can be temporarily exceeded by the user and hard limit which can not be exceeded. To see your hard limit execute command:
# ulimit -a -H
core file size          (blocks, -c) unlimited
data seg size           (kbytes, -d) unlimited
file size               (blocks, -f) unlimited
pending signals                 (-i) 38912
max locked memory       (kbytes, -l) 32
max memory size         (kbytes, -m) unlimited
open files                      (-n) 40960
pipe size            (512 bytes, -p) 8
POSIX message queues     (bytes, -q) 819200
stack size              (kbytes, -s) unlimited
cpu time               (seconds, -t) unlimited
max user processes              (-u) 38912
virtual memory          (kbytes, -v) unlimited
file locks                      (-x) unlimited
The hard limits are usually bigger then the soft limits or sometimes the same.
For us the most important parameter is: open files. You can change the property in file: /etc/security/limits.conf. You have to append 2 following lines to the end of the file:
jabber               soft    nofile         350000
jabber               hard    nofile         350000
Where the jabber is the user name of the account running you IM service. You can also set the limits for all users on the machine in a following way:
*               soft    nofile         350000
*               hard    nofile         350000
For those changes to make an effect you have to logout from the modified account and login again. New limits should be applied.
5.3.6. su and init script
If one intends to use init scripts for startup purposes (or simply wants to be able to start the server utilizing su command) it’s necessary to adjust PAM configuration by modifying /etc/pam.d/su file and uncomment following line:
session required pam_limits.soAfterwards the init scripts will respect configured limits.
5.4. Configuration Storage Options in Tigase
The whole configuration framework for the Tigase server has been redesigned and rewritten for v5.1. This was done to cleanup all the configuration code and logic as well as extend the current functionality to allow for configuration storage in different kinds of repositories - memory, file, database, …
Although this article is titled configuration changes, version 5.x still follows our policy about backward compatibility. So the changes could be considered extensions rather than complete overhauls.
There is however one change which can affect a few users. Those who use the server and worked with it’s configuration remember the mess and confusion related to duality in the server configuration - the init.properties file and tigase.xml file. This is now over.
5.4.1. Default Behavior
By default Tigase server loads tigase.conf.ConfigurationCache class which stores the whole configuration in memory. Please note that the init.properties file with initial settings is always loaded if it is available at the given location and all settings in this file work exactly as before. For more details, please refer to the online documentation.
A couple of times 'initial configuration' and 'whole configuration' were mentioned. What is this about, what is the difference?
The 'initial configuration' are startup settings provided by the user in the init.properties file. Most of the server elements use far more configuration parameters which are set to sensible default values if they are not provided by the user. The configuration framework in Tigase server always keeps the complete configuration of all active elements. This is implemented in such a way to make it possible to present currently used settings to the end-users or administrators and allow them to change the server parameters during runtime.
5.4.2. Storing Configuration in SQL Database
There is one more configuration storage implemented right now. It allows you to store the server settings in the SQL database. In most cases this is not quite useful, just opposite, very inconvenient. However. there is at least one case where you really want to keep the server configuration in the SQL database. This is in the cluster mode. If you have a Tigase cluster system of 10 or more nodes it is much easier to keep the configuration in a single central location and manage it from there, rather then go to every single machine every time you want to change some settings. You can even change any settings for all cluster nodes with a single database query.
You set the SQL storage the same way as you set it for XML file. However, there is one more parameter as you have to provide also database connection string for the server so it knows where to connect to for the settings:
-
Parameters in init.properties file:
--tigase-config-repo-class=tigase.conf.ConfigSQLRepository --tigase-config-repo-uri=connection-uri -
Alternatively you can provide system properties to the JVM:
-Dtigase-config-repo-class=tigase.conf.ConfigSQLRepository
-Dtigase-config-repo-uri=connection-uri
Please note, the current implementation for the SQL storage automatically creates the tables necessary to operate if it does not exist. So you don’t have to worry about the schema, but you should make sure that the database user used by the Tigase has permissions to create a table.
Configuration is stored in table with following schema:
create table tigase_configuration (
-- The component name by which the configuration parameter
-- is used.
  component_name varchar(127) NOT NULL,

-- The configuration property key name or identifier.
  key_name varchar(127) NOT NULL,

-- The configuration property value
  value varchar(8191) NOT NULL,

-- The cluster node by which the configuration property is read,
-- if empty it will be read by all cluster nodes.
  cluster_node varchar(255) NOT NULL DEFAULT '',

-- Additional, secondary identifier for the configuration property.
-- The configuration can be organized in a hierarchical way to allow
-- multiple occurrences of the same property name for a single
-- component, for example you can have the same property for
-- different tcp/ip ports set to a different value:
-- c2s/5222/port_type=plain
-- c2s/5223/port_type=ssl
-- the port number is a secondary identifier.
  key_node varchar(127) NOT NULL DEFAULT '',

--  Not currently used. In future it will be used to distinguish between
-- different kind of properties (initial settings, defaults, updated by
-- user, etc...)
  flag varchar(32) NOT NULL DEFAULT 'DEFAULT',

-- The system detects basic Java types and stores information about
-- the property type, when the property is read the original property
-- type is restored and provided to the component without need for
-- a parsing or conversion.
  value_type varchar(8) NOT NULL DEFAULT 'S',

-- It is not currently used. In the future it will be used to reload
-- settings changed in last, defined period of time. Basically, the
-- system can automatically check the configuration database to
-- see whether some properties have been updated, then reload
-- them and apply automatically.
  last_update           timestamp,

primary key(cluster_node, component_name, key_node,
                  key_node, flag));
5.4.3. Reverting To the Old Behavior
While using the tigase.xml file is still possible and the old behavior can be preserved, it is now disabled by default. By default the Tigase server reads only init.properties file with initial settings and stores all the complete configuration in memory only.
The init.properties works exactly as before and all old parameters are still working exactly as before. The only difference is the lack of the tigase.xml which is not created or read by default if it is present. The main advantage is that you don’t have to remove it each time you change something in the init.properties to pick up new settings.
Firstly we will go into how to re-enable the server to check and use the tigase.xml file to retain functionality with older settings. This is actually very simple to accomplish. The Tigase server now, offers pluggable repository support. This means that you can easily extend current functionality with a different configuration storage by writing own class which reads and writes configuration parameters.
By default class tigase.conf.ConfigurationCache is loaded which stores configuration in memory only.
Please note, the init.properties file is always read if it exists at a given location.
To revert to the old behavior you just need to pass a parameter to Tigase server with a class name which is responsible for keeping server parameters in the old XML file. You can do it in two ways:
-
Add a parameter to init.properties file:
--tigase-config-repo-class=tigase.conf.ConfigXMLRepository -
Or you can pass a system property to the JVM at the startup time:
-Dtigase-config-repo-class=tigase.conf.ConfigXMLRepository
5.4.4. Going Further
As the configuration mechanism in the Tigase server offers pluggable storage engines, you can easily write your own engine by implementing the interface: tigase.conf.ConfigRepositoryIfc or by extending one of current implementations.
The whole configuration framework is pluggable and you can replace it completely if it does not suit you well enough. Your implementation has to extend tigase.conf.ConfiguratorAbstract class and can be set using JVM system property (as this is configuration framework you can’t do this via any configuration system):
-Dtigase-configurator=tigase.conf.ConfiguratorThe example above shows the parameter set to the default configuration framework.
5.4.5. Message Router Implementation is Configurable Too
The Message router component was the only component which was fixed to the Tigase instance. In theory it could always have been replaced but in practice there was no way of doing it as that was the first element loaded at startup.
Now Tigase message router implementation can be easily replaced to and it can be made a configurable option if needed.
At the server startup time the code creates configurator and calls method: getMessageRouterClassName() which by default returns class: tigase.server.MessageRouter. You can extend the configurator and provide any different class name instead which implements required interfaces. You can even make it configureable as it is no longer tied to the server instance.
5.5. JVM settings and recommendations
Tigase configuration file tigase.conf (described in more detail in Startup File for tigase.sh - tigase.conf) mentioned a couple of environmental variables which are related to the operation of the JVM. In this guide we would like to expound on those configuration options and provide hints for the optimal settings.
Settings included in the etc/tigase.conf are as follows:
#GC="-XX:+UseBiasedLocking -XX:+UseConcMarkSweepGC -XX:+UseParNewGC -XX:NewRatio=2 -XX:+CMSIncrementalMode -XX:-ReduceInitialCardMarks -XX:CMSInitiatingOccupancyFraction=70 -XX:+UseCMSInitiatingOccupancyOnly"
#EX="-XX:+OptimizeStringConcat -XX:+DoEscapeAnalysis -XX:+UseNUMA"

#GC_DEBUG=" -XX:+PrintTenuringDistribution -XX:+PrintGCDetails -XX:+PrintGCDateStamps -XX:+PrintGCTimeStamps -Xloggc:logs/jvm.log -verbose:gc "

#PRODUCTION_HEAP_SETTINGS=" -Xms5G -Xmx5G " # heap memory settings must be adjusted on per deployment-base!
JAVA_OPTIONS="${GC} ${GC_DEBUG} ${EX} ${ENC} ${DRV} ${JMX_REMOTE_IP} -server ${PRODUCTION_HEAP_SETTINGS} ${DNS_RESOLVER} ${INTERNAL_IP} ${EXTERNAL_IP}  -XX:MaxDirectMemorySize=128m "
And while this file utilizes bash variables, JVM configuration options can be used in the same manner on all operating systems.
The guide will consists of two main parts - memory settings and Garbage Collector tweaks descriptions and hints.
We recommend using -server JVM parameter in all cases.
5.5.1. Heap Sizing
For the non-production deployments (development or stating environments) we recommend using default memory settings of the JVM (which depends on the underlaying operating system), which result i automatic memory allocation and, by the rule of thumb - are the safest in such environments.
For the production environments we recommend a fixed size HEAP - both initial and maximum size, which can be set with (respectively)-Xms and -Xmx JVM flags - ideally to the same value (which should be roughtly 95% of the available memory, if Tigase will be the only service on the machine) to avoid allocation and deallocation.
For convenience it’s possible to uncomment line with PRODUCTION_HEAP_SETTINGS and adjust parameters accordingly.
5.5.2. GC settings
Let’s start with stating that there is no "one to rule them all" - each deployment and use-case is different, however we will try to give a couple of pointers and recommendations proceed with short introduction to GC itself.
XMPP is quite specific in terms of memory allocation - short-lived objects (various types of stanzas) usually exceed number of long-lived objects (user connections and related data). This is important bit of information in the context of how usually JVM HEAP is organised and how Garbage Collector works. On the most basic level Heap is separated into couple of regions:
Generations
-
Young Generation, which is further divided in to:
-
Eden - the region when the objects are usually allocated when they are created;
-
Survivor Spaces - (to and from - one of which is always empty) - responsible for storing all live object remaining after collecting Young Generation (process is repeated several times until objects are finally considered old enough);
-
-
Old Generation - (Tenured Space) - responsible for live objects remaining after running GC on Survivor Spaces - those would be long-lived objects (usually user connections and associated data);
Minor, Major and Full GC - optimizing
General thinking suggests that: * Minor GC cleans Young generation; * Major GC cleans Tenured space; * Full GC cleans all heap.
However, while we can certainly state that Minor GC cleans Young generation it’s a bit more difficult to differentiate Major and Full GC, especially considering that Major GC can be quite often triggered by Minor GC and some garbage collectors can perform cleaning concurrently. Instead of focusing of distinguishing phases one should pay closer attention to actual operations of Garbage Collector itself - uncommenting the line GC_DEBUG=" -XX:+PrintTenuringDistribution -XX:+PrintGCDetails -XX:+PrintGCDateStamps -XX:+PrintGCTimeStamps -Xloggc:logs/jvm.log -verbose:gc " in etc/tigase.conf (or adding same properties to the java commandline) and subsequently analyzing the results should prove more helpful. In addition monitoring GC operation using for example VisualVM (with VisualGC plugin) will also be helpful.
Settings for XMPP
Ideally we should limit both number of GC pauses as well as their duration. After running rather tests following conclusions were made:
-
Garbage Collection is the faster the more dead objects occupies given space, therefore on high-traffic installation it’s better to have rather large YoungGen resulting in lower promotion of the objects to the OldGen;
-
with JVM8 default sizing of Young / Old generation changed, even tho NewRatio is still defaulting to “2” - setting it explicitly to "2" brought back previous sizing;
-
Concurrent Mark and Sweep (CMS) enabled (applies to Tenured space only) with explicit configuration of NewRatio set to default value of 2 (i.e.
-XX:+UseConcMarkSweepGC -XX:+UseParNewGC -XX:NewRatio=2) in general behaves best; -
For small installations (few core CPU, less memory) with low traffic default Parallel collector may be a better solution;
-
Using Heap size adjusted to the actual usage is better as the larger the heap the larger are spaces over which collection needs to be performed thus resulting in longer pauses; in case of huge heaps G1 collector may be better solution to avoid longer pauses;
Considering all of the above using following options should be a good starting point toward further optimizing of Garbage Collection:
GC="-XX:+UseBiasedLocking -XX:+UseConcMarkSweepGC -XX:+UseParNewGC -XX:+CMSIncrementalMode -XX:-ReduceInitialCardMarks -XX:CMSInitiatingOccupancyFraction=70 -XX:+UseCMSInitiatingOccupancyOnly"
GC settings worth considering
In addition to the general recommendation to use CMS collector, following options (or changes to the options) may be worth considering:
-
-XX:NewRatio=2- defines the ratio between the young and tenured generation is 1:2. In other words, the combined size of the eden and survivor spaces will be one-third of the total heap size. The parameters NewSize and MaxNewSize bound the young generation size from below and above. Setting these to the same value fixes the young generation, just as setting -Xms and -Xmx to the same value fixes the total heap size. -
-XX:CMSInitiatingOccupancyFraction=percent- sets the percentage of the old generation occupancy (0 to 100) at which to start a CMS collection cycle. -
-XX:+UseCMSInitiatingOccupancyOnly- instructs the JVM not to base its decision when to start a CMS cycle on run time statistics but instead it uses the value of CMSInitiatingOccupancyFraction for every CMS cycle. -
-XX:ParallelGCThreads=x- sets the number of threads used for parallel garbage collection in the young and old generations. The default value depends on the number of CPUs available to the JVM. If the Tigase JMV is the only one running on the installation default value is recommended. -
-XX:ConcGCThreads=x- sets the number of threads used for concurrent GC. The default value depends on the number of CPUs available to the JVM. If the Tigase JMV is the only one running on the installation default value is recommended. -
-XX:+UseBiasedLockingand-XX:+DoEscapeAnalysis- designed to eliminate locking overhead, however their effect on performance is unpredictable therefore testing is required; reduced locking should improve concurrency and, on current multi-core hardware, improve throughput. -
-XX:+OptimizeStringConcat- enables the optimization of String concatenation operations. This option is enabled by default. -
-XX:+UseNUMA- enables performance optimization of an application on a machine with nonuniform memory architecture (NUMA - most modern computers are based on NUMA architecture) by increasing the application’s use of lower latency memory. By default, this option is disabled and no optimization for NUMA is made. The option is only available when the parallel garbage collector is used (-XX:+UseParallelGC). -
-XX:-UseCompressedOops— disables the use of compressed pointers. By default, this option is enabled, and compressed pointers are used when Java heap sizes are less than 32 GB. When this option is enabled, object references are represented as 32-bit offsets instead of 64-bit pointers, which typically increases performance when running the application with Java heap sizes less than 32 GB. This option works only for 64-bit JVMs.
5.5.3. What to use with Machine x, y, z?
Server class machine (non-VM), > 16GB, >= 8 core CPU
For such setup enabling CMS garbage collector is recommended. Depending on the traffic usage and particular use-case adjusting NewRatio may be needed. Adjusting Xms and Xms sizes for actual available memory is needed (or better yet, for the actual traffic!). Following should be used:
GC="-XX:+UseBiasedLocking -XX:+UseConcMarkSweepGC -XX:+UseParNewGC -XX:NewRatio=2 -XX:+CMSIncrementalMode -XX:-ReduceInitialCardMarks -XX:CMSInitiatingOccupancyFraction=70 -XX:+UseCMSInitiatingOccupancyOnly"
EX="-XX:+OptimizeStringConcat -XX:+DoEscapeAnalysis -XX:+UseNUMA"

#GC_DEBUG=" -XX:+PrintTenuringDistribution -XX:+PrintGCDetails -XX:+PrintGCDateStamps -XX:+PrintGCTimeStamps -Xloggc:logs/jvm.log -verbose:gc "

PRODUCTION_HEAP_SETTINGS=" -Xms15G -Xmx15G " # heap memory settings must be adjusted on per deployment-base!
JAVA_OPTIONS="${GC} ${GC_DEBUG} ${EX} ${ENC} ${DRV} ${JMX_REMOTE_IP} -server ${PRODUCTION_HEAP_SETTINGS} ${DNS_RESOLVER} ${INTERNAL_IP} ${EXTERNAL_IP}  -XX:MaxDirectMemorySize=128m "
For installation with lot of available memory and intention to utilize it all, using G1GC collector may be a better idea :
GC="-XX:+UseG1GC -XX:ConcGCThreads=4 -XX:G1HeapRegionSize=2 -XX:InitiatingHeapOccupancyPercent=35 -XX:MaxGCPauseMillis=100"
EX="-XX:+OptimizeStringConcat -XX:+DoEscapeAnalysis -XX:+UseNUMA"

#GC_DEBUG=" -XX:+PrintTenuringDistribution -XX:+PrintGCDetails -XX:+PrintGCDateStamps -XX:+PrintGCTimeStamps -Xloggc:logs/jvm.log -verbose:gc "

PRODUCTION_HEAP_SETTINGS=" -Xms60G -Xmx60G " # heap memory settings must be adjusted on per deployment-base!
JAVA_OPTIONS="${GC} ${GC_DEBUG} ${EX} ${ENC} ${DRV} ${JMX_REMOTE_IP} -server ${PRODUCTION_HEAP_SETTINGS} ${DNS_RESOLVER} ${INTERNAL_IP} ${EXTERNAL_IP}  -XX:MaxDirectMemorySize=128m "
VM machine, 8GB of RAM, 4 core CPU equivalent
For such setup enabling CMS garbage collector is also recommended. Depending on the traffic usage and particular use-case adjusting NewRatio may be needed (and configuring NewRatio is a must!). Adjusting Xms and Xms sizes for actual available memory is needed (or better yet, for the actual traffic!). Following should be used:
GC="-XX:+UseBiasedLocking -XX:+UseConcMarkSweepGC -XX:+UseParNewGC -XX:NewRatio=2 -XX:+CMSIncrementalMode -XX:-ReduceInitialCardMarks -XX:CMSInitiatingOccupancyFraction=70 -XX:+UseCMSInitiatingOccupancyOnly"
EX="-XX:+OptimizeStringConcat -XX:+DoEscapeAnalysis -XX:+UseNUMA"

#GC_DEBUG=" -XX:+PrintTenuringDistribution -XX:+PrintGCDetails -XX:+PrintGCDateStamps -XX:+PrintGCTimeStamps -Xloggc:logs/jvm.log -verbose:gc "

PRODUCTION_HEAP_SETTINGS=" -Xms7G -Xmx7G " # heap memory settings must be adjusted on per deployment-base!
JAVA_OPTIONS="${GC} ${GC_DEBUG} ${EX} ${ENC} ${DRV} ${JMX_REMOTE_IP} -server ${PRODUCTION_HEAP_SETTINGS} ${DNS_RESOLVER} ${INTERNAL_IP} ${EXTERNAL_IP}  -XX:MaxDirectMemorySize=128m "
VM machine with 4GB or less of RAM, and less than 4 core CPU equivalent
Small installations with limited resources could operate better with default (for JVM versions up to 8, which is the most current at the moment of the writing). Again - depending on the traffic usage and particular use-case adjusting NewRatio may be needed. Adjusting Xms and Xms sizes for actual available memory is recommended (or better yet, for the actual traffic!). Following should be used (i.e. GC line should be commented so the defaults will be used):
#GC="-XX:+UseBiasedLocking -XX:+UseConcMarkSweepGC -XX:+UseParNewGC -XX:NewRatio=2 -XX:+CMSIncrementalMode -XX:-ReduceInitialCardMarks -XX:CMSInitiatingOccupancyFraction=70 -XX:+UseCMSInitiatingOccupancyOnly"
EX="-XX:+OptimizeStringConcat -XX:+DoEscapeAnalysis -XX:+UseNUMA"

#GC_DEBUG=" -XX:+PrintTenuringDistribution -XX:+PrintGCDetails -XX:+PrintGCDateStamps -XX:+PrintGCTimeStamps -Xloggc:logs/jvm.log -verbose:gc "

PRODUCTION_HEAP_SETTINGS=" -Xms3G -Xmx3G " # heap memory settings must be adjusted on per deployment-base!
JAVA_OPTIONS="${GC} ${GC_DEBUG} ${EX} ${ENC} ${DRV} ${JMX_REMOTE_IP} -server ${PRODUCTION_HEAP_SETTINGS} ${DNS_RESOLVER} ${INTERNAL_IP} ${EXTERNAL_IP} -XX:MaxDirectMemorySize=128m "5.6. Session Manager
Tigase Session Manager is where most of Tigase basic options can be configured, and where many operations are controlled from. Changes to session manager can effect operations throughout an entire XMPP installation, so care must be made when changing settings here.
5.6.1. Mobile Optimizations
By default, Tigase employs XEP-0352 Client State Indication which allows for a more streamlined mobile experiencing by allowing the XMPP server to suppress or reduce the number of updates sent to a client thereby reducing the number of stanzas sent to a mobile client that is inactive. This employment is contained within the processor ClientStateIndication and is independent from the MobileV1, MobileV2, MobileV3 settings.
However, this can be fine tuned by using mobile plugins from Tigase which can be used at the same time by adding the following line to the init.properties file:
sess-man/plugins-conf/urn\:xmpp\:csi\:0/logic=tigase.xmpp.impl.MobileV1Options are:
MobileV2
This setting delays delivery of presences while client is in inactive state, but only keeps the last presence for each full jid. This is the default setting for CSI logic.
MobileV3
Keeps the same presence logic as MobileV2, but also queues Message Carbons. Currently not supported by CSI processor, will cause issues.
Disabling CSI
If you wish to not use the ClientStateIndication processor, set the following in your init.properties file:
--sm-plugins=-urn:xmpp:csi:0A note about Mobile Plugins
Previously, you could enable Mobile optimization logic using --sm-plugins=+Mobile_V1.
If you have used these in the past, it is recommended you change your system to use the CSI processor with the appropriate mobile processing logic.
If you require v3 logic, or do not wish to use CSI, be sure to disable it using the above option.
5.6.2. Thread Pool Counts
Session manager can control the number of available thread pools for each processor. By adding the following line to the init.properties file, the global thread pool can be increased by a specified factor:
sess-man/sm-threads-factor[I]=3In this case, the global thread pools is increased by a factor or 3.
6. Security
The articles here cover advanced security features built into to Tigase Server, and some options for adding your own levels of security.
6.1. XEP-0191 Support
The simplest security feature, however, inside an XMPP server is the ability to block users and JIDS. XEP-0191 specifies the parameters of simple blocking without using privacy lists. Below is a breakdown and some sample commands you may find helpful. To enable this feature, be sure the following is in your init.properties file:
--sm-plugins +urn:xmpp:blocking
If you have other plugins running, then just add +urn:blocking to the list to activate this feature.
To confirm if your installation of Tigase supports this feature, a quick disco#info of your server should reveal the following feature:
<feature var='urn:xmpp:blocking'/>
Blocked users are stored on the server on a per-JID basis, so one user may only see his or her blocked JIDs. Lists of blocked JIDs will return as an IQ stanza with a list of <item> fields. To retrieve the blocklist, the following command is issued:
<iq type='get' id='blockedjids'>
  <blocklist xmlns='urn:xmpp:blocking'/>
</iq>
The server responds:
<iq type='result' id='blockedjids'>
  <blocklist xmlns='urn:xmpp:blocking'>
    <item jid='user1@domain.net'/>
    <item jid='admin@example.com'/>
  </blocklist>
</iq>
To block a JID, a similar stanza to the one above is sent to the server with the items of the blocked JIDs you wish to add:
<iq from='admin@domain.net' type='set' id='block'>
  <block xmlns='urn:xmpp:blocking'>
    <item jid='user2@domain.net'/>
  </block>
</iq>
The server will then push an unavailable presence to blocked contacts. Communication between a contact that is blocked, and an entity that blocked it will result in a <not-acceptable> error:
<message type='error' from='user2@domain.net' to='admin@domain.net'>
  <body>Hello, are you online?</body>
  <error type='cancel'>
    <not-acceptable xmlns='urn:ietf:params:xml:ns:xmpp-stanzas'/>
    <blocked xmlns='urn:xmpp:blocking:errors'/>
  </error>
</message>
Unblocking a contact is just as easy as blocking, send an unblock stanza to the server:
<iq from='admin@domain.net' type='set' id='unblock'>
  <unblock xmlns='urn:xmpp:blocking'>
    <item jid='user2@domain.net'/>
  </unblock>
</iq>
The server will begin pushing presence information to unblocked contacts and resources so long as permissions have not changed between.
You may also opt to unblock all contacts and essentially clear out your blocked list using the following command:
<iq type='set' id='unblockall'>
  <unblock xmlns='urn:xmpp:blocking'/>
</iq>
6.2. Server Certificates
6.2.1. Creating and Loading the Server Certificate in pem Files
Server Certificates
Server certificates are needed when you use secure socket connections - SSL/TLS.
For secure socket connection a proper certificate is needed. You can either generate your own self-signed certificate or obtain certificate from trusted third party organization.
Here are steps how to obtain certificate from a trusted organization.
Generating your Own Certificates
Self-signed certificates can be generated easily on a Linux system. Although it may not be considered a 'trusted' certificate authority, it can be useful to test server installations. We do not recommend regular use of self-signed certificates.
Note that Tigase v5.0 and later can automatically create self signed PEM files if needed. However we will cover doing this process by hand.
This tutorial assumes you are running a Linux-based operating system with access to command shell, and the 'Openssl' package is installed on the system.
The process takes the following steps:
1. Create a local private key. This file ends with .key extension. It is recommended to create a new private key for the process.
2. Generate a certificate request. This file ends with the .csr extension and is the file sent to the Certificate Authority to be signed.
3. CA signs private key. This can be done by your own computer, but can also be done by private CAs for a fee.
4. Results are obtained from the CA. This is a .crt file which contains a separate public certificate.
5. Combine the .csr and .crt file into a unified .pem file. Tigase requires keys to be non-password protected PEM files.
openssl genrsa -out[domain.com.key] 1024This command generates a private key using a 1024 bit RSA algorithm. -out designates the name of the file, in this case it will be domain.com.key. The exact name is not important, and the file will be created in whatever directory you are currently in.
openssl req -nodes -key domain.com.key -out domain.com.csrThis command generates a certificate request using the file specified after -key, and the result file will be domain.com.csr. You will be asked a series of questions to generate the request.
Country Name (2 letter code) [AU]:AU
State or Province Name (full name) [Some-State]:Somestate
Locality Name (eg, city) []:Your city name
Organization Name (eg, company) [Internet Widgits Pty Ltd]:Company name
Organizational Unit Name (eg, section) []:Department or any unit
Common Name (eg, YOUR name) []:*.yourdomain.com
Email Address []:your_email_address@somedomain.com

Please enter the following 'extra' attributes
to be sent with your certificate request
A challenge password []:
An optional company name []:Now the .csr file will be signed by a Certificate Authority. In this tutorial, we will be self-signging our certificate. This practice however is generally not recommended, and you will receive notifications that your certificate is not trusted. There are commercial offers from companies to sign your certificate from trusted sources. Please see the Certificate From Other Providers section for more information.
openssl x509 -req -days 365 -in domain.com.csr -signkey domain.com.key -out domain.com.crtThis command signs the certificate for 365 days and generates the domain.com.crt file. You can, of course use any number of days you like.
You should now have the following files in the working directory: ..\ domain.com.key domain.com.csr domain.com.crt
cat yourdomain.com.crt yourdomain.com.key > yourdomain.com.pemIf the certificate is issued by third-party authority you will have to attach the certificate chain, that being certificate of the authority who has generated your certificate. You normally need to obtain certificates for your chain from the authority who has generated your certificate. For example, if you have a certificate from XMPP federation you need to download StartCom root certificate and intermediate ICA certificate. In such cases the pem file is created using following command:
cat yourdomain.com.crt yourdomain.com.key sub.class1.xmpp.ca.crt ca.crt > yourdomain.com.pemThe result file should looks similar to:
-----BEGIN CERTIFICATE-----
MIIG/TCCBeWgAwIBAgIDAOwZMA0GCSqGSIb3DQEBBQUAMIGMMQswCQYDVQQGEwJJ
.
.
.
pSLqw/PmSLSmUNIr8yQnhy4=
-----END CERTIFICATE-----
-----BEGIN RSA PRIVATE KEY-----
WW91J3JlIGtpZGRpbmchISEKSSBkb24ndCBzaG93IHlvdSBvdXIgcHJpdmF0ZSBr
.
.
.
ZXkhISEhCkNyZWF0ZSB5b3VyIG93biA7KSA7KSA7KQo=
-----END RSA PRIVATE KEY-----
-----BEGIN CERTIFICATE-----
MIIHyTCCBbGgAwIBAgIBATANBgkqhkiG9w0BAQUFADB9MQswCQYDVQQGEwJJTDEW
.
.
.
xV/stleh
-----END CERTIFICATE-----
For Tigase server as well as many other servers (Apache 2.x), the order is following; your domain certificate, your private key, authority issuing your certificate, root certificate.
Note! Tigase requires full certificate chain in PEM file (described above)! Different applications may require pem file with certificates and private key in different order. So the same file may not be necessarily used by other services like Web server or e-mail server. Currently, Tigase can automatically sort certificates in PEM file while loading it.
Installing/Loading Certificate To the Tigase Server
From version 3.1.0-b802 of Tigase server, installing and loading certificates is very easy. The server can load all certificates directly from pem files. You just need to create a separate pem file for each of your virtual domains and put the file in a directory accessible by the server. Tigase server can automatically load all pem files found in given directory. By default, and to make things easy, we recommend the Tigase/certs directory.
Certificate From Other Providers
There is number of certificate providers offering certificates either for free or for money. You can use any of them, however you have to be aware that sometimes certificates might not be recognized by all XMPP servers, especially if it’s one from a new provider. Here is an example list of providers:
-
CAcert - free certificates with an excellent Web GUI for managing generated certificates and identities.
-
StartCom - both free and paid certificates, class 1, 2 and 3. Very good GUI for managing certificates and identities.
-
Verisign - very expensive certificates comparing to above provides but the provider is recognized by everybody. If you have a certificate from Verisign you can be sure it is identified as a valid certificate.
-
Comodo Certificate Authority offers different kind of commercial certificates
To obtain certificate from a third party authority you have to go to its website and request the certificate using certificate request generated above. I cannot provide any instructions for this as each of the providers listed have different requirements and interfaces.
Using one certificate for multiple domains
By default, each virtual hosts will require it’s own certificate. However, if you choose to use one certificate for all virtual hosts, Tigase supports that option. For example, if you have host1.example.net, host2.example.net, and host3.example.net each vhost will need some configuration:
basic-conf/virtual-hosts-cert-host1.example.net=/home/tigase/certs/host1.pem
basic-conf/virtual-hosts-cert-host2.example.net=/home/tigase/certs/host2.pem
basic-conf/virtual-hosts-cert-host3.example.net=/home/tigase/certs/host3.pem
This may be time consuming if you have many Vhosts, or expect to generate many more. The good news is, now one certificate can be used for ALL Vhosts using the following configuration line:
basic-conf/virt-hosts-cert-*.example.net=/home/tigase/certs/certificate.pemNow any Vhosts created will use the same certificate located at /home/tigase/certs/certificate.pem. NOTE: This is an all or nothing option, if you wish to customize each Vhost, you will need to do so individually.
Tigase Server Configuration for 5.1.0 and older
Starting from version 5.1.0 and newer it’s not needed to use external libraries nor extra configuration in the init.properties file. With this version Tigase uses, loaded by default thus no need to configure it, following class:
--ssl-container-class=tigase.io.SSLContextContainerOlder versions require different configurations. In order to be able to load server certificates directly from pem files you need to have tigase-extras package installed in your server libs/ directory in version at least 0.1.0. If you use a Tigase server binary package other than mini, this library is included by default. If you haven’t changed anything in your XML configuration file, put following line in your initial.properties file:
--ssl-container-class=tigase.extras.io.PEMSSLContextContainerCopy all your pem files with certificates into certs/ subdirectory in Tigase server installation, stop the server, remove XML configuration file and start the server. XML configuration will be automatically regenerated with the new SSLContainer used by all components and all certificates will be automatically loaded.
If you have changed your XML configuration file, and do not want to lose those changes, you will now have to manually change the existing SSLContainer class with the new one. Just replace all occurrences of the default SSLContainer - tigase.io.SSLContextContainer with the new - tigase.extras.io.PEMSSLContextContainer, copy all your pem files with certificates into certs/ subdirectory in Tigase server installation and restart the server.
6.2.2. Installing LetsEncrypt Certificates in Your Linux System
LetsEncrypt is a trusted CA that provides free security certificates. Unlike previously self-signed certificates, we can use LetsEncrypt Certificates to certify your domains from a trusted source. To do this, remote into the server hosting Tigase, or login to the computer locally and begin to install git if that is not already on the system.
sudo apt-get install gitOnce the machine installs git, use the following command to download the LetsEncrypt Tools.
sudo git clone https://github.com/letsencrypt/letsencrypt /opt/letsencryptThis will download the tools into the computers' /opt/letsencrypt directory. You will now need to generate the certificates using this tool using the next command.
sudo -H ./letsencrypt-auto certonly --standalone -d domain.comwhere domain.com is your currently hosted domain. Be sure that port 443 is forwarded to this computer, and that proper A and DNS records are registered for your domain.
|
Note
|
Letsencrypt does not allow for wildcards in the domain name, you will need to generate certificates for each subdomain you wish certified by the CA. |
Those certificates will be created and will be stored in /etc/letsencrypt/live/$domain and you will need admin privladges to see them.
sudo -i
**********
cd /etc/letsencrypt/live/$domain

ls

cert.pem chain.pem fullchain.pem privkey.pem
In that directory, you will find four certificates: - cert.pem - chain.pem - fullchain.pem - privkey.pem
For Tigase, we are only concerned with privkey.pem contents. Copy that certificate to another directory.
cp privkey.pem /home/userAt this point we will need to obtain the root and intermediate certificates, this can be done by downloading these certificates from the LetsEncrypt website.
Alternatively, you may obtain them using wget:
wget https://letsencrypt.org/certs/isrgrootx1.pem
wget https://letsencrypt.org/certs/letsencryptauthorityx3.pem
These are the root certificate, and the intermediate certificate signed by root certificate. NOTE: IdenTrust cross-signed certificate will not function properly.
Take the contents of your privkey.pem, and combine them with the contents of isrgrootx1.pem and letsencryptauthorityx3.pem into a single pem certificate. You may wish to name the file after your domain such as mydomain.com.pem. Your certificate should look something like this:
-----BEGIN PRIVATE KEY-----
MIIEvgIBADANBgkqhkiG9w0BAQEFAASCBKgwggSkAgEAAoIBAQDAUAqqKu7Z4odo
...
og89F9AbWr1mNmyRoScyqMXo
-----END PRIVATE KEY-----
-----BEGIN CERTIFICATE-----
cmNoIEdyb3VwMRUwEwYDVQQDEwxJU1JHIFJvb3QgWDEwHhcNMTUwNjA0MTEwNDM4
...
TzELMAkGA1UEBhMCVVMxKTAnBgNVBAoTIEludGVybmV0IFNlY3VyaXR5IFJlc2Vh
-----END CERTIFICATE-----
-----BEGIN CERTIFICATE-----
FhpodHRwOi8vY3BzLmxldHNlbmNyeXB0Lm9yZzCBqwYIKwYBBQUHAgIwgZ4MgZtU
...
bmcgUGFydGllcyBhbmQgb25seSBpbiBhY2NvcmRhbmNlIHdpdGggdGhlIENlcnRp
-----END CERTIFICATE-----
Place that certificate into your /certs folder of Tigase, and installation of this certificate is done.
You will need to do this for all subdomains you wish to have a certificate for, however, you may be able to import the root and intermediate certificates to your keystore to avoid having to paste the chain certificates for each subdomain.
|
Warning
|
LetsEncrypt certificates expire 90 days from issue and need to be renewed in order for them to remain valid! |
Including letsencrypt cert.pem
For some installations, you may need to also include the cert.pem contents into your certificate chain to avoid handshake errors. You will then have 4 certificates in your domain.com.pem file. Be sure the order is as follows: cert.pem, privkey.pem, isgrootx1.pem, then letsencryptauthorityx3.pem
If you moved all certs to a single directry, you may combine them using the following command in a *nix operating system.
cat ./cert.pem ./privkey.pem ./letsencryptauthorityx3.pem ./isrgrootx1.pem > mydomain.com.pem6.3. Custom Authentication Connectors
This article presents configuration options available to the administrator and describe how to set Tigase server up to use user accounts data from a different database.
The first thing to know is that Tigase server always opens 2 separate connections to the database. One connection is used for user login data and the other is for all other user data like the user roster, vCard, private data storage, privacy lists and so on…
In this article we still assume that Tigase server keeps user data in it’s own database and only login data is retrieved from the external database.
At the moment Tigase offers following authentication connectors:
-
'mysql', 'pgsql', 'derby' - standard authentication connector used to load user login data from the main user database used by the Tigase server. In fact the same physical implementation is used for all JDBC databases.
-
'drupal' - is the authentication connector used to integrate the Tigase server with Drupal CMS.
-
'libresource' - is the authentication connector used to integrate the Tigase server with Libresource Collaboration platform.
-
'tigase-auth' - is the authentication connector which can be used with any database. It executes stored procedures to perform all actions. Therefore it is a very convenient way to integrate the server with an external database if you don’t want to expose the database structure. You just have to provide a set of stored procedures in the database. While implementing all stored procedures expected by the server might be a bit of work it allows you to hide the database structure and change the SP implementation at any time. You can add more actions on user login/logout without restarting or touching the server. And the configuration on the server side is very simple. For detailed description of this implementation please refer to Tigase Auth documentation.
-
'tigase-custom' - is the authentication connector which can be used with any database. Unlike the 'tigase-auth' connector it allows you to define SQL queries in the configuration file. The advantage of this implementation is that you don’t have to touch your database. You can use either simple plain SQL queries or stored procedures. The configuration is more difficult as you have to enter carefully all SQL queries in the config file and changing the query usually involves restarting the server. For more details about this implementation and all configuration parameters please refer to Tigase Custom Auth documentation.
As always the simplest way to configure the server is through the init.properties file. In the article describing this file you can find long list with all available options and all details how to handle it. For the authentication connector setup however we only need 2 options:
-
'--auth-db = connector'
-
'--auth-db-uri = database connection url'
If you happen to keep the user data in the same database as user authentication data you can even skip the second parameter as Tigase automatically assumes settings from the '--user-db-uri' it '--auth-db-uri' is missing.
'--auth-db-uri' stored a standard JDBC connection URL and is exactly the same as for all other settings. For example if you store authentication data in a 'drupal' database on 'localhost' the URL might look like:
--auth-db-uri = jdbc:mysql://localhost/drupal?user=user&password=passwd'--auth-db' stored just a connector name or connector implementation class. For convenience Tigase has predefined short names for the most common connectors but you can always use the class name if you know it. You have to use a class name if you want to attach your own authentication connector. The following 2 settings are equal:
--auth-db = tigase-auth--auth-db = tigase.db.jdbc.TigaseAuthIn the same exact way you can setup connector for any different database type:
--auth-db = drupal--auth-db = tigase-customYou can normally skip configuring connectors for the default Tigase database format: 'mysql', 'pgsql' and 'derby' as they are applied automatically if the parameter is missing.
One more important thing to know is that you will have to modify '--user-db-uri' if you use a custom authentication connector. This is because if you retrieve user login data from the external database this external database is usually managed by an external system. User accounts are added without notifying Tigase server. Then, when the user logs in and tries to retrieve the user roster, the server can not find such a user in the roster database.
To keep user accounts in sync between the authentication database and the main user database you have to add following option to the end of the database connection URL: 'autoCreateUser=true'.
For example:
--user-db-uri=jdbc:mysql://localhost/tigasedb?user=nobody&password=pass&autoCreateUser=trueIf you are interested in even further customizing your authentication connector by writing your own queries or stored procedures, please have a look at 2 following guides:
6.3.1. Tigase Auth Connector
The Tigase Auth connector with shortcut name: tigase-auth is implemented in the class: tigase.db.jdbc.TigaseAuth. It allows you to connect to any external database to perform user authentication. You can find more details how to setup a custom connector in the Custom Authentication Connectors guide.
To make this connector working you have to prepare your database to offer set of stored procedures for Tigase server to perform all the authentication actions. The best description is the example schema with all the stored procedures defined. Please refer to the Tigase SVN repository for the schema definition files.
Files with the stored procedures implementations are located in postgresql-schema-4.sql file for PostgreSQL database.
The absolute minimum of stored procedures you have to implement is:
-
TigUserLoginPlainPw - to perform user authentication. The procedure is always called when the user tries to login to the XMPP server. This is the only procedure which must be implemented and actually must work.
-
TigUserLogout - to perform user logout. The procedure is always called when the user logouts or disconnects from the server. This procedure must be implemented but it can be empty and can do nothing. It just needs to exist because Tigase expect it to exist and attempts to call it.
With these 2 above stored procedures you can only perform user login/logouts on the external database. You can’t register a user account, change user password or remove the user. In many cases this is fine as all the user management is handled by the external system.
If you however want to allow for account management via XMPP you have to implement also following procedures:
-
TigAddUserPlainPw - to add a new user account
-
TigRemoveUser - to remove existing user account
-
TigUpdatePasswordPlainPw - to change a user password for existing account
6.3.2. Tigase Custom Auth Connector
The Tigase Custom Auth connector with shortcut name: tigase-custom is implemented in the class: tigase.db.jdbc.TigaseCustomAuth. It allows you to connect to any external database to perform user authentication and use a custom queries for all actions.
You can find more details how to setup a custom connector in the Custom Authentication Connectors guide.
The basic configuration is very simple:
--auth-db = tigase-custom
--auth-db-uri = jdbc:mysql://localhost/drupal?user=user&password=passwd
That’s it.
The connector loads correctly and starts working using predefined, default list of queries. In most cases you also might want to define your own queries in the configuration file. The shortest possible description is the following example of the content from the init.properties file:
# This query is used to check connection to the database, whether it is still alive or not
basic-conf/auth-repo-params/conn-valid-query=select 1

# This is database initialization query, normally we do not use it, especially in
# clustered environment
basic-conf/auth-repo-params/init-db-query=update tig_users set online_status = 0

# Below query performs user authentication on the database level.
# The Tigase server does not need to know authentication algorithm or password
# encoding type, it simply passes user id (BareJID) and password in form
# which was received from the client, to the stored procedure. If the
# authentication was successful the procedure returns user bare JID or null otherwise.
# The Tigase checks whether the JID returned from the query matches
# JID passed as a parameter. If they match, the authentication is successful.
basic-conf/auth-repo-params/user-login-query={ call TigUserLoginPlainPw(?, ?) }

# Below query returns number of user accounts in the database, this is mainly used
# for the server metrics and monitoring components.
basic-conf/auth-repo-params/users-count-query={ call TigAllUsersCount() }

# Below query is used to add a new user account to the database
basic-conf/auth-repo-params/add-user-query={ call TigAddUserPlainPw(?, ?) }

# Below query is used to remove existing account with all user's data from the database
basic-conf/auth-repo-params/del-user-query={ call TigRemoveUser(?) }

# This query is used for the user authentication if "user-login-query" is not defined,
# that is if there is no database level user authentication algorithm available. In such
# a case the Tigase server loads user's password from the database and compares it
# with data received from the client.
basic-conf/auth-repo-params/get-password-query=select user_pw from tig_users where user_id = ?

# Below query is used for user password update in case user decides to change his password
basic-conf/auth-repo-params/update-password-query=update tig_users set user_pw = ? where user_id = ?

# Below query is called on user logout event. Usually we use a stored procedure which
# records user logout time and marks user as offline in the database
basic-conf/auth-repo-params/user-logout-query=update tig_users, set online_status = online_status - 1 where user_id = ?

# This is configuration setting to specify what non-sasl authentication mechanisms
# expose to the client
basic-conf/auth-repo-params/non-sasl-mechs=password,digest

# This is configuration setting to specify what sasl authentication mechanisms expose to the client
basic-conf/auth-repo-params/sasl-mechs=PLAIN,DIGEST-MD5
Queries are defined in the configuration file and they can be either plain SQL queries or stored procedures. If the query starts with characters: '\{ call' then the server assumes this is a stored procedure call, otherwise it is executed as a plain SQL query. Each configuration value is stripped from white characters on both ends before processing.
Please don’t use semicolon ';' at the end of the query as many JDBC drivers get confused and the query may not work.
Some queries can take arguments. Arguments are marked by question marks '?' in the query. Refer to the configuration parameters description for more details about what parameters are expected in each query.
The first example shows how to put a stored procedure as a query with 2 required parameters.
add-user-query={ call TigAddUserPlainPw(?, ?) }The same query with plain SQL parameters instead:
add-user-query=insert into users (user_id, password) values (?, ?)The order of the query arguments is important and must be exactly as described in specification for each parameter.
-
'conn-valid-query' - Query executing periodically to ensure active connection with the database.
Takes no arguments.
Example query: 'select 1'
-
'init-db-query' - Database initialization query which is run after the server is started.
Takes no arguments.
Example query: 'update tig_users set online_status = 0'
-
'add-user-query' - Query adding a new user to the database.
Takes 2 arguments: (user_id (JID), password)
Example query: 'insert into tig_users (user_id, user_pw) values (?, ?)'
-
'del-user-query' - Removes a user from the database.
Takes 1 argument: (user_id (JID))
Example query: 'delete from tig_users where user_id = ?'
-
'get-password-query' - Retrieves user password from the database for given user_id (JID).
Takes 1 argument: (user_id (JID))
Example query: 'select user_pw from tig_users where user_id = ?'
-
'update-password-query' - Updates (changes) password for a given user_id (JID).
Takes 2 arguments: (password, user_id (JID))
Example query: 'update tig_users set user_pw = ? where user_id = ?'
-
'user-login-query' - Performs user login. Normally used when there is a special SP used for this purpose. This is an alternative way to a method requiring retrieving user password. Therefore at least one of those queries must be defined: user-login-query or get-password-query.
If both queries are defined then user-login-query is used. Normally this method should be only used with plain text password authentication or sasl-plain.
Tigase expects a result set with user_id to be returned from the query if login is successful and empty results set if the login is unsuccessful.
Takes 2 arguments: (user_id (JID), password)
Example query: 'select user_id from tig_users where (user_id = ?) AND (user_pw = ?)'
-
'user-logout-query' - This query is called when user logs out or disconnects. It can record that event in the database.
Takes 1 argument: (user_id (JID))
Example query: 'update tig_users, set online_status = online_status - 1 where user_id = ?'
-
'non-sasl-mechs' - Comma separated list of NON-SASL authentication mechanisms. Possible mechanisms are: password and digest. The digest mechanism can work only with get-password-query active and only when password are stored in plain text format in the database.
-
'sasl-mechs' - Comma separated list of SASL authentication mechanisms. Possible mechanisms are all mechanisms supported by Java implementation. The most common are: PLAIN, DIGEST-MD5, CRAM-MD5.
"Non-PLAIN" mechanisms will work only with the get-password-query active and only when passwords are stored in plain text format in the database. Application: Tigase Server
6.3.3. Drupal Authentication
Currently, we can only check authentication against a Drupal database at the moment. Full Drupal authentication is not implemented as of yet.
As Drupal keeps encrypted passwords in database the only possible authorization protocols are those based on PLAIN passwords.
To protect your passwords Tigase server must be used with SSL or TLS encryption.
Implementation of a Drupal database based authorization is located in tigase.db.jdbc.DrupalAuth class. Although this class is capable of adding new users to the repository I recommend to switch in-band registration off due to the caching problems in Drupal. Changes in database are not synchronized with Drupal yet. Functionality for adding new users is implemented only to ease user accounts migration from different repository types from earlier Tigase server installations.
The purpose of that implementation was to allow all accounts administration tasks from Drupal like: account creation, all accounts settings, like e-mail, full name, password changes and so on.
Tigase server uses following fields from Drupal database: name (user account name), pass (user account password), status (status of the account). Server picks up all changes instantly. If user status is not 1 then server won’t allow user to login trough XMPP even if user provides valid password.
There is no Roster management in Drupal yet. So Roster management have to be done from the XMPP client.
6.3.4. LDAP Authentication Connector
From version 5.1.0, rev. (build) 2881 Tigase XMPP Server offers support for authenticating users against an LDAP server in Bind Authentication mode.
Configuration for the LDAP support is really simple you just have to add a few lines to your init.properties file.
# LDAP Authentication connector
--auth-db = tigase.db.ldap.LdapAuthProvider
# LDAP connection URI
--auth-db-uri=ldap://ldap.tigase.com:389
# LDAP access parameters
basic-conf/auth-repo-params/user-dn-pattern=cn=USER_ID,ou=people,dc=tigase,dc=org
Please note the USER_ID element, this is a special element of the configuration which is used to authenticate particular user. Tigase LDAP connector replaces it with appropriate data during authentication. You can control what Tigase should put into this part. In your configuration you must replace this string with one of the following:
-
%1$s - use user name only for authentication (JabberID’s localpart)
-
%2$s - use domain name only for authentication (JabberID’s domain part)
-
%3$s - use the whole Jabber ID (JID) for authentication
6.3.5. Configuration of SASL EXTERNAL
In order to enable SASL External add following line to the init.properties file
c2s/clientCertCA=/path/to/cacert.pemFile cacert.pem contains Certificate Authority certificate which is used to sign clients certificate.
Client certificate must include user’s Jabber ID as XmppAddr in subjectAltName:
As specified in RFC 3920 and updated in RFC 6120, during the stream negotiation process an XMPP client can present a certificate (a “client certificate”). If a JabberID is included in a client certificate, it is encapsulated as an id-on-xmppAddr Object Identifier (“xmppAddr”), i.e., a subjectAltName entry of type otherName with an ASN.1 Object Identifier of “id-on-xmppAddr” as specified in Section 13.7.1.4 of RFC 6120.[1]
It is possible to make client certificate required:
c2s/clientCertRequired[B]=trueIf this option will be enabled, then client must provide certificate. This certificate will be verified against c2s/clientCertCA. If client does not provide certificate or certificate will be invalid, TLS handshake will be interrupted and client will be disconnected.
Using this options does not force client to use SASL EXTERNAL. Client still may authenticate with other SASL mechanisms.
6.4. Packet Filtering
Tigase offers different ways to filter XMPP packets flying through the server. The most common use for packet filtering is to restrict users from sending or receiving packets based on the sender or received address.
There are also different possible scenarios: time based filtering, content filtering, volume filtering and so on.
All pages in this section describe different filtering strategies.
6.4.1. Domain Based Packet Filtering
Domain based packet filtering is a simple filter allowing to restrict user communication based on the source/destination domain name. This is especially useful if we want to limit user communication within a single - own domain only or a list of domains.
A company might not wish to allow employers to chat during work hours with anybody in the world. A company may also have a few different domains used by different branches or departments. An administrator may restrict communication to a list of domains.
Introduction
The restriction is on a per-user basis. So the administrator can set a different filtering rules for each user. There is also a per-domain configuration and global-installation setting (applied from most general to most specific, i.e. from installation to user).
Regular users can not change the settings. So this is not like a privacy list where the user control the filter. Domain filter can not be changed or controlled by the user. The system administrator can change the settings based on the company policy.
There are predefined rules for packet filtering:
-
ALL- user can send and receive packets from anybody. -
LOCAL- user can send and receive packets within the server installation only and all it’s virtual domains. -
OWN- user can send and receive packets within his own domains only -
BLOCK- user can’t communicate with anyone. This could be used as a means to temporarily disable account or domain. -
LIST- user can send and receive packets within listed domains only (i.e. whitelist). -
BLACKLIST- user can communicate with everybody (likeALL), except contacts on listed domains. -
CUSTOM- user can communicate only within custom created rules set.
Whitelist (LIST) and blacklist (BLACKLIST) settings are mutually exclusive, i.e. at any given point of time only one of them can be used.
Those rules applicable to particular users are stored in the user repository and are loaded for each user session. If there are no rules stored for a particular user server tries to apply rules for a VHost of particular user, and if there is no VHost filtering policy server uses global server configuration. If there is no filtering policy altogether server applies defaults based on following criteria:
-
If this is Anonymous user then LOCAL rule is applied
-
For all other users ALL rule is applied.
Configuration
Filtering is performed by the domain filter plugin which must be loaded at startup time. It is loaded by default if the plugins list is not set in the configuration file. However if you have a list of loaded plugins in the configuration file make sure domain-filter is on the list.
There is no other configuration required for the plugin to work.
Administration, Rules Management
Although controlling domain filtering rules is possible for each user separately, it is not practical for large installations. In most cases users are stored in the database and a third-party system keeps all the user information.
To change the rule for a single user you can use loadable administration scripts feature and load UserDomainFilter.groovy script. It enables modifying rules for a given user JID.
Implementation
If you have a third party system which keeps and manages all user information than you probably have your own UserRepository implementation which allows the Tigase server to access user data. Filtering rules are loaded from user repository using following command:
repo.getData(user_id, null, DomainFilter.ALLOWED_DOMAINS_KEY, null)
repo.getData(user_id, null, DomainFilter.ALLOWED_DOMAINS_LIST_KEY, null)
Where user_id is user Jabber ID without resource part, DomainFilter.ALLOWED_DOMAINS_KEY is a property key: "allowed-domains". The user repository MUST return one of following only:
-
ALL- if the user is allowed to communicate with anybody -
LOCAL- if the user is allowed to communicate with users on the same server installation. -
OWN- if the user is allowed to communicate with users within his own domain only. -
LIST- list of domains within which the user is allowed to communicate with other users. No wild-cards are supported. User’s own domain should be included too. -
BLACKLIST- list of domains within which the user is NOT allowed to communicate with other users. No wild-cards are supported. User’s own domain should NOT be included. -
CUSTOM- list of rules defining custom communication permissions (server processes stanza according to first matched rule, similar to XEP-0016) in the following format:
ruleSet = rule1;rule2;ruleX;

rule = order_number|policy|UID_type[|UID]

order_number = any integer;
policy = (allow|deny);
UID_type = [jid|domain|all];
UID = user JID or domain, for example pubsub@test.com; if UID_type is ALL then this is ignored.
For example:
1|allow|self;
2|allow|jid|admin@test2.com;
3|allow|jid|pubsub@test.com;
4|deny|all;-
null- a java null if there are no settings for the user.
In case of LIST and BLACKLIST filtering options, it’s essential to provide list of domains for the whitelisting/blacklisting. DomainFilter.ALLOWED_DOMAINS_LIST_KEY is a property key: "allowed-domains-list". The user repository MUST return semicolon separated list of domains: domain1.com;domain2.com,domain3.org
The filtering is performed by the tigase.xmpp.impl.DomainFilter plugin. Please refer to source code for more implementation details.
6.5. Access Control Lists in Tigase
Tigase offers support for Access Control List (ACL) to allow for fine grained access to administration commands on the server.
By default, all administration commands are only accessible (visible through service discovery and can be executed) by the service administrators. Service administrators are existing accounts with JIDs (BareJIDs) listed in the init.properties file under --admins.
Additionally, other XMPP users and entities can be assigned permissions to execute a command or commands using Tigase’s ACL capabilities.
The following is a list of possible ACL modifiers for administrator command accessibility:
-
ALL - Everybody can execute the command, even users from different federated servers.
-
ADMIN - Local server administrators can execute the command, this is a default setting if no ACL is set for a command.
-
LOCAL - All users with accounts on the local server can execute the command. Users from other, federated servers will not be able to execute the command.
-
DOMAIN - Only users with accounts on the selected domain will be able to execute the command. It may be useful to setup a domain specifically for admin accounts, and automatically all users within that domain would be able to run the command.
-
JID - Comma separated list of JIDs of users who can execute the command.
In any case, regardless of ACL settings, any command can be executed and accessed by the designated service wide administrators, that is accounts listed as admins in the init.properties file.
Multiple ACL modifiers can be combined and applied for any command. This may not always makes sense. For example ALL supersedes all other settings, so it does not make sense to combine it with any other modifier. However, most others can be combined with JID to broaden access to specific accounts.
On Tigase server the Access Control List is checked for the first matching modifier. Therefore if you combine ALL with any other modifier, anybody from a local or remote service will always be able to execute the command, no matter what other modifiers are added.
Please note, the ACL lists work on the command framework level. Access is verified before the command is actually executed. There might be additional access restrictions within a command itself. In many cases, even if all local users are permitted to execute a command (LOCAL modifier), some commands allow only to be executed by a domain owner or a domain administrator (and of course by the service-wide administrators as well). All the commands related to a user management such as adding a new user, removing a user, password changes, etc… belong to this category. When conducting domain (vhost) management, creation/registration of a new domain can be done by any local user (if LOCAL ACL modifier is set) but then all subsequent domain management tasks such as removing the vhost, updating its configuration, setting SSL certificate can be done by the domain owner or administrator only.
The ACL list is set for a specific Tigase component and a specific command. Therefore the configuration property must specify all the details. So the general format for configuring ACL for a command is this:
comp-id/command/command-id=ACL_modifier,ACL_modifier,ACL_modifier
The breakdown is as such:
-
comp-id is the Tigase server component ID such as: sess-man, vhost-man, c2s, etc..
-
command is a static text which indicates that the property is for component’s command settings.
-
command-id is a command ID for which we set the ACL such as query-dns, http://jabber.org/protocol/admin#add-user, user-roster-management, etc…
Here are a few examples:
Allowing local users to create and manage their own domains
vhost-man/command/comp-repo-item-add=LOCAL
vhost-man/command/comp-repo-item-remove=LOCAL
vhost-man/command/comp-repo-item-update=LOCAL
vhost-man/command/ssl-certificate-add=LOCAL
In fact all the commands except item-add can be executed by the domain owner or administrator.
Allowing local users to execute user management commands:
sess-man/command/http\://jabber.org/protocol/admin#add-user=LOCAL
sess-man/command/http\://jabber.org/protocol/admin#change-user-password=LOCAL
sess-man/command/http\://jabber.org/protocol/admin#delete-user=LOCAL
sess-man/command/http\://jabber.org/protocol/admin#get-online-users-list=LOCAL
sess-man/command/http\://jabber.org/protocol/admin#get-registered-user-list=LOCAL
sess-man/command/http\://jabber.org/protocol/admin#user-stats=LOCAL
sess-man/command/http\://jabber.org/protocol/admin#get-online-users-list=LOCAL
As in the previous example, the commands will by executed only by local users who are the specific domain administrators.
Allowing users from a specific domain to execute query-dns command and some other users for given JIDs from other domains:
vhost-man/command/query-dns=DOMAIN:tigase.com,admin@tigase.org,frank@example.com
To be able to set a correct ACL property you need to know component names and command IDs. Component IDs can be found in the service discovery information on running server or in the server logs during startup. A command ID can be found in the command script source code. Each script contains a list of metadata at the very beginning of it’s code. One of them is AS:CommandId which is what you have to use for the ACL setting.
7. Database Management
Tigase is coded to perform with multiple database types and numbers. Owing to it’s versatile nature, there are some tools and procedures that may be of use to certain administrators.
7.1. Recommended database versions
As of v7.1.0 here are the minimum and recommended versions of databases for use with Tigase:
| Database | Recommended Version | Minimum Version | Additional Information |
|---|---|---|---|
DerbyDB |
10.12.1.1 |
10.12.1.1 |
Included with Tigase XMPP Server |
MySQL |
5.6 |
5.5 |
|
SQLServer |
2012 |
2008 R2 |
|
MongoDB |
2.6 |
2.6 |
Driver not working with mongoDB 3.0 or newer. |
Although Tigase may support other versions of databases, these are the ones we are most familiar with in offering support and advice. Use of databases outside these guidelines may result in unforeseen errors.
7.2. Database Preparation
Tigase uses generally the same database schema and the same set of stored procedures and functions on every database. However, the schema creation scripts and code for stored procedures is different for each database. Therefore the manual process to prepare database is different for each database system.
Of course the simplest and easiest way to prepare database is to use Tigase installer or webinstaller which automates the whole process. Sometimes this is not possible. A second option is to use the DBSchemaLoader utility in Tigase. If either of those won’t work, or won’t suit your needs, provided are set of guides describing initialization and preparation process for each supported database.
-The DBSchemaLoader Utility - Prepare the MySQL Database for the Tigase Server - Hashed User Passwords in Database - Prepare the Derby Database for the Tigase Server - Prepare the MS SQL Server Database for the Tigase Server - Prepare the PostgreSQL Database for the Tigase Server
7.2.1. dbSchemaLoader Utility
Included with Tigase is the dbSchemaLoader Utility, which can be used to apply schema files to databases. It is able to operate with Derby, MySQL, SQLServer, and PostgreSQL databases. In order to use this utility with any of the databases, you will need to first have the database environment up and running, and have established user credentials. You may use root or an account with administrator write privileges.
|
Important
|
All commands in this guide are required to be running from the Tigase installation directory. |
Operation & Variables
First, lets cover the DBSchemaLoader operation and variables:
Operation The utility is run using the java -cp command from the Tigase installation directory. Be sure that you have JDK v1.8 or later installed. Linux
java -cp "jars/*" tigase.util.DBSchemaLoaderor from a Windows environment
java -cp jars/* tigase.util.DBSchemaLoader
These commands will be followed by a combination of the following variables
Variables
- Use the following options to customize. Options in bold are required, {potential options are in brackets}.
-
-
-dbType database_type {derby, mysql, postgresql, sqlserver}
-
-schemaVersion schema version {4, 5, 5-1}
-
-dbName database name
-
-dbHostname database hostname (default is localhost)
-
-dbUser tigase username
-
-dbPass tigase user password
-
-rootUser database root username
-
-rootPass database root password
-
-file path to sql schema file {database/derby-schema-7-1.sql}
-
-query sql query to execute
-
-logLevel java logger Level
-
-adminJID comma separated list of admin JIDs
-
-adminJIDpass password (one for all entered JIDs)
-
With that out of the way, lets look at some examples. Lets say you have a new mysql database server with root user root and password rood (to keep things simple, we do not recommend this). The MySQL database is hosted locally, your command would be as follows:
java -cp "jars/*" tigase.util.DBSchemaLoader -dbType mysql -dbName tigasedb -rootUser root -rootPass root -schemaVersion -adminJID admin@example.com -adminJIDpass password 7.1 -file database/mysql-schema-7-1.sqlThis will create the tigasedb database, add an Admin user as admin@example.com with password 'password', and apply the v7.1 schema files. Output will look like this:
LogLevel: CONFIG

tigase.util.DBSchemaLoader              <init>                   CONFIG     Properties: [{dbHostname=localhost, logLevel=CONFIG, adminJID=admin@example.com, dbType=mysql, file=database/mysql-schema-7-1.sql, rootUser=root, adminJIDpass=password, dbPass=tigase_pass, dbName=tigasedb, schemaVersion=7.1, rootPass=root, dbUser=tigase_user}]

tigase.util.DBSchemaLoader              validateDBConnection          INFO       Validating DBConnection, URI: jdbc:mysql://localhost/?user=root&password=root

tigase.util.DBSchemaLoader              validateDBConnection          CONFIG     DriverManager (available drivers): [[org.apache.derby.jdbc.AutoloadedDriver@10f87f48, org.postgresql.Driver@1b2c6ec2, com.mysql.jdbc.Driver@50040f0c, jTDS 1.3.1]]

tigase.util.DBSchemaLoader              validateDBConnection          INFO       Connection OK
tigase.util.DBSchemaLoader              validateDBExists          INFO       Validating whether DB Exists, URI: jdbc:mysql://localhost/tigasedb?user=tigase_user&password=tigase_pass

tigase.util.DBSchemaLoader              validateDBExists          INFO       Doesn't exist, creating...

tigase.util.DBSchemaLoader              validateDBExists          INFO        OK

tigase.util.DBSchemaLoader              loadSchemaFile           INFO       Loading schema from file: database/mysql-schema-7-1.sql, URI: jdbc:mysql://localhost/tigasedb?user=root&password=root
tigase.util.DBSchemaLoader              loadSchemaFile           INFO        completed OK

tigase.util.DBSchemaLoader              printInfo                INFO

Database init.properties configuration:

--user-db=mysql
--user-db-uri=jdbc:mysql://localhost/tigasedb user=tigase_user&password=tigase_pass&useUnicode=true&characterEncoding=UTF-8|
Tip
|
The utility will automatically generate the lines you need to add to your init.properties file to use this database! |
At this time, it is suggested to load the PubSub schema since you will have to change very little of the command:
java -cp "jars/*" tigase.util.DBSchemaLoader -dbType mysql -dbName tigasedb -rootUser root -rootPass root -file database/mysql-pubsub-schema-3.2.0.sqlShould you wish to use the Socks5 Proxy component, you will need to load that schema as well
java -cp "jars/*" tigase.util.DBSchemaLoader -dbType mysql -dbName tigasedb -rootUser root -rootPass root -file database/mysql-socks5-schema.sqlAt this time you’re finished setting up a database for use with Tigase! For other databases that are supported, the operations will be very similar with only the -dbType and perhaps the -dbHostname being different.
-Query function
Should you decide to customize your own functions, or have specific information you want to put into the database, you can use the -query function to perform a single query step.
java -cp "jars/*" tigase.util.DBSchemaLoader -dpType mysql -dbName tigasedb -rootUser root -rootPass root -query "CREATE TABLE tigasedb.EXTRA_TABLE (id INT(6) UNSIGNED AUTO_INCREMENT PRIMARY KEY, name VARCHAR(10) NOT NULL)"Of course this would break the schema for tigasedb by adding an unexpected table, you will receive the following message:
tigase.util.DBSchemaLoader printInfo WARNING Database schema is invalid
A note about MySQL
If you are using these commands, you may result in the following error:
tigase.util.DBSchemaLoader validateDBConnection WARNING Table 'performance_schema.session_variables' does not existIf this occurs, you will need to upgrade your version of MySQL using the following command:
mysql_upgrade -u root -p --forceAfter entering the password and upgrading MySQL the schema error should no longer show when working with Tigase databases.
But this is a demonstration how you may run a query through the database without the need to use another tool. Note that you will need to select the specific database for each query.
7.2.2. Prepare the MySQL Database for the Tigase Server
This guide describes how to prepare MySQL database for connecting Tigase server.
Basic Setup
The MySQL database can be prepared in many ways. Most Linux distributions contain tools which allow you to go through all steps from the shell command line. To make sure it works on all platforms in the same way, we will first show how to do it under MySQL command line client.
Configuring from MySQL command line tool
Run the MySQL command line client in either Linux or MS Windows environment and enter following instructions:
-
Create the database for the Tigase server:
mysql> create database tigasedb; -
Add the tigase_user user and grant him access to the tigasedb database. Depending on how you plan to connect to the database (locally or over the network) use one of following commands or all if you are not sure:
Grant access to tigase_user connecting from any network address.
mysql> GRANT ALL ON tigasedb.* TO tigase_user@'%'
            IDENTIFIED BY 'tigase_passwd';
Grant access to tigase_user connecting from localhost.
mysql> GRANT ALL ON tigasedb.* TO tigase_user@'localhost'
            IDENTIFIED BY 'tigase_passwd';
Grant access to tigase_user connecting from local machine only.
mysql> GRANT ALL ON tigasedb.* TO tigase_user
            IDENTIFIED BY 'tigase_passwd';
For the Tigase server version 4.x additional permissions must be granted for the database user:
mysql> GRANT SELECT, INSERT, UPDATE ON mysql.proc TO 'tigase_user'@'localhost';
mysql> GRANT SELECT, INSERT, UPDATE ON mysql.proc TO 'tigase_user'@'%';
mysql> GRANT SELECT, INSERT, UPDATE ON mysql.proc TO 'tigase_user';
And now you can update user permission changes in the database:
mysql> FLUSH PRIVILEGES; -
Load the proper mysql schema into the database. Full installations of Tigase will have all the SQL file you need to create and update the database. First, switch to the database you have just created:
mysql> use tigasedb;We are assuming you run the mysql client in Linux from the Tigase installation directory.
mysql> source database/mysql-7-1-schema.sql;For the Tigase server version v7.1.0 you have to use proper schema version which is 5.1. You will also need to manually load the PubSub schema as well, current version is v3.2.0. All modern versions will load previous schemas first so no need to do a manual upgrade.
mysql> source database/mysql-pubsub-schema-3.2.0.sql;If you plan to use the Socks5 component, you will also need to add that schema as well.
mysql> source database/mysql-socks5-schema.sql;On Windows you have probably to enter the full path, assuming Tigase is installed in C:\Program Files\Tigase:
mysql> source c:/Program Files/Tigase/database/mysql-7-1-schema.sql;
mysql> source c:/Program Files/Tigase/database/mysql-pubsub-schema-3.2.0.sql;
mysql> source c:/Program Files/Tigase/database/mysql-socks5-schema.sql;
Configuring From the Linux Shell Command Line
Follow steps below to prepare the MySQL database:
-
Create the database space for the Tigase server:
mysqladmin -p create tigasedb
-
Add the tigase_user user and grant access to the tigasedb database. Depending on how you plan to connect to the database (locally or over the network) use one of following commands or all if you are not sure: Grant access to tigase_user connecting from any network address.
echo "GRANT ALL ON tigasedb.* TO tigase_user@'%' \
            IDENTIFIED BY 'tigase_passwd'; \
            FLUSH PRIVILEGES;" | mysql -u root -pdbpass mysql
Grant access to tigase_user connecting from localhost.
echo "GRANT ALL ON tigasedb.* TO tigase_user@'localhost' \
            IDENTIFIED BY 'tigase_passwd'; \
            FLUSH PRIVILEGES;" | mysql -u root -pdbpass mysql
Grant access to tigase_user connecting from local machine only.
echo "GRANT ALL ON tigasedb.* TO tigase_user \
            IDENTIFIED BY 'tigase_passwd'; \
FLUSH PRIVILEGES;" | mysql -u root -pdbpass mysql-
Load the proper mysql schema into the database. Full installations of Tigase will have all the SQL file you need to create and update the database.
mysql -u dbuser -p tigasedb < mysql-schema-7-1.sql
mysql -u dbuser -p tigasedb < mysql-pubsub-schema-3.2.0.sql
If you want to use the socks5 component, then oyu will need to include the following line as well:
mysql -u dbuser -p tigasedb < mysql-socks5-schema.sqlConfiguring MySQL for UTF-8 Support
In my.conf put following lines:
[mysql]
default-character-SET=utf8

[client]
default-character-SET=utf8

[mysqld]
init_connect='SET collation_connection = utf8_general_ci; SET NAMES utf8;'
character-set-server=utf8
default-character-SET=utf8
collation-server=utf8_general_ci
skip-character-set-client-handshake
Then connect to the database from the command line shell check settings:
SHOW VARIABLES LIKE 'character_set_database';
SHOW VARIABLES LIKE 'character_set_client';
If any of these shows something else then 'utf8' then you need to fix it using the command:
ALTER DATABASE tigasedb DEFAULT CHARACTER SET utf8;You can now also test your database installation if it accepts UTF-8 data. The easiest way to ensure this is to just to create an account with UTF-8 characters:
call TigAddUserPlainPw('żółw@some.domain.com', 'żółw');And then check that the account has been created:
SELECT * FROM tig_users WHERE user_id = 'żółw@some.domain.com';If the last command gives you no results it means there is still something wrong with your settings. You might also want to check your shell settings to make sure your command line shell supports UTF-8 characters and passes them correctly to MySQL:
export LANG=en_US.UTF-8
export LOCALE=UTF-8
export LESSCHARSET='utf-8'
It seems that MySQL 5.0.x also needs extra parameters in the connection string: '&useUnicode=true&characterEncoding=UTF-8' while MySQL 5.1.x seems to not need it but it doesn’t hurt to have it for both versions. You have to edit 'etc/init.properties' file and append this to the database connection string.
For MySQL 5.1.x, however, you need to also update code for all database stored procedures and functions used by the Tigase. They are updated for Tigase version 4.4.x and up, however if you use an older version of the Tigase server, you can reload stored procedures using the file from SVN.
Other MySQL Settings Worth Considering
There are a number of other useful options, especially for performance improvements. Please note, you will have to review them as some of them may impact data reliability and are useful for performance or load tests installations only.
# InnoDB seems to be a better choice
# so lets make it a default DB engine
default-storage-engine = innodb
Some the general MySQL settings which mainly affect performance:
key_buffer = 64M
max_allowed_packet = 32M
sort_buffer_size = 64M
net_buffer_length = 64K
read_buffer_size = 16M
read_rnd_buffer_size = 16M
thread_stack = 192K
thread_cache_size = 8
query_cache_limit = 10M
query_cache_size = 64M
InnoDB specific settings:
# Keep data in a separate file for each table
innodb_file_per_table = 1
# Allocate memory for data buffers
innodb_buffer_pool_size = 1000M
innodb_additional_mem_pool_size = 100M
# A location of the MySQL database
innodb_data_home_dir = /home/databases/mysql/
innodb_log_group_home_dir = /home/databases/mysql/
# The main thing here is the 'autoextend' property
# without it your data file may reach maximum size and
# no more records can be added to the table.
innodb_data_file_path = ibdata1:10M:autoextend
innodb_log_file_size = 10M
innodb_log_buffer_size = 32M
# Some other performance affecting settings
innodb_flush_log_at_trx_commit = 2
innodb_lock_wait_timeout = 50
innodb_thread_concurrency = 16
These settings may not be fully optimized for your system, and have been only tested on our systems. If you have found better settings for your systems, feel free to let us know.
7.2.3. Prepare the Derby Database for the Tigase Server
This guide describes how to prepare Derby database for connecting the Tigase server.
Basic Setup
Preparation of Derby database is quite simple, but the following assumptions are made
-
DerbyDB - Derby database name
-
database/ directory contains all necessary schema files
-
jars/ and libs/ directories contains Tigase and Derby binaries
General Approach
From the main Tigase directory execute following commands (Linux and Windows accordingly)
Linux
java -Dij.protocol=jdbc:derby: -Dij.database="DerbyDB;create=true" -cp libs/derby.jar:libs/derbytools.jar:jars/tigase-server.jar org.apache.derby.tools.ij database/derby-schema-7.1.sqlWindows
java -Dij.protocol=jdbc:derby: -Dij.database="DerbyDB;create=true" -cp libs\derby.jar;libs\derbytools.jar;jars\tigase-server.jar org.apache.derby.tools.ij "database\derby-schema-7-1.sql"This will create Derby database named DerbyDB in the main Tigase directory and load Tigase schema for version 7.1.
You will need to repeat this process again to add the PubSub schema into the database.
Linux
java -Dij.protocol=jdbc:derby: -Dij.database="DerbyDB;create=true" -cp libs/derby.jar:libs/derbytools.jar:jars/tigase-server.jar org.apache.derby.tools.ij database/derby-pubsub-schema-3.2.0.sqlWindows
java -Dij.protocol=jdbc:derby: -Dij.database="DerbyDB;create=true" -cp libs\derby.jar;libs\derbytools.jar;jars\tigase-server.jar org.apache.derby.tools.ij "database\derby-pubsub-schema-3.2.0.sql"If you wish to use the Sock5 Proxy Component, you will need to add that schema as well:
Linux
java -Dij.protocol=jdbc:derby: -Dij.database="DerbyDB;create=true" -cp libs/derby.jar:libs/derbytools.jar:jars/tigase-server.jar org.apache.derby.tools.ij database/derby-socks5-schema.sqlWindows
java -Dij.protocol=jdbc:derby: -Dij.database="DerbyDB;create=true" -cp libs\derby.jar;libs\derbytools.jar;jars\tigase-server.jar org.apache.derby.tools.ij "database\derby-socks5-schema.sql"7.2.4. Prepare the MS SQL Server Database for the Tigase Server
This guide describes how to prepare the MS SQL Server database for connecting the Tigase server to it.
Basic Setup
It’s expected that a working installation of Microsoft SQL Server is present. The following guide will describe the necessary configurations required for using MS SQL Server with Tigase XMPP Server.
Preparing MS SQL Server Instance
After installation of MS SQL Server an instance needs to be configure to handle incoming JDBC connections. For that purpose it’s required to open SQL Server Configuration Manager. In the left-hand side panel navigate to SQL Server Configuration Manager, then SQL Server Network Configuration → Protocols for ${INSTANCE_NAME}. After selecting instance in the right-hand side panel select TCP/IP and open Properties, in the Protocol tab in General section select Yes for Enabled property. In the IP Addresses tab select Yes for Active and Enabled properties of all IP Addresses that you want MS SQL Server to handle. Subsequently set the TCP Port property (if missing) to the default value - 1433. A restart of the instance may be required afterwards.
Configuration using MS SQL Server Management Studio
In order to prepare the database you can use either a wizard or execute queries directly in the Query Editor. Firstly you need to establish a connection to the MS SQL Server instance. From Object Explorer select Connect and in the Connect to Server dialog enter administrator credentials.
Using Wizards
-
Create Login
In the left-hand side panel select Security → Logins and from context menu choose New Login, in the Wizard window enter desired Login name, select SQL Server authentication and enter desired password subsequently confirming action with OK
-
Create Database
From the Object Explorer select Databases node and from context menu select New Database; in the Wizard window enter desired Database name and enter previously created Login name into Owner field; subsequently confirming action with OK.
Using Queries
From the Object Explorer root node’s context menu select New Query. In the Query windows execute following statements adjusting details to your liking:
USE [master]
GO

CREATE DATABASE [tigasedb];
GO

CREATE LOGIN [tigase] WITH PASSWORD=N'tigase12', DEFAULT_DATABASE=[tigasedb]
GO

ALTER AUTHORIZATION ON DATABASE::tigasedb TO tigase;
GO
Import Schema
From the File menu Select Open → File (or use Ctrl+O) and then open following files:
-
sqlserver-schema-7-1-schema.sql
-
sqlserver-schema-7-1-sp.sql
-
sqlserver-schema-7-1-props.sql
-
sqlserver-pubsub-schema-3.2.0.sql
Subsequently select created database from the list of Available Databases (Ctrl+U) available on the toolbar and execute each of the opened files in the order listed above.
Configuring from command line tool
Creation of the database and import of schema can be done from command line as well. In order to do that, execute following commands from the directory where Tigase XMPP Server is installed otherwise paths to the schema need to be adjusted accordingly:
sqlcmd -S %servername% -U %root_user% -P %root_pass% -Q "CREATE DATABASE [%database%]"
sqlcmd -S %servername% -U %root_user% -P %root_pass% -Q "CREATE LOGIN [%user%] WITH PASSWORD=N'%password%', DEFAULT_DATABASE=[%database%]"
sqlcmd -S %servername% -U %root_user% -P %root_pass% -d %database% -Q "ALTER AUTHORIZATION ON DATABASE::%database% TO %user%;"
sqlcmd -S %servername% -U %root_user% -P %root_pass% -d %database% -i database\sqlserver-schema-7-1-schema.sql
sqlcmd -S %servername% -U %root_user% -P %root_pass% -d %database% -i database\sqlserver-schema-7-1-sp.sql
sqlcmd -S %servername% -U %root_user% -P %root_pass% -d %database% -i database\sqlserver-schema-7-1-props.sql
sqlcmd -S %servername% -U %root_user% -P %root_pass% -d %database% -i database\sqlserver-pubsub-schema-3.2.0.sql
Above can be automatized with provided script %tigase-server%\scripts\db-create-sqlserver.cmd (note: it needs to be executed from main Tigase XMPP Server directory due to maintain correct paths):
$ scripts\db-create-sqlserver.cmd %database_servername% %database_name% %tigase_username% %tigase_password% %root_username% %root_password%If no parameters are provided then the following defaults are used:
%database_servername%=localhost
%database_name%=tigasedb
%tigase_username%=tigase
%tigase_password%=tigase12
%root_username%=root
%root_password%=root
Tigase configuration - init.properties
Configuration of the MS SQL Server follows general database convention. For MS SQL Support --user-db needs to be set to sqlserver:
--user-db=sqlserverand the --user-db-uri needs to point to the configured database:
--user-db-uri=jdbc:[jtds:]sqlserver://db_hostname:port[;property=val]where any number of additional parameters can (and should) consist of:
-
databaseName - name of the database
-
user - username configured to access database
-
password - password for the above username
-
schema - name of the database schema
-
lastUpdateCount - 'false' value causes all update counts to be returned, including those returned by server triggers
Example:
--user-db-uri=jdbc:sqlserver://hostname:1433;databaseName=tigasedb;user=tigase;password=tigase12;schema=dbo;lastUpdateCount=falseJDBC: jTDS vs MS JDBC driver
Tigase XMPP Server supports two JDBC drivers intended to be used with Microsoft SQL Server - one created and provided by Microsoft itself and the alternative implementation - jTDS. Tigase is shipped with the latter in the distribution packages. Starting with the version 7.1.0 we recommend using jDTS driver that is shipped with Tigase as JDBC driver created by Microsoft can cause problems with some components in cluster installations. MS driver can be downloaded form the website: JDBC Drivers 4.0, 4.1 for SQL Server then unpack the archive. Copy sqljdbc_4.0/enu/sqljdbc4.jar file to ${tigase-server}/jars directory.
Depending on the driver used --user-db-uri needs to be configured accordingly.
-
Microsoft driver:
--user-db-uri=jdbc:sqlserver://... -
jDTS driver
--user-db-uri=jdbc:jdts:sqlserver://...
7.2.5. Prepare the PostgreSQL Database for the Tigase Server
This guide describes how to prepare PostgreSQL database for connecting to Tigase server.
Basic Setup
The PostgreSQL database can be prepared in many ways. Below are presented two possible ways. The following assumptions apply to both methods:
-
admin_db_user - database user with admin rights
-
tigase_user - database user for Tigase
-
tigasedb - database for Tigase
Configuring from PostgreSQL Command Line Tool
Run the PostgreSQL command line client and enter following instructions:
-
Add the tigase_user:
psql=# create role tigase_user with login password 'tigase123'; -
Create the database for the Tigase server with tigase_user as owner of database:
psql=# create database tigasedb owner tigase_user; -
Load database schema to initialize the Tigase server from the file that corresponds to the version of Tigase you want to use. First you need to switch to tigasedb.
psql=# \connect tigasedbBegin by applying the basic Schema
psql=# \i database/postgresql-schema-7-1.sqlContinue by adding the PubSub Schema
psql=# \i database/postgresql-pubsub-schema-3.2.0.sqlAnd finally if you wish to use Socks5 Proxy component, add that schema:
psql=# \i database/postgresql-socks5-schema.sql
Configuring From the Linux Shell Command Line
Follow steps below to prepare the PostgreSQL database:
-
Add the tigase_user:
createuser -U admin_db_user -W -D -R -S -P tigase_userYou will be asked for credentials for admin_db_user and password for new database user.
-
Create the database for the Tigase server with tigase_user as owner of database:
createdb -U admin_db_user -W -O tigase_user tigasedb -
Load database schema to initialize the Tigase server from the file that corresponds to the Tigase version you want to use.
psql -q -U tigase_user -W tigasedb -f database/postgresql-schema-7-1.sql
psql -q -U tigase_user -W tigasedb -f database/postgresql-pubsub-schema-3.2.0.sql
If you want to use the socks5 proxy component, then add the following line:
psql -q -U tigase_user -W tigasedb -f database/postgresql-socks5-schema.sqlThe above commands should be executed from the main Tigase directory. The initialization schema file should be also available locally in database/ directory of your Tigase installation.
7.2.6. Preparing Tigase for MongoDB
Tigase now supports MongoDB for auth, settings, and storage repositories. If you wish to use MongoDB for Tigase, please use this guide to help you.
Dependencies
To run Tigase MongoDB support library requires drivers for MongoDB for Java which can be downloaded from here. This driver needs to be placed in /jars directory located in Tigase XMPP Server installation directory.
Configuration
Configuration of user repository for Tigase XMPP Server
To configure Tigase XMPP Server to use MongoDB you need to set --user-db-uri= in etc/init.properties file to proper MongoDB URI pointing to which MongoDB database should be used (it will be created by MongoDB if it does not exist). --user-db property should not be set to let Tigase XMPP Server autodetect proper implementation of UserRepository. Tigase XMPP Server will create proper collections in MongoDB if they do not exist so no schema files are necessary.
Example configuration of XMPP Server pointing to MongoDB database tigase_test in a local instance:
--user-db-uri=mongodb://localhost/tigase_testIf Tigase Server is not able to detect a proper storage layer implementation, it can be forced to use one provided by Tigase using the following lines in etc/init.properties file:
--user-db=tigase.mongodb.MongoRepository
--auth-db=tigase.mongodb.MongoRepository
Every component should be able to use proper implementation to support MongoDB using this URI. Also MongoDB URI can be passed as any URI in configuration of any component.
Configuration for MUC
By default, MUC component will use MongoDB to store data if Tigase is configured to use it as a default store. However, if you would like to use a different MongoDB database to store MUC message archive, you can do this by adding the following line to etc/init.properties file:
muc/history-db-uri=mongodb://localhost/tigase_testIf MUC components fails to detect and use a proper storage layer for MongoDB, you can force it to use one provided by Tigase by using the following line in the init.properties file:
muc/history-db=tigase.mongodb.muc.MongoHistoryProvider
Configuration for PubSub
By default, PubSub component will use MongoDB to store data if Tigase is configured to use it as a default store. However, if you would like to use a different MongoDB database to store PubSub component data, you can do this by adding the following line to etc/init.properties file:
pubsub/pubsub-repo-url=mongodb://localhost/tigase_testIf the PubSub components fails to detect and use a proper storage layer for MongoDB, you can force it to use one provided by Tigase by using the following line in the init.properties file:
pubsub/pubsub-repo-class=tigase.mongodb.pubsub.PubSubDAOMongo
Configuration for Message Archiving
By default, the Message Archiving component will use MongoDB to store data if Tigase is configured to use it as a default store. However, if you would like to use a different MongoDB database to store message archives, you can do this by adding the following line to etc/init.properties file:
message-archive/archive-repo-uri=mongodb://localhost/tigase_testIf Message Archiving component fails to detect and use a proper storage layer for MongoDB, you can force it to use one provided by Tigase by using the following line in the init.properties file:
message-archive/archive-repo-class=tigase.mongodb.archive.MongoMessageArchiveRepository
Schema Description
This description contains only basic description of schema and only basic part of it. More collections may be created if additional components of Tigase XMPP Server are loaded and configured to use MongoDB.
Tigase XMPP Server Schema
Basic schema for UserRespository and AuthRepository consists of two collections: . tig_users - contains list of users . tig_nodes - contains data related to users in tree-like way
tig_users collection contains the following fields:
| Name | Description |
|---|---|
_id |
id of user which is SHA256 hash of users jid (raw byte array) |
user_id |
contains full user jid |
domain |
domain to which user belongs for easier lookup of users by domain |
password |
password of user (or hash of password) |
tig_nodes collection contains the following fields
| Name | Description |
|---|---|
_id |
id of row autogenerated by MongoDB |
uid |
id of user which is SHA256 hash of users jid (raw byte array) |
node |
full path of node in tree-like structure separated by / (may not exist) |
key |
key for which value for node is set |
value |
value which is set for node key |
Tigase XMPP Server also uses additional collections for storage of Offline Messages
| Name | Description |
|---|---|
from |
full user jid of message sender |
from_hash |
SHA256 hash of message sender jid as raw byte array |
to |
full users jid of message recipient |
to_hash |
SHA256 hash of message recipient full jid as raw byte array |
ts |
timestamp of message as date |
message |
serialized XML stanza containing message |
expire-at |
timestamp of expiration of message (if message contains AMP expire-at set) |
7.3. Hashed User Passwords in Database
By default, user passwords are stored in plain-text in the Tigase’s database. However, there is an easy way to have them encoded in either one of already supported ways or to even add a new encoding algorithm on your own.
Storing passwords in hashed format in the database makes it possible to avoid using a plain-text password authentication mechanism. You cannot have hashed passwords in the database and non-plain-text password authentication. On the other hand, the connection between the server and the client is almost always secured by SSL/TLS so the plain-text password authentication method is perhaps less of a problem than storing plain-text passwords in the database.
Nevertheless, it is simple enough to adjust this in Tigase’s database and we will add an option in the Tigase installer to allow you to make the decision on install.
7.3.1. Shortcut
Connect to your database from a command line and execute following statement for MySQL database:
call TigPutDBProperty('password-encoding', 'encoding-mode');Where encoding mode is one of the following:
-
MD5-PASSWORD the database stores MD5 hash code from the user’s password.
-
MD5-USERID-PASSWORD the database stores MD5 hash code from concatenated user’s bare JID and password.
-
MD5-USERNAME-PASSWORD the database stores MD5 hash code from concatenated user’s name (localpart) and password.
For example:
call TigPutDBProperty('password-encoding', 'MD5-PASSWORD');7.3.2. Full Route
The way passwords are stored in the DB is controlled by Tigase database schema property. Properties in the database schema can be set by a stored procedure called: TigPutDBProperty(key, value). Properties from the DB schema can be retrieved using another stored function called: TigGetDBProperty(key).
The simplest way to call them is via command-line interface to the database.
For the purpose of this guide let’s say we have a MySQL database and a test account: test@example.com with password test77.
By default, most of DB actions for Tigase, are performed using stored procedures including user authentication. So, the first thing to do is to make sure the stored procedures are working correctly.
Create a Test User Account
To add a new user account we use a stored procedure: TigAddUserPlainPw(bareJid, password). As you can see there is this strange appendix to the procedure name: PlainPw. This procedure accepts plain passwords regardless how it is stored in the database. So it is safe and easy to use either for plain-text passwords or hashed in the DB. There are also versions of procedures without this appendix but they are sensitive on the data format and always have to pass password in the exact format it is stored in the database.
So, let’s add a new user account:
call TigAddUserPlainPw('test@example.com', 'test77');If the result was 'Query OK', then it means the user account has been successfully created.
Test User Authentication
We can now test user authentication:
call TigUserLoginPlainPw('test@example.com', 'test77');If authentication was successful the result looks like this:
+--------------------+
| user_id            |
+--------------------+
| 'test@example.com' |
+--------------------+
1 row in set (0.01 sec)

Query OK, 0 rows affected (0.01 sec)
If authentication was unsuccessful, the result looks like this:
+---------+
| user_id |
+---------+
|    NULL |
+---------+
1 row in set (0.01 sec)

Query OK, 0 rows affected (0.01 sec)
Password Encoding Check
TigGetDBProperty is a function, not a procedure in MySQL database so we have to use select to call it:
select TigGetDBProperty('password-encoding');Most likely output is this:
+---------------------------------------+
| TigGetDBProperty('password-encoding') |
+---------------------------------------+
| NULL                                  |
+---------------------------------------+
1 row in set, 1 warning (0.00 sec)
Which means a default password encoding is used, in plain-text and thus no encoding. And we can actually check this in the database directly:
select uid, user_id, user_pw from tig_users where user_id = 'test@example.com';And expected result with plain-text password format would be:
+-----+--------------------+---------+
| uid | user_id            | user_pw |
+-----+--------------------+---------+
|  41 | 'test@example.com' | test77  |
+-----+--------------------+---------+
1 row in set (0.00 sec)
Password Encoding Change
Now let’s set password encoding to MD5 hash:
call TigPutDBProperty('password-encoding', 'MD5-PASSWORD');'Query OK', means the password encoding has been successfully changed. Of course we changed the property only. All the existing passwords in the database are still in plain-text format. Therefore we expect that attempt to authenticate the user would fail:
call TigUserLoginPlainPw('test@example.com', 'test777');
+---------+
| user_id |
+---------+
|    NULL |
+---------+
1 row in set (0.00 sec)

Query OK, 0 rows affected (0.00 sec)
We can fix this by updating the user’s password in the database:
call TigUpdatePasswordPlainPw('test@example.com', 'test777');
Query OK, 1 row affected (0.01 sec)

mysql> call TigUserLoginPlainPw('test@example.com', 'test777');
+--------------------+
| user_id            |
+--------------------+
| 'test@example.com' |
+--------------------+
1 row in set (0.00 sec)

Query OK, 0 rows affected (0.00 sec)
7.4. Tigase Server and Multiple Databases
Splitting user authentication data from all other XMPP information such as roster, vcards, etc… was almost always possible in Tigase XMPP Server. Possible and quite simple thing to configure. Also it has been always possible and easy to assign a different database for each Tigase component (MUC, PubSub, AMP), for recording the server statistics. Almost every data type or component can store information in a different location, simple and easy to setup through the configuration file.
However it is much less known that it is also possible to have a different database for each virtual domain. This applies to both the user repository and authentication repository. This allows for very interesting configuration such as user database sharding where each shard keeps users for a specific domain, or physically split data based on virtual domain if each domain refers to a different customer or group of people.
How can we do that then?
This is very easy to do through the Tigase’s configuration file.
Typically the well known lines:
--auth-db=tigase-custom
--auth-db-uri=jdbc:mysql://db1.tigase/dbname?user&password
--user-db=mysql
--user-db-uri=jdbc:mysql://db2.tigase/dbname?user&password
Define just a default databases for both user repository and authentication repository. Default means it is used when there is no repository specified for a particular virtual domain. However, you can have a separate, both user and authentication repository for each virtual domain.
Here is, how it works:
# First, let's define our default database for all VHosts
--auth-db=tigase-custom
--auth-db-uri=jdbc:mysql://db1.tigase/dbname?user&password
--user-db=mysql
--user-db-uri=jdbc:mysql://db2.tigase/dbname?user&password

# Now, we have VHost: domain1.com
# User authentication data for this VHost is stored in Drupal database
--auth-db[domain1.com]=drupal
--auth-db-uri[domain1.com]=jdbc:mysql://db7.tigase/dbname?user&password
# All other user data is stored in Tigase's standard database in MySQL
--user-db[domain1.com]=mysql
--user-db-uri[domain1.com]=jdbc:mysql://db4.tigase/dbname?user&password

# Next VHost: domain2.com
# User authentication is in LDAP server
--auth-db[domain2.com]=tigase.db.ldap.LdapAuthProvider
# Pretty standard Tigase's definition for the database (repository)
#  connection string
--auth-db-uri[domain2.com]=ldap://ldap.domain2.com:389
# Now is something new, we have a custom authentication repository
# settings for a single domain.
# Please note how we define the VHost for which we set custom parameters
basic-conf/auth-repo-params/domain2.com/user-dn-pattern=cn=,ou=,dc=,dc=
# All other user data is stored in the same as default repository
--user-db[domain2.com]=mysql
--user-db-uri[domain2.com]=jdbc:mysql://db2.tigase/dbname?user&password

# Next VHost: domain3.com
# Again user authentication is in LDAP server but pointing to
# a different LDAP server with different access credentials
--auth-db[domain3.com]=tigase.db.ldap.LdapAuthProvider
# Pretty standard Tigase's definition for the database
# (repository) connection string
--auth-db-uri[domain3.com]=ldap://ldap.domain3.com:389
# Now is something new, we have a custom authentication
# repository settings for a single domain
# Please note how we define the VHost for which we set custom parameters
basic-conf/auth-repo-params/domain3.com/user-dn-pattern=cn=,ou=,dc=,dc=
# All other user data is stored on the domain3 server in PostgreSQL database
--user-db[domain3.com]=pgsql
--user-db-uri[domain3.com]=jdbc:pgsql://db.domain3.com/dbname?user&password

# For VHost: domain4.com all the data, both authentication and
# user XMPP data are stored on a separate
# MySQL server with custom stored procedures for both user
# login and user logout processing.
--auth-db[domain4.com]=tigase-custom
--auth-db-uri[domain4.com]=jdbc:mysql://db14.domain4.com/dbname?user&password
basic-conf/auth-repo-params/domain4.com/user-login-query={ call UserLogin(?, ?) }
basic-conf/auth-repo-params/domain4.com/user-logout-query={ call UserLogout(?) }
basic-conf/auth-repo-params/domain4.com/sasl-mechs=PLAIN,DIGEST-MD5
--user-db[domain4.com]=mysql
--user-db-uri[domain4.com]=jdbc:mysql://db14.domain4.com/dbname?user&password
As you can see, it requires some writing but flexibility is very extensive and you can setup as many separate databases as you need or want. If one database (recognized by the database connection string) is shared among different VHosts, Tigase still uses a single connection pool, so it won’t create an excessive number of connections to the database.
I hope this helps with more complex setups and configuration cases.
7.5. Importing User Data
You can easily copy data between Tigase compatible repositories that is repositories for which there is a database connector. However, it is not that easy to import data from an external source. Therefore a simple data import functionality has been added to repository utilities package.
You can access repository utilities through command ./bin/repo.sh or ./scripts/repo.sh depending on whether you use a binary package or source distribution.
-h parameter gives you a list of all possible parameters:
./scripts/repo.sh -h

Parameters:
 -h          this help message
 -sc class   source repository class name
 -su uri     source repository init string
 -dc class   destination repository class name
 -du uri     destination repository init string
 -dt string  data content to set/remove in repository
 -u user     user ID, if given all operations are only for that ID
             if you want to add user to AuthRepository parameter must
             in form: "user:password"
 -st         perform simple test on repository
 -at         simple test for adding and removing user
 -cp         copy content from source to destination repository
 -pr         print content of the repository
 -n          data content string is a node string
 -kv         data content string is node/key=value string
 -add        add data content to repository
 -del        delete data content from repository
 ------------
 -roster     check the user roster
 -aeg [true|false]  Allow empty group list for the contact
 -import file  import user data from the file of following format:
         user_jid, password, roser_jid, roster_nick, subscription, group


Note! If you put UserAuthRepository implementation as a class name
      some operation are not allowed and will be silently skipped.
      Have a look at UserAuthRepository to see what operations are
      possible or what operation does make sense.
      Alternatively look for admin tools guide on web site.
The most critical parameters are the source repository class name and the initialization string. Therefore there are a few example preset parameters which you can use and adjust for your system. If you look inside the repo.sh script you can find at the end of the script following lines:
XML_REP="-sc tigase.db.xml.XMLRepository -su ../testsuite/user-repository.xml_200k_backup"
MYSQL_REP="-sc tigase.db.jdbc.JDBCRepository -su jdbc:mysql://localhost/tigase?user=root&password=mypass"
PGSQL_REP="-sc tigase.db.jdbc.JDBCRepository -su jdbc:postgresql://localhost/tigase?user=tigase"

java $D -cp $CP tigase.util.RepositoryUtils $MYSQL_REP $*
You can see that the source repository has been set to MySQL database with tigase as the database name, root the database user and mypass the user password.
You can adjust these settings for your system.
Now to import data to your repository simply execute the command:
./bin/repo.sh -import import-file.txtNote, the import function is available from b895
The format of the import file is very simple. This is a flat file with comma separated values:
jid,password,roster_jid,roster_nick,subscriptio,groupTo create such a file from MySQL database you will have to execute a command like this one:
SELECT a, b, c, d INTO OUTFILE 'import-file.txt'
FIELDS TERMINATED BY ','
LINES TERMINATED BY '\n'
FROM test_table;
7.6. Importing Existing Data
Information about importing user data from other databases.
7.6.1. Connecting the Tigase Server to MySQL Database
Please before continuing reading of this manual have a look at the initial MySQL database setup. It will help you with database preparation for connecting with Tigase server.
The easiest way to setup Tigase server for connecting with MySQL database is to use the configuration wizards (configuration generators) which release you from manually editing the XML configuration file and allow you quickly regenerate the XML configuration file in case of problems.
The article describes an older way for using configuration generators which is a bit more difficult and doesn’t work on Windows systems. The guide below describes a new way to use them which is simpler and can be applied to Windows systems as well. It is using the init.properties file where you can put all your initial configuration parameters.
This guide describes MySQL database connection parameters.
This guide is actually very short as there are example configuration files which can be used and customized for your environment.
Unfortunately these files are not included yet in the server version 3.x binary release and you have to download them from the SVN repository using following links:
-
tigase-mysql.conf - the Tigase server startup file. The only difference from the default one is that it points to the file described below to load initial parameters.
-
init-mysql.properties - the file contains a few initial parameters which can/should be adjusted to your environment. Here is a content of the file with each line described:
# Load standard set of the server components.
# Look at the http://www.tigase.org/configuration-wizards
# document for other possible values. Normally you don't
# need to change this line.
config-type=--gen-config-def
# List of administrator accounts, please replace them with
# administrator accounts in your installation
--admins=admin@tigase.org,admin@test-d
# The line says that the database used by the Tigase server is 'mysql'
# Look at the configuration wizards article for different options
# You can also put here a Java class name if you have a custom
# implementation for a database connector.
--user-db=mysql
# The line contains the database connection string. This is database
# specific string and for each kind of database it may look differently.
# Below string is for MySQL database. Please modify it for your system.
# MySQL connector requires connection string in the following format:
# jdbc:mysql://[hostname]/[database name]?user=[user name]&password=[user password]
--user-db-uri=jdbc:mysql://localhost/tigasedb?user=tigase_user&password=mypass
# Virtual domains for your server installation, comma separated list of vhosts
--virt-hosts=tigase.org,test-d,localhost
# Select what packages you want to have logging switched for
# The below setting is recommended for the initail setup and it is required
# when asking for help with setting the server up
--debug=server
Download both files and put them to your etc/ directory.
Edit the init-mysql.properties for your environment.
Remove the XML configuration file.
Start the server using following command:
./bin/tigase.sh start etc/tigase-mysql.confAsk more questions if you got stuck or need any help with this.
7.6.2. Integrating Tigase Server with Drupal
Tigase supports integration with Drupal on many levels. At the moment this guide can work with Drupal version 4.x and 5.x. They may also work with Drupal 6.x but this version hasn’t been tested.
First of all, Tigase can authenticate users against a Drupal database which means you have the same user account for both Drupal website and the XMPP server. Moreover in such a configuration all account management is done via Drupal web interface like account creation, password change update user details and so on. Administrator can temporarily disable user account and this is followed by Tigase server too.
Connecting to Drupal Database
The best way to setup Tigase with Drupal database is via configuration wizards that is init.properties file where you can put initial setting for Tigase configuration.
If you look in etc/ directory of your Tigase installation you should find a few files there. The one we want to base our configuration on is: init-mysql.properties. In some older packages the file might be missing, then you can download it from the SVN repository.
If you look inside the file and strip all the comments you would see following lines:
config-type=--gen-config-def
--admins=admin@tigase.org,admin@tigase.net
--user-db=mysql
--user-db-uri=jdbc:mysql://localhost/tigasedb?user=tigase_user&password=mypass
--virt-hosts=tigase.org,tigase.net
--debug=server
All you need to connect to Drupal database are 2 following lines:
--auth-db=drupal
--auth-db-uri=jdbc:mysql://localhost/drupal?user=drupalusr&password=drupalpass
Let’s combine it in a single file called etc/init-drupal.properties:
config-type=--gen-config-def
--admins=admin@tigase.org,admin@tigase.net
--auth-db=drupal
--auth-db-uri=jdbc:mysql://localhost/drupal?user=drupalusr&password=drupalpass
--user-db=mysql
--user-db-uri=jdbc:mysql://localhost/tigasedb?user=tigase_user&password=mypass
--virt-hosts=tigase.org,tigase.net
--debug=server
In theory you can load Tigase database schema to Drupal database and then both db-uris would have the same database connection string. More details about setting up and connecting to MySQL database can be found in the MySQL guide.
You need also to edit etc/tigase.conf file to point to your newly created properties file. The last line which looks like this:
TIGASE_OPTIONS=" --property-file etc/init.properties "should be changed to following:
TIGASE_OPTIONS=" --property-file etc/init-drupal.properties "Make sure you have Java-6 installed and JAVA_HOME is set to the correct location. If JAVA_HOME is not set you can add following line to etc/tigase.conf file:
JAVA_HOME="/your/java-6-location"The best way to check whether the variable is set correctly is with command:
$ ls -l $JAVA_HOME/bin/javashould list you the file without error.
Check also if the logs/ directory is created in your Tigase server location as sometimes unpacking application doesn’t create empty directories.
Now when you have the configuration file and databases ready to use you can start the Tigase server with the following command:
./bin/tigase.sh start etc/tigase.confIf you run the Tigase server installed from sources the command would be:
./scripts/tigase.sh start etc/tigase.confThere are system startup scripts for Gentoo and Mandriva Linux on bin/ or scripts/ directory which can be used to automatically start the server when system starts.
Now you can register an account on your Drupal website and connect with an XMPP client using the account details.
Note! You have to enable plain password authentication in your XMPP client to connect to Tigase server with Drupal database
7.6.3. Integrating Tigase Server With LibreSource
This document is still not finished.
Taken directly from LibreSource page:
LibreSource is a collaborative platform dedicated to both software development and community building. Based on Java/J2EE technology, LibreSource is a modular web server that users can customize online by combining resources and rights: wiki pages, forum, trackers, files, download areas, etc. All the tools are included and integrated.
Short Introduction
Integration between Tigase server and LibreSource is on a database level. It is implemented in the same way as integration with Drupal but with slightly more functions available.
Basically LibreSource system maintains own database with all it’s data and Tigase connects to LibreSource database to authenticate users. All user data specific to XMPP service are kept in separate tables which can be located in the same database as LibreSource data or in different database.
Current list of features included in the integration:
-
XMPP users authentication against user data stored in LibreSource database.
-
Recording XMPP user on-line status in LibreSource database. This can be displayed on the Web page as additional user info.
-
Recording user last login time and this information can also be available on Web page.
-
Checking user account status. So if the user account is disabled in LibreSource system then this user will not be able to login to XMPP service too.
-
User account creation. This feature might be useful during testing time or user data transition from an old Tigase installation to LibreSource system. Please note! This feature should be normally disabled on live system. All user account management should be done from LibreSource system because of data caching.
-
User account deletion. Please note! This feature should be normally disabled on live system. All user account management should be done from LibreSource system because of data caching.
A few assumptions:
-
LibreSource data are kept in PostgreSQL database - libresource and database user is demo.
-
For use in cases where Tigase data are stored in MySQL database name is tigase, database user is dbuser and database user password is dbpass
How to set Tigase up
Now we will focus on setting things up to have both services up and running together. Below is example of the most complex environment to run where LibreSource is using PostgreSQL database and Tigase is using a MySQL database. All basic user data needed for authentication is kept by LibreSource, so Tigase has to connect to PostgreSQL database also in order to authenticate users.
-
First you need LibreSource system up and running. Please refer to LS documentation for details.
-
Install Tigase server in the normal way including loading Tigase database schema. Database tables used by Tigase server use different naming convention so you can simply load Tigase DB schema to the same database as LibreSource data. It is also possible and recommended to keep Tigase data in separate database.
-
Using configuration wizards generate configuration for Tigase server to connect to LibreSource database. Here is the sample file with parameters for configuration wizard assuming following setup:
-
LibreSource data are kept in PostgreSQL database: libresource, user: demo
-
Tigase data are kept in MySQL database: tigase, user: dbuser, password: dbpass
-
No external components are connected to Tigase server
-
Tigase works for domain: domain.net
ENC="-Dfile.encoding=UTF-8 -Dsun.jnu.encoding=UTF-8"
DRV="-Djdbc.drivers=com.mysql.jdbc.Driver:org.postgresql.Driver"

JAVA_OPTIONS="${ENC} ${DRV} -server -Xms100M -Xmx100M "
TIGASE_CONFIG="etc/tigase-mysql-libresource.xml"
TIGASE_OPTIONS="--gen-config-def \
  --user-db mysql \
  --user-db-uri jdbc:mysql://localhost/tigase?user=dbuser&password=dbpass&autoCreateUser=true \
  --auth-db libresource \
  --auth-db-uri jdbc:postgresql://localhost/libresource?user=demo \
  --virt-hosts domain.net,localhost "
-
-
A simpler example where all data (LibreSource and Tigase) are stored in the same database:
-
LibreSource data are kept in PostgreSQL database: libresource, user: demo
-
Tigase data are kept also in PostgreSQL database: libresource, user: demo
-
No external components are connected to Tigase server
-
Tigase works for domain: domain.net
ENC="-Dfile.encoding=UTF-8 -Dsun.jnu.encoding=UTF-8"
DRV="-Djdbc.drivers=com.mysql.jdbc.Driver:org.postgresql.Driver"

JAVA_OPTIONS="${ENC} ${DRV} -server -Xms100M -Xmx100M "
TIGASE_CONFIG="etc/tigase-mysql-libresource.xml"
TIGASE_OPTIONS="--gen-config-def \
  --user-db pgsql \
  --user-db-uri jdbc:postgresql://localhost/libresource?user=demo&autoCreateUser=true \
  --auth-db libresource \
  --auth-db-uri jdbc:postgresql://localhost/libresource?user=demo \
  --virt-hosts domain.net,localhost "
-
Now, you can run Tigase as normal and it all works.
Note! You have to load Tigase database schema for user data. Please refer to guide for specific database: MySQL or PostgreSQL.
Migration From an old Tigase Installation to LibreSource
Tigase package includes additional tools to make it easier to manage and control you installation. One is used to change configuration settings - config.sh and another is used to manipulate user data in repository - repo.sh.
Depending on whether you use Tigase version built from sources or binary version these scripts might be available in either scripts/ or bin/ subdirectories. To make things simpler let’s assume they are stored in scripts/ directory.
Assuming you have an old Tigase server installation with number of users in MySQL database and you want to migrate all of them to LibreSource there are 2 steps involved:
-
User data migration
-
Changing your existing configuration
Data Migration
First we need to migrate user data used for authentication. That data will be used by both services: LibreSource and Tigase and they normally stored in LibreSource database. Therefore we have to use LibreSource database connector to handle the data (write or read). Tigase server will be using LibreSource database for reading only but during migration time we need to write user accounts to LS database. Sample command to migrate user accounts looks like this:
./scripts/repo.sh -sc tigase.db.jdbc.JDBCRepository \
  -su "jdbc:mysql://localhost/tigase?user=dbuser&password=dbpass" \
  -dc tigase.db.jdbc.LibreSourceAuth \
  -du "jdbc:postgresql://localhost/libresource?user=demo" \
  -cp
The above command will copy all user accounts from MySQL tigase database to libresource database. Please refer to repository management tool documentation for information how to migrate single or selected user accounts.
If you want to keep all Tigase server data in the same database you have to copy also all other user data like rosters, vCards and so on.
First thing we have to do is load the database schema for Tigase data. Because Tigase tables have distinct names from LibreSource, there is no danger for any conflict. As in the above example let’s assume LibreSource’s data is stored in libresource database and database user name is demo:
psql -q -U demo -d libresource -f database/postgresql-schema.sqlNow we can load and transfer all user data from MySQL database to LibreSource:
./scripts/repo.sh -sc tigase.db.jdbc.JDBCRepository \
  -su "jdbc:mysql://localhost/tigase?user=dbuser&password=dbpass" \
  -dc tigase.db.jdbc.JDBCRepository \
  -du "jdbc:postgresql://localhost/libresource?user=demo" \
  -cp
This command looks siumilar to the previous one. Just a Java class used for handling destination database is different.
7.6.4. MySQL Database Use
This guide describes how to configure Tigase server to use MySQL database as a user repository.
If you used an XML based user repository before you can copy all user data to MySQL database using repository management tool. All steps are described below.
MySQL Database Preparation
To load db schema to your MySQL instance first create database:
mysqladmin -p create tigaseAnd then you can load database schema:
mysql -u dbuser -p tigase < mysql-schema.sqlServer Configuration
Now you have to change configuration to load a jdbc module instead of XML based repository. Using configuration management script, first change class name handling repository.
To see current settings run command:
$ ./scripts/config.sh -c tigase-config.xml -print -key session_1/user-repo-classAs a result you should see something like:
session_1/user-repo-class = tigase.db.xml.XMLRepositoryYou can see that current setting points to the XML repository implementation. To use jdbc module for connecting to MySQL database you have to set tigase.db.jdbc.JDBCRepository class (enter text below in one line):
$ ./scripts/config.sh -c tigase-config.xml -print -key session_1/user-repo-class -value tigase.db.jdbc.JDBCRepository -setAs a result you will see new value set for the parameter:
session_1/user-repo-class = tigase.db.jdbc.JDBCRepositoryYou have also to set the same value as authorization repository unless you want to use different authorization data source:
$ ./scripts/config.sh -c tigase-config.xml -print -key session_1/auth-repo-class -value tigase.db.jdbc.JDBCRepository -setAnd again as a result we can see:
session_1/auth-repo-class = tigase.db.jdbc.JDBCRepositoryNext step is to set the database connection string. Assuming you have database: tigase on localhost with database user: dbuser and password dbpass your connection string will look like this:
jdbc:mysql://localhost/tigase?user=dbuser&password=dbpassTo set this in your configuration file, you have to the configuration management script 2 times. First for user data repository and second for authorization data repository:
$ ./scripts/config.sh -c tigase-config.xml -print -key session_1/user-repo-url -value "jdbc:mysql://localhost/tigase?user=dbuser&password=dbpass" -set
$ ./scripts/config.sh -c tigase-config.xml -print -key session_1/auth-repo-url -value "jdbc:mysql://localhost/tigase?user=dbuser&password=dbpass" -set
Note quotes around connection string. They are needed to make sure the shell won’t interpret special characters.
Now the configuration is ready to load the jdbc module and connect to your database.
One more thing you need to do is to tell JVM which jdbc driver to use to connect to database. Depending on your MySQL and jdbc installation it might be: com.mysql.jdbc.Driver. To set is as database driver you have to set is a jdbc.drivers property value. Usually you do this by adding -D parameter to Java call:
$ java -Djdbc.drivers=com.mysql.jdbc.Driver tigase.server.XMPPServerIf you use tigase.sh script to run server you will have to add -Djdbc.drivers=com.mysql.jdbc.Driver to the startup script init.Properties property file to JAVA_OPTIONS values.
User Data Import
If you previously used an XML based user repository, you can import all data into a MySQL database using repository management tool. This is quite long command so let me list all required parameters first with brief explanation:
-
-cp copy content of the source repository to destination repository.
-
-sc tigase.db.xml.XMLRepository source repository class.
-
-su user-repository.xml source repository connection string - assuming your user repository is in user-repository.xml file.
-
-dc tigase.db.jdbc.JDBCRepository destination repository class.
-
-du "jdbc:mysql://localhost/tigase?user=dbuser&password=dbpass" destination repository connection string.
And now whole command. Enter all in one line:
$ ./scripts/repo.sh -cp -sc tigase.db.xml.XMLRepository -su user-repository.xml -dc tigase.db.jdbc.JDBCRepository -du "jdbc:mysql://localhost/tigase?user=dbuser&password=dbpass"For more information how to use command line administration tools refer to command line tools guide.
7.6.5. PostgreSQL Database Use
This guide describes how to configure Tigase server to use PostgreSQL database as a user repository.
If you used an XML based user repository before you can copy all user data to PostgreSQL database using repository management tool. All steps are described below.
PostgreSQL Database Preparation
Create new database user account which will be used to connect to your database:
# createuser
Enter name of user to add: tigase
Shall the new user be allowed to create databases? (y/n) y
Shall the new user be allowed to create more new users? (y/n) y
Now using new database user account create database for your service:
# createdb -U tigase tigasedb
CREATE DATABASE
Now you can load the database schema:
# psql -U tigase -d tigasedb -f postgresql-schema.sqlNow the database is ready for Tigase server to use.
Server Configuration
Server configuration is identical as MySQL database setup. The same jdbc module is used to connect to PostgreSQL database as for MySQL. The only difference is the connection string which usually looks like:
jdbc:postgresql://localhost/tigasdb?user=tigaseSo for more detailed guide how to change configuration refer to MySQL database use guide or if you look for a more automatic configuration file generation refer to configuration wizards page.
7.7. Schema Updates
This is a repository for Schema updates in case you have to upgrade from older installations.
-
Tigase Server Schema v7.1 Updates Applies to v7.1.0 and v7.2.0
7.7.1. Tigase Server Schema v7.1 Updates
FOR ALL USERS UPGRADING TO v7.1.0 FROM A v7.0.2 INSTALLATION
The schema has changed for the main database, and the pubsub repository. In order to upgrade to the new schemas, you will need to do the following:
-
Upgrade the Main database schema to v7.1 using the database/${DB_TYPE}-schema-upgrade-to-7-1.sql file
-
Upgrade the Pubsub Schema to v3.1.0 using the database/${DB_TYPE}-pubsub-schema-3.1.0.sql file
-
Upgrade the Pubsub Schema to v3.2.0 using the database/${DB_TYPE}-pubsub-schema-3.2.0.sql file
All three commands may be done at the same time in that order, it is suggested you make a backup of your current database to prevent data loss.
Tigase Schema Change for v7.1
Tigase has made changes to its database to include primary keys in the tig_pairs table to improve performance of the Tigase server. This is an auto-incremented column for Primary Key items appended to the previous schema.
You MUST update your database to be compliant with the new v7.1 schema. If you do not, Tigase will not function properly.
This change will affect all users of Tigase using v7.1.0 and newer.
If you are installing a new version of v7.1.0 on a new database, the schema should automatically be installed.
First, shut down any running instances of Tigase to prevent conflicts with database editing. Then from command line use the DBSchemaLoader class to run the -schema-upgrade-to-7.1.sql file to the database. The command is as follows:
In a linux environment
java -cp "jars/*" tigase.util.DBSchemaLoader -dbHostname ${HOSTNAME} -dbType ${DB_TYPE} -rootUser ${ROOT_USER} -dbPass ${DB_USER_PASS} -dbName ${DB_NAME} -schemaVersion ${DB_VERSION} -rootPass ${ROOT_USER_PASS} -dbUser ${DB_USER} -adminJID "${ADMIN_JID}" -adminJIDpass ${ADMIN_JID_PASS} -logLevel ALL -file database/${DB_TYPE}-schema-upgrade-to-7-1.sqlIn a windows environment
java -cp jars/* tigase.util.DBSchemaLoader -dbHostname ${HOSTNAME} -dbType ${DB_TYPE} -rootUser ${ROOT_USER} -dbPass ${DB_USER_PASS} -dbName ${DB_NAME} -schemaVersion ${DB_VERSION} -rootPass ${ROOT_USER_PASS} -dbUser ${DB_USER} -adminJID "${ADMIN_JID}" -adminJIDpass ${ADMIN_JID_PASS} -logLevel ALL -file database/${DB_TYPE}-schema-upgrade-to-7-1.sqlAll variables will be required, they are as follows:
-
${HOSTNAME} - Hostname of the database you wish to upgrade.
-
${DB_TYPE} - Type of database [derby, mysql, postgresql, sqlserver].
-
${ROOT_USER} - Username of root user.
-
${ROOT_USER_PASS} - Password of specified root user.
-
${DB_USER} - Login of user that can edit database.
-
${DB_USER_PASS} - Password of the specified user.
-
${DB_NAME} - Name of the database to be edited.
-
${DB_VERSION} - In this case, we want this to be 7.1.
-
${ADMIN_JID} - Bare JID of a database user with admin privileges. Must be contained within quotation marks.
-
${ADMIN_JID_PASS} - Password of associated admin JID.
Please note that the SQL file for the update will have an associated database with the filename. i.e. postgresql-update-to-7.1.sql for postgresql database.
A finalized command will look something like this:
java -cp "jars/*" tigase.util.DBSchemaLoader -dbHostname localhost -dbType mysql -rootUser root -rootPass root -dbUser admin -dbPass admin -schemaVersion 7.1 -dbName Tigasedb -adminJID "admin@local.com" -adminJIDPass adminpass -logLevel ALL -file database/mysql-schema-upgrade-to-7.1.sqlOnce this has successfully executed, you may restart you server. Watch logs for any db errors that may indicate an incomplete schema upgrade.
Changes to Pubsub Schema
Tigase has had a change to the PubSub Schema, to upgrade to PubSub Schema v7.1 without having to reform your databases, use this guide to update your databases to be compatible with the new version of Tigase.
NOTE Current PubSub Schema is v3.2.0, you will need to repeat these instructions for v3.1.0 and then v3.2.0 before you run Tigase V7.1.0.
The PubSub Schema has been streamlined for better resource use, this change affects all users of Tigase. To prepare your database for the new schema, first be sure to create a backup! Then apply the appropriate PubSub schema to your MySQL and it will add the new storage procedure.
All these files should be in your /database folder within Tigase, however if you are missing the appropriate files, use the links below and place them into that folder.
The MySQL schema can be found Here.
The Derby schema can be found Here.
The PostGRESQL schema can be found Here.
The MS SQL schema can be found Here.
The same files are also included in all distributions of v7.1.0 in [tigaseroot]/database/ . All changes to database schema are meant to be backward compatible.
You can use a utility in Tigase to update the schema using the following command from the Tigase root: Linux
java -cp "jars/*" tigase.util.DBSchemaLoader
or from a Windows environment
java -cp jars/* tigase.util.DBSchemaLoader
NOTE: Some variation may be necessary depending on how your java build uses -cp option
- Use the following options to customize. Options in bold are required.
-
-
[-dbType database_type {derby, mysql, postgresql, sqlserver}]
-
[-schemaVersion schema version {4, 5, 5-1} ]
-
[-dbName database name]
-
[-dbHostname database hostname] (default is localhost)
-
[-dbUser tigase username]
-
[-dbPass tigase user password]
-
[-rootUser database root username]
-
[-rootPass database root password]
-
[-file path to sql schema file]
-
[-query sql query to execute]
-
[-logLevel java logger Level]
-
[-adminJID comma separated list of admin JIDs]
-
[-adminJIDpass password (one for all entered JIDs]
-
Arguments take following precedent: query, file, whole schema
As a result your final command should look something like this:
java -cp "jars/*" tigase.util.DBSchemaLoader -dbType mysql -dbName tigasedb -dbUser root -dbPass password -file database/mysql-pubsub-schema-3.1.0.sql
7.7.2. Tigase 5.1 Database Schema Upgrade
We had to make a small change to the database schema for Tigase version 5.1.0.
It does not affect data or data structure, only the way in which some data is accessed in database. We added one more stored procedure which has to be installed in database if you upgrade your installation from a previous Tigase version
The schema upgrade is very simple and safe but make sure the current database schema is in version 4.0. If you happen to use ancient version of Tigase earlier than 4.0 and you want to upgrade to 5.1, you have to run 4.0 upgrade script first.
Please follow detailed guide for the database applicable to your installation: Derby, MySQL, PostgreSQL.
7.7.3. Derby Database Schema Upgrade for Tigase 5.1
The schema upgrade is very simple and safe but make sure the current database schema is in version 4.0.
First things first - make a database backup:
tar -czf derbyDB.tar.gz /path/to/derbyDBIf you need to restore database for any reason simply extract files from the backup archive:
rm -rf /path/to/derbyDB
tar -xf derbyDB.tar.gz
Now we can run schema upgrade script
java -Dij.protocol=jdbc:derby: -Dij.database="/path/to/derbyDB" \
                -Dderby.system.home=`pwd` \
                -cp libs/derby.jar:libs/derbytools.jar:jars/tigase-server.jar \
                org.apache.derby.tools.ij database/postgresql-schema-upgrade-to-5-1.sql
7.7.4. MySQL Database Schema Upgrade for Tigase 5.1
The schema upgrade is very simple and safe but make sure the current database schema is in version 4.0.
Assumptions:
-
tigasedb is a database name
-
tigase_user is a database user name
-
mypass is database user password
First things first - make a database backup:
mysqldump -u tigase_user -pmypass tigasedb > tigasedb_dump.sqlIf you need to restore database for any reason execute following commands:
msyqladmin -u tigase_user -pmypass drop tigasedb
mysqladmin -u tigase_user -pmypass create tigasedb
mysql -u tigase_user -pmypass tigasedb < tigasedb_dump.sql
Note! You may be required to use root user and his password to execute mysqladmin commands.
Now we can run schema upgrade script
mysql -u tigase_user -pmypass tigasedb < database/mysql-schema-upgrade-to-5-1.sql7.7.5. PostgreSQL Database Schema Upgrade for Tigase 5.1
The schema upgrade is very simple and safe but make sure the current database schema is in version 4.0.
Assumptions:
-
tigasedb is a database name
-
tigase_user is a database user name
-
admin_db_user is database admin user name
First things first - make a database backup:
pg_dump -U tigase_user -W tigasedb > tigasedb_dump.sqlIf you need to restore database for any reason execute following commands:
dropdb -U admin_db_user -W tigasedb
createdb -U admin_db_user -W -O tigase_user tigasedb
psql -U tigase_user -W tigasedb < tigasedb_dump.sql
Now we can run schema upgrade script
psql -q -U tigase_user -W tigasedb -f database/postgresql-schema-upgrade-to-5-1.sql7.7.6. Tigase Database Minor but Useful Schema Change in Version 5.1.0
We have recently made a simple but very useful change to the DB schema in Tigase. It preserves backward compatibility and so your existing schema does not need to be changed, even if you upgrade your installation to the most recent 5.1.0 version.
However, the change is can help to track new accounts creation, therefore this article shows how to make modifications to you schema manually.
The change is related to adding a new field: acc_create_time which stores exact time of user account creation. The time is recorded automatically by the database when a new record in the user table is created. This allows for no extra overhead or resource usage on Tigase.
Along with the new field, there are slight modifications to 2 other fields: last_login and last_logout.
Here is how it looks now:
-- Time the account has been created
acc_create_time timestamp DEFAULT CURRENT_TIMESTAMP,
-- Time of the last user login
last_login timestamp DEFAULT 0,
-- Time of the last user logout
last_logout timestamp DEFAULT 0,
You can easily update your schema with above changes using a simple SQL query. Enter the MySQL shell and copy-paste following query:
alter table tig_users
  modify last_login timestamp DEFAULT 0,
  modify last_logout timestamp DEFAULT 0,
  add acc_create_time timestamp DEFAULT CURRENT_TIMESTAMP;
Please note, after executing query above the column acc_create_time will have a null value. To populate the entry for existing records just copy last_login value to acc_create_time:
update tig_users set acc_create_time = last_login;7.7.8. MySQL Database Schema Upgrade for Tigase 4.0
For number of reasons the database schema had to be changed for Tigase server version 4.0. The most important are:
-
Compliance with the XMPP RFC which says that each part of JID may have up to 1023 characters. We store in the database user JIDs without resource names thus the maximum possible size of the user id is 2047. There aren’t really JIDs that long yet, but we experienced quite long JIDs in a few installations already. So it was decided to prepare Tigase to accept any JID allowed by RFC.
-
Performance and flexibility - the Tigase server now accesses database using stored procedures. This allows for any database storage format and it doesn’t really matter for Tigase server what is the database schema how data is organized inside. What it needs is just bunch of stored procedures to access the data. This allows for much more flexibility in storing user data as well as much easier integration with third-party systems as well as organize data in more efficient way.
Therefore when you run the Tigase server now it may (depending on what exact SVN revision you use) refuse to start if it detects that the database schema is not updated. If it happens just follow steps below to update the database schema and start the server again. Updating of the database schema is very easy and almost fully automated process. Just follow the steps below and you should be able to run the new version of Tigase server in a few minutes or even seconds depending on your database size. It took around 7 minutes to update our database with 200k user accounts on an average machine.
Note. Do not update the database schema before Tigase server tells you to do so. Be sure to do a database backup before starting the schema update.
Please note. I have done a few schema upgrades already in a few different configurations and here are a few tips which might be useful if something goes wrong:
-
You really, REALLY have to do the DB backup (database dump) before upgrading. If you don’t you might not be able to revert database on your own.
-
In case of error: ERROR 1419 (HY000) at line 31 in file: 'database/mysql-schema-4-sp.schema': You do not have the SUPER privilege and binary logging is enabled (you *might want to use the less safe log_bin_trust_function_creators variable)* Restore the database following description found below and run the update again as MySQL super user.
-
The following error may manifest itself in many ways from the NullPointerException in Tigase server log file to message like this: User does not have access to metadata required to determine stored procedure parameter types. If rights can not be granted, configure connection with "noAccessToProcedureBodies=true" to have driver generate parameters that represent INOUT strings irregardless of actual parameter types. The best solution to this is to grant proper permissions to this user. Enter the MySQL command line mode as MySQL super user:
$ mysql -u root -proot_passwd mysql
mysql> GRANT SELECT, INSERT, UPDATE ON \`mysql\`.\`proc\` TO 'tigase_user'@'localhost';
mysql> GRANT SELECT, INSERT, UPDATE ON \`mysql\`.\`proc\` TO 'tigase_user'@'%';
mysql> GRANT SELECT, INSERT, UPDATE ON \`mysql\`.\`proc\`
Assumptions:
-
tigasedb is a database name
-
tigase_user is a database user name
-
mypass is database user password
First things first - make a database backup:
mysqldump -u tigase_user -pmypass tigasedb > tigasedb_dump.sqlIf you need to restore database for any reason execute following commands:
msyqladmin -u tigase_user -pmypass drop tigasedb
mysqladmin -u tigase_user -pmypass create tigasedb
mysql -u tigase_user -pmypass tigasedb < tigasedb_dump.sql
Note! You may be required to use root user and password to execute mysqladmin commands. Ok we have the database backup and we know how to restore it. Now we can run schema upgrade script:
mysql -u tigase_user -pmypass tigasedb < database/mysql-schema-upgrade-to-4.sqlThe script should generate output like this:
Droping index for user_id column
Resizing user_id column to 2049 characters to comply with RFC
Creating a new index for user_id column for first 765 bytes of the field
Adding sha1_user_id column
Adding user_pw column
Adding last_login column
Adding last_logout column
Adding online_status column
Adding failed_logins column
Adding account_status column
Creating a new index for user_pw column
Creating a new index for last_login column
Creating a new index for last_logout column
Creating a new index for account_status column
Creating a new index for online_status column
Resizing node column to 255 characters
Changing pval column type to mediumtext
Loading stored procedures definitions
Setting passwords encoding in the database
Converting database to a new format
Creating a new index for sha1_user_id column
Setting schema version to 4.0
All done, database ready to use!
8. Configuring the Tigase Server to Load a Component
A detailed description of all the configuration options is in the init.properties guide where you can also find information described below and much more. The purpose of this document is to give you a brief introduction on how to load a component into Tigase server without the need to dig through all the details.
I will show how to load 2 components into Tigase server using a configuration in the init.properties file: MUC and PubSub.
The only step is to tell the server what components to load, how to name them and optionally give some extra parameters. To do so open the init.properties file you use in your installation.
Let’s say you want to just add PubSub for now. All you need to do is add 2 lines to the properties file:
--comp-name-1=pubsub
--comp-class-1=tigase.pubsub.PubSubComponent
The first line contains the component name 'pubsub' and the main class for this component is: 'tigase.pubsub.PubSubClusterComponent'. It doesn’t really matter what the component name is, the only requirement is that it must be unique among other components names. Because you can load many components, it helps to provide descriptive names thus 'pubsub' is a good name for a 'PubSub' component.
You can of course add more components, even PubSub components to the same server. Just remember that each of them would need to have a different name then. For example:
--comp-name-2=pubsub-priv
--comp-class-2=tigase.pubsub.PubSubComponent
Although this may be rare, it allows for wide compatibility and platform stability.
Normally, however we want to load few different components like PubSub, MUC, MSN Transport and so on…. Therefore instead of the above second PubSub we can load the MUC component:
--comp-name-2=muc
--comp-class-2=tigase.muc.MUCComponent
Changes to the init.properties file will take effect upon server restart.
8.1. StanzaSender
StanzaSender is a component which makes it easier to integrate XMPP server with other third-party tools.
It simply allows you to send stanzas from your application without implementing any XMPP specific code. The component regularly reads specified data source for XMPP packets to send. The data source can be a SQL database, directory on your filesystem, or anything you might want.
If you have a Web application for example for which you want to send notifications of an event to selected users you can install StanzaSender component on your Tigase server. It will help you to easily distribute your messages to end-users.
8.1.1. How it Works
The module itself doesn’t do anything, it just schedules tasks and sends stanzas which come from anywhere. To do the actual work of retrieving stanzas from data source the component uses tasks.
In theory the task can retrieve XMPP packets for sending from any location or may just generate stanzas on its own.
In practice there are 2 tasks already implemented and ready to use. You can treat them as a sample code for implementation of your own tasks customised for your specific needs or you can just use these tasks as they are.
The tasks which are available are:
-
FileTask retrieving stanzas from directory in file system.
-
JDBCTask retrieving stanzas from SQL database.
FileTask
FileTask implements tasks for cyclic retrieving stanzas from a directory and sending them to the StanzaHandler object.
It looks for any new stanza to send. Any single file can contain only a single stanza to send and any entry in database table can also contain only a single stanza to send. Files on hard disk and records in databases are deleted after it is read.
Any file in a given directory is treated the same way - Tigase assumes it contains valid XML data with XMPP stanza to send. You can however set in configuration, using wildchars which files contain stanzas. All stanzas must contain complete data including correct "from" and "to" attributes.
By default it is looking for *.stanza files in /var/spool/jabber/ folder but you can specify different directory names in the initialization string. Here is a sample initialization strings:
-
/var/spool/jabber/*.stanza
-
/var/spool/jabber/*
The last is equal to:
-
/var/spool/jabber/
Note the last forward slash '/' is required in such case if the last element of the path is a directory.
Please note! Tigase must have writing permissions for this directory, otherwise it may not function properly.
JDBCTask
JDBCTask implements tasks for cyclic retrieving stanzas from database and sending them to the StanzaHandler object.
Database table format:
-
id - numerical unique record identifier.
-
stanza - text field containing valid XML data with XMPP stanza to send.
Any record in this table is treated the same way - Tigase assumes it contains valid XML data with XMPP stanza to send. No other data are allowed in this table. All stanzas must be complete including correct "from" and "to" attributes.
By default it is looking for stanzas in xmpp_stanza table, but you can specify a different table name in the connection string. For example:
jdbc:mysql://localhost/tigasedb?user=tigase&password=pass&table=xmpp_stanza
Please note the last parameter which is specific to JDBCTask. You can specify the table name which stores stanzas for sending, if omitted default value is: xmpp_stanza.
8.1.2. Configuration
StanzaSender is a Tigase component so the configuration is similar to that of all other components. The simplest way to get the settings for StanzaSender is by generating a configuration with all possible components. To do this you have to run Tigase server with --gen-config-all parameter set.
By default this component name is ssend and here is a content of the configuration file for StanzaSender:
It is one of msg-receivers:
<entry type="String[]" key="id-names">
  ...
  <item value="ssend"/>
</entry>
To activate the component and a specify class name for it following entries has been added:
<entry value="true" type="Boolean" key="ssend.active"/>
<entry value="tigase.server.ssender.StanzaSender" type="String" key="ssend.class"/>
And the main settings section for the component:
<component name="ssend">
  <map>
   <entry value="10" type="Long" key="default-interval"/>
   <entry value="1000" type="Integer" key="max-queue-size"/>
   <entry type="String[]" key="stanza-listeners">
    <item value="jdbc"/>
    <item value="file"/>
   </entry>
  </map>
  <node name="file">
   <map>
    <entry value="true" type="Boolean" key="active"/>
    <entry value="tigase.server.ssender.FileTask" type="String" key="class-name"/>
    <entry value="/var/spool/jabber/*.stanza" type="String" key="init-string"/>
    <entry value="10" type="Long" key="interval"/>
   </map>
  </node>
  <node name="jdbc">
   <map>
    <entry value="true" type="Boolean" key="active"/>
    <entry value="tigase.server.ssender.JDBCTask" type="String" key="class-name"/>
    <entry value="jdbc:mysql://localhost/tigase?user=tigase&
        password=mypass&table=xmpp_stanza"
      type="String" key="init-string"/>
    <entry value="10" type="Long" key="interval"/>
   </map>
  </node>
 </component>
Most parameters should be pretty clear but some may need a little explanation.
General StanzaSender parameters:
-
default-interval number which specifies in seconds how often should the task look in data source for new packets to send.
-
max-queue-size is a number which specifies internal packets queue size. This is used to prevent the component from consuming all the memory for data in case the component can not process them.
-
stanza-listeners is a list of task names to load. Each task can read XMPP packets to send from different data sources. You can load as many listeners (tasks) as you need. Each task must read stanzas from different data sources.
For each task from the stanza-listeners list there is a separate section with parameters for each task:
-
active boolean switch allowing you to turn on/off the task without removing configuration completely.
-
class-name Java class name which implements the task. This class must extend tigase.server.ssender.SenderTask and it is loaded at runtime.
-
init-string is kind of data source connection string. For database it is just database connection string, for file system this is just a directory name. It may be even different for different tasks. The 2 tasks already implemented have some specific features: FileTask allows you to use wild-chars in directory/ file name specification and JDBCTask allows you to specify additional parameter at the end of JDBC connection string - database table name. For specific examples look at above config sections.
-
interval is a number which allows you to specify different interval in seconds for checking data source for each task.
NOTE: Each task has own separate parameters list.
8.2. Tigase HTTP API
Welcome to the Tigase HTTP API users guide. The HTTP API allows you to manage, configure, chat, and send commands to Tigase server using a simple, easy-to-use interface right from your browser! We will guide you through setup, running, and going through some features of the HTTP API.
8.2.1. Requirements
The HTTP API Requires Tigase version v5.0.3 but we recommend using the latest version of Tigase which will give you the easiest setup and functionality. Current versions of Tigase include most of the required files needed to run the API, however you will need to add one more library: servlet-api-3.1.jar which is available Here. Place that file in your /jars directory and you’re all setup and good to go.
Please note, earlier versions of Tigase installer may have not included another required file: javax.servlet-api.jar
This file is included in the archive distributions, and may be extracted to the /jars directory from there.
For older versions of the API, please see the Tigase HTTP API Wiki.
8.2.2. Setup & Configuration
Once all the requirements in place, all you need to do is add the following lines to Tigase’s init.properties file:
--comp-name-3=http
--comp-class-3=tigase.http.HttpMessageReceiver
Note that the class and name number is not important, so long as you don’t have anything else with the same number.
With this default configuration Tigase will attempt to start an http server at port 8080 and run the default modules such as RestModule which will add context for the REST API in /rest path. RestModule will also load all groovy scripts located in scripts/rest/xxx directories and it will bind it to proper action for the /rest/xxx/ paths. More than one directory can be used, think of xxx as a wildcard.
Advanced Configuration
The HTTP component has a variety of configuration options, lets see them in detail here
Component Properties
Please note, for settings mentioning {compname} replace them with the exact text found as --comp-name, which may be http, rest, or something you have set custom in init.properties.
- {compname}/http/ports[i]=8088,8096
-
Sets a comma separated list of ports on which the HTTP server listens for connections. 8080 is set by default.
- {compname}/2222/socket=ssl
-
Sets the port you wish the HTTP server to listen to for HTTPS connections to 2222
- {compname}/4096/domain=example.com
-
Sets 4096 as the port number you want to listen to HTTPS connections AND set the domain name of the SSL certificate from Tigase XMPP server certificate store to be used.
- {compname}/server-class=
-
Sets the name of the class used to manage the HTTP server. The following names may be used
-
tigase.http.jetty.JettyStandaloneHttpServer - starts standalone Jetty HTTP Server instance (requires Tigase HTTP API - Jetty HTTP Server)
-
tigase.http.jetty.JettyOSGiHttpServer - uses Jetty HTTP Server instance available as OSGi service (may be used only in OSGi envoirment) (requires Tigase HTTP API - Jetty HTTP Server)
-
tigase.http.java.JavaStandaloneHttpServer - uses HttpServer provided by Java JDK to start standalone HTTP server (may not work on JDK from every JDK provider)
-
- {compname}/http/port
-
An older version of the /ports[i] setting, it is still supported, but expect to be phased out.
- {compname}/setup/admin-credentials
-
Sets a user and password combination that can access the web installer setup pages. By default administrator JIDs listed in --admins property are granted access, however you may specifiy a specific user and password to give access in addition to those JIDs.
Format is [username:password] So for example, http/setup/admin-credentials=admin:password
Note that this stores the information in plaintext on init.properties file, and this is an optional setting.
Modules
Tigase HTTP API component provides functionalities as modules which may be enabled or disabled and configured separately. Common settings for modules which can be passed in component properties in following format component_name/module_id/module_setting:
-
active[B]= Values true/false to enable or disable module
-
context-path= Path of HTTP context under which module should be available
-
vhosts[s]= Comma separated list of virtual hosts under which the module should be availble. If this setting is not set, the HTTP module will be available for all virtual hosts.
With those ideas in mind, lets look at the available modules for the HTTP API.
This module provides support for the REST API. enable it by using this line in the init.properties file:
http/RestModule/active[B]=true
Assuming that comp-name for the class is http
- rest-scripts-dir=
-
Path to directory containing scripts processing REST requests. By default this directory is scripts/rest
- api-keys[s]=
-
Comma separated list of strings which would be possible to use as keys to pass api-key parameter to request an authorization to execute. If nothing is passed, then no request will be allowed. To allow any request, this property needs to be set to open_access.
dns-webservice module provides support for resolution of DNS names using the HTTP protocol. This might be useful for web applications that need to resolve DNS address to a specific IP. For example, discover IP and port of WebSocket service to use to connect to XMPP server.
To activate this module, use the following line;
http/dns-webservice/active[B]=trueAssuming that comp-name for the class is http
8.2.3. Use of the HTTP API
To begin using the HTTP API, point a browser to the following url http://your.server.domain:8080/ui/ and you will be presented with the following image to login with.
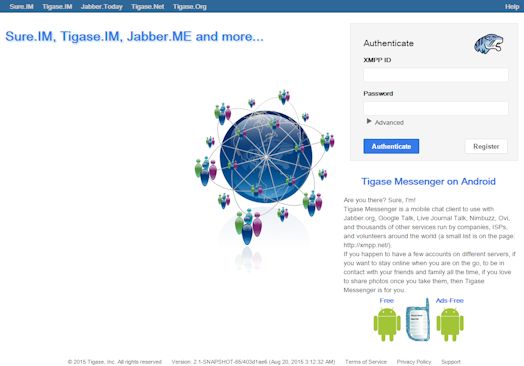
Use your admin-level XMPP id and it’s password to login. Please use bare JID for logins.
NOTE: Normal users can login here as well to use chat and basic functions, but they will not have admin privileges as shown in this guide
8.2.4. Browser interface walk-through
Chat
Chat is the first window that you will see after logging in. It’s quite bare here since there is no roster to speak of. If you had a roster, users would be shown. Lets add a user. Click the user add icon, and then fill in the fields below.
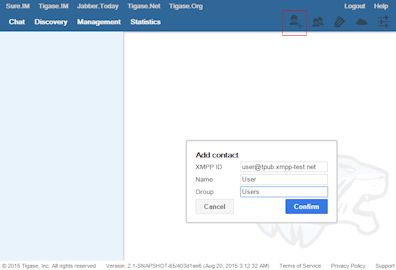
Once both users have added and authorized each other’s roster listing, the users and groups will be shown on the left, with the right side being used for chat functionality.
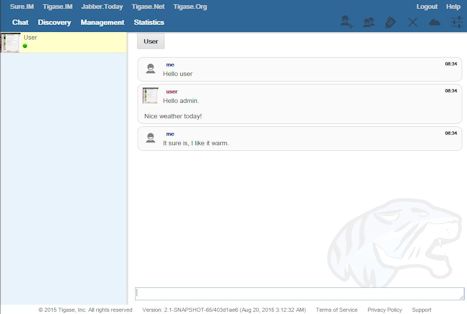
Discovery
The Discovery tab encapsulates the service discovery function of XMPP servers, and will provide a list of available services. Clicking on the service will give you options for executing commands, checking settings, MUC rooms and more.
Management
The Management tab is your administration and settings tool for the XMPP server. Here you can change settings, add and remove users, send server-wide notifications, write and execute scripts, and even obtain server statistics at a glance.
NOTE: some changes to settings may be instant, and others require a server restart
8.2.5. HTTP API Scripting
Scripts in the HTTP API component are used for processing all of requests.
To add a new action to HTTP API component you need to create a script in Groovy in which there is an implementation of class extending tigase.http.rest.Handler class. The URI of the script will be created from the location of script in scripts folder. For example, if TestHandler script with regular a expression will be set to /test and will be placed in scripts/rest/tested, the handler will be called for following URI /rest/tested/test.
Properties
If you are extending classes, you will need to set the following properties:
- regex
-
regular expression which is used to match request URI and parse parameters embedded in URI, example below:
/\/([^@\/]+)@([^@\/]+)/
- requiredRole
-
Role of the user required to be able to access this URI. Available values: null, "user", "admin". If requiredRole is not null, authentication will be required.
- isAsync
-
If set to true, it will be possible to wait for results, perhaps waiting for an IQ stanza to send results.
Properties Containing Closures
Extended class should also set closures for one or more of the following properties: execGet, execPut, execPost, and execDelete depending on which HTTP action or actions you need to support for the following URI. Each closure has dynamic arguments lists. Below is a list of arguments passed to closure which describes how and when the list of arguments change.
-
service: Implementation of Service interface, used to access database or send/recieve XMPP stanzas.
-
callback: Closure which needs to be called to return data. Accepts only one argument of type String,byte[],Map. If data is type of Map it will be encoded to JSON or XML depending on 'Content-Type' header.
-
user: Will be passed only if requiredRole is not null. In other cases this argument will not be in arguments list!
-
content: Parsed content of the request. Will not be in arguments list if Content-Length of request is empty. If Content-Type is of XML or JSON type, type returned as Map. Otherwise it will be an instance of HttpServletRequest.
-
x: Additional arguments passed to callback are groups from regular expression matching URI. Groups are not passed as list, but are added to a list of arguments as next arguments.
If the property for corresponding HTTP action is not set, the component will return a 404 HTTP error.
8.2.6. REST API & HTTP Guide
This component covers both REST API as well as basic HTTP component configuration. REST stands for REpresentational State Transfer which is a stateless communication method that in our case passes commands using HTTP GET, PUT, POST, and DELETE commands to resources within the Tigase server. Although REST uses HTTP to receive commands, REST itself is not intended for use in a browser.
Setup & Configuration
Tigase’s REST component requires the following in classpath
-
servlet-api-3.1.jar
If you have installed Tigase v7.1.0 or later, the jar is already installed. If you are using an older version of Tigase, you may download the file from this link. Once this is installed, you will also need to add the following lines in your init.properties file to enable the HTTP component.
--comp-name-4=http
--comp-class-4=tigase.http.HttpMessageReceiver
In this default configuration, Tigase will try to start a standalone Jetty HTTP server at port 8080 and start up the default modules, including RestModule which will add context for REST API in the /rest path. RestModule will also load all groovy scripts located in scripts/rest/* directories and will bind them to proper actions for the /rest/* paths.
NOTE: Scripts that handle HTTP requests are available in the component repository in src/scriopts/groovy/tigase/rest/ directory.
Component Properties
Here are some additional properties for the HttpMessageReceiver component that can be set in the init.properties file.
-
{compname}/http/ports[i]= - Sets a comma separated list of ports on which the HTTP server will listen for connections. Default is 8080.
-
{compname}/*********/socket=ssl - Sets the port for SSL connections, replace # with the port number of your choice.
-
{compname}/*********/domain=example.com - This sets the domain name of the SSL certificate from Tigase XMPP certificate store, also sets the port to # to listen for HTTPS connections.
-
{compname}/server-class= - Sets the name of the class used to manage the HTTP server. Currently there are the following options:
-
tigase.http.JettyStandaloneHttpServer - Starts standalone Jetty HTTP Server instance (requires Tigase HTTP API - Jetty HTTP Server)
-
tigase.http.jetty.JettyOSGIHttpServer - Uses Jetty HTTP Server instance available as OSGi service (may be used only in OSGi envoirment) (require Tigase HTTP API - Jetty HTTP Server)
-
tigase.http.java.JavaStandaloneHttpServer - Uses HttpServer provided by Java JDK to start standalone HTTP server (may not work on JDK from every JDK provider).
-
{compname}/http/threads= - Sets the number of threads available for HTTP component. Default is 4.
-
{compname}/http/request-timeout= - Sets the timeout time in ms for threads to close on inactive connections. Default is 60 seconds.
-
Modules
Tigase’s REST Component comes with two modules that can be enabled, disabled, and configured separately. Common settings for modules for component properties are used in the following format: component_name/module_id/module_setting/ the following settings are available for both listed modules:
-
active[B] - Boolean values true/false to enable or disable the module.
-
context-path - Path of HTTP context under which the module should be available.
-
vhosts[s] - Comma separated list of virtual hosts for which the module should be available. If not configured, the module will be available for all vhosts.
This is the Module that provides support for the REST API. Available properties:
-
rest-scripts-dir - Provides ability to specify path to scripts processing REST requests if you do not wish to use default (scripts/rest).
-
api-keys[s] - Comma separated list of strings which would be possible to use as keys to pass api-key parameter to request authorization for request execution. If nothing is passed, then no request will be allowed. To allow any request, this property needs to be set using the following:
http/rest/api-keys[s]=open_access
You may set api-keys to any string you wish, however, when you make requests of the HTTP API service, the included API key must match EXACTLY. Keep the API key to ASCII characters to maintain compatibility. For example, if you were to set the following API key:
http/rest/api-key[s]=a7D2dm3lps138w
Requests made to the HTTP service must conclude with the same key: http://localhost:8080/rest/adhoc/sess-man@domain.com?api-key=a7D2dm3lps138w
This module provides resolution of DNS names using HTTP protocol. This particular module might be useful for web applications that need to resolve the DNS address to a particular IP. For example to help discover the IP and port of WebSocket services used to connect to the XMPP server.
Usage Examples
Here are some examples using the HTTP API using available scripts.
Retrieving list of available ad-hoc commands
To retrieve a list of available commands, REST needs to use the GET method from the following resource: /rest/adhoc/sess-man@domain.com. This provides a list of available adhoc commands from the sess-man@domain.com resource. This can be change to any bare JID that you wish to get commands from so it can be a MUC room, monitor component, or in this case, the Session manager. With the server running, lets connect to the address http://localhost:8080/rest/ and the following resource /adhoc/sess-man@domain.com which will retrieve a list of all ad-hoc commands available at sess-man@domain.com. This particular action is protected by authentication using HTTP basic authentication so valid credentials are necessary. User credentials are available in the Tigase’s user database installation, so use the bare JID and password of an admin-authorized account to conduct this activity. The result will be an XML format output of available commands, similar to an IQ stanza, below an example of that result.
<items>
  <item>
    <jid>sess-man@domain.com</jid>
    <node>http://jabber.org/protocol/admin#get-active-users</node>
    <name>Get list of active users</name>
  </item>
  <item>
    <jid>sess-man@domain.com</jid>
    <node>del-script</node>
    <name>Remove command script</name>
  </item>
  <item>
    <jid>sess-man@domain.com</jid>
    <node>add-script</node>
    <name>New command script</name>
  </item>
</items>
There is also the ability to return a JSON formatted result. To achieve this, you need to pass Content-Type: application/json to the HTTP header of the request, or add the type parameter and set it to application/json setting. An example of a JSON result is below.
{
    "items": [
        {
            "jid": "sess-man@domain.com",
            "node": "http://jabber.org/protocol/admin#get-active-users",
            "name": "Get list of active users"
        },
        {
            "jid": "sess-man@domain.com",
            "node": "del-script",
            "name": "Remove command script"
        },
        {
            "jid": "sess-man@domain.com",
            "node": "add-script",
            "name": "New command script"
        }
    ]
}
Again, either of these methods can be used on any component with available ad-hoc commands. Feel free to experiment and see what options are available for each component.
Executing ad-hoc commands
Once you have found a command you wish to use, you can send that command using the HTTP POST method. In this example, lets request a list of active users as seen in the previous section. NOTE: like the previous example, these commands require basic HTTP authentication.
The following command is sent to http://localhost:8080/rest/adhoc/sess-man@domain.com
<command>
  <node>http://jabber.org/protocol/admin#get-active-users</node>
  <fields>
    <item>
      <var>domainjid</var>
      <value>domain.com</value>
    </item>
    <item>
      <var>max_items</var>
      <value>25</value>
    </item>
  </fields>
</command>
This particular command reqiures the three fields <node>, domainjid, and max_items. These three values are the node for the command, as returned in available commands, the domain results are to be returned from, and the maximum number of results. Keep in mind that Content-type: text/xml must be passed to the HTTP header to get an XML result. Not doing so may yield errors or incomprehensible results. The result for this command will look like this:
<command>
  <jid>sess-man@domain.com</jid>
  <node>http://jabber.org/protocol/admin#get-active-users</node>
  <fields>
    <item>
      <var>Users: 3</var>
      <label>text-multi</label>
      <value>admin@domain.com</value>
      <value>user1@domain.com</value>
      <value>morbo@domain.com</value>
    </item>
  </fields>
</command>
Similar results can be sent and received using JSON in a similar fashion. Again, be sure to set ContentType: application/json in the header or default settings.
{
  "command" : {
    "node" : "http://jabber.org/protocol/admin#get-active-users",
    "fields" : [
      {
        "var" : "domainjid",
        "value" : "subdomain.domain.com"
      },
      {
        "var" : "max_items",
        "value" : "25"
      }
    ]
  }
}
The results will look quite similar to the XML results:
{
    "command": {
        "jid": "sess-man@domain.com",
        "node": "http://jabber.org/protocol/admin#get-active-users",
        "fields": [
            {
                "var": "Users: 2",
                "label": "text-multi",
                "value": [
                  "minion1@subdomain.domain.com",
                  "overadmin@subdomain.domain.com"
                ]
            }
        ]
    }
}
Sending any XMPP Stanza
XMPP messages or any other XMPP stanza can be sent using this API by sending HTTP POST request on http://localhost:8080/rest/stream/api-key=API_KEY with a serialized XMPP stanza as content, where API_KEY is the API key specified in the init.properties file. Each request needs to be authorized by sending a valid administrator JID and password as a user/password of BASIC HTTP authorization method. The content of the HTTP request should be encoded in UTF-8 and Content-Type should be set to application/xml.
If no from attribute is set in the stanza, the HTTP API component will supplant it’s JID instead, however if one is set it will be preserved. However, in iq stanzas, if no from attribute is set the HTTP response content will be sent back as a response. Successful requests will return a HTTP response code of 200.
Examples: Any of these examples must be sent as an HTTP POST request to /rest/stream/?api-key=API_KEY of the HTTP API component.
<message xmlns="jabber:client" type="chat" to="test@example.com/resource-1">
    <body>Example message 1</body>
</message>
Sending messages through REST
You can also send messages, or really any XMPP stanza to users and components through REST API. Sending XMPP messages or stanzas using HTTP is realized as a groovy script bundled in the installation package from v7.0.2. If you want to be sure your current install supports this feature, check for the presence of Stream.groovy file in the scripts/rest/stream/ directory.
As in other examples, be sure that you have the following line in your init.properties:
http/rest/api-keys[s]=test_keyYou may also opt to have open_access set to disable API key parameter.
Usage
Using the HTTP POST method, XMPP stanzas can be sent using the built in HTTP API. In a local installation, the request can be sent to http://localhost:8080/rest/stream/?api-key=API_KEY with a seralized XMPP stanza as content, where API_KEY is the API key for HTTP API which is set in etc/init.properties as rest/api-keys[s]. In the case we laid out, it would be test_key. Because XMPP uses XML for formatting, all content in these requests MUST be encoded in UTF-8 and Content-type must be set to application/xml. Lets take a look at some examples.
In all examples the data is sent as an HTTP POST request to /rest/stream/?api-key=test-key.
<message xmlns="jabber:client" type="chat" to="test@example.com/resource-1">
<body>Example message 1</body>
</message>Once this message is sent, the Groovy script adds the remaining information automatically, and the following is what is receieved by test@example.com/resource-1.
<message xmlns="jabber:client" type="chat" from:"http@example.com" to="test@example.com/resource-1">
<body>Example message 1</body>
</message>As you can see, the HTTP component is automatically populated as the sender.
<message xmlns="jabber:client" type="chat" to="test@example.com">
    <body>Example message 1</body>
</message>The syntax and formatting is the same, with the recepiant messaging being exactly the same.
<message xmlns="jabber:client" type="chat" from:"http@example.com" to="test@example.com/resource-1">
<body>Example message 1</body>
</message>You may specify any JID that is registered in the server to send the stanza, ones that use a name that is not registered will return an error.
<message xmlns="jabber:client" type="chat" from="sender@example.com" to="test@example.com/resource-1">
    <body>Example message 1</body>
</message>Ends with the result being somewhat customized.
<message xmlns="jabber:client" type="chat" from:"sender@example.com" to="test@example.com/resource-1">
    <body>Example message 1</body>
</message>
Avatar retrieval requests
There are different formats for avatar retrieval depending on how they are stored, see below for the resources for each type of avatar.
-
/rest/avatar/user@domain - which returns first avatar found (PEP, VCard4 or VCardTemp in this order)
-
/rest/avatar/user@domain/avatar - which returns PEP avatar
-
/rest/avatar/user@domain/vcard4 - which returns avatar from VCard4
-
/rest/avatar/user@domain/vcard-temp - which returns avatar from VCardTemp
Setting HTTP API Privacy Rules
The HTTP API component has settings that allow you to specify who is allowed to use the HTTP API interface, keeping unauthorized users from accessing the feature. This feature is implemented using a Groovy admin ad-hoc stript for the Session Manager component. As a result of this method, it will be avaiulable to execution using the default GTTP API componene capability to execute the script. The actual work of filtering, however, will be conducted by the DomainFilter plugin.
New Rest API added to obtain a JID login time
GetUserInfo command has been expanded to obtain user login and logout times in addition to standard information. To obtain the information, send a POST request to http://xmpp.domain.net:8080/rest/adhoc/sess-man@xmpp.domain.net?api-key=test-api-key with the following:
<command>
  <node>get-user-info</node>
  <fields>
    <item>
      <var>accountjid</var>
      <value>user@xmpp.domain.net</value>
    </item>
    <item>
      <var>Show connected resources in table</var>
      <value>true</value>
    </item>
  </fields>
</command>
Configuration
The HTTP API privacy scipt is loaded automatically. DomainFilter is a default plugin loaded by Tigase on startup. This means there is very little you need to do to have this running. Again, you may define a custom API key to limit access using the following line in init.properties
http/rest/api-keys[s]=test_keyUsage
Setting privacy rules can be done by sending a POST request to the session manager using this address: http://localhost:8080/rest/sess-man@domain.com?api-key=test_key
<command>
  <node>user-domain-perm</node>
  <fields>
    <item>
      <var>jid</var>
      <value>user@domain.com</value>
    </item>
    <item>
      <var>fiteringPolicy</var>
      <value>CUSTOM</value>
    </item>
    <item>
      <var>filteringList</var>
      <value>
         1|allow|self;
         2|allow|jid|admin@test2.com;
         3|allow|jid|pubsub@test.com;
         4|deny|all;
      </value>
    </item>
  </fields>
</command>
Here all parameters are passed to be excuted by ad-hot command. Using the user-domain-perm node we were able to add jids to a CUSTOM filter. Here is a brief breakdown:
-
jid denotes which JID the settings will be applied too.
-
filteringPolicy - This uses a CUSTOM type list that allows for multi-item list of custom processing rules.
-
filteringLise - This is a multi-item list, semi-colon delimited, where each line denotes one item with a rule in this format: +order_number|policy|UID_type[|UID]:
-
order_number can be any integer, as long as no numbers repeat.
-
policy can either allow or deny.
-
UID_type is the User ID Type, can be jid, domain, or all.
-
UID is the user JID affected. If UID_type is set to all then this will be ignored.
These ad-hoc commands replicate settings found in Domain Based Packet Filtering in the admin guide. They may also be influenced by the --domain-filter-policy property of init.properties.
Scripting
As you can see from the above commands, Tigase uses pre-defined scripts for processing of all requests in HTTP API. Although the list may be small for now, this does mean with a little bit of Groovy scripting, you can create your own scripts to interpret REST commands and send them to the server!
All scripts for this purpose will be an implementation of class extending tigase.http.rest.Handler class. The URI of the scripts will be inside the scripts folder. For example, if the script uses TestHandler with a regular expression set to /test and is placed inside the scripts/rest/ the handler will be called with this URI: scripts/rest/test/.
Properties
When extending classes, you will need to set the following listed properties. regex:: Regular expression which is used to match request URI and parse parameters embedded in URI, for example:
-----
/\/([^@\/]+)@([^@\/]+)/
-----
- requiredRole
-
Role of user required to be able to access this URI. Available values are null, user, and admin. Authentication for the script will be required if requiredRole is not null.
- isAsync
-
If set to true, it will be possible to wait for results pending the arrival of IQ stanzas for instance.
Extended class should also set for closures for one or more of the following properties: execGet, execPut, execPost, execDelete, depending on which HTTP action is needed to support the following URI. Each closure has a dynamic arguments list generated at runtime. Below is a list of arguments passed to closure which describe how and when the list of arguments change.
- service
-
Implementation of service interface which is used to access database or send/receove XMPP stanzas.
- callback
-
Callback closures needs to be called to return data. However they only accept one argument of type string,byte[],Map. If data is Map tupe, it will be encoded to JSON or XML depending on Content-Type header.
- user
-
Is passed only if requiredRole is not null. Otherwise this argument will not be in the argument list.
- content
-
Parsed content of the request. This will not be in the list of arguments if Content-Lengeth of request is empty. If Content-Type is set to XML or JSON the return result will be as Map, otherwise it will be an instance of HttpServletRequest.
- x
-
Additional arguments passed to callback are groups from regular expression matching the URI. Groups are not passed as a list, but are added to the list of arguments and next arguments.
If a property for corresponding HTTP action is not set, the component will return an HTTP 404 error.
Example Script
Lets have a look at a script that is included with the install package to get a better idea of how these scripts work. This script will GET a list of all registered account and output them according to an HTML file we will look at later.
import tigase.http.rest.Service
import tigase.xmpp.BareJID

/**
 * Class implements ability to retrieve by service administrator list of registered accounts
 * Handles requests for /rest/users/
 *
 * Example format of content of response:
 * <users><items><item>user1@domain</item><item>user2@domain</item></items><count>2</count></users>
 */
class UsersHandler extends tigase.http.rest.Handler {

    public UsersHandler() {
                description = [
                        regex : "/",
                        GET : [ info:'Retrieve list of registered user jids',
                                description: """Request do not require any parameters and returns list of all registered user accounts on this server (for all vhosts).

Example response will look like this:
\${util.formatData([users:[items:['user1@example.com','user2@example.com','user1@example2.com'],count:3]])}
"""]
                ];
        regex = /\//
        requiredRole = "admin"
        isAsync = false
        execGet = { Service service, callback, jid ->
            def users = service.getUserRepository().getUsers()
            callback([users:[items:users, count:users.size()]]);
        }
    }

}
As we can see, it’s a fairly short code. First it calls the rest service (required for all of the REST activity), and the BareJID handler. Next we extend out custom class to extend tigase.http.rest.Handler. Our author has provided a helpful description of the code to better describe it’s operation and expected result. The last section is the actual code that defines what will match our query, in this case anything, a requirement that an admin make the command, that the connection will terminate with results, and what commands will be passed.
The matching HTML, which will shape the output of the code is included here.
${ util.include('header', [title:'All users']) }
<table style="margin: auto;">
<tr>
<th>Avatar</th>
<th>User JID</th>
</tr>
<% result.users.items.each { user -> %>
<tr>
<td>
<img style="max-height: 50px; max-width: 50px;" src="${util.link("/avatar/" + user)}" />
</td>
<td>
<a href="${util.link("/user/"+user)}">${user}</a>
</td>
</tr>
<% } %>
</table>
${ util.include('footer') }
This file builds a table using the user fields from the GET request. NOTE: Not all scripts need a matching HTML file, basic requests may not need special handling.
REST API & PubSub
All PubSub Scripts are found within the scripts/rest/pubsub directory of Tigase’s installation directory. All examples in this section are prepared for a PubSub component available at pubsub@example.com. To use these examples for your installation, that JID needs to be replaced with with your pubsub JID.
All parameters passed in the content of HTTP request needs to be wrapped with <data/> tag at the root of the XML document. Returned results will be wrapped within the <result/> tag in the root of the XMl document.
Create a Node
HTTP URL: example.com/rest/pubsub/pubsub@example.com/create-node
Available HTTP methods:
GET
Method returns example content which contains all required and optional parameters that may be passed to the newly created node.
POST
Command requires fields node and pubsub#node_type to be filled with proper values for execution.
-
node Field contains id of node to create
-
owner Field may contain JID or JIDS which will be considered owner of the node. If this field is empty, server will use JID of HTTP API Component (rest@example.com)
-
pubsub#node_type Field should contain one of two types:
-
leaf Node to items that will be published
-
collection Node to nodes what will contain other nodes
-
Below is an example of creating a leaf type node with the owner set to admin@example.com.
<data>
  <node>example</node>
  <owner>admin@example.com</owner>
  <pubsub prefix="true">
    <node_type>leaf</node_type>
  </pubsub>
</data>
Server response:
<result>
  <Note type="fixed">
    <value>Operation successful</value>
  </Note>
</result>
Delete a node
HTTP URL: example.com/rest/pubsub/pubsub@example.com/delete-node
Available HTTP methods:
GET
Command returns example content which contains all required and operational parameters that may be passed.
POST
Command requires field node to be filled where node is the id of the node to delete.
Below is an example of removing a node with an id of example
<data>
  <node>example</node>
</data>
Server response
<result>
  <Note type="fixed">
    <value>Operation successful</value>
  </Note>
</result>
Subscribe to a node
HTTP URI: example.com/rest/pubsub/pubsub@example.com/subscribe-node
Available HTTP methods:
GET
Method returns example content which contains all required and optional parameters that may be passed.
POST
Command requires node and jid fields to be filled.
-
node is the id of the node to subscribe too.
-
jid is the JID or JIDS to be subscribed to the node.
Below is an example of the XML information passed between client and server with test1@example.com and test2@example.com subscribing to example node.
<data>
  <node>example</node>
  <jids>
    <value>test1@example.com</value>
    <value>test2@example.com</value>
  </jids>
</data>
Server response:
<result>
  <Note type="fixed">
    <value>Operation successful</value>
  </Note>
</result>
Unsubscribe from a node
HTTP URI: example.com/rest/pubsub/pubsub@example.com/unsubscribe-node
Available HTTP methods:
GET
Method returns example content which contains all required and optional parameters that may be passed.
POST
Like the Subscribe to a node section, the command requires both the node and jid fields to be filled.
-
node is the id of the node to unsubscribe from.
-
jid is the JID or JIDS to be unsubscribed from the node.
Below is an example of the XML information passed between client and server with test1@example.com and test2@example.com unsubscribing to example node.
<data>
  <node>example</node>
  <jids>
    <value>test@example.com</value>
    <value>test2@example.com</value>
  </jids>
</data>
Server response:
<result>
  <Note type="fixed">
    <value>Operation successful</value>
  </Note>
</result>
Publish an item to a node
HTTP URI: example.com/rest/pubsub/pubsub@example.com/publish-item
Available HTTP methods:
GET
Method returns example content which contains all required and optional parameters that may be passed.
POST
Command requires the node and entry fields to be filled. Available fields:
-
node Field contains the id of the node to be published to.
-
item-id Field to contain the id of the entry to publish.
-
expire-at Field may contain a timestamp after which item should not be delivered to subscribed users. Timestamp should follow this pattern: YYYY-MM-DDhh:mm:ss with a trailing Z to indicate UTC time in a 24h format.
-
entry Field should contain multi-line entry content which should be valid XML value for an item.
Below is an example exchange between client and server for publishing an item with id item-1 to node example .
<data>
  <node>example</node>
  <item-id>item-1</item-id>
  <expire-at>2015-05-13T16:05:00+02:00</expire-at>
  <entry>
    <item-entry>
      <title>Example 1</title>
      <content>Example content</content>
    </item-entry>
  </entry>
</data>
Server response:
<result>
  <Note type="fixed">
    <value>Operation successful</value>
  </Note>
</result>
List Available Nodes
HTTP URI: example.com/rest/pubsub/pubsub.example.com/list-nodes
Available HTTP methods
GET
This method returns list of available PubSub nodes for the domain passed as part of the URI (pubsub.example.com).
Below is an example exchange between client and server for listing all nodes, the result having test, node_54idf40037 and node_3ws5lz0037
<result>
<title>List of available nodes</title>
<nodes label="Nodes" type="text-multi">
<value>test</value>
<value>node_54idf40037</value>
<value>node_3ws5lz0037</value>
</nodes>
</result>
List Published Items on Node
HTTP URI: example.com/rest/pubsub/pubsub.example.com/list-items
Available HTTP methods
GET
Method returns example content which contains all required and optional parameters that may be passed.
POST
This command requires the node field to be filled. The node field contains the ID of the node from which we want the list of published items.
Below is an example exchange between client and server asking for all items published in the example node.
<data>
<node>example</node>
</data>
Server Response
<result>
<title>List of PubSub node items</title>
<node label="Node" type="text-single">
<value>example</value>
</node>
<items label="Items" type="text-multi">
<value>item-1</value>
<value>item-2</value>
</items>
</result>
Items item-1 and item-2 are the listed items.
Retrieve Published Item on Node
HTTP URI: example.com/rest/pubsub/pubsub.example.com/retrieve-item
Available HTTP methods
GET
Method returns example content which contains all required and optional parameters that may be passed.
POST
Command requires that fields node and item-id are filled. Available Fields: - node The node the item is published to. - item-id The id of the item you wish to retrieve.
Example communication between client and server:
<data>
<node>example</node>
<item-id>item-1</item>
</data>
Server response:
<result>
<title>Retrive PubSub node item</title>
<node label="Node" type="text-single">
<value>example</value>
</node>
<item-id label="Item ID" type="text-single">
<value>item-1</value>
</item-id>
<item label="Item" type="text-multi">
<value><item expire-at="2015-05-13T14:05:00Z" id="item-1"><item-entry>
<title>Example 1</title>
<content>Example content</content>
</item-entry></item>
</value>
</item>
</result>Node that inside the item element, there is an XML encoded element, this will be retrieved without any decoding.
8.2.7. Admin UI Guide
The Admin User Interface is an HTTP-based interface that sends REST commands to the server to update configurations, change settings, and retrieve statistics.
A Note about REST
REST stands for REpresentational State Transfer which is a stateless communication method that in our case passes commands using HTTP GET, PUT, POST, and DELETE commands to resources within the Tigase server. Although REST uses HTTP to receive commands, REST itself is not intended for use in a browser. For more information, please see the REST API guide.
Configuration
Allows you to list server components and their configurations, as well as manage server components and plugins.
List server/component configuration section covers all the component options including the basic-conf and will allow you to change each setting by changing the values in the field and clicking submit. All settings are listed by the component name in the dropdown menu either as default, or as defined by --component-name property.
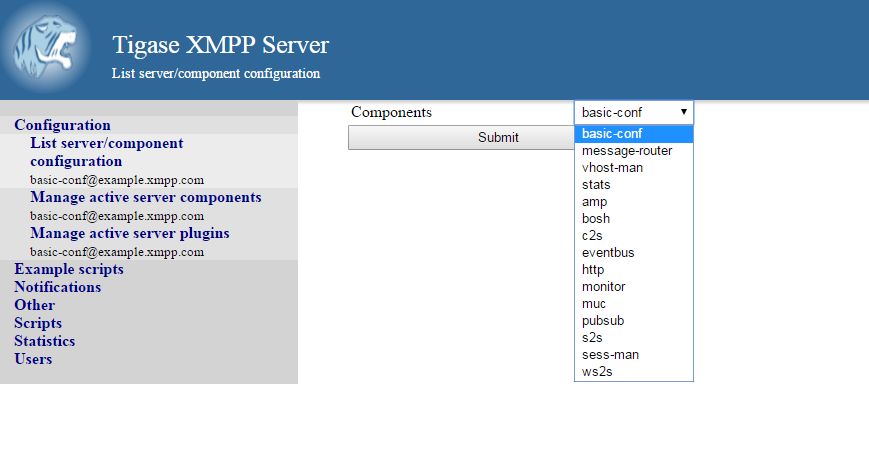
Manage active server components allows you to do exactly that, but you can also add and disable components from this interface.
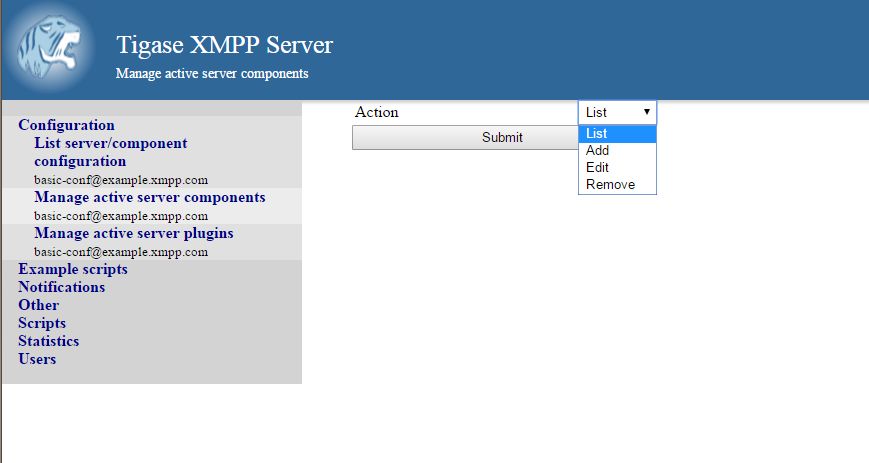
Here you can List, Add, Edit, and Remove components. - List provides a list of all running components, each with its name, info, and class. - Add provides an interface to add a class and a name for components. You will not be able to add invalid component names or classes. - Edit enables you to edit the specific properties of any running component. Even options for which there are no current values will be listed, you can consider this list a comprehensive list of settings and options for the current component. - Remove provides a way to remove running components.
Managing server plugins allows you to turn on or off plugins from this window VIA check-boxes. Note that the changes are made in real-time.
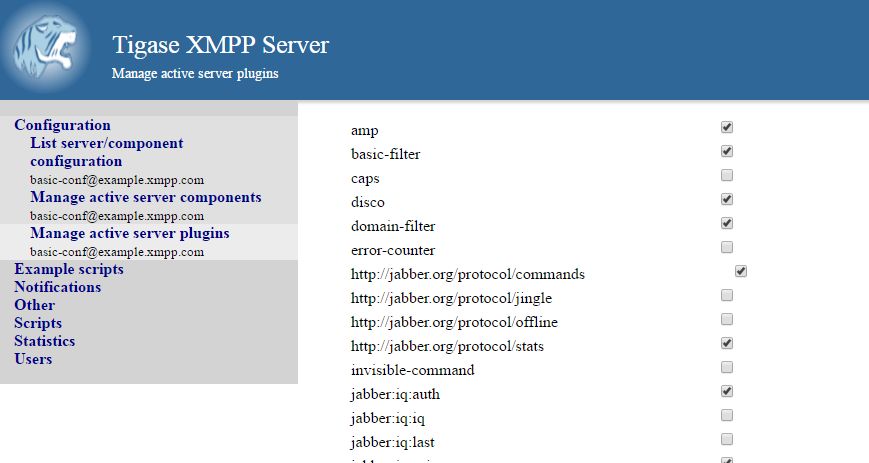
Example Scripts
This is a list of script examples that can be run and do menial functions for each component. They may not have particular value themselves, but are present to be used as reference when writing custom scripts. Get list of available commands is one script, that is present for every component that is active on the server, and as its title implies, will provide a list of all commands for that component. Lastly, the two scripts from the Scripting section of this guide. Generally, there is not much needed to see in this section.
Notifications
This section has one simple command: to be able to send a mass message to all logged in users. There are three types of messages that can be sent from this section: - normal Messages will show as a pop-up in most clients. - headline Certain clients will take headline messages and insert them into MUC or chats between users, otherwise it will create a pop-up like normal messages. - chat Chat messages will open up a chat dialog with users.
Other
This section contains a considerable list of options and settings affecting server functions.
Activate log tracker for a user
This allows you to set a log file to track a specific user. Set the bare or full JID of the user you want to log, and a name of the files you wish the log to be written to. The files will be written in the root Tigase directory unless you give a directory like logs/filename. The log files will be named with a .0 extension and will be named .1, .2, .3 and so on as each file reaches 10MB by default. filename.0 will always be the most recent. Logging will start once the command has been issued, and cease once the server restarts.
Add SSL certificate
Here you can add SSL certificates from PEM files to specific virtual hosts. Although Tigase can generate its own self-signed certificates, this will override any default certificates. The certificates cannot contain a passphrase, or be encrypted. Be sure that the contents contain both the certificate and private key data. You also have the option to save the certificate to disk, making the change permanent.
Add listener script
This section allows you to create a custom function for the eventbus component. These scripts can have the server conduct certain operations if set criteria are met. You may write the script in either Groovy or EMCAscript. Please see the eventbus section for more details.
Add Monitor Task
You can write scripts for Groovy or ECMAScript to add to monitor tasks here. This only adds the script to available scripts however, you will need to run it from another prompt. Note that these scripts may only work with the monitor component.
Add Monitor Timer Task
This section allows you to add monitor scripts in Groovy while using a delay setting which will delay the start of the script.
Add New Item - ext
Depending on whether you have any external components loaded or not, this may show. This allows you to add additional external components to the running instance of Tigase.
Add New Item - Vhost
This allows you to add new virtual hosts to the XMPP server. A breakdown of the fields is as follows:
-
Domain name: the full domain name of the new vhost. Tigase will not add anything to this domain, so if it is ti be a subdomain of example.com, you will need to enter sub.domain.com.
-
Enabled: Whether the domain is turned on or off.
-
Anonymous enabled: Allow anonymous logins.
-
In-band registration: Whether or not to allow users to register accounts upon login.
-
TLS required: Require logins to the vhost to conduct a TLS handshake before opening streams.
-
S2S secret: a server-generated code to differentiate traffic between servers, typically there is no need to enter your own, but you may if you need to get into low level code.
-
Domain filter policy: Sets the filter policy for this domain, see This section for a description of the rules.
-
Domain filter domains: a specific setting to restrict or control cross domain traffic.
-
Max users: maximum users allowed to be registered to the server.
-
Allowed C2S, BOSH, Websocket ports: Comma separated list of ports that this vhost will check for all of these services.
-
Presence forward address: specific address where presence information is forwarded too. This may be handy if you are looking to use a single domain for presence processing and handling.
-
Message forward address: Specific address where all messages will be sent too. This may be useful to you if you have a single server handling AMP or message storage and want to keep the load there.
-
Other Parameters: Other settings you may wish to pass to the server, consider this a section for options after a command.
-
Owner: The owner of the vhost who will also be considered an administrator.
-
Administrators: comma separated list of JIDs who will be considered admins for the vhost.
-
XEP-0136 Message Archiving Enabled: Whether to turn on or off this feature.
-
XEP-0136 Required store method: If XEP-0136 is turned on, you may restrict the portion of message that is saved. This is required for any archiving, if null, any portion of the message may be stored.
-
Client certificate required: Whether the client should submit a certificate to login.
-
Client certificate CA: The Certificate Authority of the client certificate.
-
XEP-0136 retention period: integer of number of days message archives will be set.
-
Trusted JIDs: Comma separated list of JIDs who will be added to the trusted list, these are JIDS that may conduct commands, edit settings, or other secure work without needed secure logins.
-
XEP-0136 retention type: Sets the type of data that retention period will use. May be User defined (custom number type), Unlimited, or Number of Days.
-
XEP-0136 - store MUC messages: Whether or not to store MUC messages for archiving. Default is user, which allows users to individually set this setting, otherwise tue/false will override.
-
see-other-host redirection enabled: in servers that have multiple clusters, this feature will help to automatically repopulate the cluster list if one goes down, however if this is unchecked, that list will not change and may attempt to send traffic to a down server.
-
XEP-0136 Default store method: The default section of messages that will be stored in the archive.
Change user inter-domain communication permission
Here you can restrict users to be able to communicate on specific domains, this works similar to the domain filtering policy using the same rule sets. For more details, see Domain Based Packet Filtering section for rule details and specifics. Note that the changes may be made to mutiple JIDs at the same time.
Create Node
This section allows you to create a new node for the pubsub component. Here is a breakdown of the fields:
-
The node to create: this is the name of the node that will be created.
-
Owner JID: user JID who will be considered the owner of the node.
-
pubsub#node type: sets the type of node the the new node will be. Options include:
-
leaf Node that can publish and be published too.
-
collection A collection of other nodes.
-
-
A friendly name for the node: Allows spaces and other characters to help differentiate it from other nodes.
-
Whether to deliver payloads with event notifications: as it says, to publish events or not.
-
Notify subscribers when the configuration changes: default is false
-
Persist items to storage: whether or not to physically store items in the node.
-
Max # of items to persist: Limit how many items are kept in the node archive.
-
The collection with which the node is affiliated: If the node is to be in a collection, place that node name here.
-
Specify the subscriber model: Choose what type of subscriber model will be used for this node. Options include:
-
authorize - Requires all subscriptions to be approved by the node owner before items will be published to the user. Also only subscribers may retrieve items.
-
open - All users may subscribe and retrieve items from the node.
-
presence - Typically used in an instant message environment. Provides a system under which users who are subscribed to the owner JID’s presence with a from or both subscription may subscribe from and retrieve items from the node.
-
roster - This is also used in an instant message environments, Users who are both subscribed to the owners presence AND is placed in specific allowed groups by the roster are able to subscribe to the node and retrieve items from it.
-
whitelist - Only explicitly allowed JIDs are allowed to subscribe and retrieve items from the node, this list is set by the owner/administrator.
-
-
Specify the Publisher model: Choose what type of publisher model will be used for this node. Options include:
-
open - Any user may publish to this node.
-
publishers - Only users listed as publishers may be able to publish.
-
subscribers - Only subscribers may publish to this node.
-
-
When to send the last published item: This allows you to decide if and when the last published item to the node may be sent to newly subscribed users.
-
never - Do not send the last published item.
-
on_sub - Send the last published item when a user subscribes to the node.
-
on_sub_and_presence - Send the last published item to the user after a subscription is made, and the user is available.
-
-
The domains allowed to access this node: Comma separated list of domains for which users can access this node. By default is is blank, and there is no domain restriction.
-
Whether to deliver items to available users only: Items will only be published to users with available status if this is selected.
-
Whether to subscription expired when subscriber going offline: This will make all subscriptions to the node valid for a single session and will need to be re-subscribed upon reconnect.
-
The XSL transformation which can be applied to payloads in order to generate an appropriate message body element: Since you want a properly formatted <body> element, you can add an XSL transformation here to address any payloads or extra elements to be properly formatted here.
-
The URL of the XSL transformation which can be applied to payloads in order to generate an appropriate message body element: This would be the URL of the XSL Transform, e.g. http://www.w3.org/1999/XSL/Transform.
-
Roster groups allowed to subscribe: a list of groups for whom users will be able to subscribe. If this is blank, no user restriction will be imposed.
-
Notify subscribers when owner changes their subscription or affiliation state: This will have the node send a message in the case of an owner changing affiliation or subscription state.
-
Allows get list of subscribers for each subscriber: Allows subscribers to produce a list of other subscribers to the node.
-
Whether to sort collection items by creation date or update time: options include
-
byCreationDate - Items will be sorted by the creation date, i.e. when the item was made.
-
byUpdateTime - Items will be sorted by the last update time, i.e. when the item was last edited/published/etc..
-
Default config - Pubsub
Here you may set the default configuration for any new pubsub node. These changes will be made for all future nodes, but will not affect currently active nodes.
Default room config
This page allows admins to set the default configuration for any new MUC rooms that may be made on the server.
Delete Monitor Task
This removes a monitor task from the list of available monitor scripts. This action is not permanent as it will revert to inital settings on server restart.
Delete Node
Provides a space to remove a node from the server. It must be the full name of the node, and only one node can be removed at a time.
Deleting ALL Nodes
This page allows the logged in admin to delete all nodes from the associated vhost. This change is irreversible, be sure to read and check the box before submitting the command.
Fix User’s Roster
You can fix a users roster from this prompt. Fill out the bare JID of the user and the names you wish to add or remove from the roster. This will NOT edit a user’s roster, but rather compare client roster to database and fix any errors between them.
Fix User’s Roster on Tigase Cluster
This does the same as the Fix User’s Roster, but can apply to users who may not be logged into the local vhost, but are logged into a clustered server.
Get User Roster
As the title implies this gets a users' roster and displays it on screen. You can use a bare or full JID to get specific rosters.
Get any file
Enables you to see the contents of any file in the tigase directory. By default you are in the root directory, if you wish to go into directory use the following format: logs/tigase.log.0
Get Configuration File
If you don’t want to type in the location of a configuration file, you can use this prompt to bring up the contents of either tigase.conf or init.properties.
Get init.properties File
Will output the current init.properties file, this includes any modifications made during the current server session.
Get list available commands
This may be listed multiple times for different components, but this will do as the section suggest and list available commands for that particular component.
Load test
Here you can run a test with the pubsub component on any node to test functionality and proper settings for the node.
Load Errors
Will display any errors the server encounters in loading and running. Can be useful if you need to address any issues.
New command script
This space allows you to create a new command script that will work within the associated component. Note that under the hyperlinked title, there is a listing of muc.server.org or pubsub.server.org, use these to determine where the new command will operate.
OAuth Credentials
This allows the setting of new custom OAuth credentials for the server, and you can also require the use of OAuth tokens for users when they login. This is a setting for the specific host you are logged into. If you are logged into xmpp1.domain.com, it will not affect settings for xmpp2.domain.com.
Pre-Bind BOSH user session
This allows a JID to be paired with a BOSH session before that user logs in, can reduce CPU use if you have a user that logs in via BOSH on a regular basis, or a web client that will regularly connect. You may also specify HOLD and WAIT integers to affect how BOSH operates with the associated JID.
Publish item to node
This window allows you to not only test, but publish an item to the specified node. All fields must be filled in in order to avoid the server dropping an improperly formatted stanza.
Rebuild database
This will force Tigase to rebuild databases for the pubsub component, this may be useful for pubsub subscribers who continue to get pushed events after they unsubscribe.
Reload component repository
This will reload any vhosts that the server is running. This may be useful if one is disconnected or broken during runtime.
Remove an item
This will remove a running vhost from the server, you will be presented with a list to pick from.
Remove command script
Like new command script, take a look at the subheading to determine which component you want to remove the script from. Once there, select the command you wish to remove from the server. If remove from disk is selected, then the change will be permanent. Otherwise, the command will be removed until the next server restart.
Remove listener script
Select from a list the listener script you wish to remove. This will only affect custom listener scripts added to the eventbus component.
Remove room
This provides fields to remove a room from the MUC component. you may suggest an alternative room which will move occupants to the alternative room once the current one is removed.
Retrieve items
Here you can retrieve items from PubSub nodes, this simulates the get IQ stanza from the pubsub component. - Service name - The address of the pubsub component. - Node name - Item node to retrieve items from. - Item ID - The item ID of the item you wish to retrieve. - Items Since - UTC timestamp to start search from: YYYY-MM-DDTHH:MM:SSZ
S2S Bad State Connections
This will list any connections to other servers that are considered bad or stale. This will populate very rarely as Tigase automatically adjusts around clustered servers that go down. In the event a connection stays bad, it is recommended to reset those connections in the next space.
S2S Reset Bad State Connections
This will reset the connections with other servers that are considered bad and have shown up in the S2S Bad State Connections page.
Subscribe to a node
This provides a space for an administrator to manually have a JID subscribe to a particular node.
Unsubscribe from node
Here you can unsubscribe users from a particular node. Users can be a comma separated list.
Update item configuration
Typically two entries will be seen for this entry, one for basic-conf and another for vhost-man. They each have their own sections, but provide for a plethora of server options. Changes to the server are done in realtime, and may not be permanent.
This will prompt a list of nearly every component setting currently available in the Tigase installation. They are broken down as follows: Component/catagory or setting/setting So for example, if you wanted to change admins for the eventbus component, you will select 'eventbus/admins'. Another example might be if you wanted to turn on or off a task in monitor component, lets say disk-checker-task, you would find 'monitor/disk-checker-task/enabled'. Clicking Submit query will show current status and settings, and possible fields to change. Most changes done in this manner will be reset to default or as written in init.properties file on server restart.
You will be presented with a list of domains that Tigase is currently hosting, you will be able to change settings for one domain at a time using this function. Once a domain is selected, you will be able to set or change the following settings:
-
Domain name: the full domain name of the new vhost. Tigase will not add anything to this domain, so if it is ti be a subdomain of example.com, you will need to enter sub.domain.com.
-
Enabled: Whether the domain is turned on or off.
-
Anonymous enabled: Allow anonymous logins.
-
In-band registration: Whether or not to allow users to register accounts upon login.
-
TLS required: Require logins to the vhost to conduct a TLS handshake before opening streams.
-
S2S secret: a server-generated code to differentiate traffic between servers, typically there is no need to enter your own, but you may if you need to get into low level code.
-
Domain filter policy: Sets the filter policy for this domain, see This section for a description of the rules.
-
Domain filter domains: a specific setting to restrict or control cross domain traffic.
-
Max users: maximum users allowed to be registered to the server.
-
Allowed C2S, BOSH, Websocket ports: Comma separated list of ports that this vhost will check for all of these services.
-
Presence forward address: specific address where presence information is forwarded too. This may be handy if you are looking to use a single domain for presence processing and handling.
-
Message forward address: Specific address where all messages will be sent too. This may be useful to you if you have a single server handling AMP or message storage and want to keep the load there.
-
Other Parameters: Other settings you may wish to pass to the server, consider this a section for options after a command.
-
Owner: The owner of the vhost who will also be considered an administrator.
-
Administrators: comma separated list of JIDs who will be considered admins for the vhost.
-
XEP-0136 Message Archiving Enabled: Whether to turn on or off this feature.
-
XEP-0136 Required store method: If XEP-0136 is turned on, you may restrict the portion of message that is saved. This is required for any archiving, if null, any portion of the message may be stored.
-
Client certificate required: Whether the client should submit a certificate to login.
-
Client certificate CA: Client Certificate Authority.
-
XEP-0136 retention period: Integer of number of days message archives will be set.
-
Trusted JIDs: Comma separated list of JIDs who will be added to the trusted list, these are JIDS that may conduct commands, edit settings, or other secure work without needed secure logins.
-
XEP-0136 retention type: Sets the type of data that retention period will use. May be User defined (custom number type), Unlimited, or Number of Days.
-
XEP-0136 - store MUC messages: Whether or not to store MUC messages for archiving. Default is user, which allows users to individually set this setting, otherwise true/false will override.
-
see-other-host redirection enabled: in servers that have multiple clusters, this feature will help to automatically repopulate the cluster list if one goes down, however if this is unchecked, that list will not change and may attempt to send traffic to a down server.
-
XEP-0136 Default store method: The default section of messages that will be stored in the archive.
Update user roster entry
This section allows admins to edit individual users rosters, although it provides similar functionality to fix users roster, this is designed for precision editing of a user roster.
-
Roster owner JID: The BareJID of the user roster you wish to edit.
-
JID to manipulate: The specific BareJID you want to add/remove/change.
-
Comma separated groups: Groups you wish to add the JID too.
-
Operation Type: What function will be performed?
-
Add - Add the JID to manipulate to the owner JID’s roster and groups.
-
Remove - Remove the JID to manipulate from the owner JID’s roster and groups.
-
-
Subscription type: The type of subscription stanza that will be sent to the server, and subsequently between the two users will be employed.
-
None - Select this if neither the owner or the user to be manipulated wishes to receive presence information.
-
From - The Roster Owner will not receive presence information from the JID to manipulate, but the opposite will be true.
-
To - The JID to manipulate will not receive presence information from the Roster Owner, but the opposite will be true.
-
Both - Both JIDs will receive presence information about each other.
-
Update user roster entry extended version
This section is an expanded version of the previous one, all fields already specified are the same with these additions:
-
Roster owner name: A friendly name or nickname if you wish to change/create one. not required
-
Comma separated of owner groups: Groups that the user wants to join/leave. not required
-
Roster item JID: The specific JID that needs to be edited.
-
Roster item name: A friendly name or nickname that will be changed/created. not required
-
Comma separated list of item groups: A group or list of groups that the roster item JID will be added to/removed from.
-
Action:
-
Add/update item - Will add or update the item JID in the roster owner’s roster.
-
Remove item - Will remove the item JID from the roster owner’s roster.
-
Add/update both rosters - Will add or update the item in both roster owner and roster item’s roster.
-
Remove from both rosters - Will remove the item from both roster owner and roster item’s roster.
-
Scripts
This section will enable administrators to custom write or enter their own scripts for specific components. Each active component will have an entry for new and remove command scripts and scripts written there will be for that component.
New Command Script
-
Description: A friendly name of the script, will be the title of the link in the menu on the left.
-
Command ID: Internal command that Tigase will use when referencing this script.
-
Group: The group for the script, which may be any of the headings on the left (Configuration, Example scripts, Notifications, Other etc..) or your own. If no group exists, a new one will be created.
-
Language: The language the script is written in. Currently Tigase supports Groovy and EMCAScript.
-
Script text: the fulltext of the script.
-
Save to disk: Scripts that are saved to disk will be permanently stored in the server’s directory /scripts/admin/[Component]/commandID.js NOTE Scripts that are NOT saved to disk will not survive a server restart.
Remove Command Script
As with New Command Script, there is an entry for each component. This page will provide a space to remove commands for the selected component. You will be provided a list of scripts associated with that component. You also have the open to remove from disk, which will permanently delete the script from the hard drive the server is on. If this is unchecked, the script will be unavailable until the next restart.
Statistics
This section is more useful to test statistics scripts and components, as many of them produce very small amounts of information, however these may be collected by other components or scripts for a better information display.
Get User Statistics
Provides a script output of user statistics including how many active sessions are in use, number of packets used, specific connections and their packet usage and location. All resources will return individual stats along with IP addresses.
Users
Add User
Here you can add new users to any domain handled by vHosts, users are added to database immediately and are able to login. NOTE: You cannot bestow admin status to these users in this section.
Change User Password
This enables you to change the password of any user in the database. Although changes will take effect immediately, users currently logged in will not know the password has been changed until they try to log in again.
Delete User
This removes the user or users (comma separated) from the database. The deleted users will be kicked from the server once submit is clicked.
Get User Info
This section allows admins to get information about a specific user including current connections as well as offline and online messages awaiting delivery.
8.2.8. Tigase Web Client
Tigase now has a fully featured XMPP client built right into the HTTP interface. Everything you would expect from an XMPP client can now be done from the comfort of your browser window with no software install required!
Lets walk through setup.
Tigase web client requires the Http.Message.Receiver plugin to be active. To enable this add the following lines to your init.properties file:
--comp-name-5:http
--comp-class-5:tigase.HttpMessageReceiver
NOTE: If you selected HTTP API to be enabled on setup, you already have everything you need. This sets up an HTTP server with the default port of 8080. See the HTTP API guide for component configuration.
To access the client, point a browser to the following address: xmpp.your-server.net:8080/ui/
It will ask you for a login, any bare JID of users registered with the server will work. NOTE: Use your bare JID for login
Once you have logged in successfully, you will be presented with the following screen.

The commands are broken into categories shown here. All changes made in these sections are instant and should be seen the same as if you were using an external XMPP client like Psi.
NOTE The BOSH client will automatically translate all requests to the server name. In some rare cases this may not be resolvable by the browser and you will be unable to login. Should that happen, you may disable that feature using the following line in your init.properties:
bosh/send-node-hostname[B]=false
You may have to specifically designate the bosh URL when using the advanced tag in the login screen.
Chat
This is the default window, and your main interface for chatting inside XMPP with this server. NOTE: you can only communicate to users logged onto the current server, or connected clusters Users from your roster will be on the left panel, the right all active discussions and MUCs, as well as the currently selected chat will be available.
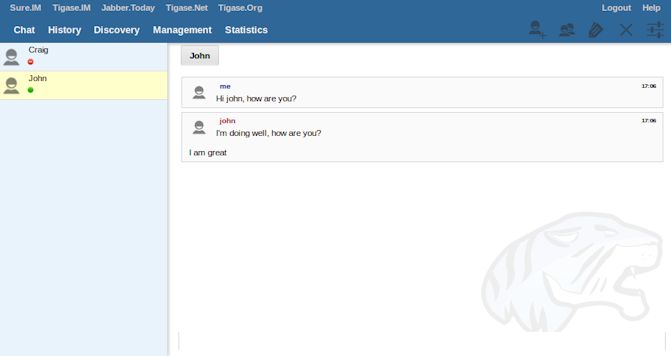
Users that are logged in and on your roster will be displayed on the left side. Double-clicking will bring up a new chat window with the user. You can Right-click on them to bring up a sub menu with the following;
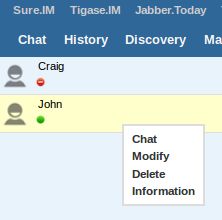
-
Chat replicates a double-click and opens a new window for chat.
-
Modify brings up a dialogue that allows you to change the JID of the contact, a nickname, and group.
-
Delete removes the user from your roster. This will also remove subscription authorization for the selected user to receive presence information effectively removing you from their roster. NOTE: this will not block user packets from your JID
-
Info brings up the User Info (this is the disco#info command for the selected user)
The top right section has a few icons with specific functionality, they are;
 adds a new user to your roster.
 creates a new Multi-user chatroom.
 allows you to edit your user information such as picture and nickname.
 closes the active chat window.
 provides a place to change your password or publish changes to your user info. NOTE: you are limited to changing the General fields
Discovery
This is your service discovery panel, which breaks down by component in the sidebar. Each component name and its associated JID is listed to help you find what you need. Most components give you an option to Execute commands with a few exceptions allowing browsing and the ability to join a MUC.
Browse allows you to dig deeper into certain components; for example list the chatrooms available in the MUC component. At the top of the page the specific JID of the component are you in will be displayed. This is a text field, and can be edited to reflect the JID of the component (or just the server name) to navigate.

Join to Room will join you to a MUC room that is selected. Alternatively, selecting Join to Room while MUC component is selected, you can join and start a new MUC room.
Execute Command Provides a hierarchy of commands and options to view and edit settings, run commands and scripts, view contents of files, and see statistics. Since each Component can have a unique structure it is best to explore each to see what options are available.
Management
This is an advanced window for settings and management for the XMPP server.
Configuration
From a drop-down menu you can view all the active components, or the server configuration (basic-conf). This is a read-only list of the current settings.
This section gives you a drop-down menu for components - List will provide a list of active running components with the following format component name :: componentInfo{Title=Server, Server version/revision (submission date), Class=component class} For example: amp :: componentInfo{Title=Tigase XMPP Server, Version=7.1.0-SNAPSHOT-b3990/574c329f (2015-08-28/10:32:06), Class=tigase.server.amp.AmpComponent}
-
Add Allows you to activate a component in a similar way you would in the init.properties files. define a name for the component, and the class for the component. Once you click Confirm that component will be active and running.
-
Edit will allow you to edit details of the selected component. All possible values for the component will be listed, even ones that do not have specific settings. Changes will be immediate, although changes will revert to ones specified in init.properties upon restart.
-
Remove allows you to remove components from a dropdown list. Components will be removed upon confirmation, however settings will be reverted on server restart.
Notifications
This section has one simple command: to be able to send a mass message to all logged in users. You may choose to change the type of message to headline or Normal which will show as a pop-up in most XMPP clients. Chat messages will open up a chat dialog with users.
Activate log tracker for a user
This allows you to set a log file to track a specific user. Set the bare or full JID of the user you want to log, and a name of the files you wish the log to be written to. The files will be written in the root Tigase directory unless you give a directory like logs/filename. The log files will be named with a .0 extension and will be named .1, .2, .3 and so on as each file reaches 10MB by default. filename.0 will always be the most recent. Logging will cease once the server restarts.
Add SSL certificate
Here you can add SSL certificates from PEM files to specific virtual hosts. Although Tigase can generate its own self-signed certificates, this will override those default certificates.
Add Monitor Task
You can write scripts for Groovy or ECMAScript to add to monitor tasks here. This only adds the script to available scripts however, you will need to run it from another prompt.
Add Monitor Timer Task
This section allows you to add monitor scripts in Groovy while using a delay setting which will delay the start of the script.
Add New Item - ext
Provides a method to add external components to the server. By default you are considered the owner, and the Tigase load balancer is automatically filled in.
Change user inter-domain communication permission
You can restrict users to only be able to send and receive packets to and from certain virtual hosts. This may be helpful if you want to lock users to a specific domain, or prevent them from getting information from a statistics component.
Default room config
Allows you to set the default configuration for new MUC rooms. This will not be able to modify current in use and persistent rooms.
Delete Monitor Task
This removes a monitor task from the list of available monitor scripts. This action is not permanent as it will revert to initial settings on server restart.
Fix User’s Roster
You can fix a users roster from this prompt. Fill out the bare JID of the user and the names you wish to add or remove from the roster. You can edit a users roster using this tool, and changes are permanent.
Fix User’s Roster on Tigase Cluster
This does the same as the Fix User’s Roster, but can apply to users in clustered servers.
Get User Roster
As the title implies this gets a users' roster and displays it on screen. You can use a bare or full JID to get specific rosters.
Get any file
Enables you to see the contents of any file in the tigase directory. By default you are in the root directory, if you wish to go into directory use the following format: logs/tigase.log.0
Get Configuration File
If you don’t want to type in the location of a configuration file, you can use this prompt to bring up the contents of either tigase.conf or init.properties.
Get init.properties File
Will output the current init.properties file, this includes any modifications made during the current server session.
Load Errors
Will display any errors the server encounters in loading and running. Can be useful if you need to address any issues.
New command script - Monitor
Allows you to write command scripts in Groovy and store them physically so they can be saved past server restart and run at any time. Scripts written here will only be able to work on the Monitor component.
New command script - MUC
Allows you to write command scripts in Groovy and store them physically so they can be saved past server restart and run at any time. Scripts written here will only be able to work on the MUC component.
OAUth credentials
Uses OAuth to set new credentials and enable or disable a registration requirement with a signed form.
Pre-Bind BOSH user session
Allows admins to pre-bind a BOSH session with a full or bare JID (with the resource automatically populated on connection). You may also specify HOLD or WAIT parameters.
Reload component repository
This will show if you have any external components and will reload them in case of any stuck threads.
Scripts
This section provides a list of command scripts for all active components. Each component has the following options - Get list available commands will list script commands for the component divided by either Scripts or Groups. - New command script provides a method to author new command scripts for specific components written in EMCAScript or Groovy. You do have an option to save the script to disk which will make the script permanent within the server. - Remove command script allows you to remove the selected script from the repository. If Remove from disk is not checked, the script will be unavailable until server restart. If it is, it will be permanently removed from the server.
You will be unable to edit or run commands from this section.
Statistics
These statistics might be more useful as script results yield small bits of data, but you may find them useful when looking for server loads or finding user issues.
Provides a script output of user statistics including how many active sessions are in use, number of packets used, specific connections and their packet usage and location. All resources will return individual stats along with IP addresses.
Provides a list of active users under the selected domain within the server. An active user is considered a user currently logged into the XMPP server.
Users
Here you can add new users to any domain handled by vHosts, users are added to database immediately and are able to login. NOTE: You cannot bestow admin status to these users in this section.
Allows for admins to change the password of a specific user without needing to know the original password for the selected bare JID. Users currently logged in will not know password has been changed until they attempt to re-login.
Provides a text window for admins to input the bare JID of the user they wish to remove from the server.
This section allows admins to get information about a specific user including current connections as well as offline and online messages awaiting delivery.
8.3. Message Archiving Component
NOTE: This component is incomplete and does not support all methods specified in XEP-0136 Tigase server supports many of the features in XEP-0136, however it is not yet in full compliance with the XEP. The reason for this is that it uses the archived message date as the thread id of message due to the face that some clients sens messages with no thread id (e.g. Psi, Psi+). Due to this fact it is also possible to query the component about messages without specifying thread ids. For now the component also stores bare JIDs of recipients.
8.3.1. Installation
The message archiving component is not included with the standard build of Tigase, and thus will need to be compiled or downloaded. Here are the two methods:
Download
The easiest way is to download the tigase-message-archiving-1.2.0-SNAPSHOT.jar file into your /jars directory.
Compile
The Tigase Message Archive component is kept in a separate repository from Tigase-server. It will compile in a similar manner though. Be sure you have Maven 3.0 or later installed. (to check use mvn version) First, obtain a clone of the repository using the following command:
$ git clone https://repository.tigase.org/git/message-archiving.gitThe repository will be downloaded to the /message-archiving/ directory.
$cd message-archiving
/message-archiving$ mvn clean package
Once Maven has finished compiling, go into the /target directory and you will find the required jar there. Move that to Tigase’s /jars folder and your component is ready to run.
8.3.2. Configuration
To activate message archiving, place the following lines in the init.properties file:
--comp-name-3=message-archive
--comp-class-3=tigase.archive.MessageArchiveComponent
These two lines are the component required to be active. As with activating any component, be sure the component name and class match, and that the number is not used by another component.
message-archive/archive-repo-uri=jdbc:mysql://localhost/messagearchivedb?user=test&password=test
This next line defines that message archives will be stored in a specific database, in this case messagearchivedb hosted on localhost. If this is blank, the archive will be stored in the default user repository.
--sm-plugins=message-archive-xep-0136
sess-man/plugins-conf/message-archive-xep-0136/component-jid=archive@host.com
The next line turns on the message archive plugin, while this is not always necessary, in order to configure extra options, this line is needed. Finally, this line specifies the name for the component, if left blank the component’s JID will be message-archive@local-machine-name.
NOTE: Message tagging can take up considerable resources! There are a high number of prepared statements which are used to process and archive messages as they go through the server, and you may experience an increase in resource use with the archive turned on. It is recommended to drecrease the repository connection pool to help balance server load from this component using the following line in init.properties:
--data-repo-pool-size=5Saving Options
By default, Tigase Message Archive will only store the message body with some metadata, this can exclude messages that are lacking a body. If you decide you wish to save non-body elements within Message Archive, you can now can now configure this using the following line from init.properties:
sess-man/plugins-conf/unified-archive/msg-archive-paths[s]=/message/body,/message/subject
Where above will set the archive to store messages with <body/> or <subject/> elements.
|
Tip
|
Enabling this for elements such as iq, or presence will quickly load the archive. Configure this setting carefully! |
8.3.3. Usage
Now that we have the archive component running, how do we use it? Currently, the only way to activate and modify the component is through XMPP stanzas. Lets first begin by getting our default settings from the component:
<iq type='get' id='prefq'>
  <pref xmlns='urn:xmpp:archive'/>
</iq>
It’s a short stanza, but it will tell us what we need to know, Note that you do not need a from or a to for this stanza. The result is as follows:
<iq type='result' id='prefq' to='admin@domain.com/cpu'>
<pref xmlns='urn:xmpp:archive'>
<auto save='false'/>
<default otr='forbid' muc-save="false" save="body"/>
<method use="prefer" type="auto"/>
<method use="prefer" type="local"/>
<method use="prefer" type="manual"/>
</prefq>
</iq>
See below for what these settings mean.
XEP-0136 Field Values
- <auto/>
-
-
Required Attributes
-
save= Boolean turning archiving on or off
-
-
Optional Settings
-
scope= Determines scope of archiving, default is \'stream' which turns off after stream end, or may be \'global' which keeps auto save permanent,
-
-
- <default/>
-
Default element sets default settings for OTR and save modes, includes an option for archive expiration.
-
Required Attribures
-
otr= Specifies setting for Off The Record mode. Available settings are:
-
approve The user MUST explicitly approve OTR communication.
-
concede Communications MAY be OTR if requested by another user.
-
forbid Communications MUST NOT be OTR.
-
oppose Communications SHOULD NOT be OTR.
-
prefer Communications SHOULD be OTR.
-
require Communications MUST be OTR.
-
-
save= Specifies the portion of messages to archive, by default it is set to body.
-
body Archives only the items within the <body/> elements.
-
message Archive the entire XML content of each message.
-
stream Archive saves every byte of communication between server and client. (Not recommended, high resource use)
-
-
-
Optional Settings
-
expire= Specifies after how many seconds should the server delete saved messages.
-
-
- <item/>
-
The Item element specifies settings for a particular entity. These settings will override default settings for the specified JIDS.
-
Required Attributes
-
JID= The Jabber ID of the entity that you wish to put these settings on, it may be a full JID, bare JID, or just a domain.
-
otr= Specifies setting for Off The Record mode. Available settings are:
-
approve The user MUST explicitly approve OTR communication.
-
concede Communications MAY be OTR if requested by another user.
-
forbid Communications MUST NOT be OTR.
-
oppose Communications SHOULD NOT be OTR.
-
prefer Communications SHOULD be OTR.
-
require Communications MUST be OTR.
-
-
save= Specifies the portion of messages to archive, by default it is set to body.
-
body Archives only the items within the <body/> elements.
-
message Archive the entire XML content of each message.
-
stream Archive saves every byte of communication between server and client. (Not recommended, high resource use)
-
-
-
Optional Settings
-
expire= Specifies after how many seconds should the server delete saved messages.
-
-
- <method/>
-
This element specifies the user preference for available archiving methods.
-
Required Attributes
-
type= The type of archiving to set
-
auto Preferences for use of automatic archiving on the user’s server.
-
local Set to use local archiving on user’s machine or device.
-
manual Preferences for use of manual archiving to the server.
-
-
use= Sets level of use for the type
-
prefer The selected method should be used if it is available.
-
concede This will be used if no other methods are available.
-
forbid The associated method MUST not be used.
-
-
-
Now that we have established settings, lets send a stanza changing a few of them:
<iq type='set' id='pref2'>
  <pref xmlns='urn:xmpp:archive'>
    <auto save='true' scope='global'/>
    <item jid='domain.com' otr='forbid' save='body'/>
    <method type='auto' use='prefer'/>
    <method type='local' use='forbid'/>
    <method type='manual' use='concede'/>
  </pref>
</iq>
This now sets archiving by default for all users on the domain.com server, forbids OTR, and prefers auto save method for archiving.
8.3.4. Manual Activation
Turning on archiving requires a simple stanza which will turn on archiving for the use sending the stanza and using default settings.
<iq type='set' id='turnon'>
  <pref xmlns='urn:xmpp:archive'>
    <auto save='true'/>
  </pref>
</iq>
A sucessful result will yield this response from the server:
<iq type='result' to='user@domain.com' id='turnon'/>Once this is turned on, incoming and outgoing messages from the user will be stored in tig_ma_msgs table in the database.
8.3.5. Automatic Activation of MUC messages
Enabling this feature allows MUC messages to be stored in the Message Archive repository and are added in the same way as for any other message. For this setting consider the MUC room JID, this will be the "user" that the messages will be archived with. This is the same JID used for retrevial as well as sending to storage. Archived MUC messages will be in the same format as normal archival messages with one exception, each message will have a <name> attribute attached which will be the room nick for the user that sent the message. This feature is disabled by default.
NOTE: It is worth to mention that even if more than on user resources joins the same room and each resource will receive the same messages, then only a single message will be stored in Message Archiving repository. It is also important to note that MUC messages are archived to user messages archive only when user is joined to MUC room. For example, if message was sent to room but it was not sent to particular user, it will not be archived.
Configuration
Enabling archiving of MUC messages is done by adding one more line to your init.properties file. Along with defining comp-name and comp-class add this line:
sess-man/plugins-conf/message-archive-xep-0136/store-muc-messages=valuevalue may be one of the following values: - user Allows value to be set on domain level by user if the domain level setting allows that. [what?] - true Enables the feature for all users in every hosted domain. This cannot be overridden by settings for individual domains or users. - false Disables the feature for all users in every hosted domain. This cannot be overridden by settings for individual domains or users.
To configure this setting for individual vhosts, you will need to execute a configuration command using one of the following settings: - user Allows user to start this feature - true Enables feature for users of the configured domain. Users will be unable to disable this feature. - false Disables feature for users of the configured domain. Users will be unable to disable this feature.
8.3.6. Searching for Messages
Tigase Message Archiving Component allows users to query for messages or collections that contain a string. A simple stanza sent to the message archive component will begin a search. For example, the following stanza requests a search for messages with "test failed" in the <body> element. NOTE: Searches can ONLY be conducted within <body> elements.
<query xmlns="http://tigase.org/protocol/archive#query">
    <contains>test failed</contains>
</query>
This query element must be the child of a list or retrieve element.
Search options include:
-
with= Specify JID of user sending message
-
from= Search from this time and date, Format: YYYY-MM-DDTHH:MM:SSZ Time is in 24h set to GMT
-
end= Search until this time and date, Format: YYYY-MM-DDTHH:MM:SSZ Time is in 24h set to GMT
Example queries
Retrieving messages with "test failed" string with user juliet@capulet.com between 2014-01-01 00:00:00 and 2014-05-01 00:00:00
<iq type="get" id="query2">
    <retrieve xmlns='urn:xmpp:archive'
        with='juliet@capulet.com'
        from='2014-01-01T00:00:00Z'
        end='2014-05-01T00:00:00Z'>
          <query xmlns="http://tigase.org/protocol/archive#query">
              <contains>test failed</contains>
          </query>
    </retrieve>
</iq>
Retrieving collections containing messages with "test failed" string with user juliet@capulet.com between 2014-01-01 00:00:00 and 2014-05-01 00:00:00
<iq type="get" id="query2">
    <list xmlns='urn:xmpp:archive'
        with='juliet@capulet.com'
        from='2014-01-01T00:00:00Z'
        end='2014-05-01T00:00:00Z'>
          <query xmlns="http://tigase.org/protocol/archive#query">
              <contains>test failed</contains>
          </query>
    </list>
</iq>
8.3.7. Message Tagging Support
Tigase now is able to support querying message archives based on tags created for the query. Currently, Tigase can support the following tags to help seach through message archives: - hashtag Words prefixed by a hash (#) are stored with a prefix and used as a tag, for example #Tigase - mention Words prefixed by an at (@) are stored with a prefix and used as a tag, for example @Tigase
NOTE: Tags must be written in messages from users, they do not act as wildcards. To search for #Tigase, a message must have #Tigase in the <body> element.
This feature allows users to query and retrieve messages or collections from the archive that only contain one or more tags.
Activating Tagging
To enable this feature, the following line must be in the init.properties file (or may be added with Admin or Web UI)
message-archiving/tags-support[B]=trueWhere message-archiving is the class name of the component.
Usage
To execute a request, the tags must be individual children elements of the retrieve or list element like the following request:
<query xmlns="http://tigase.org/protocol/archive#query">
    <tag>#People</tag>
    <tag>@User1</tag>
</query>
You may also specify specific senders, and limit the time and date that you wish to search through to keep the resulting list smaller. That can be accomplished by adding more fields to the retrieve element such as 'with', 'from', and 'end' . Take a look at the below example:
<iq type="get" id="query2">
    <retrieve xmlns='urn:xmpp:archive'
        with='juliet@capulet.com'
        from='2014-01-01T00:00:00Z'
        end='2014-05-01T00:00:00Z'>
          <query xmlns="http://tigase.org/protocol/archive#query">
              <tag>#People</tag>
              <tag>@User1</tag>
          </query>
    </retrieve>
</iq>
This stanza is requesting to retrieve messages tagged with @User1 and #people from chats with the user juliet@capulet.com between January 1st, 2014 at 00:00 to May 1st, 2014 at 00:00.
NOTE: All times are in Zulu or GMT on a 24h clock.
You can add as many tags as you wish, but each one is an AND statement; so the more tags you include, the smaller the results.
Tag Searching
You can also retrieve a list of Tags that have already been used and are stored in the message archive. You can search for exact or a partial of the tag or mention. The following request is searching for tags that are 'like' #test, in this case any tags with #test present will show in a list.
<iq type="set" id="tagquery">
    <tags xmlns="http://tigase.org/protocol/archive#query" like="#test"/>
</iq>
The result will return tags with #test in them:
<iq type="result" id="tagquery">
    <tags xmlns="http://tigase.org/protocol/archive#query" like="#test">
        <tag>#test1</tag>
        <tag>#test123</tag>
        <tag>#testwin</tag>
        <set xmlns="http://jabber.org/protocol/rsm">
             <first index='0'>0</first>
             <last>2</last>
             <count>3</count>
        </set>
    </tags>
</iq>
You may retrieve a list of tags or mentions by using just the # or @ symbols in the like= field.
8.3.8. Purging Information from Message Archive
This feature allows for automatic removal of entries older than a configured number of days from the Message Archive. It is designed to clean up database and keep its size within reasonable boundaries.
There are 4 settings available for this feature: To enable the feature: message-archive/remove-expired-messages[B]=true
This setting changes the initial delay after the server is started to begin removing old entries. In other words, MA purging will not take place until the specified time after the server starts. Default setting is PT1H, or one hour. message-archive/remove-expired-messages-delay=PT2H
This setting sets how long MA purging will wait between passes to check for and remove old entries. Default setting is P1D which is once a day. message-archive/remove-expired-messages-period=PT2D
NOTE that these commands are also compatible with unified-archive component, just replace message with unified.
Configuration of number of days in VHost
VHost holds a setting that determines how long a message needs to be in archive for it to be considered old and removed. This can be set independently per Vhost. This setting can be modified by either using the HTTP admin, or the update item execution in adhoc command.
Command-line utility Sets after how many days message should be removed - by default we use 24 hours. So if entry is older than 24 hours then it will be removed, ie. entry from yesterday from 10:11 will be removed after 10:11 after next execution of purge. This configuration is done by execution of Update item configuration adhoc command of vhost-man component, where you should select domain for which messages should be removed and then in field XEP-0136 - retention type select value Number of days and in field XEP-0136 - retention period (in days) enter number of days after which events should be removed from UA.
In adhoc select domain for which messages should be removed and then in field XEP-0136 - retention type select value Number of days and in field XEP-0136 - retention period (in days) enter number of days after which events should be removed from UA.
In HTTP UI select Other, then Update Item Configuration (Vhost-man), select the domain, and from there you can set XEP-0136 retention type, and set number of days at XEP-0136 retention period (in days).
Value of remove-expired-messages-delay and remove-expired-messages-period is in format described at Duration.parse() in Java documentation.
8.4. Advanced Message Processing - AMP XEP-0079
Tigase server 5.1.0 or later offers support for Advanced Message Processing, called AMP or XEP-0079.
It is enabled by default but there are several configuration options that you may tweak.
Configuration of AMP is not very complex, but as it is implemented as a component in the Tigase server it does needs a few settings to get it right.
Here is a first, brief overview of the AMP configuration and later detailed explanation of each parameter.
--sm-plugins=amp,-message,-msgoffline
--amp-repo-uri=jdbc:mysql://localhost/tigasedb?user=db_usr&password=db_pwd
--amp-security-level=STRICT
sess-man/plugins-conf/amp/amp-jid=amp@your-domain.tld
8.4.1. First of all: plugins:
Even though the whole functionality is implemented inside the component you need a way to forward messages with AMP payload to that component. This is what the 'amp' plugin does. The 'amp' plugin intercepts all <message/> packets even without AMP payload, redirecting some of the to the AMP component and others processing in a standard way. Therefore you no longer need 'message' plugin or 'msgoffline' plugin. Those are all functions are offered by the 'amp' plugin now. Hence you have to switch 'message' and 'msgoffline' plugins off (the 'amp' plugin is loaded by default):
--sm-plugins=+amp,-message,-msgofflineThe 'amp' plugin needs to know where to forward all the AMP packets. By default plugin uses hostname of the given machine as this is true to the most installations. However, this is configured by the last line of the example configuration, which forwards all packets to the address 'amp@your-domain.tld':
sess-man/plugins-conf/amp/amp-jid=amp@your-domain.tld8.4.3. Optional parameters:
There is also one parameter shared between the component and the plugin. Connection to the database where offline messages are stored. The AMP component has a dedicated schema for storing offline messages designed for a high traffic and high load installations. It does not use UserRepository for storing messages.
By default the same physical database as for UserRepository is used but you can change it and store messages in a completely separate location to reduce performance degradation of rest of the system. You can set a database connection string using following property:
--amp-repo-uri=jdbc:mysql://localhost/tigasedb?user=db_usr&password=db_pwdThe XEP-0079 specification has a Section 9. - Security Considerations. As it describes, in some cases the AMP protocol can be used to reveal user’s presence information by other users who are not authorised for presence updates. There are a few possible ways to prevent this.
Tigase’s implementation offers 3 modes to handle AMP requests to prevent revealing user’s status to non-authorized users:
--amp-security-level=STRICTIn this mode the server performs strict checking. The AMP specification is fully handled. This however involves roster loading for each offline user, hence it may impact the service performance. It may not be feasible or possible to run in this mode for services under a high load with lots of AMP messages.
In the XEP this mode is described in the following way:
Accept the relevant condition only if the sender is authorized to receive the receiver’s presence, as a result of which the server MUST reply with a <not-acceptable/> error condition if the sender is not so authorized; this is the RECOMMENDED behavior. This is also the default in Tigase.
--amp-security-level=PERFORMANCEDummy checking is performed efficiently by just returning an error response every time there is a chance that the default action may reveal user status without looking into the user’s roster. This does not affect performance but it does impact the AMP compliance.
In the XEP this mode is described in the following way:
Accept the relevant condition only if the action is "drop", as a result of which the server MUST reply with a <not-acceptable/> error condition if the action is "alert", "error", or "notify"; this is slightly less restrictive but still unnecessarily restricts the functionality of the system, so is NOT RECOMMENDED.
It does not do any checking. It acts like all users are authorized to receive notifications, even if it may reveal user status to unauthorized users. It does not impact the server performance and it offers full AMP compliance.
--amp-security-level=NONE8.5. PubSub Component
8.5.1. Configuration
Tigase’s Publish Subscribe component is an XEP-0060 compliant plugin handling all publish and subscribe activity within Tigase server. To enable the component the following should be in your init.properties file
--comp-name-2 = pubsub
--comp-class-2 = tigase.pubsub.PubSubComponent
8.5.2. Pubsub naming
Within Tigase, all pubsub component address MUST be domain-based address and not a JID style address. This was made to simplify communications structure. Tigase will automatically set component names to pubsub.domain, however any messages send to pubsub@domain will result in a SERVICE_UNAVAILABLE error.
Pubsub nodes within Tigase can be found as a combination of JID and node where nodes will be identified akin to service discovery. For example, to address a friendly node, use the following structure:
<iq to='pubsub.domain'>
  <query node='friendly node'/>
</iq>
8.5.3. Configure Roster Maxmimum size
Starting with Tigase v7.1.0, administrators can configure the maximum allowable roster size per user via the init.properties file.
sess-man/plugins-conf/jabber\:iqa\:roster/max_roster_size=100
This sets the roster limit to 100 entries per user. It can be set to any integer, however by default no limit is set.
8.5.4. AdHoc Commands
Similar to the HTTP API, AdHoc commands based on groovy scripts can be sent to this component to do a number of tasks. All scripts for these Ad-hoc commands are found at sec/main/groovy/tigase/admin in source distrubitions, or at this link. To use them, the scripts need to be copied into the scripts/admin/pubsub folder in the Tigase installation directory. For all examples, the component address will be pubsub.example.com.
Create a Node
Ad-hoc command node: create-node Required role: Service Administrator
Command requires fields node and pubsub#node_type to be filled with proper values for execution. - node Field containing id of node to create. - pubsub#node_type Contains one of two possible values. * leaf-node Node that will be published. * collection Node that will contain other nodes.
Other fields are optional fields that can be set to change configuration of newly create node to different configuration than default.
Example call using TCLMT:
bin/tclmt.sh -u admin@example.com -p admin123 remote pubsub.example.com create-node example admin@example.com leaf
Delete a Node
Ad-hoc command node: delete-node Required role: Service Administrator
Command requires node field to be filled. - node Field containing id of node to delete.
Example call using TCLMT:
bin/tclmt.sh -u admin@example.com -p admin123 remote pubsub.example.com delete-node example
Subscribe to a Node
Ad-hoc command node: subscribe-node Required role: Service Administrator
Command requires node and jids nodes to be filled. - node Field containing node to subscribe to. - jids Field containing list of JIDs to subscribe to the node.
Example call using TCLMT:
bin/tclmt.sh -u admin@example.com -p admin123 remote pubsub.example.com subscribe-node example admin@example.com,test1@example.com
Unsubscribe to a Node
Ad-hoc command node: unsubscribe-node Required role: Service Administrator
Command requires node and jids nodes to be filled. - node Field containing node to unsubscribe to. - jids Field containing list of JIDs to unsubscribe to the node.
Example call using TCLMT:
bin/tclmt.sh -u admin@example.com -p admin123 remote pubsub.example.com unsubscribe-node example admin@example.com,test2@example.com
Publish an item to a Node
Ad-hoc command node: publish-item Required role: Service Administrator
Command requires fields node and entry to be filled. - node Field containing id of node to publish to. - item-id Field may contain id of entry to publish, can be empty. - entry Field should contain multi-line entry content that should be valid XML values for items.
This command due to it’s complexity cannot be easily executed by TCLMT using default remote script which provides support for basic adhoc commands. Example call using TCLMT:
bin/tclmt.sh -u admin@example.com -p admin123 remote pubsub.example.com publish-item example item-1 '<entry><title>Example 1</title></entry>'
Example Groovy script to execute create-node command using JAXMPP2
import tigase.jaxmpp.j2se.Jaxmpp
import tigase.jaxmpp.core.client.AsyncCallback
import tigase.jaxmpp.core.client.exceptions.JaxmppException
import tigase.jaxmpp.core.client.xmpp.stanzas.Stanza
import tigase.jaxmpp.core.client.SessionObject
import tigase.jaxmpp.j2se.ConnectionConfiguration
import tigase.jaxmpp.core.client.xml.Element
import tigase.jaxmpp.core.client.xml.DefaultElement
import tigase.jaxmpp.core.client.xmpp.forms.JabberDataElement

Jaxmpp jaxmpp = new Jaxmpp();

jaxmpp.with {
    getConnectionConfiguration().setConnectionType(ConnectionConfiguration.ConnectionType.socket)
    getConnectionConfiguration().setUserJID("admin@example.com")
    getConnectionConfiguration().setUserPassword("admin123")
}

jaxmpp.login(true);

def packet = IQ.create();
packet.setAttribute("to", "pubsub.example.com");

Element command = new DefaultElement("command");
command.setXMLNS("http://jabber.org/protocol/commands");
command.setAttribute("node", "create-node");
packet.addChild(command);

Element x = new DefaultElement("x");
x.setXMLNS("jabber:x:data");

command.addChild(x);

def data = new JabberDataElement(x);
data.addTextSingleField("node", "example");
data.addListSingleField("pubsub#node_type", "leaf");

jaxmpp.send(packet, new AsyncCallback() {
    void onError(Stanza responseStanza, tigase.jaxmpp.core.client.XMPPException.ErrorCondition error) throws JaxmppException {
        println "received error during processing request";
    }

    void onSuccess(Stanza responseStanza) throws JaxmppException {
        x = responseStanza.getFirstChild("command").getFirstChid("x");
        data = new JabberDataElement(x);
        def error = data.getField("Error");
        println "command executed with result = " + (error ? "failure, error = " + error.getFieldValue() : "success");
    }

    void onTimeout() {
        println "command timed out"
    }
});

Thread.sleep(30000);
jaxmpp.disconnect();
8.5.5. PubSub Node Presence Protocol
Occupant Use Case === Log in to Pubsub Node To log in to PubSub Node user must send presence to PubSub component with additional information about node:
<presence
    from='hag66@shakespeare.lit/pda'
    id='n13mt3l'
    to='pubsub.shakespeare.lit'>
  <pubsub xmlns='tigase:pubsub:1' node='princely_musings'/>
</presence>
Component will publish this information in node:
<message from='pubsub.shakespeare.lit' to='francisco@denmark.lit' id='foo'>
  <event xmlns='http://jabber.org/protocol/pubsub#event'>
    <items node='princely_musings'>
      <item>
        <presence xmlns='tigase:pubsub:1' node='princely_musings' jid='hag66@shakespeare.lit/pda' type='available'/>
      </item>
    </items>
  </event>
</message>
<message from='pubsub.shakespeare.lit' to='bernardo@denmark.lit' id='bar'>
  <event xmlns='http://jabber.org/protocol/pubsub#event'>
    <items node='princely_musings'>
      <item>
        <presence xmlns='tigase:pubsub:1' node='princely_musings' jid='hag66@shakespeare.lit/pda' type='available'/>
      </item>
    </items>
  </event>
</message>
And then will send notification with presences of all occupants to new occupant.
Log out from PubSub Node
To logout from single node, user must send presence stanza with type unavailable:
<presence
    from='hag66@shakespeare.lit/pda'
    type='unavailable'
    to='pubsub.shakespeare.lit'>
  <pubsub xmlns='tigase:pubsub:1' node='princely_musings'/>
</presence>
Component will send events to all occupants as described:
<message from='pubsub.shakespeare.lit' to='francisco@denmark.lit' id='foo'>
  <event xmlns='http://jabber.org/protocol/pubsub#event'>
    <items node='princely_musings'>
      <item>
        <presence xmlns='tigase:pubsub:1' node='princely_musings' jid='hag66@shakespeare.lit/pda' type='unavailable'/>
      </item>
    </items>
  </event>
</message>
If component receives presence stanza with type unavailable without specified node, then component will log out user from all nodes he logged before and publish events.
Retrieving list of all Node Subscribers
To retrieve list of node subscribers, node configuration option tigase#allow_view_subscribers must be set to true:
<iq type='set'
    from='hamlet@denmark.lit/elsinore'
    to='pubsub.shakespeare.lit'
    id='config2'>
  <pubsub xmlns='http://jabber.org/protocol/pubsub#owner'>
    <configure node='princely_musings'>
      <x xmlns='jabber:x:data' type='submit'>
        <field var='FORM_TYPE' type='hidden'>
          <value>http://jabber.org/protocol/pubsub#node_config</value>
        </field>
        <field var='tigase#allow_view_subscribers'><value>1</value></field>
      </x>
    </configure>
  </pubsub>
</iq>
When option is enabled, each subscriber may get list of subscribers the same way as owner.
<iq type='get'
    from='hamlet@denmark.lit/elsinore'
    to='pubsub.shakespeare.lit'
    id='subman1'>
  <pubsub xmlns='http://jabber.org/protocol/pubsub#owner'>
    <subscriptions node='princely_musings'/>
  </pubsub>
</iq>
There is extension to filter returned list:
<iq type='get'
    from='hamlet@denmark.lit/elsinore'
    to='pubsub.shakespeare.lit'
    id='subman1'>
  <pubsub xmlns='http://jabber.org/protocol/pubsub#owner'>
    <subscriptions node='princely_musings'>
        <filter xmlns='tigase:pubsub:1'>
            <jid contains='@denmark.lit' />
        </filter>
    </subscriptions>
  </pubsub>
</iq>
In this example will be returned all subscriptions of users from domain "denmark.lit".
8.5.6. Store Full XML of Last Presence
A new feature has been implemented in v7.1.0 that allows Tigase to store a more detailed <unavailable/> presence stanza to include timestamps and other information.
Requirements
Ensure that presence-offline plugin is enabled in init.properties. To do this, add +presence-offline to the --sm-plugins line.
The following two lines configure options to broadcast probes to offline users.
sess-man/plugins-conf/skip-offline=false
sess-man/plugins-conf/skip-offline-sys=false
Without these lines, Tigase will not send presence probes to users that the server knows to be offline.
The full XML presence is stored under the tig_pairs table with a pkey of last-unavailable-presence will look like this:
<presence from="user@example.com" xmlns="jabber:client" type="unavailable">
<status>Logged out</status>
<delay stamp="2015-12-29T16:51:50.748Z" xmlns="urn:xmpp:delay"/></presence>
As you can see, the plugin has added a delay stamp which indicates the last time they were seen online. This may be suppressed by using the following line in your init.properties file.
sess-man/plugins-conf/delay-stamp=false
You may also limit probe responses only to newly connected resources.
sess-man/plugins-conf/probe-full-jid=true
When a user logs on, they will receive the same full unavailable presence statements from contacts not logged in. Also the repository entry containing their last unavailable presence will be removed.
NOTE: This will increase traffic with users with many people on their rosters.
8.5.7. Offline Message Sink
Description
Messages sent to offline users is published in PubSub node, from where that message is sent to all the node subscribers as a PubSub notification.
<message from='pubsub.coffeebean.local' to='bard@shakespeare.lit' id='foo'>
  <event xmlns='http://jabber.org/protocol/pubsub#event'>
    <items node='message_sink'>
      <item id='ae890ac52d0df67ed7cfdf51b644e901'>
        <message type="chat" xmlns="jabber:client" id="x2ps6u0004"
          to="userB_h6x1bt0002@coffeebean.local"
          from="userA_uyhx8p0001@coffeebean.local/1149352695-tigase-20">
          <body>Hello</body>
        </message>
      </item>
    </items>
  </event>
</message>
Configuration
The PubSub node must be created and configured beforehand:
Create node
<iq type='set'
    to='pubsub.coffeebean.local'
    id='create1'>
  <pubsub xmlns='http://jabber.org/protocol/pubsub'>
    <create node='message_sink'/>
  </pubsub>
</iq>
After that is done, you need to add SessionManager as a publisher:
Add sess-man as publisher
<iq type='set'
to='pubsub.coffeebean.local'
id='ent2'>
<pubsub xmlns='http://jabber.org/protocol/pubsub#owner'>
<affiliations node='message_sink'>
<affiliation jid='sess-man@coffeebean.local' affiliation='publisher'/>
</affiliations>
</pubsub>
</iq>Finally, the AMP plugin must be configured as well
Usage
Because these sinks use a standard PubSub component, administration of the sink node is identical to any other PubSub node. XEP-0060 defines standard PubSub usage and management.
8.5.8. PubSub Schema Changes
Tigase PubSub Component is currently version 3.2.0 which is introduced in Tigase server v7.1.0
PubSub 3.2.0 Changes
PubSub v 3.2.0 adds a new procedure TigPubSubGetNodeMeta which supports PubSub metadata retrieval while conducting a disco#info query on nodes.
You will need to upgrade your database if you are not using v3.2.0 schema. Tigase will report being unable to load PubSub component if you do not have this schema version.
The MySQL schema can be found Here.
The Derby schema can be found Here.
The PostGRESQL schema can be found Here.
The MS SQL schema can be found Here.
The same files are also included in all distributions of v7.1.0 in [tigaseroot]/database/ . All changes to database schema are meant to be backward compatible.
For instructions how to manually upgrade the databases, please refer to Tigase v7.1.0 Schema Updates section.
PubSub 3.1.0 Changes
The PubSub Schema has been streamlined for better resource use, this change affects all users of Tigase. To prepare your database for the new schema, first be sure to create a backup! Then apply the appropriate pubsub schema to your MySQL and it will add the new storage procedure.
The MySQL schema can be found Here.
The Derby schema can be found Here.
The PostGRESQL schema can be found Here.
The MS SQL schema can be found Here.
The same files are also included in all distributions of v7.1.0 in [tigaseroot]/database/ . All changes to database schema are meant to be backward compatible.
PubSub v3.0.0 Changes
To update older installations of Tigase to the PubSub Schema v3.0.0 follow these instructions. Note this should be done before upgrading to PubSub v3.1.0.
Step by Step guide.
Prepare Old Database for Upgrade
In database directory of Tigase installation you will find SQL files which will prepare old database schema for upgrade using following this naming pattern: <database_type>-pubsub-schema-3.0.0-pre-upgrade.sql Where <database_type> can be one of the following: mysql, sqlserver, ie. for MySQL you will find the file mysql-pubsub-schema-3.0.0-pre-upgrade.sql. You need to execute statements from this file on your source database, which will drop old procedures and functions used to access database and also this statements will rename old tables by adding suffix _1 to each of old tables. Example:
- MySQL
-
mysql -u tigase -p tigase_pubsub < database/mysql-pubsub-schema-3.0.0-pre-upgrade.sql
- MS SQL
-
sqlcmd -S %servername% -U %root_user% -P %root_pass% -d %database% -i database\sqlserver-pubsub-schema-3.0.0-pre-upgrade.sql
Update Tigase PubSub Component
For this you need to copy the Tigase PubSub Component jar file to jars directory inside Tigase XMPP Server installation directory. It is also recommended to copy files from database directory of Tigase PubSub Component to database directory in Tigase XMPP Server installation directory.
If you happen to use one of the the distribution packaged (either installer or -dist-max flavored archive) then all required files are already available - both new schema files will be available in database/ directory as well as both versions of PubSub component will be present in jars/ directory - PubSub3 as tigase-pubsub.jar and PubSub2 as tigase-pubsub-2.2.0.jar.old (provided for compatibility reasons).
Load New Schema
In the database directory you will find files containing new schemas for:
-
MySQL - mysql-pubsub-schema-3.0.0.sql
-
PostgreSQL - postgresql-pubsub-schema-3.0.0.sql
-
MSSQL - sqlserver-pubsub-schema-3.0.0.sql
-
DerbyDB - derby-pubsub-schema-3.0.0.sql and pubsub-db-create-derby.sh
For most databases, with the exception of Derby, you only need to execute statements from the proper file. For example:
- MySQL
-
mysql -u tigase -p tigase_pubsub < database/mysql-pubsub-schema-3.0.0.sql
- MS SQL
-
sqlcmd -S %servername% -U %root_user% -P %root_pass% -d %database% -i database\sqlserver-pubsub-schema-3.0.0.sql
- PostgreSQL
-
psql -h $DB_HOST -q -U ${USR_NAME} -d $DB_NAME -f database/sqlserver-pubsub-schema-3.0.0.sql
For DerbyDB you need to execute the pubsub-db-create-derby.sh script and pass proper JDBC URI to database to which you want to load schema (if database does not exist, it will be created).
database/pubsub-db-create-derby.sh
NOTE: It is possible to use same database which was used before - then after upgrade you will have new tables and old tables with _1 suffix.
Execute Migration Utility
In the /database directory you will find the pubsub-db-migrate.sh file which you need to execute and pass arguments with JDBC URIs needed to connect to source and destination database. If you used dedicated tables for PubSub you will also need to pass a class name used to access database (value of pubsub/pubsub-repo-class variable from etc/init.properties file).
Example for dedicated table used for PubSub:
database/pubsub-db-migrate.sh -in-repo-class tigase.pubsub.repository.PubSubDAO
-in 'jdbc:mysql://localhost/tigase_pubsub?user=tigase&password=passwd'
-out 'jdbc:mysql://localhost/tigase_pubsub?user=tigase&password=passwd'Example for use without dedicated PubSub tables:
database/pubsub-db-migrate.sh
-in 'jdbc:mysql://localhost/tigase?user=tigase&password=passwd'
-out 'jdbc:mysql://localhost/tigase?user=tigase&password=passwd'Example for use with dedicated tables in a Windows environment:
database/pubsub-db-migrate.cmd -in-repo-class tigase.pubsub.repository.PubSubDAO
-in 'jdbc:sqlserver://<hostname>\\<instance>:<port>;databaseName=<name>;user=tigase;password=tigase;schema=dbo;lastUpdateCount=false'
-out 'jdbc:sqlserver://<hostname>\\<instance>:<port>;databaseName=<name>;user=tigase;password=tigase;schema=dbo;lastUpdateCount=false'During execution this utility will report information about migration of PubSub data to the new schema, and the same information will be store in pubsub_db_migration.log.
8.6. Server Monitoring
All the documentation and resources related to the Tigase server monitoring.
8.6.1. Setting Up Remote Monitoring in the Server
Tigase server can be remotely monitored over following protocols: JMX/RMI, SNMP and HTTP. Even though JMX offers the biggest control and visibility to the server states, all of the monitoring services give the same basic set of the server statistics:
-
Number of network connections for s2s, c2s and Bosh
-
Last second, last minute and last hour load for all main components: SM, MR, c2s, s2s, Bosh, MUC and PubSub
-
System statistics - memory usage (heap and non heap) and the server uptime in milliseconds and human readable text.
-
Users statistics - number of registered users and number of online user session.
JMX/RMI and SNMP servers offer basic security and can restrict access while the HTTP server doesn’t offer any access restriction mechanisms. Therefore HTTP monitoring is recommended to operate behind a firewall.
The monitoring itself causes very low overhead in terms of the resources and CPU consumption on top of the normal Tigase processing requirements so it can be left on without worrying about performance degradation.
Note. This works with the Tigase server from version 4.2.0 or SVN revision 1418.
What You Need
Using v7.1.0 and later, statistics binaries are built-in dist-max and no extra files are needed. If you have downloaded -dist file, you will need tigase-extras.
To ensure, two files are necessary to run monitoring:
-
tigase-extras or the current snapshot.
-
jdmkrt.jar file from OpenDMK project version 5.1 or later. A copy of this jar file in also available in our maven repository: jdmkrt.jar.
Both files should be in the /jars directory.
Activation
You can either run the Tigase installer and use the configuration wizard to activate the monitoring or edit etc/init.properties file and add following line:
--monitoring=jmx:9050,http:9080,snmp:9060As you see there is only a single line where you put list of monitoring servers you want to activate. Each server is responsible for activation of a different protocol and takes a single parameter - port number. There are following protocols supported right now:
-
jmx - activating monitoring via JMX/RMI
-
http - activating monitoring over HTTP protocol
-
snmp - activating monitoring over SNMP protocol
You can have all protocols active at the same time or any combination of them or none.
Security
Both JMX and SNMP offer security protection to limit access to monitoring data. The security configuration is a bit different for both.
JMX
After the server installation or in the SVN repository you can find 2 files in the etc/ directory: jmx.access and jmx.password.
-
jmx.access is a user permission file. You can use it to specify whether the user can access the monitoring data for reading only 'readonly' or with read-write 'readwrite' access. There are example entries in the file already and the content may simply look like:
monitor readonly admin readwrite -
jmx.password is a user password file. You can set user passwords here and the format again is very simple and the same as for jmx.access. There are example entries already provided for you convenience. Content of the file may look like the example below:
admin admin_pass monitor monitor_pass
Using above to files you can control who and how can access the JMX monitoring services.
SNMP
Access to SNMP monitoring is controlled using ACL (access control lists) which can be configured in the file snmp.acl located in etc/ directory. It contains lots of detailed instructions how to setup ACL and restrict access per user, host and what kind access is allowed. The simplest possible configuration may look like this:
acl = {
{
communities = public, private
access = read-only
managers = public.host.com, private.host.com
}
{
communities = admin
access = read-write
managers = localhost, admin.host.com
}
}You might also need Tigase MIB definition: TIGASE-MANAGEMENT-MIB.mib for the server specific statistics. The MIB contains definition for all the server statistics exposed via SNMP.
8.6.2. Retrieving statistics from the server
By default we can retrieve server statistics using XMPP, no additional setup is necessary.
Retrieving statistics using XMPP
Accessing statistics over XMPP protocol requires any XMPP client capable of executing XEP-0050: Ad-Hoc Commands. It’s essential to remember, that only administrator (a user whose JID is configured as administrative) can access the statistics.
Psi XMPP Client
For the purpose of this guide Psi client will be used. After successfully configuring and connecting to account with administrative privileges we need to access Service Discovery, either from application menu or from context menu of the particular account account:

In the Service Discovery window we need to find Server Statistics component:

We can either access statistics for all components or select particular component after expanding the tree. To execute ad-hoc command simply double click on the particular node which will open window with statistics:

In this window, in addition to see the statistics, we can adjust Stats level by selecting desired level from the list and confim by clicking Finish.
Retrieving statistics using JMX
In order to access statistics over JMX we need to enable support for it in Tigase - Monitoring Activation. Afterwards we can use a number of tools to get to the statistics, for example the following:
JConsole
After opening JConsole we either select local process or provide details of the remote process, including IP, port and credentials from etc/jmx.* files:
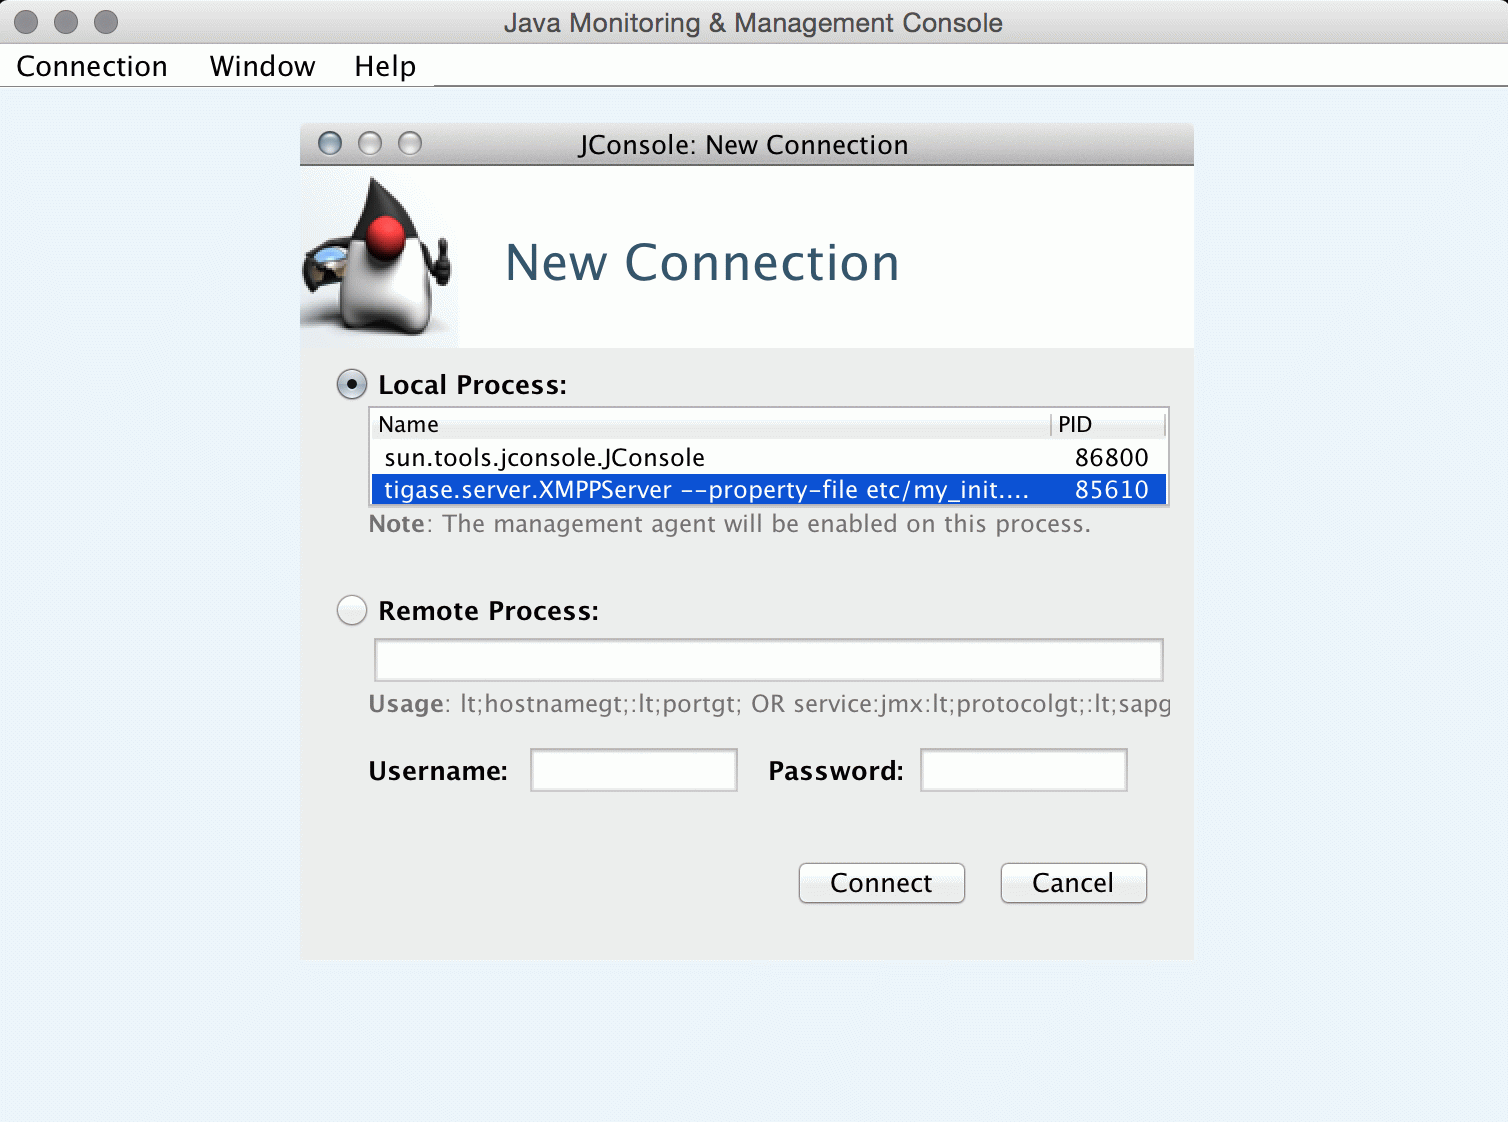
Afterwards we navigate to the MBeans tab from where we can access the tigase.stats MBean. It offers similar options to XMPP - either accessing statistics for all components or only for particular component as well as adjusting level for which we want to obtain statistics:
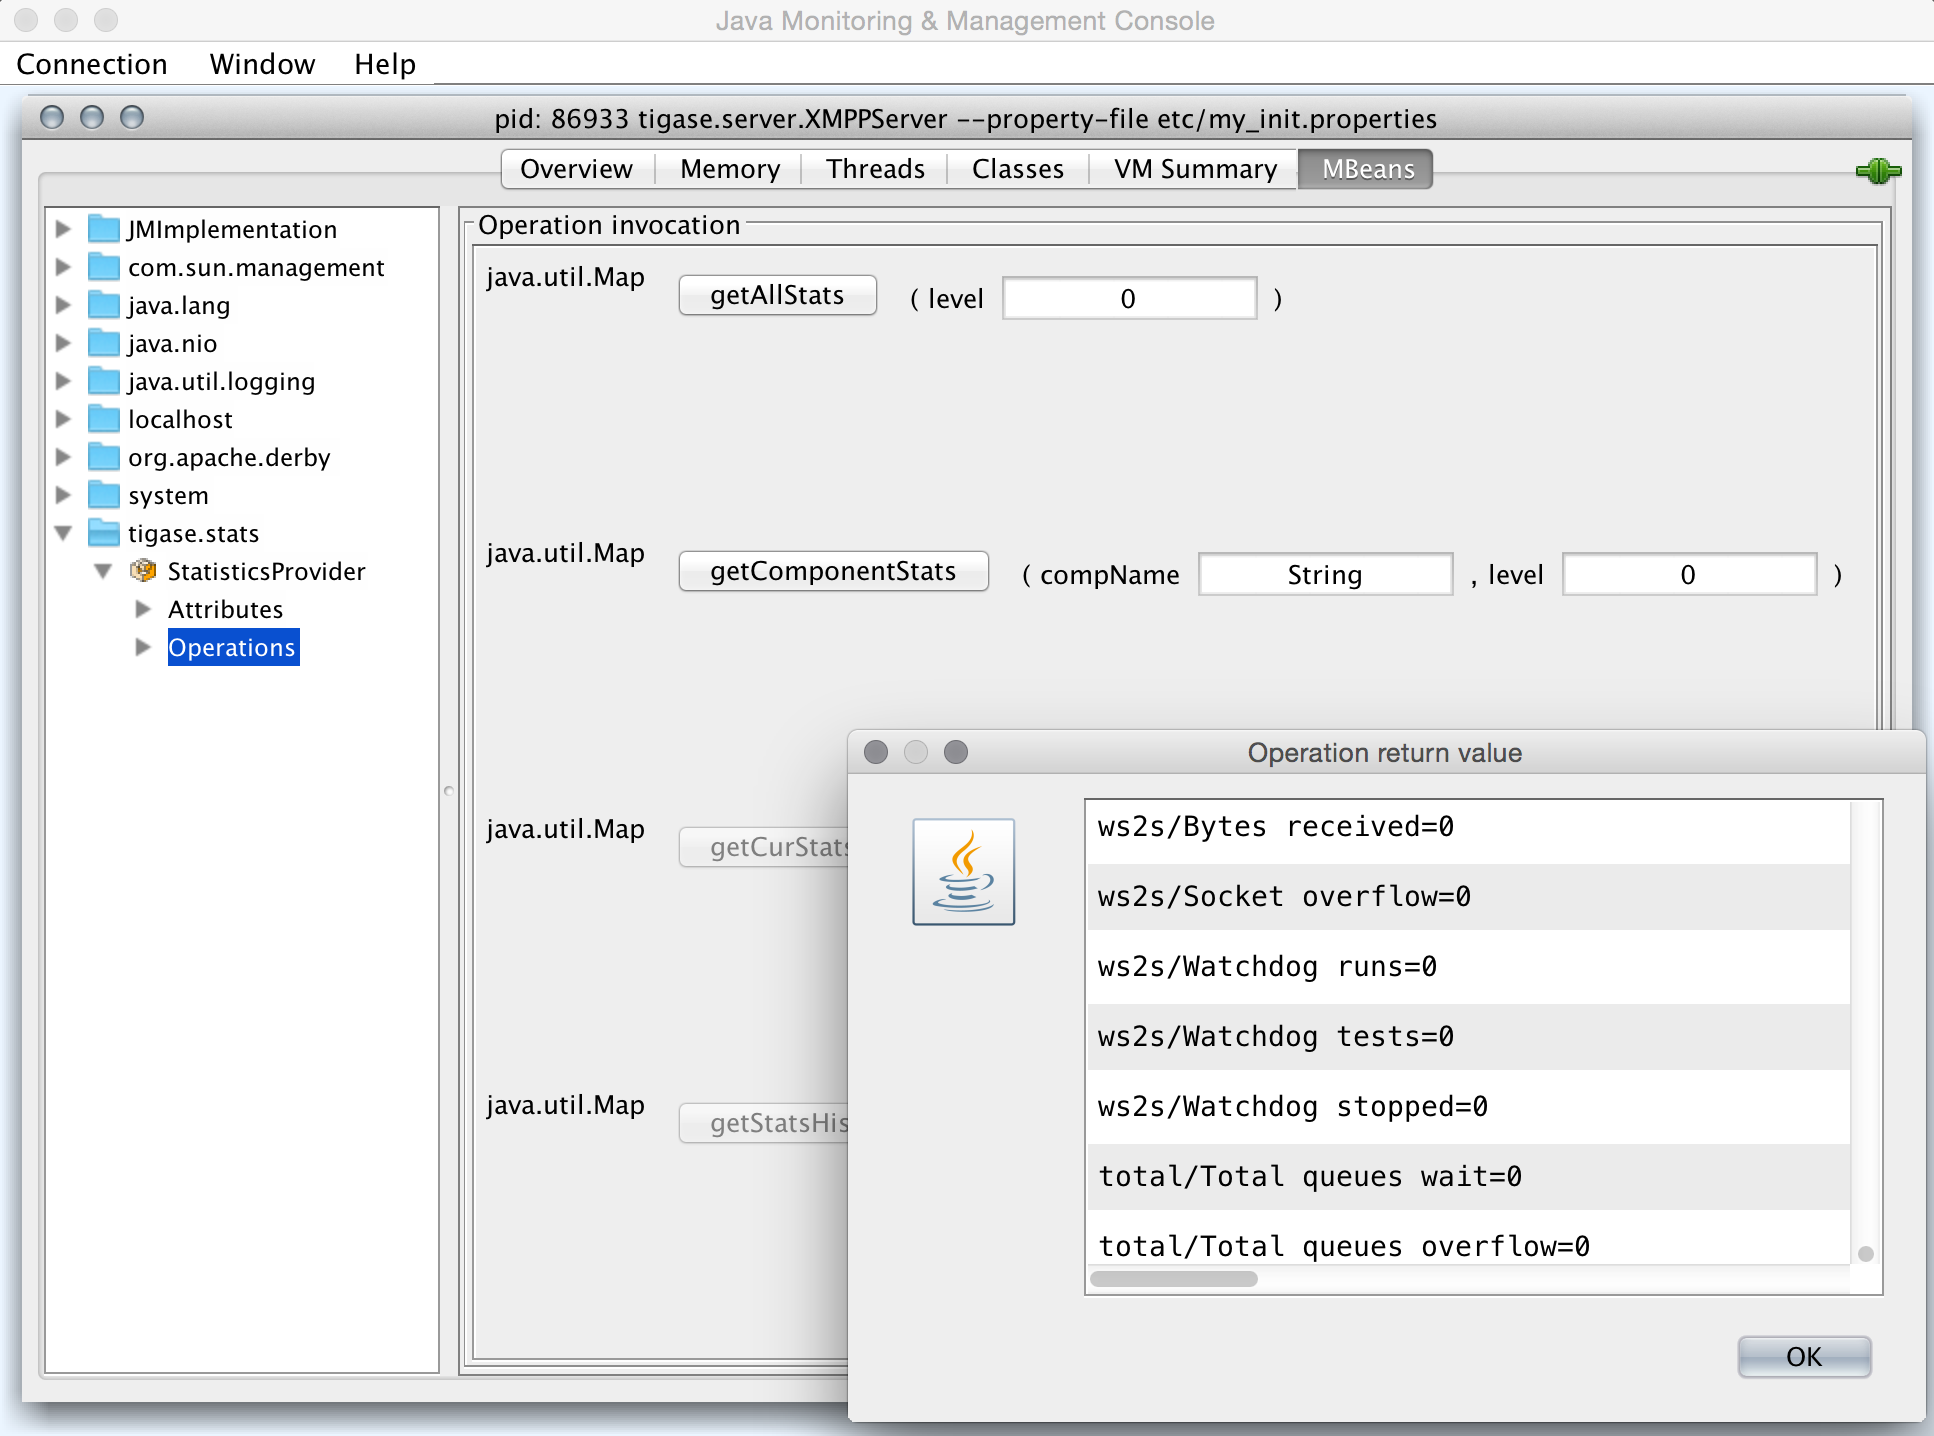
StatsDumper.groovy
In order to collect statistics over period of time following groovy script can be used: StatsDumper.groovy. It’s a Simple JMX client that connects to Tigase and periodically saves all statistics to files.
It takes following parameters:
$ groovy StatsDumper.groovy [hostname] [username] [password] [dir] [port] [delay(ms)] [interval(ms)] [loadhistory(bool)]-
hostname - address of the instance
-
username - JMX username
-
password - JMX username
-
dir - directory to which save the files with statistics
-
port - port on which to make the connection
-
delay(ms) - initial delay in milliseconds after which statistics should be saved
-
interval(ms) - interval between each retrieval/saving of statistics
-
loadhistory(bool) - indicates whether or not load statistics history from server (if such is enabled in Tigase)
8.6.3. Statistics description
Statistics are divided between components and processors. You may see the same statistics collected for multiple components which are defined in common components section. Note that statistics are defined by {$component}/statistic so if you wanted Max queue size on pubsub, you would look for pubsub/Max queue size. Statistics will not be provided by components that are not enabled.
Statistics common to components
These statistics may be found in multiple components and may be seen multiple times. For example both s2s and c2s will have Bytes sent statistic, so each can be found the following way:
s2s/Bytes received
c2s/Bytes receivedadd-script last {interval}
The number of times that add-script adhoc command has been run within the last interval.
Available {interval}: hour|minute|second
Statistics Level: FINEST
Result Format: Integer
Sub-level Statistics Available:
add-script/Average processing time: The average time in ms, returned as an integer, it takes for add-script to execute.
Available from the following components:
amp, bosh, c2s, cl-comp, eventbus, message-archive, message-router, monitor, muc, proxy, pubsub, rest, s2s, sess-man, ws2sList of possible statistics:
{compname}/adhoc-command/add-script last hour
{compname}/adhoc-command/add-script last minute
{compname}/adhoc-command/add-script last second
{compname}/adhoc-command/add-script/Average processing timeAverage processing time on last 100 runs [ms]
The average processing time in milliseconds for all commands and scripts for this component over the last 100 times component is called. This number will populate with less than 100 runs, and will continue averaging until 100 runs happens, at that point, it’s the most recent 100 instances. This statistic will reset every time the server shuts down or restarts.
Statistics Level: FINEST
Result Format: Integer
Available from the following components:
amp, bosh, c2s, cl-comp, eventbus, message-archive, message-router, monitor, muc, proxy, pubsub, rest, s2s, sess-man, ws2sList of possible statistics:
{compname}/Average processing time on last 100 runs [ms]Bytes received
The total number of bytes that the component has received during the current server instance. This statistic resets at server shutdown or restart.
Statistics Level: FINE|FINEST
c2s is FINE, all others are FINEST
Result Format: Integer
Available from the following components:
bosh, c2s, cl-comp, proxy, s2s, ws2sList of possible statistics:
{compname}/Bytes receivedBytes sent
The total number of bytes that the component has sent during the current server instance. This statistic resets at server shutdown or restart.
Statistics Level: FINE|FINEST
c2s is FINE, all others are FINEST
Result Format: Integer
Available from the following components:
bosh, c2s, cl-comp, proxy, s2s, ws2sList of possible statistics:
{compname}/Bytes sentdel-script last {interval}
The number of times that del-script adhoc command has been run within the last interval.
Available {interval}: hour|minute|second
Statistics Level: FINEST
Result Format: Integer
Sub-level Statistics Available:
del-script/Average processing time: The average time in ms, returned as an integer, it takes for del-script to execute.
Available from the following components:
amp, bosh, c2s, cl-comp, eventbus, message-archive, message-router, monitor, muc, proxy, pubsub, rest, s2s, sess-man, ws2sList of possible statistics:
{compname}/adhoc-command/del-script last hour
{compname}/adhoc-command/del-script last minute
{compname}/adhoc-command/del-script last second
{compname}/adhoc-command/del-script/Average processing timeLast {interval} packets
The number of packets that have been handled by this component in the last interval.
Available {interval}: hour|minute|second
Statistics Level: FINEST
Result Format: Integer
Available from the following components:
amp, bosh, c2s, cl-comp, eventbus, message-archive, message-router, monitor, muc, proxy, pubsub, rest, s2s, sess-man, ws2sList of possible statistics:
{compname}/last hour packets
{compname}/last minute packets
{compname}/last second packetslist-commands last {interval}
The number of list-commands requests sent to the component in the last interval.
Available {interval}: hour|minute|second
Statistics Level: FINEST
Result Format: Integer
Sub-level Statistics Available:
list-commands/Average processing time: The average time in ms, returned as an integer, it takes for list-commands to execute.
Available from the following components:
amp, bosh, c2s, cl-comp, eventbus, message-archive, message-router, monitor, muc, proxy, pubsub, rest, s2s, sess-man, ws2sList of possible statistics:
{compname}/list-commands last hour
{compname}/list-commands last minute
{compname}/list-commands last second
{compname}/list-commands/Average processing time{IN|OUT|Total} queue overflow
The number of times the in or out queue has overflown for this component. That is there are more packets queues than the max queue size. A total statistic is also available that combines both results.
Statistics Level: FINEST
Result Format: Integer
Available from the following components:
amp, bosh, c2s, cl-comp, eventbus, message-archive, message-router, monitor, muc, proxy, pubsub, rest, s2s, sess-man, ws2sList of possible statistics:
{compname}/IN queue overflow
{compname}/OUT queue overflow
{compname}/Total queue overflow{in|out} queue wait: {priority}
The number of packets with {priority} priority currently in the incoming or outgoing queue.
Available {priority}: SYSTEM|CLUSTER|HIGH|NORMAL|LOW|PRESENCE|LOWEST
Statistics Level: FINEST
Result Format: Integer
Available from the following components:
amp, bosh, c2s, cl-comp, eventbus, message-archive, message-router, monitor, muc, proxy, pubsub, rest, s2s, sess-man, ws2sList of possible statistics:
{compname}/In queue wait: SYSTEM
{compname}/In queue wait: CLUSTER
{compname}/In queue wait: HIGH
{compname}/In queue wait: NORMAL
{compname}/In queue wait: LOW
{compname}/In queue wait: PRESENCE
{compname}/In queue wait: LOWEST
{compname}/Out queue wait: SYSTEM
{compname}/Out queue wait: CLUSTER
{compname}/Out queue wait: HIGH
{compname}/Out queue wait: NORMAL
{compname}/Out queue wait: LOW
{compname}/Out queue wait: PRESENCE
{compname}/Out queue wait: LOWEST{IN|OUT}_QUEUE processed {type}
The number of stanzas of different types that have been processed VIA the In or Out Queue of this component. This number will reset at the end of the server instance. Each component will have a list of the different types of stanzas it can process.
Available {type}:
messages
presences
cluster
other
IQ no XMLNS
IQ http://jabber.org/protocol/disco#items
IQ bind
IQ jabber:iq:roster
IQ session
IQ vCard
IQ command
IQ jabber:iq:private
IQ http://jabber.org/protocol/disco#info
total IQ|
Note
|
Several statistics are only available from statistics component, shutdown thread will ONLY print the following: messages, presences, cluster, other, IQ no XLMNS, total IQ. |
Statistics Level: FINER
Result Format: Integer
Available from the following components:
amp, bosh, c2s, cl-comp, eventbus, message-archive, message-router, monitor, muc, proxy, pubsub, rest, s2s, sess-man, ws2sList of possible statistics:
{compname}/IN_QUEUE processed messages
{compname}/IN_QUEUE processed presences
{compname}/IN_QUEUE processed cluster
{compname}/IN_QUEUE processed other
{compname}/IN_QUEUE processed IQ no XMLNS
{compname}/IN_QUEUE processed IQ http://jabber.org/protocol/disco#items
{compname}/IN_QUEUE processed IQ http://jabber.org/protocol/disco#info
{compname}/IN_QUEUE processed IQ bind
{compname}/IN_QUEUE processed IQ jabber:iq:roster
{compname}/IN_QUEUE processed IQ jabber:iq:private
{compname}/IN_QUEUE processed IQ session
{compname}/IN_QUEUE processed IQ vCard
{compname}/IN_QUEUE processed IQ command
{compname}/IN_QUEUE processed total IQ
{compname}/OUT_QUEUE processed messages
{compname}/OUT_QUEUE processed presences
{compname}/OUT_QUEUE processed cluster
{compname}/OUT_QUEUE processed other
{compname}/OUT_QUEUE processed IQ no XMLNS
{compname}/OUT_QUEUE processed IQ http://jabber.org/protocol/disco#items
{compname}/OUT_QUEUE processed IQ http://jabber.org/protocol/disco#info
{compname}/OUT_QUEUE processed IQ bind
{compname}/OUT_QUEUE processed IQ jabber:iq:roster
{compname}/OUT_QUEUE processed IQ jabber:iq:private
{compname}/OUT_QUEUE processed IQ session
{compname}/OUT_QUEUE processed IQ vCard
{compname}/OUT_QUEUE processed IQ command
{compname}/OUT_QUEUE processed total IQmax queue size
The maximum number of items allowed in the packet queue for this component.
Statistics Level:
Result Format: Integer
Available from the following components:
amp, bosh, c2s, cl-comp, eventbus, message-archive, message-router, muc, monitor, proxy, pubsub, rest, s2s, sess-man, ws2sList of possible statistics:
{compname}/max queue sizeOpen Connections
The number of open connections to the component.
Statistics Level: INFO|FINEST
c2s is INFO, all other components are FINEST
Result Format: Integer
Available from the following components:
bosh, c2s, cl-comp, proxy, s2s, ws2sList of possible statistics:
{compname}/Open connectionsPackets received
The total number of packets received by the component from external sources in the current instance. This number resets at server shutdown or restart.
Statistics Level: FINE
Result Format: Integer
Available from the following components:
amp, bosh, c2s, cl-comp, eventbus, message-archive, message-router, monitor, muc, proxy, pubsub, rest, s2s, sess-man, ws2sList of possible statistics:
{compname}/Packets receivedPackets sent
The total number of packets sent by the component in the current instance. This number resets at server shutdown or restart.
Statistics Level: FINE
Result Format: Integer
Available from the following components:
amp, bosh, c2s, cl-comp, eventbus, message-archive, message-router, monitor, muc, proxy, pubsub, rest, s2s, sess-man, ws2sList of possible statistics:
{compname}/Packets sentProcessed packets thread: {in|out}
How many packets have been processed in and out by each processing thread. Statistics will provide an array for each processor, listed from 0, 1, 2, 3 etc.. Let’s say that we have 4 threads set for ws2s, a list will be seen like this:
ws2s/Processed packets thread: IN=[2, 6, 4, 2]
ws2s/Processed packets thread: OUT=[8, 0, 1, 3]
ws2s/Processed packets thread (outliers) IN=mean: 79.0, deviation: 441, outliers: [in_10-ws2s: 2359]
ws2s/Processed packets thread (outliers) OUT=mean: 16.5, deviation: 23.2058941, outliers: [out_ws2s: 80]Note that the processor arrray will only have as many threads as the component has as defined in {compname}/Processing threads.
Statistics Level: FINEST
Result Format: Integer
Available from the following components:
amp, bosh, c2s, cl-comp, eventbus, message-archive, message-router, monitor, muc, pubsub, proxy, rest, s2s, sess-man, ws2sList of possible statistics:
{compname}/Processed packets thread: IN
{compname}/Processed packets thread: OUT
{compname}/Processed packets thread (outliers) IN
{compname}/Processed packets thread (outliers) OUTprocessing threads
The number of threads provided for the particular component.
Statistics Level: FINER
Result Format: Integer
Available from the following components:
amp, bosh, c2s, cl-comp, eventbus, message-archive, message-router, monitor, muc, proxy, pubsub, rest, s2s, sess-man, ws2sList of possible statistics:
{compname}/processing threadsSocket overflow
The number of times that this component has experienced socket overflow and had to drop packets. This does not include the number of dropped packets.
Statistics Level: FINEST
Result Format: Integer
Available from the following components:
bosh, c2s, cl-comp, proxy, s2s, ws2sList of possible statistics:
{compname}/Socket overflowTotal {in|out} queues wait
The number of packets in the inbound or outbound queue that are currently waiting to be sent. This includes packets of all types. This is an instant statistics, in that the number in queue is only as many in the queue the moment statistics are gathered.
Related Statistics: {compname}/Total queue wait: A combined total of Total in queue wait and Total out queue wait statistics for this component. Total queues wait: A combined total of all component queue wait statistics.
Statistics Level: FINEST
Result Format: Integer
Available from the following components:
amp, bosh, c2s, cl-comp, eventbus, message-archive, message-router, muc, monitor, proxy, pubsub, rest, s2s, sess-man, ws2sList of possible statistics:
{compname}/Total in queues wait
{compname}/Total out queues wait
{compname}/Total queues wait
Total queues waitTotal queues overflow
The number of times the component packet wait queue has overflown and had to drop packets. This statistic does not keep track of the number of dropped packets.
Related Statistics: total/Total queues overflow: The combined total of all queue overflow statistics for all components.
Statistics Level: FINEST
Result Format: Integer
Available from the following components:
amp, bosh, c2s, cl-comp, eventbus, message-archive, message-router, monitor, muc, proxy, pubsub, rest, s2s, sess-man, ws2sList of possible statistics:
{compname}/Total queues overflow
total/Total queues overflowWaiting to send
The number of packets in the component’s queue that are waiting to be sent. This number will usually be 0 however it will grow if a large number of packets are jamming up your system, or your queue sizes are set too low.
Statistics Level: FINEST
Result Format: Integer
Available from the following components:
bosh, c2s, cl-comp, proxy, s2s, ws2sList of possible statistics:
{compname}/Waiting to sendWatchdog runs
The number of times watchdog has been run on this component to check for stale connections.
Statistics Level: FINER
Result Format: Integer
Available from the following components:
bosh, c2s, cl-comp, s2s, ws2sList of possible statistics:
{compname}/Watchdog runsWatchdog stopped
The number of times watchdog identified and closed a connection it has found to be stale according to the settings in init.properties or by the defaults defined in this section.
Statistics Level: FINER
Result Format: Integer
Available from the following components:
bosh, cl-comp, c2s, s2s, ws2sList of possible statistics:
{compname}/Watchdog stoppedWatchdog tests
The number of times watchdog has found a potential stale connection and has conducted a test to determine whether or not to close the connection. This is per component in the current server instance.
Statistics Level: FINER
Result Format: Integer
Available from the following components:
bosh, cl-comp, c2s, s2s, ws2sList of possible statistics:
{compname}/Watchdog testsbosh
Bosh sessions
The number of currently open and running BOSH sessions to the server.
Statistics Level: FINEST
Result Format: Integer
List of possible statistics:
bosh/Bosh sessionspre-bind-session last {interval}
The number of times the pre-bind-session command has been executed within the last specified interval.
Available {interval}: hour|minute|second
Statistics Level: FINEST
Result Format: Integer
Sub-level Statistics Available:
bosh/pre-bind-session/Average processing time: The average time in ms, returned as an integer, it takes for pre-bind-session to execute.
List of possible statistics:
bosh/adhoc-command/pre-bind-session last hour
bosh/adhoc-command/pre-bind-session last minute
bosh/adhoc-command/pre-bind-session last second
bosh/adhoc-command/pre-bind-session/Average processing timecl-comp
adhoc-command/cluster-nodes-list last {interval}
The number of times per interval that the cluster-nodes-list command has been executed.
Available {interval}: hour|minute|second
Statistics Level: FINEST
Result Format: Integer
Sub-level Statistics Available:
cl-comp/Adhoc-command/cluster-nodes-list/Average processing time: The average time in ms, returned as an integer, it takes for cluster-nodes-list to execute.
List of possible statistics:
cl-comp/adhoc-command/cluster-nodes-list last hour
cl-comp/adhoc-command/cluster-nodes-list last minute
cl-comp/adhoc-command/cluster-nodes-list last second
cl-comp/adhoc-command/cluster-nodes-list/Average processing timeadhoc-command/force-stop-service last {interval}
The number of times per interval that the force-stop-service command has been executed.
Available {interval}: hour|minute|second
Statistics Level: FINEST
Result Format: Integer
Sub-level Statistics Available:
cl-comp/Adhoc-command/force-stop-service/Average processing time: The average time in ms, returned as an integer, it takes for force-stop-service to execute.
List of possible statistics:
cl-comp/adhoc-command/force-stop-service last hour
cl-comp/adhoc-command/force-stop-service last minute
cl-comp/adhoc-command/force-stop-service last second
cl-comp/adhoc-command/force-stop-service/Average processing timeadhoc-command/service-keys last {interval}
The number of times per interval that the service-keys command has been executed.
Available {interval}: hour|minute|second
Statistics Level: FINEST
Result Format: Integer
Sub-level Statistics Available:
cl-comp/Adhoc-command/service-keys/Average processing time: The average time in ms, returned as an integer, it takes for service-keys to execute.
List of possible statistics:
cl-comp/adhoc-command/service-keys last hour
cl-comp/adhoc-command/service-keys last minute
cl-comp/adhoc-command/service-keys last second
cl-comp/adhoc-command/service-keys/Average processing timeadhoc-command/sim-serv-stopped {interval}
The number of times per interval that the sim-serv-stopped command has been executed.
Available {interval}: hour|minute|second
Statistics Level: FINEST
Result Format: Integer
Sub-level Statistics Available:
cl-comp/Adhoc-command/sim-serv-stopped/Average processing time: The average time in ms, returned as an integer, it takes for sim-serv-stopped to execute.
List of possible statistics:
cl-comp/adhoc-command/sim-serv-stopped last hour
cl-comp/adhoc-command/sim-serv-stopped last minute
cl-comp/adhoc-command/sim-serv-stopped last second
cl-comp/adhoc-command/sim-serv-stopped/Average processing timeAverage compression ratio
The average compression ratio of data sent to other clusters during the session.
Statistics Level: FINE
Result Format: Float
List of possible statistics:
cl-comp/Average compression ratioAverage decompression ratio
The average compression ratio of data received from other clusters during the session.
Statistics Level: FINE
Result Format: Float
List of possible statistics:
cl-comp/Average decompression ratioKnown cluster nodes
The number of cluster nodes currently connected to the server.
Statistics Level: INFO
Result Format: Integer
List of possible statistics:
cl-comp/Known cluster nodesLast {interval} disconnects
The number of cluster disconnections within the specified interval.
Available {interval}: day|hour
Statistics Level: FINE
Result Format: Comma separated Array. For day, each array is the number of disconnections each hour, most recent first. For hour each array is the number of disconnections each minute, most recent first.
List of possible statistics:
cl-comp/Last day disconnects
cl-comp/Last hour disconnectsmessage-archive
Removal time of expired messages (avg)
The average amount of time in milliseconds it takes to remove expired messages from the repository. This includes manual and automatic removal of messages.
Statistics Level: FINE
Result Format: Integer
List of possible statistics:
message-archive/Removal time of expired messages (avg)message-router
CPUs no
The number of CPUs available on the host machine.
Statistics Level: FINEST
Result Format: Integer
List of possible statistics:
message-router/CPUs noCPU usage
% of available CPU power used by Tigase Server at the moment statistics are taken. Two formats are available for CPU usage: A float integer which expresses a long decimal available from CPU Usage [%], and a string which provides a rounded number with a % sign from CPU usage.
Statistics Level: FINE
Result Format: Float|String
List of possible statistics:
message-router/CPU usage [%]
message-router/CPU usageFree Heap
The amount of heap memory that is available for use, expressed in KB
Statistics Level: FINE
Result Format String
List of possible statistics:
message-router/Free HeapFree NonHeap
The amount of non-heap memory that is available for use, expressed in KB
Statistics Level: FINE
Result Format String
List of possible statistics:
message-router/Free NonHeapHEAP usage [%]
Total percent of HEAP memory in use by Tigase.
Statistics Level: FINE
Result Format: Float
List of possible statistics:
message-router/HEAP usage [%]Local hostname
The local hostname of the physical server.
Statistics Level: INFO
Result Format: String
List of possible statistics:
message-router/Local hostnameLoad average
The average system load for the previous minute. The way in which the load average is calculated is operating system specific but is typically a damped time-dependent average.
Statistics Level: FINE
Result Format: Float
List of possible statistics:
message-router/Load averageMax Heap mem
Maximum amount of heap memory available as defined by JAVA_OPTIONS in tigase.conf, in Kb.
Statistics Level: INFO
Result Format: String
List of possible statistics:
message-router/Max Heap memMax NonHeap mem
Maximum amount of non-heap memory available as defined by JAVA_OPTIONS in tigase.conf, in Kb.
Statistics Level: FINE
Result Format: String
List of possible statistics:
message-router/Max NonHeap memNONHEAP usage [%]
Total amount of NONHEAP memory in use expressed as a percentage.
Statistics Level: FINE
Result Format: Float
List of possible statistics:
message-archive/NONHEAP usage [%]Threads count
The total number of processing threads available across all components.
Statistics Level: FINEST
Result Format: Integer
List of possible statistics:
message-router/Threads countUptime
The total amount of time the server has been online for this session.
Statistics Level: INFO
Result Format: String
List of possible statistics:
message-router/Uptimemonitor
adhoc-command/load-errors last {interval}
The number of times per interval that the load-errors command has been executed.
Available {interval}: hour|minute|second
Statistics Level: FINEST
Result Format: Integer
Sub-level Statistics Available:
monitor/Adhoc-command/load-errors/Average processing time: The average time in ms, returned as an integer, it takes for load-errors to execute.
List of possible statistics:
monitor/adhoc-command/load-errors last hour
monitor/adhoc-command/load-errors last minute
monitor/adhoc-command/load-errors last second
monitor/adhoc-command/load-errors/Average processing timemuc
adhoc-command/remove-room last {interval}
The number of times per interval that the remove-room command has been executed.
Available {interval}: hour|minute|second
Statistics Level: FINEST
Result Format: Integer
Sub-level Statistics Available:
muc/Adhoc-command/remove-room/Average processing time: The average time in ms, returned as an integer, it takes for remove-room to execute.
List of possible statistics:
monitor/adhoc-command/remove-room last hour
monitor/adhoc-command/remove-room last minute
monitor/adhoc-command/remove-room last second
monitor/adhoc-command/remove-room/Average processing timeadhoc-command/default-room-config last {interval}
The number of times per interval that the default-room-command command has been executed.
Available {interval}: hour|minute|second
Statistics Level: FINEST
Result Format: Integer
Sub-level Statistics Available:
muc/Adhoc-command/default-room-config/Average processing time: The average time in ms, returned as an integer, it takes for default-room-config to execute.
List of possible statistics:
muc/adhoc-command/default-room-config last hour
muc/adhoc-command/default-room-config last minute
muc/adhoc-command/default-room-config last second
muc/adhoc-command/default-room-config/Average processing timeproxy
Average transfer size in KB
Average size of packets sent through the proxy component during the current session.
Statistics Level: FINEST
Result Format: Integer
List of possible statistics:
proxy/Average transfer size in KBKBytes transferred
Total number of Kb transferred through the proxy component.
Statistics Level: FINEST
Result Format: Integer
List of possible statistics:
proxy/KBytes transferredpubsub
Added new nodes
The total number of new nodes that has been added in the current server instance. This statistic is reset when the server resets.
Statistics Level: FINEST
Result Format: Integer
List of possible statistics:
pubsub/Added new nodesadhoc-command/delete-item last {interval}
The number of times per interval that the delete-item command has been executed.
Available {interval}: hour|minute|second
Statistics Level: FINEST
Result Format: Integer
Sub-level Statistics Available:
pubsub/adhoc-command/delete-item/Average processing time: The average time in ms, returned as an integer, it takes for delete-item to execute.
List of possible statistics:
pubsub/adhoc-command/delete-item last hour
pubsub/adhoc-command/delete-item last minute
pubsub/adhoc-command/delete-item last second
pubsub/adhoc-command/delete-item/Average processing timeadhoc-command/delete-node last {interval}
The number of times per interval that the delete-node command has been executed.
Available {interval}: hour|minute|second
Statistics Level: FINEST
Result Format: Integer
Sub-level Statistics Available:
pubsub/adhoc-command/delete-node/Average processing time: The average time in ms, returned as an integer, it takes for delete-item to execute.
List of possible statistics:
pubsub/adhoc-command/delete-node last hour
pubsub/adhoc-command/delete-node last minute
pubsub/adhoc-command/delete-node last second
pubsub/adhoc-command/delete-node/Average processing timeadhoc-command/list-items last {interval}
The number of times per interval that the list-items command has been executed.
Available {interval}: hour|minute|second
Statistics Level: FINEST
Result Format: Integer
Sub-level Statistics Available:
pubsub/adhoc-command/list-items/Average processing time: The average time in ms, returned as an integer, it takes for list-items to execute.
List of possible statistics:
pubsub/adhoc-command/list-items last hour
pubsub/adhoc-command/list-items last minute
pubsub/adhoc-command/list-items last second
pubsub/adhoc-command/list-items/Average processing timeadhoc-command/list-nodes last {interval}
The number of times per interval that the list-nodes command has been executed.
Available {interval}: hour|minute|second
Statistics Level: FINEST
Result Format: Integer
Sub-level Statistics Available:
pubsub/adhoc-command/list-nodes/Average processing time: The average time in ms, returned as an integer, it takes for list-nodes to execute.
List of possible statistics:
pubsub/adhoc-command/list-nodes last hour
pubsub/adhoc-command/list-nodes last minute
pubsub/adhoc-command/list-nodes last second
pubsub/adhoc-command/list-nodes/Average processing timeadhoc-command/publish-item last {interval}
The number of times per interval that the publish-item command has been executed.
Available {interval}: hour|minute|second
Statistics Level: FINEST
Result Format: Integer
Sub-level Statistics Available:
pubsub/adhoc-command/publish-item/Average processing time: The average time in ms, returned as an integer, it takes for publish-item to execute.
List of possible statistics:
pubsub/adhoc-command/publish-item last hour
pubsub/adhoc-command/publish-item last minute
pubsub/adhoc-command/publish-item last second
pubsub/adhoc-command/publish-item/Average processing timeadhoc-command/retrieve-item last {interval}
The number of times per interval that the retrieve-item command has been executed.
Available {interval}: hour|minute|second
Statistics Level: FINEST
Result Format: Integer
Sub-level Statistics Available:
pubsub/adhoc-command/retrieve-item/Average processing time: The average time in ms, returned as an integer, it takes for retrieve-item to execute.
List of possible statistics:
pubsub/adhoc-command/retrieve-item last hour
pubsub/adhoc-command/retrieve-item last minute
pubsub/adhoc-command/retrieve-item last second
pubsub/adhoc-command/retrieve-item/Average processing timeAdHocConfigCommandModule last {interval}
The number of times per interval that the AdHocConfigCommandModule command has been executed.
Available {interval}: hour|minute|second
Statistics Level: FINEST
Result Format: Integer
Sub-level Statistics Available:
pubsub/AdHocConfigCommandModule/Average processing time: The average time in ms, returned as an integer, it takes for AdHocConfigCommandModule to execute.
List of possible statistics:
pubsub/AdHocConfigCommandModule last hour
pubsub/AdHocConfigCommandModule last minute
pubsub/AdHocConfigCommandModule last second
pubsub/AdHocConfigCommandModule/Average processing timeAffiliations count (in cache)
The total number of pubsub affiliations that are resident in cache memory. Affiliations include JIDs that are one of the following; Owner, Publisher, Publish-Only, Member, None, Outcast. This may not reflect total pubsub affiliations in repository.
Statistics Level: FINEST
Result Format: Integer
List of possible statistics:
pubsub/Affiliations count (in cache)Average DB write time [ms]
The average time of all DB writes from PubSub component. Average is calculated using two other statistics: (Total writing time / Database writes)
Statistics Level: FINEST
Result Format: Integer
List of possible statistics:
pubsub/Average DB write time [ms]cache/hits last {interval}
The number of times the cache has achieved a hit within the last interval. A hit is when a request for information is matched to data that is inside the cache memory.
Available {interval}: hour|minute|second
Statistics Level: FINEST
Result Format: Integer
List of possible statistics:
pubsub/cache/hits last hour
pubsub/cache/hits last minute
pubsub/cache/hits last secondcache/hit-miss ratio per {interval}
The ratio of cache hits to cache misses over the specified period. A cache hit is when a request for information from the cache is matched with information in the cache. A miss is when that information request cannot find a match in cache. A miss only indicates that that information was not found in the cache, not that it is not in the repository.
Available {interval}: hour|minute
Statistics Level: FINE
Result Format: Float
List of possible statistics:
pubsub/cache/hit-miss ratio per hour
pubsub/cache/hit-miss ratio per minutecache/requests last {interval}
The number of memory cache requests made within the last interval.
Available {interval}: hour|minute|second
Statistics Level: FINEST
Result Format: Integer
List of possible statistics:
pubsub/cache/Requests last hour
pubsub/cache/Requests last minute
pubsub/cache/Requests last secondCached nodes
The number of nodes that is currently in memory cache.
Statistics Level: FINEST
Result Format: Integer
List of possible statistics:
pubsub/Cached nodesCapsModule
The number of times per interval that the CapsModule command has been executed.
Available {interval}: hour|minute|second
Statistics Level: FINEST
Result Format: Integer
Sub-level Statistics Available:
pubsub/CapsModule/Average processing time: The average time in ms, returned as an integer, it takes for CapsModule to execute.
List of possible statistics:
pubsub/CapsModule last hour
pubsub/CapsModule last minute
pubsub/CapsModule last second
pubsub/CapsModule/Average processing timedb/GetNodeItems requests last {interval}
The number of times GetNodeItems command has been run within the specified interval.
Available {interval}: hour|minute|second
Statistics Level: FINEST
Result Format: Integer
Sub-level Statistics Available:
pubsub/db/GetNodeItems/Average processing time: The average time in ms, returned as an integer, it takes for GetNodeItems to execute.
List of possible statistics:
pubsub/db/GetNodeItems last hour
pubsub/db/GetNodeItems last minute
pubsub/db/GetNodeItems last second
pubsub/db/GetNodeItems/Average processing timeDefaultConfigModule last {interval}
The number of times per interval that the DefaultConfigModule command has been executed.
Available {interval}: hour|minute|second
Statistics Level: FINEST
Result Format: Integer
Sub-level Statistics Available:
pubsub/DefaultConfigModule/Average processing time: The average time in ms, returned as an integer, it takes for DefaultConfigModule to execute.
List of possible statistics:
pubsub/DefaultConfigModule last hour
pubsub/DefaultConfigModule last minute
pubsub/DefaultConfigModule last second
pubsub/DefaultConfigModule/Average processing timeDiscoverInfoModule last {interval}
The number of times per interval that the DiscoverInfoModule command has been executed.
Available {interval}: hour|minute|second
Statistics Level: FINEST
Result Format: Integer
Sub-level Statistics Available:
pubsub/DiscoverInfoModule/Average processing time: The average time in ms, returned as an integer, it takes for DiscoverInfoModule to execute.
List of possible statistics:
pubsub/DiscoverInfoModule last hour
pubsub/DiscoverInfoModule last minute
pubsub/DiscoverInfoModule last second
pubsub/DiscoverInfoModule/Average processing timeDiscoverItemsModule last {interval}
The number of times per interval that the DiscoverItemsModule command has been executed.
Available {interval}: hour|minute|second
Statistics Level: FINEST
Result Format: Integer
Sub-level Statistics Available:
pubsub/DiscoverItemsModule/Average processing time: The average time in ms, returned as an integer, it takes for DiscoverItemsModule to execute.
List of possible statistics:
pubsub/DiscoverItemsModule last hour
pubsub/DiscoverItemsModule last minute
pubsub/DiscoverItemsModule last second
pubsub/DiscoverItemsModule/Average processing timeJabberVersionModule last {interval}
The number of times per interval that the JabberVersionModule command has been executed.
Available {interval}: hour|minute|second
Statistics Level: FINEST
Result Format: Integer
Sub-level Statistics Available:
pubsub/JabberVersionModule/Average processing time: The average time in ms, returned as an integer, it takes for JabberVersionModule to execute.
List of possible statistics:
pubsub/JabberVersionModule last hour
pubsub/JabberVersionModule last minute
pubsub/JabberVersionModule last second
pubsub/JabberVersionModule/Average processing timeManageAffiiationsModule last {interval}
The number of times per interval that the ManageAffiliationsModule command has been executed.
Available {interval}: hour|minute|second
Statistics Level: FINEST
Result Format: Integer
Sub-level Statistics Available:
pubsub/ManageAffiliationsModule/Average processing time: The average time in ms, returned as an integer, it takes for ManageAffiliationsModule to execute.
List of possible statistics:
pubsub/ManageAffiliationsModule last hour
pubsub/ManageAffiliationsModule last minute
pubsub/ManageAffiliationsModule last second
pubsub/ManageAffiliationsModule/Average processing timeManageSubscriptionModule last {interval}
The number of times per interval that the ManageSubscriptionModule command has been executed.
Available {interval}: hour|minute|second
Statistics Level: FINEST
Result Format: Integer
Sub-level Statistics Available:
pubsub/ManageSubscriptionModule/Average processing time: The average time in ms, returned as an integer, it takes for ManageSubscriptionModule to execute.
List of possible statistics:
pubsub/ManageSubscriptionModule last hour
pubsub/ManageSubscriptionModule last minute
pubsub/ManageSubscriptionModule last second
pubsub/ManageSubscriptionModule/Average processing timeNodeConfigModule last {interval}
The number of times per interval that the NodeConfigModule command has been executed.
Available {interval}: hour|minute|second
Statistics Level: FINEST
Result Format: Integer
Sub-level Statistics Available:
pubsub/NodeConfigModule/Average processing time: The average time in ms, returned as an integer, it takes for NodeConfigModule to execute.
List of possible statistics:
pubsub/NodeConfigModule last hour
pubsub/NodeConfigModule last minute
pubsub/NodeConfigModule last second
pubsub/NodeConfigModule/Average processing timeNodeCreateModule last {interval}
The number of times per interval that the NodeCreateModule command has been executed.
Available {interval}: hour|minute|second
Statistics Level: FINEST
Result Format: Integer
Sub-level Statistics Available:
pubsub/NodeCreateModule/Average processing time: The average time in ms, returned as an integer, it takes for NodeCreateModule to execute.
List of possible statistics:
pubsub/NodeCreateModule last hour
pubsub/NodeCreateModule last minute
pubsub/NodeCreateModule last second
pubsub/NodeCreateModule/Average processing timeNodeDeleteModule last {interval}
The number of times per interval that the NodeDeleteModule command has been executed.
Available {interval}: hour|minute|second
Statistics Level: FINEST
Result Format: Integer
Sub-level Statistics Available:
pubsub/NodeDeleteModule/Average processing time: The average time in ms, returned as an integer, it takes for NodeDeleteModule to execute.
List of possible statistics:
pubsub/NodeDeleteModule last hour
pubsub/NodeDeleteModule last minute
pubsub/NodeDeleteModule last second
pubsub/NodeDeleteModule/Average processing timePresenceCollectorModule last {interval}
The number of times per interval that the PresenceCollectorModule command has been executed.
Available {interval}: hour|minute|second
Statistics Level: FINEST
Result Format: Integer
Sub-level Statistics Available:
pubsub/PresenceCollectorModule/Average processing time: The average time in ms, returned as an integer, it takes for PresenceCollectorModule to execute.
List of possible statistics:
pubsub/PresenceCollectorModule last hour
pubsub/PresenceCollectorModule last minute
pubsub/PresenceCollectorModule last second
pubsub/PresenceCollectorModule/Average processing timePendingSubscriptionModule last {interval}
The number of times per interval that the PendingSubscriptionModule command has been executed.
Available {interval}: hour|minute|second
Statistics Level: FINEST
Result Format: Integer
Sub-level Statistics Available:
pubsub/PendingSubscriptionModule/Average processing time: The average time in ms, returned as an integer, it takes for PendingSubscriptionModule to execute.
List of possible statistics:
pubsub/PendingSubscriptionModule last hour
pubsub/PendingSubscriptionModule last minute
pubsub/PendingSubscriptionModule last second
pubsub/PendingSubscriptionModule/Average processing timePresenceNotifierModule last {interval}
The number of times per interval that the PresenceNotifierModule command has been executed.
Available {interval}: hour|minute|second
Statistics Level: FINEST
Result Format: Integer
Sub-level Statistics Available:
pubsub/PresenceNotifierModule/Average processing time: The average time in ms, returned as an integer, it takes for PresenceNotifierModule to execute.
List of possible statistics:
pubsub/PresenceNotifierModule last hour
pubsub/PresenceNotifierModule last minute
pubsub/PresenceNotifierModule last second
pubsub/PresenceNotifierModule/Average processing timePublishItemModule last {interval}
The number of times per interval that the PublishItemModule command has been executed.
Available {interval}: hour|minute|second
Statistics Level: FINEST
Result Format: Integer
Sub-level Statistics Available:
pubsub/PublishItemModule/Average processing time: The average time in ms, returned as an integer, it takes for PublishItemModule to execute.
List of possible statistics:
pubsub/PublishItemModule last hour
pubsub/PublishItemModule last minute
pubsub/PublishItemModule last second
pubsub/PublishItemModule/Average processing timePurgeItemsModule last {interval}
The number of times per interval that the PurgeItemsModule command has been executed.
Available {interval}: hour|minute|second
Statistics Level: FINEST
Result Format: Integer
Sub-level Statistics Available:
pubsub/PurgeItemsModule/Average processing time: The average time in ms, returned as an integer, it takes for PurgeItemsModule to execute.
List of possible statistics:
pubsub/PurgeItemsModule last hour
pubsub/PurgeItemsModule last minute
pubsub/PurgeItemsModule last second
pubsub/PurgeItemsModule/Average processing timeRepository writes
Number of individual writes to Repository from the pubsub component since startup.
Statistics Level: FINEST
Result Format: Integer
Sub-level Statistics Available:
pubsub/Repository writesRetractItemModule last {interval}
The number of times per interval that the RetractItemModule command has been executed.
Available {interval}: hour|minute|second
Statistics Level: FINEST
Result Format: Integer
Sub-level Statistics Available:
pubsub/RetractItemModule/Average processing time: The average time in ms, returned as an integer, it takes for RetractItemModule to execute.
List of possible statistics:
pubsub/RetractItemModule last hour
pubsub/RetractItemModule last minute
pubsub/RetractItemModule last second
pubsub/RetractItemModule/Average processing timeRetrieveAffiliationsModule last {interval}
The number of times per interval that the RetrieveAffiliationsModule command has been executed.
Available {interval}: hour|minute|second
Statistics Level: FINEST
Result Format: Integer
Sub-level Statistics Available:
pubsub/RetrieveAffiliationsModule/Average processing time: The average time in ms, returned as an integer, it takes for RetrieveAffiliationsModule to execute.
List of possible statistics:
pubsub/RetrieveAffiliationsModule last hour
pubsub/RetrieveAffiliationsModule last minute
pubsub/RetrieveAffiliationsModule last second
pubsub/RetrieveAffiliationsModule/Average processing timeRetrieveItemsModule last {interval}
The number of times per interval that the RetrieveItemsModule command has been executed.
Available {interval}: hour|minute|second
Statistics Level: FINEST
Result Format: Integer
Sub-level Statistics Available:
pubsub/RetrieveItemsModule/Average processing time: The average time in ms, returned as an integer, it takes for RetrieveItemsModule to execute.
List of possible statistics:
pubsub/RetrieveItemsModule last hour
pubsub/RetrieveItemsModule last minute
pubsub/RetrieveItemsModule last second
pubsub/RetrieveItemsModule/Average processing timeRetrieveSubscriptionsModule last {interval}
The number of times per interval that the RetrieveSubscriptionsModule command has been executed.
Available {interval}: hour|minute|second
Statistics Level: FINEST
Result Format: Integer
Sub-level Statistics Available:
pubsub/RetrieveSubscriptionsModule/Average processing time: The average time in ms, returned as an integer, it takes for RetrieveSubscriptionsModule to execute.
List of possible statistics:
pubsub/RetrieveSubscriptionsModule last hour
pubsub/RetrieveSubscriptionsModule last minute
pubsub/RetrieveSubscriptionsModule last second
pubsub/RetrieveSubscriptionsModule/Average processing timeSubscribeNodeModule last {interval}
The number of times per interval that the SubscribeNodeModule command has been executed.
Available {interval}: hour|minute|second
Statistics Level: FINEST
Result Format: Integer
Sub-level Statistics Available:
pubsub/SubscribeNodeModule/Average processing time: The average time in ms, returned as an integer, it takes for SubscribeNodeModule to execute.
List of possible statistics:
pubsub/SubscribeNodeModule last hour
pubsub/SubscribeNodeModule last minute
pubsub/SubscribeNodeModule last second
pubsub/SubscribeNodeModule/Average processing timeSubscription count (in cache)
The total number of pubsub subscriptions that are resident in cache memory. This may not reflect total pubsub subscriptions in repository.
Statistics Level: FINEST
Result Format: Integer
List of possible statistics:
pubsub/Subscription count (in cache)Total writing time
The cumulative total of time pubsub component has written to the database expressed in milliseconds.
Statistics Level: FINEST
Result Format: String (###ms)
List of possible statistics:
pubsub/Total writing timeUnsubscribeNodeModule last {interval}
The number of times per interval that the UnsubscribeNodeModule command has been executed.
Available {interval}: hour|minute|second
Statistics Level: FINEST
Result Format: Integer
Sub-level Statistics Available:
pubsub/UnsubscribeNodeModule/Average processing time: The average time in ms, returned as an integer, it takes for UnsubscribeNodeModule to execute.
List of possible statistics:
pubsub/UnsubscribeNodeModule last hour
pubsub/UnsubscribeNodeModule last minute
pubsub/UnsubscribeNodeModule last second
pubsub/UnsubscribeNodeModule/Average processing timeUpdate subscription calls
Number of times Subscriptions have been updated (this includes new, deleted, and edited).
Statistics Level: FINEST
Result Format: Integer
List of possible statistics:
pubsub/Update subscriptions callsXmppPingModule last {interval}
The number of times per interval that the XmppPingModule command has been executed.
Available {interval}: hour|minute|second
Statistics Level: FINEST
Result Format: Integer
Sub-level Statistics Available:
pubsub/XmppPingModule/Average processing time: The average time in ms, returned as an integer, it takes for XmppPingModule to execute.
List of possible statistics:
pubsub/XmppPingModule last hour
pubsub/XmppPingModule last minute
pubsub/XmppPingModule last second
pubsub/XmppPingModule/Average processing timerepo-factory
repo-factory/Number of data repositories
The number of data repositories setup for this XMPP server.
Statistics Level: FINE
Result Format: Integer
List of possible statistics:
repo-factory/Number of data repositoriesrepo-factory/repository {jdbclocation} connections count
The number of connections made to this database.
Statistics Level: FINE
Result Format: Integer
List of possible statistics:
repo-factory/repository {jdbclocation} connections counts2s
adhoc-command/get-cid-connection last {interval}
The number of times get-cid-connection command has been executed within the specified interval.
Available {interval}: hour|minute|second
Statistics Level: FINEST
Result Format: Integer
Sub-level Statistics Available:
s2s/adhoc-command/get-cid-connection/Average processing time: The average time in ms, returned as an integer, it takes for get-cid-connection to execute.
List of possible statistics:
s2s/adhoc-command/get-cid-connection last hour
s2s/adhoc-command/get-cid-connection last minute
s2s/adhoc-command/get-cid-connection last second
s2s/adhoc-command/get-cid-connection/Average processing timeadhoc-command/s2s-bad-state-conns last {interval}
The number of times s2s-bad-state-conns command has been executed within the specified interval.
Available {interval}: hour|minute|second
Statistics Level: FINEST
Result Format: Integer
Sub-level Statistics Available:
adhoc-command/s2s-bad-state-conns/Average processing time: The average time in ms, returned as an integer, it takes for s2s-bad-state-conns to execute.
List of possible statistics:
s2s/adhoc-command/s2s-bad-state-conns last hour
s2s/adhoc-command/s2s-bad-state-conns last minute
s2s/adhoc-command/s2s-bad-state-conns last second
s2s/adhoc-command/s2s-bad-state-conns/Average processing timeadhoc-command/reset-bad-state-conns last {interval}
The number of times reset-bad-state-conns command has been executed within the specified interval.
Available {interval}: hour|minute|second
Statistics Level: FINEST
Result Format: Integer
Sub-level Statistics Available:
adhoc-command/reset-bad-state-conns/Average processing time: The average time in ms, returned as an integer, it takes for reset-bad-state-conns to execute.
List of possible statistics:
s2s/adhoc-command/reset-bad-state-conns last hour
s2s/adhoc-command/reset-bad-state-conns last minute
s2s/adhoc-command/reset-bad-state-conns last second
s2s/adhoc-command/reset-bad-state-conns/Average processing timeCIDs number
ConnectionID for the server. This may include multiple CIDs if server is running multiple vhosts.
Statistics Level: FINEST
Result Format: String
List of possible statistics:
s2s/CIDs numberTotal DB keys
Total number of database keys.
Statistics Level: FINEST
Result Format: Integer
List of possible statistics:
s2s/Total DB keysTotal {incoming|outgoing}
The total number of server-to-server connections, outgoing is local server connecting to other servers, and incoming is connections from other servers. The results may or may not be the same.
Statistics Level: FINEST
Result Format: Integer
List of possible statistics:
s2s/Total incoming
s2s/Total outgoingTotal {incoming|outgoing} TLS
The total number of server-to-server connections using TLS, outgoing is local server connecting to other servers, and incoming is connections from other servers. The results may or may not be the same.
Statistics Level: FINEST
Result Format: Integer
List of possible statistics:
s2s/Total incoming TLS
s2s/Total outgoing TLSTotal outgoing handshaking
Total number of outgoing connections that are currently handshaking to other servers.
Statistics Level: FINEST
Result Format: Integer
List of possible statistics:
s2s/Total outgoing handshakingsess-man
Active user connections
Number of user connections that are considered active. An active user is a user that has sent stanzas to the server or through the server within the last 5 minutes.
Statistics Level: FINER
Result Format: Integer
list of possible statistics:
sess-man/Active user connectionsadhoc-command/connection-time last {interval}
The number of times connection-time command has been executed within the specified interval.
Available {interval}: hour|minute|second
Statistics Level: FINEST
Result Format: Integer
Sub-level Statistics Available:
adhoc-command/connection-time/Average processing time: The average time in ms, returned as an integer, it takes for connection-time to execute.
List of possible statistics:
sess-man/adhoc-command/connection-time last hour
sess-man/adhoc-command/connection-time last minute
sess-man/adhoc-command/connection-time last second
sess-man/adhoc-command/connection-time/Average processing timeadhoc-command/http://jabber.org/protocol/admin#add-user last {interval}
The number of times admin#add-user command has been executed within the specified interval.
Available {interval}: hour|minute|second
Statistics Level: FINEST
Result Format: Integer
Sub-level Statistics Available:
adhoc-command/http://jabber.org/protocol/admin#add-user/Average processing time: The average time in ms, returned as an integer, it takes for admin#add-user to execute.
List of possible statistics:
sess-man/adhoc-command/http://jabber.org/protocol/admin#add-user last hour
sess-man/adhoc-command/http://jabber.org/protocol/admin#add-user last minute
sess-man/adhoc-command/http://jabber.org/protocol/admin#add-user last second
sess-man/adhoc-command/http://jabber.org/protocol/admin#add-user/Average processing timeadhoc-command/http://jabber.org/protocol/admin#add-user-tracker last {interval}
The number of times admin#add-user-tracker command has been executed within the specified interval.
Available {interval}: hour|minute|second
Statistics Level: FINEST
Result Format: Integer
Sub-level Statistics Available:
adhoc-command/http://jabber.org/protocol/admin#add-user-tracker/Average processing time: The average time in ms, returned as an integer, it takes for admin#add-user-tracker to execute.
List of possible statistics:
sess-man/adhoc-command/http://jabber.org/protocol/admin#add-user-tracker last hour
sess-man/adhoc-command/http://jabber.org/protocol/admin#add-user-tracker last minute
sess-man/adhoc-command/http://jabber.org/protocol/admin#add-user-tracker last second
sess-man/adhoc-command/http://jabber.org/protocol/admin#add-user-tracker/Average processing timeadhoc-command/http://jabber.org/protocol/admin#announce last {interval}
The number of times admin#announce command has been executed within the specified interval.
Available {interval}: hour|minute|second
Statistics Level: FINEST
Result Format: Integer
Sub-level Statistics Available:
adhoc-command/http://jabber.org/protocol/admin#announce/Average processing time: The average time in ms, returned as an integer, it takes for admin#announce to execute.
List of possible statistics:
sess-man/adhoc-command/http://jabber.org/protocol/admin#announce last hour
sess-man/adhoc-command/http://jabber.org/protocol/admin#announce last minute
sess-man/adhoc-command/http://jabber.org/protocol/admin#announce last second
sess-man/adhoc-command/http://jabber.org/protocol/admin#announce/Average processing timeadhoc-command/http://jabber.org/protocol/admin#change-user-password last {interval}
The number of times admin#change-user-password command has been executed within the specified interval.
Available {interval}: hour|minute|second
Statistics Level: FINEST
Result Format: Integer
Sub-level Statistics Available:
adhoc-command/http://jabber.org/protocol/admin#change-user-password/Average processing time: The average time in ms, returned as an integer, it takes for admin#change-user-password to execute.
List of possible statistics:
sess-man/adhoc-command/http://jabber.org/protocol/admin#change-user-password last hour
sess-man/adhoc-command/http://jabber.org/protocol/admin#change-user-password last minute
sess-man/adhoc-command/http://jabber.org/protocol/admin#change-user-password last second
sess-man/adhoc-command/http://jabber.org/protocol/admin#change-user-password/Average processing timeadhoc-command/http://jabber.org/protocol/admin#delete-user last {interval}
The number of times admin#delete-user command has been executed within the specified interval.
Available {interval}: hour|minute|second
Statistics Level: FINEST
Result Format: Integer
Sub-level Statistics Available:
adhoc-command/http://jabber.org/protocol/admin#delete-user/Average processing time: The average time in ms, returned as an integer, it takes for admin#delete-user to execute.
List of possible statistics:
sess-man/adhoc-command/http://jabber.org/protocol/admin#delete-user last hour
sess-man/adhoc-command/http://jabber.org/protocol/admin#delete-user last minute
sess-man/adhoc-command/http://jabber.org/protocol/admin#delete-user last second
sess-man/adhoc-command/http://jabber.org/protocol/admin#delete-user/Average processing timeadhoc-command/http://jabber.org/protocol/admin#end-user-session last {interval}
The number of times admin#end-user-session command has been executed within the specified interval.
Available {interval}: hour|minute|second
Statistics Level: FINEST
Result Format: Integer
Sub-level Statistics Available:
adhoc-command/http://jabber.org/protocol/admin#end-user-session/Average processing time: The average time in ms, returned as an integer, it takes for admin#end-user-session to execute.
List of possible statistics:
sess-man/adhoc-command/http://jabber.org/protocol/admin#end-user-session last hour
sess-man/adhoc-command/http://jabber.org/protocol/admin#end-user-session last minute
sess-man/adhoc-command/http://jabber.org/protocol/admin#end-user-session last second
sess-man/adhoc-command/http://jabber.org/protocol/admin#end-user-session/Average processing timeadhoc-command/http://jabber.org/protocol/admin#get-active-users last {interval}
The number of times admin#get-active-users command has been executed within the specified interval.
Available {interval}: hour|minute|second
Statistics Level: FINEST
Result Format: Integer
Sub-level Statistics Available:
adhoc-command/http://jabber.org/protocol/admin#get-active-users/Average processing time: The average time in ms, returned as an integer, it takes for admin#get-active-users to execute.
List of possible statistics:
sess-man/adhoc-command/http://jabber.org/protocol/admin#get-active-users last hour
sess-man/adhoc-command/http://jabber.org/protocol/admin#get-active-users last minute
sess-man/adhoc-command/http://jabber.org/protocol/admin#get-active-users last second
sess-man/adhoc-command/http://jabber.org/protocol/admin#get-active-users/Average processing timeadhoc-command/http://jabber.org/protocol/admin#get-active-user-num last {interval}
The number of times admin#get-active-user-num command has been executed within the specified interval.
Available {interval}: hour|minute|second
Statistics Level: FINEST
Result Format: Integer
Sub-level Statistics Available:
adhoc-command/http://jabber.org/protocol/admin#get-active-user-num/Average processing time: The average time in ms, returned as an integer, it takes for admin#get-active-user-num to execute.
List of possible statistics:
sess-man/adhoc-command/http://jabber.org/protocol/admin#get-active-user-num last hour
sess-man/adhoc-command/http://jabber.org/protocol/admin#get-active-user-num last minute
sess-man/adhoc-command/http://jabber.org/protocol/admin#get-active-user-num last second
sess-man/adhoc-command/http://jabber.org/protocol/admin#get-active-user-num/Average processing timeadhoc-command/http://jabber.org/protocol/admin#get-idle-users last {interval}
The number of times admin#get-idle-users command has been executed within the specified interval.
Available {interval}: hour|minute|second
Statistics Level: FINEST
Result Format: Integer
Sub-level Statistics Available:
adhoc-command/http://jabber.org/protocol/admin#get-idle-users/Average processing time: The average time in ms, returned as an integer, it takes for admin#get-idle-users to execute.
List of possible statistics:
sess-man/adhoc-command/http://jabber.org/protocol/admin#get-idle-users last hour
sess-man/adhoc-command/http://jabber.org/protocol/admin#get-idle-users last minute
sess-man/adhoc-command/http://jabber.org/protocol/admin#get-idle-users last second
sess-man/adhoc-command/http://jabber.org/protocol/admin#get-idle-users/Average processing timeadhoc-command/http://jabber.org/protocol/admin#get-idle-users-num last {interval}
The number of times admin#get-idle-users-num command has been executed within the specified interval.
Available {interval}: hour|minute|second
Statistics Level: FINEST
Result Format: Integer
Sub-level Statistics Available:
adhoc-command/http://jabber.org/protocol/admin#get-idle-users-num/Average processing time: The average time in ms, returned as an integer, it takes for admin#get-idle-users-num to execute.
List of possible statistics:
sess-man/adhoc-command/http://jabber.org/protocol/admin#get-idle-users-num last hour
sess-man/adhoc-command/http://jabber.org/protocol/admin#get-idle-users-num last minute
sess-man/adhoc-command/http://jabber.org/protocol/admin#get-idle-users-num last second
sess-man/adhoc-command/http://jabber.org/protocol/admin#get-idle-users-num/Average processing timeadhoc-command/http://jabber.org/protocol/admin#get-online-users-list last {interval}
The number of times admin#get-online-users-list command has been executed within the specified interval.
Available {interval}: hour|minute|second
Statistics Level: FINEST
Result Format: Integer
Sub-level Statistics Available:
adhoc-command/http://jabber.org/protocol/admin#get-online-users-list/Average processing time: The average time in ms, returned as an integer, it takes for admin#get-online-users-list to execute.
List of possible statistics:
sess-man/adhoc-command/http://jabber.org/protocol/admin#get-online-users-list last hour
sess-man/adhoc-command/http://jabber.org/protocol/admin#get-online-users-list last minute
sess-man/adhoc-command/http://jabber.org/protocol/admin#get-online-users-list last second
sess-man/adhoc-command/http://jabber.org/protocol/admin#get-online-users-list/Average processing timeadhoc-command/http://jabber.org/protocol/admin#get-top-active-users last {interval}
The number of times admin#get-top-active-users command has been executed within the specified interval.
Available {interval}: hour|minute|second
Statistics Level: FINEST
Result Format: Integer
Sub-level Statistics Available:
adhoc-command/http://jabber.org/protocol/admin#get-top-active-users/Average processing time: The average time in ms, returned as an integer, it takes for admin#get-top-active-users to execute.
List of possible statistics:
sess-man/adhoc-command/http://jabber.org/protocol/admin#get-top-active-users last hour
sess-man/adhoc-command/http://jabber.org/protocol/admin#get-top-active-users last minute
sess-man/adhoc-command/http://jabber.org/protocol/admin#get-top-active-users last second
sess-man/adhoc-command/http://jabber.org/protocol/admin#get-top-active-users/Average processing timeadhoc-command/http://jabber.org/protocol/admin#get-registered-users-list last {interval}
The number of times admin#get-registered-users-list command has been executed within the specified interval.
Available {interval}: hour|minute|second
Statistics Level: FINEST
Result Format: Integer
Sub-level Statistics Available:
adhoc-command/http://jabber.org/protocol/admin#get-registered-users-list/Average processing time: The average time in ms, returned as an integer, it takes for admin#get-registered-users-list to execute.
List of possible statistics:
sess-man/adhoc-command/http://jabber.org/protocol/admin#get-registered-users-list last hour
sess-man/adhoc-command/http://jabber.org/protocol/admin#get-registered-users-list last minute
sess-man/adhoc-command/http://jabber.org/protocol/admin#get-registered-users-list last second
sess-man/adhoc-command/http://jabber.org/protocol/admin#get-registered-users-list/Average processing timeadhoc-command/http://jabber.org/protocol/admin#get-user-roster last {interval}
The number of times admin#get-user-roster command has been executed within the specified interval.
Available {interval}: hour|minute|second
Statistics Level: FINEST
Result Format: Integer
Sub-level Statistics Available:
adhoc-command/http://jabber.org/protocol/admin#get-user-roster/Average processing time: The average time in ms, returned as an integer, it takes for admin#get-user-roster to execute.
List of possible statistics:
sess-man/adhoc-command/http://jabber.org/protocol/admin#get-user-roster last hour
sess-man/adhoc-command/http://jabber.org/protocol/admin#get-user-roster last minute
sess-man/adhoc-command/http://jabber.org/protocol/admin#get-user-roster last second
sess-man/adhoc-command/http://jabber.org/protocol/admin#get-user-roster/Average processing timeadhoc-command/http://jabber.org/protocol/admin#remove-user last {interval}
The number of times admin#remove-user command has been executed within the specified interval.
Available {interval}: hour|minute|second
Statistics Level: FINEST
Result Format: Integer
Sub-level Statistics Available:
adhoc-command/http://jabber.org/protocol/admin#remove-user/Average processing time: The average time in ms, returned as an integer, it takes for admin#remove-user to execute.
List of possible statistics:
sess-man/adhoc-command/http://jabber.org/protocol/admin#remove-user last hour
sess-man/adhoc-command/http://jabber.org/protocol/admin#remove-user last minute
sess-man/adhoc-command/http://jabber.org/protocol/admin#remove-user last second
sess-man/adhoc-command/http://jabber.org/protocol/admin#remove-user/Average processing timeadhoc-command/http://jabber.org/protocol/admin#user-stats last {interval}
The number of times admin#user-stats command has been executed within the specified interval.
Available {interval}: hour|minute|second
Statistics Level: FINEST
Result Format: Integer
Sub-level Statistics Available:
adhoc-command/http://jabber.org/protocol/admin#user-stats/Average processing time: The average time in ms, returned as an integer, it takes for admin#user-stats to execute.
List of possible statistics:
sess-man/adhoc-command/http://jabber.org/protocol/admin#user-stats last hour
sess-man/adhoc-command/http://jabber.org/protocol/admin#user-stats last minute
sess-man/adhoc-command/http://jabber.org/protocol/admin#user-stats last second
sess-man/adhoc-command/http://jabber.org/protocol/admin#user-stats/Average processing timeadhoc-command/get-user-info last {interval}
The number of times get-user-info command has been executed within the specified interval.
Available {interval}: hour|minute|second
Statistics Level: FINEST
Result Format: Integer
Sub-level Statistics Available:
adhoc-command/get-user-info/Average processing time: The average time in ms, returned as an integer, it takes for get-user-info to execute.
List of possible statistics:
sess-man/adhoc-command/get-user-info last hour
sess-man/adhoc-command/get-user-info last minute
sess-man/adhoc-command/get-user-info last second
sess-man/adhoc-command/get-user-info/Average processing timeadhoc-command/modify-user last {interval}
The number of times modify-user command has been executed within the specified interval.
Available {interval}: hour|minute|second
Statistics Level: FINEST
Result Format: Integer
Sub-level Statistics Available:
adhoc-command/modify-user/Average processing time: The average time in ms, returned as an integer, it takes for modify-user to execute.
List of possible statistics:
sess-man/adhoc-command/modify-user last hour
sess-man/adhoc-command/modify-user last minute
sess-man/adhoc-command/modify-user last second
sess-man/adhoc-command/modify-user/Average processing timeadhoc-command/oauth-credentials last {interval}
The number of times oauth-credentials command has been executed within the specified interval.
Available {interval}: hour|minute|second
Statistics Level: FINEST
Result Format: Integer
Sub-level Statistics Available:
adhoc-command/oauth-credentials/Average processing time: The average time in ms, returned as an integer, it takes for oauth-credentials to execute.
List of possible statistics:
sess-man/adhoc-command/oauth-credentials last hour
sess-man/adhoc-command/oauth-credentials last minute
sess-man/adhoc-command/oauth-credentials last second
sess-man/adhoc-command/oauth-credentials/Average processing timeadhoc-command/roster-fixer last {interval}
The number of times roster-fixer command has been executed within the specified interval.
Available {interval}: hour|minute|second
Statistics Level: FINEST
Result Format: Integer
Sub-level Statistics Available:
adhoc-command/roster-fixer/Average processing time: The average time in ms, returned as an integer, it takes for roster-fixer to execute.
List of possible statistics:
sess-man/adhoc-command/roster-fixer last hour
sess-man/adhoc-command/roster-fixer last minute
sess-man/adhoc-command/roster-fixer last second
sess-man/adhoc-command/roster-fixer/Average processing timeadhoc-command/roster-fixer-cluster last {interval}
The number of times roster-fixer-cluster command has been executed within the specified interval.
Available {interval}: hour|minute|second
Statistics Level: FINEST
Result Format: Integer
Sub-level Statistics Available:
adhoc-command/roster-fixer-cluster/Average processing time: The average time in ms, returned as an integer, it takes for roster-fixer-cluster to execute.
List of possible statistics:
sess-man/adhoc-command/roster-fixer-cluster last hour
sess-man/adhoc-command/roster-fixer-cluster last minute
sess-man/adhoc-command/roster-fixer-cluster last second
sess-man/adhoc-command/roster-fixer-cluster/Average processing timeadhoc-command/user-domain-perm last {interval}
The number of times user-domain-perm command has been executed within the specified interval.
Available {interval}: hour|minute|second
Statistics Level: FINEST
Result Format: Integer
Sub-level Statistics Available:
adhoc-command/user-domain-perm/Average processing time: The average time in ms, returned as an integer, it takes for user-domain-perm to execute.
List of possible statistics:
sess-man/adhoc-command/user-domain-perm last hour
sess-man/adhoc-command/user-domain-perm last minute
sess-man/adhoc-command/user-domain-perm last second
sess-man/adhoc-command/user-domain-perm/Average processing timeadhoc-command/user-roster-management last {interval}
The number of times user-roster-management command has been executed within the specified interval.
Available {interval}: hour|minute|second
Statistics Level: FINEST
Result Format: Integer
Sub-level Statistics Available:
adhoc-command/user-roster-management/Average processing time: The average time in ms, returned as an integer, it takes for user-roster-management to execute.
List of possible statistics:
sess-man/adhoc-command/user-roster-management last hour
sess-man/adhoc-command/user-roster-management last minute
sess-man/adhoc-command/user-roster-management last second
sess-man/adhoc-command/user-roster-management/Average processing timeadhoc-command/user-roster-management-ext last {interval}
The number of times user-roster-management-ext command has been executed within the specified interval.
Available {interval}: hour|minute|second
Statistics Level: FINEST
Result Format: Integer
Sub-level Statistics Available:
adhoc-command/user-roster-management-ext/Average processing time: The average time in ms, returned as an integer, it takes for user-roster-management-ext to execute.
List of possible statistics:
sess-man/adhoc-command/user-roster-management-ext last hour
sess-man/adhoc-command/user-roster-management-ext last minute
sess-man/adhoc-command/user-roster-management-ext last second
sess-man/adhoc-command/user-roster-management-ext/Average processing timeAuthentication timeouts
The number of connections that have timed out during the authentication process. Default timeout is 2 minutes.
Statistics Level: FINEST
Result Format: Integer
List of available statistics:
sess-man/Authentication timeoutsClosed user connections
User connections that have been terminated by the user (as opposed to the server).
Statistics Level: FINEST
Result Format: Integer
List of available statistics:
sess-man/Closed user connectionsdefault-handler/Invalid registrations
Number of invalid registrations attempted with the server
Statistics Level: FINEST
Result Format: Integer
List of available statistics:
sess-man/default-handler/Invalid registrationsdefault-handler/Registered users
Number of registered users for this server.
Statistics Level: FINEST
Result Format: Integer
List of available statistics:
sess-man/default-handler/Registered usersMaximum user connections
Maximum number of connections that have been made during server instance, this number includes users connecting multiple times.
Statistics Level: INFO
Result Format: Integer
List of possible statistics:
sess-man/Maximum user connectionsMaximum user sessions {today|yesterday}
The number of most simultaneous sessions within the specified interval. Today = previous 24 hours, Yesterday = 24 hours after previous 24 hours (does not go by calendar date).
Statistics Level: INFO|FINEST
Result Format: Integer
List of possible statistics:
sess-man/Maximum user sessions today
sess-man/Maximum user sessions yesterdayRegistered accounts
Sum total of registered accounts for the server.
Statistics Level: FINEST
Result Format: Integer
List of possible statistics:
sess-man/Registered accountsOpen user connections
The current number of open user connections. This may be interpreted as number of connections from users, however a user can have more than one connection (connection from mobile and PC for example).
Statistics Level: INFO
Result Format: Integer
List of possible statistics:
sess-man/Open user connectionsOpen user sessions
The current number of open user sessions.
Statistics Level: INFO
Result Format: Integer
List of possible statistics:
sess-man/Open user sessionsTotal user connections
The cumulative number of connections that have been made to the server during the current instance.
Statistics Level: FINER
Result Format: Integer
List of possible statistics:
sess-man/Total user connectionsTotal user sessions
The cumulative number of sessions that this server has negotiated during the current instance.
Statistics Level: FINER
result Format: Integer
List of possible statistics:
sess-man/Total user sessionspresence/Users status changes
The number of presence changes for all users that have been conducted during the server instance.
Stastics Level: INFO
List of possible statistics:
sess-man/presence/Users status changes
sess-man/presence-state/Users status changessess-man/Processor
Processor statistics will result in a field of labels and values exclusive to that processor. The field shows as follows:
, Queue: 0, AvTime: 0, Runs: 0, Lost: 0Where: Queue: Number of packets in process queue AvTime: Average time in ms processor takes to conduct it’s operation. Runs: Number of times Processor has been run. Lost: Number of packets lost during processing.
Statistics Level: FINEST
List of possible statistics:
sess-man/Processor: message carbons
sess-man/Processor: http://jabber.org/protocol/stats
sess-man/Processor: jabber:iq:auth
sess-man/Processor: vcard-temp
sess-man/Processor: amp
sess-man/Processor: presence-subscription
sess-man/Processor: disco
sess-man/Processor: msgoffline
sess-man/Processor: urn:xmpp:blocking
sess-man/Processor: urn:xmpp:ping
sess-man/Processor: jabber:iq:register
sess-man/Processor: urn:ietf:params:xml:ns:xmpp-sasl
sess-man/Processor: prp
sess-man/Processor: presence
sess-man/Processor: message-archive-xep-0136
sess-man/Processor: default-handler
sess-man/Processor: jabber:iq:roster
sess-man/Processor: starttls
sess-man/Processor: presence-state
sess-man/Processor: jabber:iq:version
sess-man/Processor: urn:xmpp:time
sess-man/Processor: session-open
sess-man/Processor: jabber:iq:privacy
sess-man/Processor: urn:ietf:params:xml:ns:xmpp-bind
sess-man/Processor: http://jabber.org/protocol/commands
sess-man/Processor: vcard-xep0292
sess-man/Processor: session-close
sess-man/Processor: urn:ietf:params:xml:ns:xmpp-session
sess-man/Processor: jabber:iq:private
sess-man/Processor: Average amp on last 100 runs [ms]
sess-man/Processor: Average msgoffline on last 100 runs[ms]
These are example scripts included with Tigase for demonstration purposes, it is likely you will not encounter or need them.
sess-man/groovy-example last hour
sess-man/groovy-example last minute
sess-man/groovy-example last second
sess-man/groovy-example/Average processing time
sess-man/hello last hour
sess-man/hello last minute
sess-man/hello last second
sess-man/hello/Average processing timevhost-man
Checks is anonymous domain
Number of anonymous domain checks that have been run within vhost-man.
Statistics Level: FINEST
Result Format: Integer
List of possible statistics:
vhost-man/Checks is anonymous domainChecks: is local domain
Number of local domain checks that have been run within vhost-man.
Statistics Level: FINER
Result Format: Integer
List of possible statistics:
vhost-man/Checks: is local domainGet components for local domain
Number of components loaded within local domain.
Statistics Level: FINER
Result Format Integer
List of possible statistics:
vhost-man/Get components for local domain8.7. Eventbus
New for Tigase version 7.1.0, is an eventbus component to help with monitoring has been implemented. This allows you to set thresholds for certain predefined tasks and you or other JIDs can be sent a message when those thresholds are passed. You can even configure a mailer extension to have an E-mail sent to system administrators to let them know an event has occured! Lets begin with setup and requirements.
Eventbus is based on a limited PubSub specification. Events are delivered to subscribers as a normal PubSub notification.
Each component or client may subscribe for specific types of events. Only components on cluster nodes are allowed to publish events.
8.7.2. How it Works
Events in Eventbus are identified by two elements: name of event and its namespace:
<EventName xmlns="tigase:demo">
<sample_value>1</sample_value>
</EventName>Where event name is EventName and namespace is tigase:demo.
Listeners may subscribe for a specific event or for all events with specific a namespace. Because in pubsub, only one node name exists, so we have to add a way to convert the event name and namespace to a node name:
nodename = eventname + "|" + namespaceSo for example, to subscribe to <EventName xmlns="tigase:demo">, node must be: EventName|tigase:demo. If you wish to subscribe to all events with a specific namespace, use an asterisk (*) instead of the event name: *|tigase:demo.
|
Note
|
If client is subscribed to /|tigase:demo node, then events will not be sent from node /|tigase:demo, but from the real node (in this case: |
8.7.3. Available Tasks
Eventbus monitoring has several pre-defined tasks that can be monitored and set to trigger. What follows is the list of tasks with the options attributed to each task.
-
disk-task - Used to check disk usage.
Available Options-
enabled[B] - Enable or disable task, Boolean value.
-
period[I] - Period of running check, Integer value.
-
threshold - Percentage of used space on disk, Float value.
-
-
cpu-temp-task - Used to check CPU temperature.
Available Options-
enabled[B] - Enable or disable task, Boolean value.
-
period[I] - Period of running check, Integer value.
-
cpuTempThreshold[I] - Temperature threshold of CPU in °C.
-
-
load-checker-task - Used to check system load.
Available Options-
enabled[B] - Enable or disable task, Boolean value.
-
period[I] - Period of running check, Integer value.
-
averageLoadThreshold[L] - Average percent load threshold, Long value.
-
-
memory-checker-task - Used to check memory usage.
Available Options-
enabled[B] - Enable or disable task, Boolean value.
-
period[I] - Period of running check, Integer value.
-
maxHeapMemUsagePercentThreshold[I] - Alarm when percent of used Heap memory is larger than, Integer value.
-
maxNonHeapMemUsagePercentThreshold[I] - Alarm when percent of used Non Heap memory is larger than, Integer value.
-
-
logger-task - Used to transmit log entries depending on level entered.
-
enabled[B] - Enable or disable task, Boolean value.
-
levelThreshold - Minimal log level that will be the threshold. Possible values are SEVERE, WARNING, INFO, CONFIG, FINE, FINER, FINEST, and ALL.
-
-
connections-task - Used to check users disconnections.
NOTE: The event will be generated only if both thresholds (amount and percentage) will be fulfilled.-
enabled[B] - Enable or disable task, Boolean value.
-
period[I] - Period of running check in ms, Integer value.
-
thresholdMinimal[I] - Minimal amount of disconnected users required to generate alarm.
-
threshold[I] - Minimal percent of disconnected users required to generate alarm.
-
8.7.4. Configuration
Configuration of the eventbus monitor can be done one of two ways; either by lines in init.properties file, or by sending XMPP stanzas to the server. You may also send XMPP stanzas VIA HTTP REST. XMPP stanza configurations will override ones in init.properties, but they will only last until the server restarts.
init.properties
Tasks can be configured in the init.properties file. See available tasks for the tasks that can be setup.
To enable a specific monitor task, use the following line:
monitor/$TASKNAME/enabled[B]=true
Where monitor is the component name for tigase.monitor.MonitorComponent, and $TASKNAME is one of the available task names.
This format will be the same for other settings for tasks. For example:
monitor/$TASKNAME/period[I]=1000
which sets the check period to 1000 milliseconds.
NOTE Once triggers have been activated, they will become dormant. Think of these as one-shot settings.
Configuration via XMPP
We can also configure the eventbus monitor component using XMPP stanzas. This allows us to set and change configurations during server runtime. This is done using a series of iq stanzas send to the monitor component.
We can query each component for its current settings using the following stanza.
<iq type="set" to="monitor@$DOMAIN/disk-task" id="aad0a">
<command xmlns="http://jabber.org/protocol/commands" node="x-config"/>
</iq>The server will return the component current settings which will make things easier if you wish to edit them. In this case, the server has returned the following to us
<iq from="monitor@$DOMAIN/disk-task" type="result" id="aad0a" to="alice@coffeebean.local/Psi+">
<command xmlns="http://jabber.org/protocol/commands" status="executing" node="x-config" sessionid="0dad3436-a029-4082-b0e0-04d838c6c0da">
<x xmlns="jabber:x:data" type="">
<title>Task Configuration</title>
<instructions/>
<field type="boolean" label="Enabled" var="x-task#enabled">
<value>0</value>
</field>
<field type="text-single" label="Period [ms]" var="x-task#period">
<value>60000</value>
</field>
<field type="text-single" label="Disk usage ratio threshold" var="threshold">
<value>0.8</value>
</field>
</x>
</command>
</iq>This tells us that the disk-task setting is not active, has a period of 60000ms, and will trigger when disk usage is over 80%.
To send new settings to the monitor component, we can send a similar stanza back to the monitor component.
<iq type="set" to="monitor@$DOMAIN/disk-task" id="aad1a">
<command xmlns="http://jabber.org/protocol/commands" node="x-config" sessionid="0dad3436-a029-4082-b0e0-04d838c6c0da">
<x xmlns="jabber:x:data" type="submit">
<field type="boolean" var="x-task#enabled">
<value>0</value>
</field>
<field type="text-single" var="x-task#period">
<value>60000</value>
</field>
<field type="text-single" var="threshold">
<value>0.8</value>
</field>
</x>
</command>
</iq>To which a successful update will give you an XMPP success stanza to let you know everything is set correctly.
(Include what the response will be from this setting!)
Alternatively, you can update specific settings by editing a single field without adding anything else. For example, if we just wanted to turn the disk-task on we could send the following stanza:
<iq type="set" to="monitor@$HOSTNAME/disk-task" id="ab53a">
<command xmlns="http://jabber.org/protocol/commands" node="x-config">
<x xmlns="jabber:x:data" type="submit">
<field type="boolean" var="x-task#enabled">
<value>1</value>
</field>
</x>
</command>
</iq>To set any other values, do not forget that certain parts may need to be changed, specifically the
<field type="boolean" var=x-task#enabled"> fields.
- Your field type will be defined by the type of variable specified in the Available Tasks section.
- var=x task# will be followed by the property value taken directly from the Available Tasks section, minus the data type parameter.
8.7.5. Getting the Message
Without a place to send messages to, eventbus will just trigger and shut down. There are two different methods that eventbus can deliver alarm messages and relevant data; XMPP messages and using the mailer extension.
XMPP notification
In order to retrieve notifications, a subscription to the eventbus@tigase.org user must be made.
Keep in mind that subscriptions are not persistent across server restarts, or triggers.
The eventbus schema is very similar to most XMPP subscription requests but with a few tweaks to differentiate it if you wanted to subscribe to a certain task or all of them. Each task is considered a node, and each node has the following pattern: eventName|eventXMLNS. Since each monitoring task has the tigase:monitor:event event XMLNS, we just need to pick the event name from the list of tasks.
So like the above example, our event node for the disk task will be disk-task|tigase:monitor:event.
Applied to an XMPP stanza, it will look something like this:
<iq type='set'
to='eventbus@tigase.org'
id='sub1'>
<pubsub xmlns='http://jabber.org/protocol/pubsub'>
<subscribe node='disk-taskEvent|tigase:monitor:event' jid='$USER_JID'/>
</pubsub>
</iq>Don’t forget to replace $USER_JID with the bare JID of the user you want to receive those messages. You can even have them sent to a MUC or any component with a JID. Available events are as follows: - disk-taskEvent for disk-task - LoggerMonitorEvent for logger-task - HeapMemoryMonitorEvent for memory-checker-task - LoadAverageMonitorEvent for load-checker-task - CPUTempMonitorEvent for cpu-temp-task - UsersDisconnected for connections-task
Alternatively, you can also subscribe to all events within the eventbus by using a wildcard * in place of the event XMLNS like this example:
<iq type='set'
to='eventbus@tigase.org'
id='sub1'>
<pubsub xmlns='http://jabber.org/protocol/pubsub'>
<subscribe node='*|tigase:monitor:event' jid='$USER_JID'/>
</pubsub>
</iq>Sample notification from Eventbus
<message from='eventbus.shakespeare.lit' to='francisco@denmark.lit' id='foo'>
<event xmlns='http://jabber.org/protocol/pubsub#event'>
<items node='EventName|tigase:demo'>
<item>
<EventName xmlns="tigase:demo" eventSource="samplecomponent.shakespeare.lit'" eventTimestamp="1444216850">
<sample_value>1</sample_value>
</EventName>
</item>
</items>
</event>
</message>8.7.6. Mailer Extension
Tigase Server Monitor Mailer Extension (TSMME) can send messages from the monitor component to a specified E-mail address so system administrators who are not logged into the XMPP server.
For v7.1.0 versions and later, TSMME is already included in your distribution package and no extra installation is needed.
For versions older than 7.1.0 TSMME requires two files to operate:
-
A compiled build of tigase mailer from its repository. Place the compiled .jar file into /jars directory.
-
javax.mail.jar file which may be downloaded from this link. Also place this file in the /jars directory.
monitor/mailer-smtp-host=mail.tigase.org
monitor/mailer-smtp-port=587
monitor/mailer-smtp-username=sender
monitor/mailer-smtp-password=********
monitor/mailer-from-address=sender@tigase.org
monitor/mailer-to-addresses=receiver@tigase.org,admin@tigase.org-
monitor/mailer-smtp-host - SMTP Server hostname.
-
monitor/mailer-smtp-port - SMTP Server port.
-
monitor/mailer-smtp-usernam - name of sender account.
-
monitor/mailer-smtp-password - password of sender account.
-
monitor/mailer-from-address - sender email address. It will be set in field from in email.
-
monitor/mailer-to-addresses - comma separated notification receivers email addresses.
It is recommended to create a specific e-mail address in your mail server for this purpose only, as the account settings are stored in plaintext without encryption.
8.8. Server to Server Protocol Settings
Tigase server 5.1.0 or later offers new, rewritten from scratch, implementation for s2s communication which allows you to tweak it’s configuration to get a better performance in your installation.
S2S (or server to server) protocol is enabled by default with optimal settings chosen. There are however, a set of configuration parameters you can adjust the server behavior to achieve optimal performance on your installation.
This documents describes following elements of the Tigase server configuration:
-
Number of concurrent connections to external servers
-
The connection throughput parameters
-
Maximum waiting time for packets addressed to external servers and the connection inactivity time
-
Custom plugins selecting connection to the remote server
8.8.1. Number of Concurrent Connections
Normally only one connection to the remote server is required to send XMPP stanza to that server. In some cases however, under a high load, you can get much better throughput and performance if you open multiple connections to the remote server.
This is especially true when the remote server works in a cluster mode. Ideally you want to open a connection to each of the cluster nodes on the remote server. This way you can spread the traffic evenly among cluster nodes and improve the performance for s2s connections.
Tigase server offers 2 different parameters to tweak the number of concurrent, s2s connections:
-
'max-out-total-conns' - the property specifies the maximum outgoing connections the Tigase server opens to any remote XMPP server. This is 'per domain' limit, which means that this limit applies to each of the remote domains Tigase connects to. If it is set to '4' then Tigase opens a maximum of 4 connections to 'jabber.org' plus maximum 4 connections to 'muc.jabber.org' even if this is the same physical server behind the same IP address.
To adjust the limit you have to add following line to the init.properties file:
s2s/max-out-total-conns[I]=2 -
'max-out-per-ip-conns' - the property specifies the maximum outgoing connections Tigase server opens to any remote XMPP server to its single IP address. This too, is 'per domain' limit, which means that this limit applies to each of the remote domains Tigase connects to. If it is set to '1', and the above limit is set to '4', and the remote server is visible behind 1 IP address, then Tigase opens a maximum of 1 connection to 'jabber.org' plus a maximum of 1 connection to 'muc.jabber.org' and other subdomains.
To adjust the limit you have to add following line to the init.properties file:
s2s/max-out-per-ip-conns[I]=2
8.8.2. Connection Throughput
Of course everybody wants his server to run with maximum throughput. This comes with a cost on resources, usually increased memory usage. This is especially important if you have large number of s2s connections on your installations. High throughput means lots of memory for network buffers for every single s2s connection. You may soon run out of all available memory.
There is one configuration property which allows you to adjust the network buffers for s2s connections to lower your memory usage or increase data throughput for s2s communication.
More details about are available in the init.properties guide under the link to --net-buff-high-throughput property description.
8.8.3. Maximum Packet Waiting Time and Connection Inactivity Time
There are 2 timeouts you can set for the component controlling s2s communication.
-
'max-packet-waiting-time' - this sets the maximum time for the packets waiting for sending to some remote server. Sometimes, due to networking problems or DNS problems it might be impossible to send message to remote server right away. Establishing a new connection may take time or there might be communication problems between servers or perhaps the remote server is restarted. Tigase will try a few times to connect to the remote server before giving up. This parameter specifies how long the packet is waiting for sending before it is returned to the sender with an error. The timeout is specified in seconds:
s2s/max-packet-waiting-time[L]=420 -
'max-inactivity-time' - this parameters specifies the maximum s2s connection inactivity time before it is closed. If a connection is not in use for a long time, it doesn’t make sense to keep it open and tie resources up. Tigase closes s2s connection after specified period of time and reconnects when it is necessary. The timeout is specified in seconds:
s2s/max-inactivity-time[L]=900
8.8.4. Custom Plugin: Selecting s2s Connection
Sometimes for very large installations you may want to set larger number of s2s connections to remote servers, especially if they work in cluster of several nodes. In such a case you can also have a control over XMPP packets distribution among s2s connections to a single remote server.
This piece of code is pluggable and you can write your own connection selector. It is enough to implement 'S2SConnectionSelector' interface and set your class name in the configuration using following parameter in init.properties file:
s2s/s2s-conn-selector=YourSelectorImplementationThe default selector picks connections randomly.
8.9. Tigase MUC Component
Tigase MUC component is included in all Tigase distributions, to enable MUCs have the following lines in your init.properties file:
--comp-name-4 = muc --comp-class-4 = tigase.muc.MUCComponent
8.9.1. Configuration Options
-
room-log-directory
Directory to store chat logs
muc/room-log-directory=/var/log/muc/
-
message-filter-enabled
To disable filter and allow MUC transfer all subelements in <message/> set:
muc/message-filter-enabled[B]=false
For example, this allows users to send XHTML stanzas through MUC chatrooms on your server.
-
presence-filter-enabled
To disable filter and allow MUC transfer all subelements in <presence/> set:
muc/presence-filter-enabled[B]=false
-
search-ghosts-every-minute
To enable pinging occupants every minute
muc/search-ghosts-every-minute[B]=true
-
ghostbuster-enabled
To disable active searching of ghosts in MUC Rooms:
muc/ghostbuster-enabled[B]=false
-
muc-allow-chat-states
To allow transfer of chat-states in MUC messages:
muc/muc-allow-chat-states[B]=true
-
muc-lock-new-room
To turn off default locking newly created rooms:
muc/muc-lock-new-room[B]=false
By default new room will be locked until owner submit room configuration.
-
muc-multi-item-allowed To disable joining from few resources to sinlge nickname:
muc/muc-multi-item-allowed[B]=false
History Providers Parameters
-
history-db
Database type. By default the same what is used as User Repository in Server. Provided types: derby, mysql, memory, pgsql, sqlserver, none.
muc/history-db=none
-
history-db-uri
URI for database, if should be used different than default from Tigase Server:
muc/history-db-uri=jdbc:derby:/database/tigasedbmuc
Public log
-
muc-logger-class
To set custom class for MUC logger:
muc/muc-logger-class=com.example.CustomLogger
Class must implment interface tigase.muc.logger.MucLogger.
Modules
Each module can be configured to use custom implementation by including it in the init.properties, the defaults are as follows:
muc/modules/jabber:iq:version[S]=tigase.component.modules.impl.JabberVersionModule
muc/modules/owner[S]=tigase.muc.modules.RoomConfigurationModule
muc/modules/presences[S]=tigase.muc.modules.PresenceModuleImpl
muc/modules/groupchat[S]=tigase.muc.modules.GroupchatMessageModule
muc/modules/invitations[S]=tigase.muc.modules.MediatedInvitationModule
muc/modules/urn:xmpp:ping[S]=tigase.component.modules.impl.XmppPingModule
muc/modules/unique[S]=tigase.muc.modules.UniqueRoomNameModule
muc/modules/disco[S]=tigase.muc.modules.DiscoveryModule
muc/modules/iqforwarder[S]=tigase.muc.modules.IqStanzaForwarderModule
muc/modules/admin[S]=tigase.muc.modules.ModeratorModule
muc/modules/privatemessages[S]=tigase.muc.modules.PrivateMessageModule
muc/modules/commands[S]=tigase.component.modules.impl.AdHocCommandModuleRoom Configuration options
In addition to the default Room configuration options defined in the MUC specification Tigase offers following as well:
- Tigase MUC Options
-
-
tigase#presence_delivery_logic - allows configuring logic determining which presence should be used by occupant in the room while using multiple-resource connections under one nickname, following options are available:
-
PREFERE_PRIORITY
-
PREFERE_LAST
-
-
tigase#presence_filtering - (boolean) when enabled broadcasts presence only to selected affiliation groups
-
tigase#presence_filtered_affiliations - when enabled tigase#presence_filtering is enabled one can select affiliation which should receive presences, following are possible to select from:
-
owner
-
admin
-
member
-
none
-
outcast
-
-
muc#roomconfig_maxusers - Allows configuring of maximum users of room.
-
- Configuring default room configuration in init.properties
muc/default_room_config/<option>=<value>
for example:
muc/default_room_config/tigase#presence_delivery_logic=PREFERE_LAST
- Configuration per-room
-
Per room configuration is done using IQ stanzas defined in the specification, for example:
<iq type="set" to="roomname@muc.domain" id="config1">
<query xmlns="http://jabber.org/protocol/muc#owner">
<x xmlns="jabber:x:data" type="submit">
<field type="boolean" var="tigase#presence_filtering">
<value>1</value>
</field>
<field type="list-multi" var="tigase#presence_filtered_affiliations">
<value>owner</value>
</field>
</x>
</query>
</iq>8.10. Tigase Load Balancing
Starting with version 5.2.0 Tigase introduces a load balancing functionality allowing users to be redirected to the most suitable cluster node. Functionality relies on a see-other-host XMPP stream error message. The basic principle behind the mechanism is that user will get redirect if the host returned by the implementation differ from the host to which user currently tries to connect. It is required that the user JID to be known for the redirection to work correctly.
8.10.1. Available Implementations
Tigase implementation is, as usual, extensible and allows for different, pluggable redirection strategies that implement the SeeOtherHostIfc interface.
Currently there are three strategies available:
-
SeeOtherHost- most basic implementation returning either single host configured in init.properties file or name of the current host; -
SeeOtherHostHashed(default) - default implementation for cluster environment of SeeOtherHostIfc returning redirect host based on the hash value of the user’s JID; list of the available nodes from which a selection would be made is by default composed and reflects all connected nodes, alternatively hosts list can be configured in the init.properties; -
SeeOtherHostDB- extended implementation of SeeOtherHost using redirect information from database in the form of pairs user_id and node_id to which given user should be redirected.
8.10.2. Configuration Options
The most basic configuration is related to the choice of actual redirection implementation:
--cm-see-other-host=Possible values are:
-
tigase.server.xmppclient.SeeOtherHost -
tigase.server.xmppclient.SeeOtherHostHashed -
tigase.server.xmppclient.SeeOtherHostDB -
tigase.server.xmppclient.SeeOtherHostDualIP -
none- disables redirection
All the remaining options are configured on a per-connection-manager basis, thus all options need to be prefixed with the corresponding connection manager ID, i.e. c2s, bosh or ws; we will use c2s in the examples:
-
c2s/cm-see-other-host/default-host=host1;host2;host3- a semicolon separated list of hosts to be used for redirection; -
c2s/cm-see-other-host/active=OPEN;LOGIN- a semicolon separated list of phases in which redirection should be active, currently possible values are:-
OPENwhich enables redirection during opening of the XMPP stream; -
LOGINwhich enables redirection upon authenticating user session;
-
By default redirection is currently enabled only in the OPEN phase.
SeeOtherHostDB
For SeeOtherHostDB implementation there are additional options:
-
c2s/cm-see-other-host/db-url- a JDBC connection URI which should be used to query redirect information; if not configured --user-db-uri will be used; -
c2s/cm-see-other-host/get-host-query- a SQL query which should return redirection hostname; -
c2s/cm-see-other-host/get-all-data-query- a SQL helper query which should return all redirection data from database; -
c2s/cm-see-other-host/get-all-query-timeout- allows to set timeout for executed queries.
SeeOtherHostDualIP
This mechanisms matches internal Tigase cluster nodes with against the lookup table to provide matching and relevant redirection hostname/IP. By default internal Tigase cluster_nodes table will be used (and appropriate repository implementation will be used).
To enable this redirection mechanism following configuration / class should be used:
--cm-see-other-host=tigase.server.xmppclient.SeeOtherHostDualIPIt’s possible to configure it on per-connection-manager basis
<connector>/cm-see-other-host[S]=tigase.server.xmppclient.SeeOtherHostDualIPIt offers following configuration options:
-
data-source- configuration of the source of redirection information - by default internal Tigasecluster_nodestable will be used (and appropriate repository implementation will be used); alternatively it’s possible to useeventbussource; -
db-url- a JDBC connection URI which should be used to query redirect information; if not configured--user-db-uriwill be used; -
get-all-data-query- a SQL helper query which should return all redirection data from database; -
get-all-query-timeout- allows to set timeout for executed queries; -
fallback-redirection-host- if there is no redirection information present (i.e. secondary hostname is not configured for the particular node) redirection won’t be generated; with this it’s possible to configure fallback redirection address.
All options can be configured either globally (without providing type parameter)
--cm-see-other-host/db-url=jdbc:<database>://<uri>
--cm-see-other-host/data-source=<class implementing tigase.server.xmppclient.SeeOtherHostDualIP.DualIPRepository>
--cm-see-other-host/get-all-data-query=select * from cluster_nodes
--cm-see-other-host/get-all-query-timeout=10
--cm-see-other-host/fallback-redirection-host=<hostname>or on per-component basis
<connector>/cm-see-other-host/db-url[S]=jdbc:<database>://<uri>
<connector>/cm-see-other-host/data-source[S]=<class implementing tigase.server.xmppclient.SeeOtherHostDualIP.DualIPRepository>
<connector>/cm-see-other-host/get-all-data-query[S]=select * from cluster_nodes
<connector>/cm-see-other-host/get-all-query-timeout[I]=10
<connector>/cm-see-other-host/fallback-redirection-host[S]=<hostname>EventBus as a source of information
It’s possible to utilize EventBus and internal Tigase events as a source of redirection data. In order to do that eventbus should be used as a value of data-source configuration option. In addition, EventBus events needs to be enabled in ClusterConnectionManager. Example configuration:
cl-comp/eventbus-repository-notifications[B]=true
--cm-see-other-host/data-source=eventbusor on per-component basis:
cl-comp/eventbus-repository-notifications[B]=true
<connector>/cm-see-other-host/data-source[S]=eventbus8.10.3. Auxiliary setup options
Enforcing redirection
It’s possible to enforce redirection of connections on the particular port of connection manager with force-redirect-to set to Integer with the following general setting option:
<connection_manager>/connections/<listening_port>/force-redirect-to[I]=<destination_port>for example, enable additional port 5322 for c2s connection manager and enforce all connections to be redirected to port 5222 (it will utilize hostname retrieved from SeeOtherHost implementation and will be only used when such value is returned):
c2s/connections/ports[i]=5222,5322
c2s/connections/5322/type[S]=accept
c2s/connections/5322/socket[S]=plain
c2s/connections/5322/force-redirect-to[I]=5222Configuring hostnames
To fully utilize SeeOtherHostDualIP setup in automated fashion it’s now possible to provide both primary (internal) and secondary (external) hostname/IP (they need to be correct, InetAddress.getByName( property ); will be used to verify correctnes). It can be done via JVM properties tigase-primary-address and tigase-secondary-address. You can also utilize different implementation of DNS resolver by providing class implementing tigase.util.DNSResolverIfc interface as value to resolver-class property.
Those properties can be set via etc/tigase.conf (uncommenting following lines, or manually exposing in environment):
DNS_RESOLVER=" -Dresolver-class=tigase.util.DNSResolverDefault "
INTERNAL_IP=" -Dtigase-primary-address=hostname.local "
EXTERNAL_IP=" -Dtigase-secondary-address=hostname "or in the etc/init.properties (they will be converted to JVM properties):
--tigase-resolver-class=tigase.util.DNSResolverDefault
--tigase-primary-address=hostname.local
--tigase-secondary-address=hostname8.11. External Component Configuration
In Tigase server version 4.4.x and later a new implementation for connecting external components has been introduced.
It is much simpler to setup and follows the same configuration standards as all other components. It is also much more powerful as a single instance can control many TCP/IP ports and many external components on each port and even allows for multiple connections for the same component. It supports both XEP-0114 and XEP-0225 with protocol auto-detection mechanisms. Protocols are pluggable so in future more protocols can be supported or custom extensions to existing protocols can be added.
The implementation also supports a scripting API and new domains with passwords can be added at run-time using ad-hoc commands. New scripts can be loaded to even further control all connected external components.
Even though it is much simpler to setup and to use it also offers a lot of new functionality and features. Pages in this guide describe in details all the administration aspects of setting up and managing external components.
8.11.1. Basic Configuration Options (External Component)
As for all Tigase components you can load it and configure it via init.properties file described in details in another guide. This document describes how to load the component and set the initial configuration to accept or initiate connections for an external component.
First thing to do is to specify the component class and the component name which must be unique within the Tigase installation. The most commonly name used is ext and the class is tigase.server.ext.ComponentProtocol.
Following 2 lines in the init.properties will load the component during the server startup time:
--comp-name-1 = ext
--comp-class-1 = tigase.server.ext.ComponentProtocolWhile this would load the component, there are no additional configurations provided to the component would be practically useless. It is possible to add necessary parameters (external domains, passwords) during run-time via ad-hoc commands. It is generally a good practice to provide some initial parameters in the configuration file too.
There are two additional properties used for setting initial configuration for external components connections: --external and --bind-ext-hostnames.
These two properties are very well described on the online documentation, therefore I will focus on practical and working examples here.
Simple Case
The most common scenario is to connect an external component which works for a specific given domain to the main server. The component authenticates with a defined password and the external component connects to a TCP/IP port the server listens on.
For example let’s say our server works for a virtual domain: devel.tigase.org. We want it to listen on port 5270 for incoming connections from an external component working for a domain: muc.devel.tigase.org. The authentication password for the domain is muc-secret.
For such a scenario we need 3 lines in the init.properties file:
--comp-name-1 = ext
--comp-class-1 = tigase.server.ext.ComponentProtocol
--external = muc.devel.tigase.org:muc-secret:listen:5270More External Components/Domains
Suppose you want to connect more than one external component. Let’s say you want to connect PubSub and MSN components to Tigase server as well.
In that case you don’t have to open another port on the server, all the components can connect to the same port. Of course each of the components connect for a different domain and probably should use a different password.
Let’s say then that we want Tigase server accept two more domains with corresponding passwords: (pubsub.devel.tigase.org:pubsub_pass) and (msn.devel.tigase.org:msn_pass). Your configuration properties should look like this:
--comp-name-1 = ext
--comp-class-1 = tigase.server.ext.ComponentProtocol
--external = muc.devel.tigase.org:muc-secret:listen:5270, \
pubsub.devel.tigase.org:pubsub_pass, \
msn.devel.tigase.org:msn_passPlease note, the --external property with value should be written in a single line. The above example has split the line for readability.
More TCP/IP Ports
You can make Tigase listen on more than one TCP/IP port for incoming external component connections. Please be aware that there is no way, currently to bind an external component to a particular port. If Tigase listens on two or more ports it accepts any external component on any of the ports. Therefore there is no practical reason for opening more than one port.
However, if for some reason you need Tigase to listen on more ports then this is an example configuration:
--comp-name-1 = ext
--comp-class-1 = tigase.server.ext.ComponentProtocol
--external = muc.devel.tigase.org:muc-secret:listen:5270, \
pubsub.devel.tigase.org:pubsub_pass:listen:5271, \
msn.devel.tigase.org:msn_pass:listen:5272Please note, the --external property with value should be written in a single line. The above example has split the line for readability.
These settings set three TCP/IP ports to listen on: 5270, 5271 and 5272. They also specify 3 different external domains with passwords which are accepted by Tigase. Even though each port is specified with conjunction with a domain they are not bound together in any way. Any of specified domains can connect through any of specified ports.
Outgoing Connections
Tigase server can not only accept connections from external components, it can also open connections to external components.
To make Tigase connect to an external component you have to change 'listen' parameter to 'connect' and of course you have to tell where to connect - the address of the external component:
--comp-name-1 = ext
--comp-class-1 = tigase.server.ext.ComponentProtocol
--external = devel.tigase.org:muc-secret:connect:5270:muc.devel.tigase.orgAssuming the MUC component listens on the port '5270' at the DNS address: 'muc.devel.tigase.org' Tigase will connect to the component.
You can of course set as many as you need external components to which you want Tigase to connect to:
--comp-name-1 = ext
--comp-class-1 = tigase.server.ext.ComponentProtocol
--external = devel.tigase.org:mucsecret:connect:5270:muc.devel.tigase.org, \
devel.tigase.org:pubsub_pass:connect:5271:pubsub.devel.tigase.org, \
devel.tigase.org:msn_pass:connect:5272:msn.devel.tigase.orgIf external components run on a separate machines you can use the same port number for each of them.
Specifying Protocol
One of the last parameters you can set for the external component/domain is a protocol which should be used for the connection. At the moment the Tigase server supports two protocols defined in XEP-0114 and XEP-0225 and possibly further protocols.
You don’t have to specify a protocol if you setup a connection in 'listen' mode as the server automatically detects a protocol which is used in incoming connections.
You can specify the protocol which is used for outgoing connections but you have to add one more parameters to the connection string.
There are two possibilities:
An example configuration with protocol specified:
--comp-name-1 = ext
--comp-class-1 = tigase.server.ext.ComponentProtocol
--external = devel.tigase.org:mucsecret:connect:5270:muc.devel.tigase.org:accept, \
devel.tigase.org:pubsub_pass:connect:5270:pubsub.devel.tigase.org:clientLoad Balancer Plugin
With the penultimate option you can set for external component connections is load balancer class.
The load balancer plugin is used if you have multiple connections for the same component (external domain name) and you want to spread the load over all connections. Perhaps you have an installation with huge number of MUC rooms and you want to spread the load over all MUC instances.
An example configuration with load balancer plugin specified:
--comp-name-1 = ext
--comp-class-1 = tigase.server.ext.ComponentProtocol
--external = muc.devel.tigase.org:mucsecret:listen:5270:devel.tigase.org:accept:ReceiverBareJidLB, \
pubsub.devel.tigase.org:pubsub_pass:listen:5270:devel.tigase.org:accept:SenderBareJidLBIt defines two listeners for external component with different load balancer plugins. The first load-balance traffic by a packet destination BareJID, which makes sense for MUC component. This way each MUC instance handles a different set of rooms which allows for a good load distribution.
For the PubSub component we use a different load balancer plugin which distributes load by the sender BareJID instead. This is because for the PubSub destination BareJID is always the same so we cannot use it to distribute the load.
Either the ReceiverBareJidLB or SenderBareJidLB are class names from package: tigase.server.ext.lb however, you can use any class name as a plugin, you just have to provide a full class name and the class name must implement LoadBalancerIfc interface.
Encrypting connection
With the last option you can set type of the socket connection.
Following options are available:
. plain - will create a plain socket (accepting unencrypted or TLS connections)
. tls - will create a plain type socket, which enforces performing StartTLS
. ssl - will create an SSL socket (only accepting SSL connections)
An example configuration with socket type specified:
--comp-name-1 = ext
--comp-class-1 = tigase.server.ext.ComponentProtocol
--external = muc.devel.tigase.org:mucsecret:listen:5270:devel.tigase.org:accept:ReceiverBareJidLB:plain, \
pubsub.devel.tigase.org:pubsub_pass:listen:5270:devel.tigase.org:accept:SenderBareJidLB:sslfor the MUC component it will be possible to establish plain socket connection (with possibility to perform StartTLS) and for the PubSub component an encrypted, SSL connection will be required.
8.11.2. Tigase as an External Component
There are cases when you want to deploy one or more Tigase components separately from the main server, or perhaps you want to run some Tigase components connecting to a different XMPP server, or perhaps you work on a component and you do not want to restart the main server every time you make a change.
There is a way to run the Tigase server in "external component mode". In fact you can run any of Tigase’s components as an external component and connect them to the main XMPP server either via XEP-0114 or XEP-0225 connection.
Let’s look at the examples…
A Simple Case - MUC as an External Component
A few assumptions:
-
We want to run a MUC component for a domain: 'muc.devel.tigase.org' and password 'muc-pass'
-
The main server works at an address: devel.tigase.org and for the same virtual domain
-
We want to connect to the server using XEP-0114 protocol and port '5270'.
There is a special configuration type for this case which simplifies setting needed to run Tigase as an external component:
config-type=--gen-config-comp.This generates a configuration for Tigase with only one component loaded by default - the component used for external component connection. If you use this configuration type, your init.properties file may look like this:
config-type = --gen-config-comp
--debug = server
--user-db = derby
--admins = admin@devel.tigase.org
--user-db-uri = jdbc:derby:/tigasedb
--virt-hosts = devel.tigase.org
--comp-name-1 = muc
--comp-class-1 = tigase.muc.MUCComponent
--external = muc.devel.tigase.org:muc-pass:connect:5270:devel.tigase.org:acceptPlease note, you do not need lines:
--comp-name-1 = ext
--comp-class-1 = tigase.server.ext.ComponentProtocolas the
--gen-config-compautomatically includes them.
More Components
Suppose you want to run more than one component as an external components within one Tigase instance. Let’s add another - PubSub component to the configuration above and see how to set it up.
The most straightforward way is just to add another component and another connection to the main server for the component domain:
config-type = --gen-config-comp
--debug = server
--user-db = derby
--admins = admin@devel.tigase.org
--user-db-uri = jdbc:derby:/tigasedb
--virt-hosts = devel.tigase.org
--comp-name-1 = muc
--comp-class-1 = tigase.muc.MUCComponent
--comp-name-2 = pubsub
--comp-class-2 = tigase.pubsub.PubSubComponent
--external = muc.devel.tigase.org:muc-pass:connect:5270:devel.tigase.org:accept, \
pubsub.devel.tigase.org:pubsub-pass:connect:5270:devel.tigase.org:acceptPlease note however that we are opening two connections to the same server. This can waste resources and overcomplicate the system. For example, what if we want to run even more components? Opening a separate connection for each component is a tad overkill.
In fact there is a way to reuse the same connection for all component domains running as an external component. The property '--bind-ext-hostnames' contains a comma separated list of all hostnames (external domains) which should reuse the existing connection.
There is one catch however. Since you are reusing connections (hostname binding is defined in XEP-0225 only), you must use this protocol for the functionality.
Here is an example configuration with a single connection over the XEP-0225 protocol used by both external domains:
config-type = --gen-config-comp
--debug = server
--user-db = derby
--admins = admin@devel.tigase.org
--user-db-uri = jdbc:derby:/tigasedb
--virt-hosts = devel.tigase.org
--comp-name-1 = muc
--comp-class-1 = tigase.muc.MUCComponent
--comp-name-2 = pubsub
--comp-class-2 = tigase.pubsub.PubSubComponent
--external = muc.devel.tigase.org:muc-pass:connect:5270:devel.tigase.org:client
--bind-ext-hostnames=pubsub.devel.tigase.org8.11.3. Load Balancing External Components in Cluster Mode
This document describes how to load balance any external components using Tigase XMPP Server and how to make Tigase’s components work as external components in a cluster mode.
Please note, all configuration options described here apply to Tigase XMPP Server version 5.1.0 or later.
These are actually 2 separate topics:
-
One is to distribute load over many instances of a single component to handle larger traffic, or perhaps for high availability.
-
The second is to make Tigase’s components work as an external component and make it work in a cluster mode, even if the component itself does not support cluster mode.
Here are step by step instructions and configuration examples teaching how to achieve both goals.
Load Balancing External Component
The first, and most simple scenario is to connect multiple instances of an external component to a single Tigase XMPP Server to distribute load.
There are at least 2 reasons why this would be an optimal solution: one would be to spread load over more instances/machines and the second is to improve reliability in case one component fails the other one can take over the work.
So here is a simple picture showing the use case.
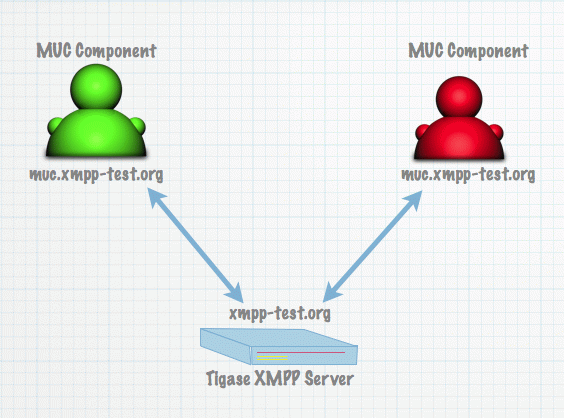
We have a single machine running Tigase XMPP Server and 2 instances of the MUC component connecting to Tigase.
The server configuration
config-type = --gen-config-def
--user-db = mysql
--admins = admin@devel.tigase.org
--user-db-uri = jdbc:mysql://localhost/db?user=tigase&password=tigase
--virt-hosts = devel.tigase.org
--comp-name-1 = ext
--comp-class-1 = tigase.server.ext.ComponentProtocol
--external = muc.devel.tigase.org:muc-secret:listen:\
5270:devel.tigase.org:accept:ReceiverBareJidLBAnd configuration for both instances of the MUC component (identical for both of them):
config-type = --gen-config-comp
--user-db = mysql
--admins = admin@devel.tigase.org
--user-db-uri = jdbc:mysql://localhost/db?user=tigase&password=tigase
--virt-hosts = devel.tigase.org
--comp-name-1 = muc
--comp-class-1 = tigase.muc.MUCComponent
--external = muc.devel.tigase.org:muc-secret:connect:\
5270:devel.tigase.org:acceptFor those familiar with Tigase’s configuration, this should be pretty basic. The difference is one small element in the server configuration. At the end of the component connection we have ReceiverBareJidLB.
This is the load balancing plugin class. Load balancing plugin decides how the traffic is distributed among different component connections that is different component instances. For the MUC component it makes sense to distribute the traffic based on the receiver bare JID because this is the MUC room address. This way we just distribute MUC rooms and traffic over different MUC component instances.
This distribution strategy does not always work for all possible components however. For transports for example this would not work at all. A better way to spread load for transports would be based on the source bare JID. And it is possible if you use plugin with class name: SenderBareJidLB.
This are two basic load distribution strategies available now. For some use cases none of them is good enough. If you have PubSub, then you probably want to distribute load based on the PubSub node. There is no plugin for that yet but it is easy enough to write one and put the class name in configuration.
External Component and Cluster
If you want to use Tigase’s component in a cluster mode which does not have clustering implemented yet there is a way to make it kind of cluster-able. In the previous section we connected many MUC components to a single Tigase server. Now we want to connect a single MUC component to many Tigase servers (or many Tigase cluster nodes).
Let’s say we have Tigase XMPP Server working for domain: xmpp-test.org and the server is installed on three cluster nodes: red.xmpp-test.org, green.xmpp-test.org and blue.xmpp-test.org.
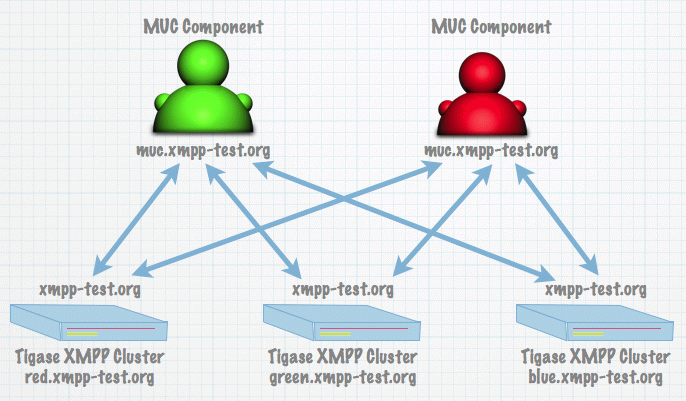
We want to make it possible to connect the MUC component to all nodes, so here is configuration for the server (for each node is the same):
config-type=--gen-config-def
--admins=admin@xmpp-test.org
--virt-hosts = xmpp-test.org
--cluster-mode = true
--cluster-nodes=red.xmpp-test.org,green.xmpp-test.org,blue.xmpp-test.org
--auth-db=tigase-auth
--user-db=mysql
--user-db-uri=jdbc:mysql://localhost/db?user=tigase&password=tigase
--comp-name-1 = ext
--comp-class-1 = tigase.server.ext.ComponentProtocol
--external = muc.xmpp-test.org:muc-secret:listen:5270:\
xmpp-test.org:accept:ReceiverBareJidLBAs you can see there is nothing special here. The most interesting part comes on the MUC side.
config-type = --gen-config-comp
--user-db = mysql
--admins = admin@xmpp-test.orgg
--user-db-uri = jdbc:mysql://localhost/db?user=tigase&password=tigase
--virt-hosts = xmpp-test.org
--comp-name-1 = muc
--comp-class-1 = tigase.muc.MUCComponent
--external = muc.xmpp-test.org:muc-secret:connect:5270:xmpp-test.org;blue.xmpp-test.org;green.xmpp-test.org,red.xmpp-test.org:acceptAs you can see remote host name is not a simple domain but a character string with a few comma separated parts. The first part is our remote domain and the rest are addresses of the host to connect to. This can be a list of domain names or IP addresses.
Of course it is possible to connect multiple external component to all cluster nodes, this way the whole installation would be really working in the cluster and also load balanced.
8.12. Client to Server Communication
Client to server communication is an integral part of XMPP communication. C2S handles all client communication to the server, and is responsible for filtering and handling remote communications. C2S CAN be disabled, however doing so will only allow communication of internal components, and S2S communications.
8.13. Configuration
8.13.1. Resumption timeout
It is now possible to set a default stream resumption timeout that the server uses. This allows control of how long a server will wait for a reconnection from a client. This can be particularly helpful to manage mobile clients connecting to your server as they may not have complete coverage, and you do not want to close the stream right away. By default, Tigase sets this value to 60 seconds.
c2s/processors/urn\:xmpp\:sm\:3/resumption-timeout[I]=90This sets the default timeout to 90 seconds. You may, if you choose, specify a maximum timout time, which will allow the server to wait between the default and maximum before a connection is closed.
c2s/processors/urn\:xmpp\:sm\:3/max-resumption-timeout[I]=900|
Note
|
If the max-resumption-timeout is not set, it will always equal the resumption-timeout number, or default is none is set. |
Available since v7.1.0
8.13.2. Packet Redelivery
Normally packets are handled by C2S and are typically processed in the first run, however if that fails to send, a retry of sending that packet will occur after 60 seconds. If that second try fails, the delay will increase by a factor of 1.5. This means that the next retry will occur at 90, 135, and so on until the retry count is reached. By default this count is 15, however it can be changed by using the following setting:
c2s/packet-delivery-retry-count[I]=5This setting prevents packet redelivery attempts from continuing into infinity (or when the host machine runs out of memory).
8.14. Socks 5 Component
Tigase SOCKS5 component allows for file transfers to be made over a SOCKS5 proxy in accordance with XEP-0065 SOCKS5 Bytestreams. This allows for some useful features such as: - transfer limits per user, domain, or global - recording transfers between users - quotas and credits system implementation
8.14.1. Installation
Tigase SOCKS5 component comes built into the dist-max archives for Tigase XMPP server, and requires the component to be listed in init.properties file:
--comp-name-3=proxy
--comp-class-3=tigase.socks5.Socks5ProxyComponentYou will also need to decide if you wish to use database-based features or not. If you wish to simply run the socks5 proxy without features such as quotas, limits add the following line:
proxy/verifier-class=tigase.socks5.verifiers.DummyVerifierThis will enable the SOCKS5 Proxy without any advanced features. If you wish to use those features, see the configuration section below.
8.14.2. Database Preparation
In order to use the more advanced features of the SOCKS5 Proxy Component, your database needs to be prepared with the proper schema prior to running the server.
You may either edit an existing database, or create a new database for specific use with the Proxy.
Edit Existing Database
You can add the proper schema to your existing database using the DBSchemaLoader utility included with Tigase. The database folder contains the schema file for your type of database.
First, backup your database before performing any actions and shut down Tigase XMPP Server.
Then from the Tigase installation directory run the following command:
java -cp "jars/*" tigase.util.DBSchemaLoader -dbType {derby,mysql,postgresql,sqlserver} - dbHostname {db address} -dbName {dbname} -rootUser root -rootPass root -file database/{dbtype}-socks5-schema.sqlYou should see the following dialogue
LogLevel: CONFIG
tigase.util.DBSchemaLoader <init> CONFIG Properties: [{dbHostname=localhost, logLevel=CONFIG, dbType=derby, file=database/derby-socks5-schema.sql, rootUser=root, dbPass=tigase_pass, dbName=tigasedb, schemaVersion=7-1, rootPass=root, dbUser=tigase_user}]
tigase.util.DBSchemaLoader validateDBConnection INFO Validating DBConnection, URI: jdbc:derby:tigasedb;create=true
tigase.util.DBSchemaLoader validateDBConnection CONFIG DriverManager (available drivers): [[jTDS 1.3.1, org.apache.derby.jdbc.AutoloadedDriver@34a245ab, com.mysql.jdbc.Driver@3941a79c, org.postgresql.Driver@6e2c634b]]
tigase.util.DBSchemaLoader validateDBConnection INFO Connection OK
tigase.util.DBSchemaLoader validateDBExists INFO Validating whether DB Exists, URI: jdbc:derby:tigasedb;create=true
tigase.util.DBSchemaLoader validateDBExists INFO Exists OK
tigase.util.DBSchemaLoader loadSchemaFile INFO Loading schema from file: database/derby-socks5-schema.sql, URI: jdbc:derby:tigasedb;create=true
tigase.util.DBSchemaLoader loadSchemaFile INFO completed OK
tigase.util.DBSchemaLoader shutdownDerby INFO Validating DBConnection, URI: jdbc:derby:tigasedb;create=true
tigase.util.DBSchemaLoader shutdownDerby WARNING Database 'tigasedb' shutdown.
tigase.util.DBSchemaLoader printInfo INFO
Database init.properties configuration:
--user-db=derby
--user-db-uri=jdbc:derby:tigasedb;create=true
One this process is complete, you may begin using SOCKS5 proxy component.
Create New Database
If you want to create a new database for the proxy component and use it as a separate socks5 database, create the database using the appropriate schema file in the database folder. Once this is created, add the following line to your init.properties folder.
proxy/repo-url=driver:addressFor example, a mysql database will have this type of URL: jdbc:mysql://localhost/SOCKS?user=root&password=root to replace {database URL}. For more options, check the database section of this documentation.
8.14.3. Configuration
verifier-class
proxy/verifier-class=Specifies the class used to verify transfer limits. The following options are available:
LimitsVerifier
-
Class Name: tigase.socks5.verifiers.LimitsVerifier
Uses the database to store limits and record the amount of data transferred VIA the proxy. It accepts one parameter, transfer-update-quantization which is used to create a value to check if the value of transferred bytes should be updated in the database or not. By default, this value is 1MB.
|
Note
|
Low values can slow down file transfers, while high values can allow for users to exceed quotas. |
socks5-repo-cls
proxy/socks5-repo-cls=Specifies implementation of repository used to store usage statistics. Two options are available for this setting: - tigase.socks5.verirepository.JDBCSocks5Repository - Uses the database implementation. - tigase.socks5.repository.DummySocks5Repository - ignores data storage, and is the default implementation.
verifier-params
proxy/repo-params=Comma separated parameters for LimitsVerifier which will override the defaults. All of these limits are on a per calendar month basis. For example, a user is limited to 10MB for all transfers. If he transfers 8MB between the 1st and the 22nd, he only has 2MB left in his limit. On the 1st of the following month, his limit is reset to 10MB.
Available parameters:
-
global-limit - Transfer limit for all domains in MB per month.
-
instance-limit - Transfer limit for server instance in MB per month.
-
default-domain-limit - The Default transfer limit per domain in MB per month.
-
default-user-limit - The default transfer limit per user in MB per month.
-
default-file-limit - The default transfer limit per file in MB per month.
8.14.4. Database usage for specific settings
The above configuration allows for global settings, however you may also define specifics for users and the scopes of those limitations by editing the database information directly.
The user_id field denotes the scope of the limitation.
-
Using a domain_name defines limits for all users whose JIDs are within that domain.
-
Using a JID of a user defines limit for this exact user.
If the value set is larger than 0, that is the specific limit. If value is equal to 0 the limit is not overridden and the global limit is used. If value equals -1 proxy will forbid any transfer for this user. It there is no value for user in this table, a new row will be created during first transfer and limits for domain or global limits will be used.
Socks5 database is setup in this manner:
| uid | user_id | sha1_user_id | domain | sha1_domain | filesize_limit | transfer_limit_per_user | transfer_limit_per_domain |
|---|---|---|---|---|---|---|---|
1 |
c35f2956d804e01ef2dec392ef3adae36289123f |
domain.com |
e1000db219f3268b0f02735342fe8005fd5a257a |
0 |
3000 |
0 |
|
2 |
domain.com |
e1000db219f3268b0f02735342fe8005fd5a257a |
domain.com |
e1000db219f3268b0f02735342fe8005fd5a257a |
500 |
0 |
0 |
This example table shows that user@domain.com is limited to 3000MB per transfer whereas all users of domain.com are limited to a max file size of 500MB. This table will populate as users transfer files using the SOCKS5 proxy, once it begins population, you may edit it as necessary. A second database is setup tig_socks5_connections that records the connections and transmissions being made, however it does not need to be edited.
8.14.5. Example init.properties block
Combined, your init.properties should look like the below excerpt to run socks5 transfers using a separate database.
proxy/repo-url=jdbc:mysql://localhost/SOCKS?user=root&password=root
proxy/verifier-class=tigase.socks5.verifiers.LimitsVerifier
proxy/socks5-repo-cls=tigase.socks5.verirepository.JDBCSocks5Repository8.15. Virtual Hosts in Tigase Server
Tigase server supports multiple virtual hosts in a single server installation. This is supported via VHostManager - the new Tigase server component added recently to the implementation. Virtual hosts can be added or removed, enabled or disabled during runtime without restarting the service or disrupting normal operation.
This document describes how virtual hosts work in Tigase server and how to get the most out of this feature in your installation.
The simplest and default way to set virtual hosts is in the server configuration. You can either edit manually the init.properties file or use the graphical installer/configuration program to set the property. If you want to edit it manually search for '--virt-hosts' property for more detailed description.
Alternatively you can use the GUI installer as shown below to set a list of virtual hosts.
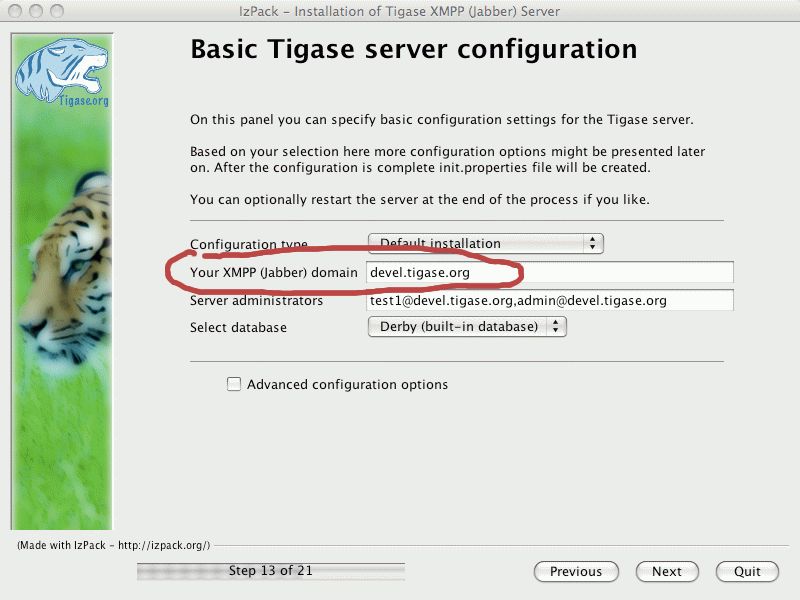
This method however has many disadvantages. It requires a server restart after each change, and the configuration file is not the best place to store long list of virtual domains. Furthermore you can not set any additional parameters for the domain other than whether it exists or not.
There is another way to store and control virtual domains in Tigase. That information can be put in the database and managed using ad-hoc commands. List of domains can be modified outside Tigase server through any third-party system or web application and the server reloads the list of when received VHOSTS_RELOAD ad-hoc command.
There are 2 more ad-hoc commands which allow you to add/update and remove virtual hosts via XMPP protocol:
-
VHOSTS_UPDATE - for adding new virtual host or changing parameters of the existing domain
-
VHOSTS_REMOVE - for removing existing virtual domain from the list of the server domains.
By default, both commands cause the vhosts list to update in the permanent repository. This is however VHostRepository implementation dependent feature and can be changed in your repository implementation.
Commands for virtual domain management can be executed using any XMPP client with proper support for service discovery and ad-hoc commands, for example Psi. Commands are accepted only when they are sent by the service administrator.
Please refer to documents listed below for more detailed information on the following topics:
You may also want to reference these for additonal information - API Description for Virtual Domains Management in Tigase Server. - virtHosts Property guide
8.15.1. Specification for ad-hoc Commands Used to Manage Virtual Domains
There are 3 ad-hoc commands for virtual domains management in the Tigase server:
-
VHOSTS_RELOAD used to reload virtual domains list from the repository (database).
-
VHOSTS_UPDATE used to add a new virtual domain or update information for existing one.
-
VHOSTS_REMOVE used to remove an existing virtual host from the running server.
Syntax of the commands follows the specification described in XEP-0050. Extra information required to complete the command is carried as data forms described in XEP-0004.
All commands are accepted by the server only when send by the installation administrator. If the command is sent from any other account <not-authorized /> error is returned. To grant administrator rights to an account you have to set --admins property in the init.Properties configuration file.
Commands are sent to the 'vhost-man' server component and the 'to' attribute of the stanza must contain a full JID of the VHostManager on the server. The full JID consists of the component name: 'vhost-man' and the local domain, that is domain which is already on the list of virtual domains and is active. Assuming 'existing.domain.com' one of domains already activated for the server installation the JID is: 'vhost-man@existing.domain.com'.
Reloading the Domains List from the Database
In order to reload virtual domains from the permanent repository other than configuration file, you have to send VHOSTS_RELOAD ad-hoc command to the VHostManager on the server.
The reload command request is of the form:
<iq type="set"
to="vhost-man@existing.domain.com"
id="aac8a">
<command xmlns="http://jabber.org/protocol/commands"
node="VHOSTS_RELOAD" />
</iq>The server sends a response upon successful completion of the command with current number of virtual domains server by the installation:
<iq from="vhost-man@existing.domain.com"
type="result"
to="cmd-sender-admin@existing.domain.com"
id="aac8a">
<command xmlns="http://jabber.org/protocol/commands"
status="completed"
node="VHOSTS_RELOAD">
<x xmlns="jabber:x:data" type="result">
<field type="fixed" var="Note">
<value>Current number of VHosts: 123</value>
</field>
</x>
</command>
</iq>If the command is sent from an account other than admin, the server returns an error:
<iq from="vhost-man@existing.domain.com"
type="error"
to="cmd-sender-admin@existing.domain.com"
id="aac8a">
<command xmlns="http://jabber.org/protocol/commands"
node="VHOSTS_RELOAD" />
<error type="auth" code="401">
<not-authorized xmlns="urn:ietf:params:xml:ns:xmpp-stanzas" />
<text xmlns="urn:ietf:params:xml:ns:xmpp-stanzas"
xml:lang="en">
You are not authorized for this action.
</text>
</error>
</iq>The response doesn’t have any special meaning other then end-user information. The client may ignore the response as it is sent after the command has been executed.
Adding a New Domain or Updating Existing One
In order to add a new domain or update existing one you have to send an ad-hoc command VHOSTS_UPDATE with at least one domain name in the command data form. You can also specify whether the domain is enabled or disabled but this is optional. Future releases may allow for setting additional parameters for the domain: maximum number of user accounts for this domain, anonymous login enabled/disabled for the domain, registration via XMPP enabled/disabled for this domain and some more parameters not specified yet.
The domain add/update command request is of the form:
<iq type="set"
to="vhost-man@existing.domain.com"
id="aacba">
<command xmlns="http://jabber.org/protocol/commands"
node="VHOSTS_UPDATE">
<x xmlns="jabber:x:data" type="submit">
<field type="text-single"
var="VHost">
<value>new-virt.domain.com</value>
</field>
<field type="list-single"
var="Enabled">
<value>true</value>
</field>
</x>
</command>
</iq>Please note: Character case in the command field variable names does matter.
Upon successful completion of the command the server sends a response back to the client with information of the existing number of virtual hosts on the server:
<iq from="vhost-man@existing.domain.com"
type="result"
to="cmd-sender-admin@existing.domain.com"
id="aacba">
<command xmlns="http://jabber.org/protocol/commands"
status="completed"
node="VHOSTS_UPDATE">
<x xmlns="jabber:x:data" type="result">
<field type="fixed" var="Note">
<value>Current number of VHosts: 124</value>
</field>
</x>
</command>
</iq>Removing a Virtual Domain From the Server
In order to remove a virtual domain you have to send VHOSTS_REMOVE command to the server with the domain name.
The domain remove command is sent by the client:
<iq type="set"
to="vhost-man@existing.domain.com"
id="aacba">
<command xmlns="http://jabber.org/protocol/commands"
node="VHOSTS_REMOVE">
<x xmlns="jabber:x:data" type="submit">
<field type="text-single"
var="VHost">
<value>virt-nn.domain.com</value>
</field>
</x>
</command>
</iq>Upon successful completion of the command the server sends a response back to the client with information of the existing number of virtual hosts on the server:
<iq from="vhost-man@existing.domain.com"
type="result"
to="cmd-sender-admin@existing.domain.com"
id="aacba">
<command xmlns="http://jabber.org/protocol/commands"
status="completed"
node="VHOSTS_REMOVE">
<x xmlns="jabber:x:data" type="result">
<field type="fixed" var="Note">
<value>Current number of VHosts: 124</value>
</field>
</x>
</command>
</iq>8.15.2. Virtual Components for the Cluster Mode
Let’s assume you have a cluster installation and you want to include a component in your installation which doesn’t support the cluster mode yet. If you put it on all nodes as a separate instances they will work out of sync and overall functionality might be useless. If you put on one node only it will work correctly but it will be visible to users connected to this one node only.
Ideally you would like to have a mechanism to install it on one node and put some redirections on other nodes to forward all packets for this component to a node where this component is working. Redirection on it’s own is not enough because the component must be visible in service discovery list and must be visible somehow to users connected to all nodes.
This is where the virtual components are handy. They are visible to users as a local normal component, they seem to be a real local component but in fact they just forward all requests/packets to a cluster node where the real component is working.
Virtual component is a very lightweight ServerComponent implementation in Tigase server. It can pretend to be any kind of component and can redirect all packets to a given address. They can mimic native Tigase components as well as third-party components connected over external component protocol (XEP-0114).
Configuration is very simple and straightforward, in fact it is very similar to configuration of any Tigase component. You set a real component name as a name of the component and a virtual component class name to load. Let’s say we want to deploy MUC component this way. The MUC component is visible as muc.domain.our in the installation. Thus the name of the component is: muc
--comp-name-1=muc
--comp-class-1=tigase.cluster.VirtualComponentThis is pretty much all you need to load a virtual component. A few other options are needed to point to correct destination addresses for packets forwarding and to set correct service discovery parameters:
muc/redirect-to=muc@cluster-node-with-real-muc.domain.our
muc/disco-name=Multi User Chat
muc/disco-node=
muc/disco-type=text
muc/disco-category=conference
muc/disco-features=http://jabber.org/protocol/mucThat’s it.
8.16. Persisting component’s items configuration
Component configuration can be handled via file-based configuration file (etc/init.properties) or via admin ad-hoc commands (either via XMPP client or web AdminUI) and persisting it to database. However, file-based configuration wasn’t persisted to repository if that was the only method to configure the server. Version 7.1.4 introduces a way to force persisting items configuration to repository by introducing Persist item configuration administrative command.
It affects following components:
-
VHost Manager (responsible for handling domains available in your installation)
-
External Connection Component (responsible for handling outgoing and incomming connections from external components)
-
HTTP API - API keys (defines access keys to HTTP API endpoints)
It’s possible to execute this command in two ways:
|
Important
|
Next major version of Tigase XMPP Server - 8.0.0 - changes how configuration is handled focusing on ad-hoc configuration of Items therefore it’s essential to persist configuration of repository items (external component connections, vhosts, http-api keys, etc…) before upgrading to version 8.0.0! |
8.16.1. Persisting items using web AdminUI
To persist items to repository using web AdminUI you should navigate to http://<machine_hostname>:8080/admin/ url. Afterwards open group Configuration from the menu on the left. In the list of commands you should click on:
-
Persist API keys items configurationto store HTTP-API component’s api-keys -
Persist item configurationon all remaining components which configuration items should be saved.
After correctly storing items a confirmation screen with Operation successful message should appear.
8.16.2. Persisting items using XMPP Client
XMPP Client supporting service discovery and admin ad-hoc commands should be used. Each client implements user interface related to those functions slightly differently however general idea stays the same - to persist configuration to the database you should:
-
connect to the server using admin account (one which credentials match any of the JIDs listed in
--admins=configuration line) -
open Service Discovery window, which should list all available components
-
to store HTTP-API component’s api-keys you should:
-
find
HTTP server integration modulecomponent (it should has addresshttp.<VHost>) -
list available ad-hoc commands (either by double-clicking on it or selecting appropriate option from context menu)
-
select and execute
Persist API keys items configurationcommand
-
-
to persist data of all remaining components:
-
find appropriate component:
-
VHost Manager(it should has address:vhost-man@<VHost> -
Configuration management(it should has address:basic-conf@<VHost> -
External component(it should has address:ext@<VHost>
-
-
list available ad-hoc commands for particular component (either by double-clicking on it or selecting appropriate option from context menu)
-
select and execute
Persist item configuration
-
After correctly storing items a confirmation screen with Operation successful message should appear.
9. Using Tigase - Applies to All Tigase Server Versions
This section keeps set of documents which apply to all the Tigase server version and contain more generic or introductory information on general use and features.
9.1. Tigase Log Guide
Tigase has multiple levels of logging available to help provide targeted and detailed information on processes, components, or traffic. In these documents we will look at where tigase generates logs, what they contain, and how we can customize them to our needs.
The list of available documents here is presented from the Tigase root directory.
*/*
derby.log
install.log
*/etc*
config-dump.properties
*/logs*
tigase.log.#
tigase.pid
tigase-console.log9.1.1. install.log
This log file is a basic list of files that are made on install of Tigase server. Although you may not need to use it, it can provide a handy list to see if any files were not written to your hard drive upon installation.
9.1.2. derby.log
If you are using the derby database installed with Tigase installer, this is the startup log for the database itself. Issues that might be related to the database, can be found in this file. Typically, if everything works okay, it’s a very small file with only 10 lines. It is overwritten on startup of the datbase.
9.1.3. config-dump.properties
The config-dump.properties is dump file of all your properties listed for every option within Tigase and components. The structure of the log lines is as follows.
modulename/settingformodulename[Data type]=value(s)
Lets take the value for admins, listing who is administrator for the server.
basic-conf/admins[s]=admin@jabber.freehost.org, administrator@jabber.freehost.org, fJones@jabber.freehost.org
The admin parameter which is an array of strings noted by the s, has 3 users listed. NOTE you can lookup the available Data types in the init.properties guide.
This file is re-written every time tigase starts.
9.1.4. tigase.log.#
The tigase.log files are where the majority of logging will take place. The rules for writing to these longs can be manipulated by editing files in the int.properties file. To see how, see the Debugging Tigase section of this manual for more details about how to turn on debug logging, and how to manipulate log settings. Entries to these logs are made in the following format:
2015-08-10 13:09:41.504 [main] Sctipr.init() INFO: Initilized script command, id: comp-manager, lang:Groovy, ext: groovy
The format of these logs is below: <timestamp> <thread_name> <class>.<method> <log_level>: <message> <thread_name>. This can vary - for components it would be <direction>_<int>_<component name>, for plugins it will just be the plugin name.
Let’s look at another example from the log file.
2015-08-10 12:31:40.893 [in_14_muc] InMemoryMucRepository.createNewRoom() FINE: Creating new room 'chatroom@muc.localhost.com'
The process ID may sometimes come in a different format such as [in_14-muc] which specifies the component (muc) along with the process thread identifier (14). As you can see, the format otherwise is nearly identical.
tigase.log can get very large in size rather quickly reaching it’s maximum size. To prevent the loss of information, we have implemented a rotating file system. The server begins writing to tigase.log.0 when it is first run, and continues to dump information until the log size limit is hit. At this point, Tigase renames tigase.log.0 as tigase.log.1. A new tigase.log.0 will be created, and Tigase will begin logging to this file. When this file is full, tigase.log.1 will be renamed tigase.log.2 and tigase.log.0 will be renamed tigase.log.1. Using this scheme, tigase.log.0 will always be your most recent log.
By default, Tigase has a limit of 10000000 bytes or 10mb with a file rotation of 10 files. You can edit these values by editing the init.properties guide and adding the following lines.
basic-conf/logging/java.util.logging.FileHandler.limit=20000000
basic-conf/logging/java.util.logging.FileHandler.count=15This code, if entered into the init.properties file increases the size of the files to 15, and enlarges the maximum size to 20mb. Note the larger the collective log space is, the larger number of sectors on hard disk are active. Large log blocks may impact system performance.
You may see a tigase.log.0.ick file in the directory while the server is running. This is a temporary file only and is deleted once Tigase is cleanly shut down.
9.1.5. statistics.log.#
Statistics log will duplicate any information that is related to sending of statistics to Tigase if you are using an unlicenced copy of Tigase XMPP server. Mainly it will consist output of LicenceChecker. The numbering logic will be the same as tigase.log.# files.
9.1.6. tigase.pid
tigase.pid is a file that just contains the Process ID or PID for the current run of Tigase. It is only valid for the current or most recent run cycle and is overwritten every time Tigase starts.
9.1.7. tigase-console.log
This file contains information related to Tigase’s running environment, and is a dump from the server itself on what is being loaded, when, and if any issues are encountered. It will start by loading Java classes (consequently making sure the Java environment is present and functioning). Then it will begin loading the configuration file, and adding default values to settings that have not been customized. You can then see all the components being loaded, and settings added where default values are needed. Lastly you will see a log of any plugins that are loaded, and any parameters therein. You may see tags such as INFO or WARNING in the logs. Although they may contain important information, the program will continue to operate as normal are not of too great concern.
ERROR flags are issues you will want to pay attention as they may list problems that prevent Tigase or components from properly functioning.
NOTE Windows does not create this file, rather the output is shown in the commandline and is not dumped to a file.
If Tigase is gracefully shut down, tigase-console.log will add statistics from the server’s operation life in the following format.
component/statistic = value
Any component that may have a statistic, whether used or not, will place a value here
This file can be handy if you are tracking issues in the server.
tigase-console.log is appended during each run session of the server.
9.1.8. Log File Location
You can also change the location of log files if you have a specific directory you wish to use. The configuration may be made by the following line in your init.properties file:
basic-conf/logging/java.util.logging.FileHandler.pattern=/var/log/tigase/tigase.logThis setting changes the log file location to /var/log/tigase/ where all log files will be made. Files in the original location will be left.
9.2. Debuging Tigase
If something goes wrong and you can’t find out why it is not working as expected, you might want more detailed debugging options switched on.
Tigase is a Java application and it uses Java logging library, this gives you the flexibility to switch logging on for selected Java packages or even for a single Java class.
Logs files are stored in logs/ directory. tigase-console.log stores basic log data, but is the main log file. tigase.log.N files keep all the detailed logging entries. So this is the place where you should look in case of problems.
9.2.1. The easy way - init.properties file
The easiest way to change logging for Tigase is modifying in init.properies following line:
--debug=serverThe line above says: "Switch on ALL debug messages for packet: tigase.server". The tigase.server packet keeps all it’s component’s classes, so it allows you to monitor what is going on in each component, what packets it receives and what it is sending out.
Usually people want to see what is going on the network level. That is what has been sent and what has been received by the server - the actual character data. The class which would print all received and sent character data is: tigase.xmpp.XMPPIOService. To enable all debugging info for this class you have to modify the debug line:
--debug=xmpp.XMPPIOServiceNote, you can skip the tigase. part.
You can also have debugging switched on for many packages/classes at the same time:
--debug=server,xmpp.XMPPIOServiceOther packages you might be interested in are:
-
tiagse.io and tigase.net which can print out what is going on a very low level network level including TLS/SSL stuff.
-
tigase.xml would print the XML parser debugging data.
-
tigase.cluster would print all the clustering related stuff. So if you have clustered installation you might be interested in debug settings:
--debug=server,cluster -
tigase.xmpp.impl would print logs from all plugins loaded to Tigase server.
This method, however has 2 main disadvantages:
-
You have to remove your XML config file and regenerate it which might be inconvenient. (only applicable to versions before 5.0.0)
-
You can’t set logging this way for classes and packages other than Tigase. This might be a problem if you include your own code in and load it into the server.
To enable logging for your own packages from packages different than Tigase, you have to use another option which has been made available for this:
--debug-packages = your.com.packageYou can also specify more parameters for the Tigase logging mechanisms like the file size, number of files rotated, and location where all Tigase logs are stored. The following lines are some examples of those filters using lines in the init.properties file:
basic-conf/logging/java.util.logging.FileHandler.limit=100000000
basic-conf/logging/java.util.logging.FileHandler.count=20
basic-conf/logging/java.util.logging.FileHandler.pattern=/var/log/tigase/tigase.log9.2.2. The more difficult but more powerful - tigase.xml file (only applicable to versions before 5.0.0)
If you want to modify debugging settings without regenerating the whole XML config file, you can modify it yourself by manually adding debug entries. This must be done very carefully or you could break the XML file and configuration won’t work.
Open the XML config file with a good text editor (or XML editor) and find the line:
<node name="logging">Below is a list of all logging settings.
<entry value="INFO" type="String" key=".level"/>Which says: INFO debug level for all the code which gives you very little debugging information. For example your init.properties line --debug=server adds one extra line in there:
<entry value="ALL" type="String" key="tigase.server.level"/>You can add a similar line changing only "key" attribute. If you need to switch logging on for a specific class - tigase.xmpp.XMPPIOService for example, add:
<entry value="ALL" type="String" key="tigase.xmpp.XMPPIOService.level"/>You can also put there your own package or class name. After you changed the config file you will have to restart the server.
Note, don’t overdose the debugging or your logs will be loaded with useless information.
9.3. Basic System Checks
Previously, a configuration article is available about Linux settings for high load systems. This has a description of basic settings which are essential to successfully run XMPP service for hundreds or thousands of online users.
Of course, high load and high traffic systems require much more tuning and adjustments. If you use selinux you have to be careful as it can interfere with the service while it is under a high load. Also some firewall settings may cause problems as the system may decide it is under a DDOS attack and can start blocking incoming connections or throttle the traffic.
In any case, there are some basic checks to do every time you deploy XMPP service to make sure it will function properly. I am trying to keep the article mentioned above up to date and add all the settings and parameters I discover while working with different installations. If you have some suggestions for different values or different parameters to add, please let me know.
If you want to run a service on a few cluster nodes (5 or even 10), then manually checking every machine and adjusting these settings is time consuming and it is very easy to forget about.
To overcome this problem I started to work on a shell script which would run all the basic checks and report problems found. Ideally it should be also able to adjust some parameters for you.
Inside the Tigase server /scripts/ repository find a script called machine-check.sh. It performs all the basic checks from the article and also tries to adjust them when necessary. Have a look at the code or check it out and run for yourself.
Any comments or suggestions, as usual, are very much appreciated.
9.4. Add and Manage Domains
For everybody interested in using our service to host their own XMPP domain we have good news! You do not have to ask an administrator to add your domain or add users for your domain anymore. You can do it on your own.
Please note, this is very new stuff. Something may go wrong or may not be polished. Please report any problems, notices or suggestions.
This is the guide to walk you through the new functions and describes how to add a new domain and new users within your domain.
You can do everything from your XMPP client or you can use our web application that allows you to connect to the service and execute admin commands. I recommend Psi because of its excellent support for parts of the XMPP protocol which are used for domains and user management. You may use other clients as well, but we can only offer support and help if you use Psi client.
Secondly, you need an account on the server. This is because all the commands and features described here are available to local users only. Therefore, if you do not have a registered domain with us yet, please go ahead and register an account on the website either the Jabber.Me or Tigase.IM.
9.4.1. Adding a New Domain
Once you register an account on one of the websites, connect to the XMPP server using the account on the Psi client. We will be using the following account: green@tigase.im which is this guide.
When you are ready right click on the account name in Psi roster window to bring up context menu. Select Service Discovery element.
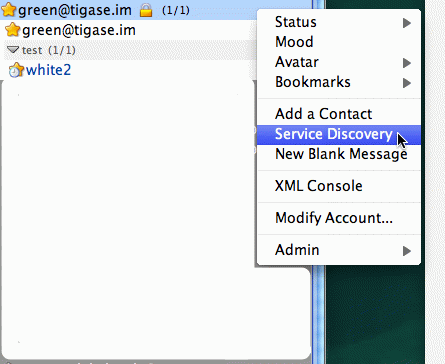
A new windows pops up as in the example on the right. The service discovery window is where all the stuff installed on XMPP service should show up. Most of elements on the list are well known transports, MUC and PubSub components. The new stuff on the list, which we are interested in, are 2 elements: VHost Manager and Session Manager.
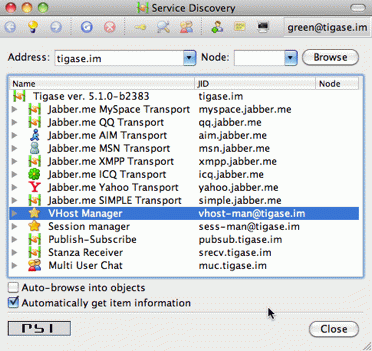
VHost Manager component in Tigase is responsible for managing and controlling virtual hosts on the installation. It provides virtual hosts information to all other parts of the system and also allows you to add new hosts and remove/update existing virtual hosts.
Session Manager component in Tigase is responsible for managing users. In most cases online users but it can also perform some actions on user repository where all user data is stored.
Select VHost Manager and double click on it. A new windows shows up (might be hidden behind the service discovery window). The window contains another menu with a few items: Add…, Remove… and Update… . These are for adding, removing and updating VHost information. For now, just select the first element Add….

Click Execute and you get a new window where you can enter all of your VHost configuration details. All fields should be self explanatory. Leave a blank field for Other parameters for now. Owner is you, that is Jabber ID which controls the domain and can change the domain configuration settings or can remove the domain from the service. Administrators field can be left blank or can contain comma separated list of Jabber IDs for people who can manage users within the domain. You do not need to add your user name to the list as Owners can always manage users for the domain.
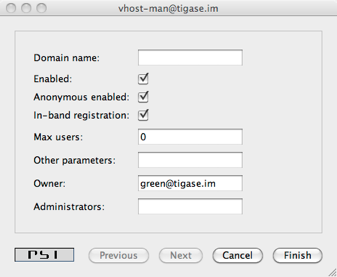
When you are ready click the Finish button. All done, hopefully. You can get either a window confirming everything went well or a window printing an error message if something went wrong. What can be wrong? There are some restrictions I decided to put on the service to prevent abuse. One of the restrictions is the maximum number of domains a user can register for himself which is 25 right now. Another restriction is that the domain which you add must have a valid DNS entry pointing to our service. The XMPP guide describes all the details about DNS settings. Please refer to these instructions if you need more details.
9.4.2. Adding a New User
Adding a new user process is quite similar, almost identical to adding a new domain. This time, however we have to select Session Manager in the service discovery window.
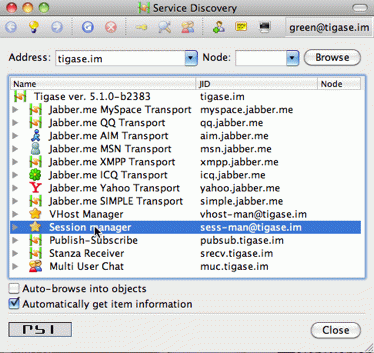
Double click on the Session Manager and a window with SM’s commands list shows up. Right now, there is only one command available to domain administrators - Add user. I am going to make available more commands in the future and I am waiting for your suggestions.
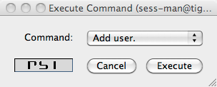
If you click Execute a window presented on the left shows up. Fill all fields accordingly and press Finish.
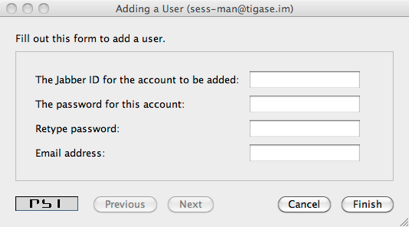
If everything went well you have just added a new user and you should get a window confirming successful operation. If something went wrong, a window with an error message should show up. Possible errors may be you tried to add a user which is already present, or you may have tried to add a user for a domain to which you do not have permission or to non-existen domain.
9.4.3. SSL Certificate Management
SSL Certificate Management has been implemented, and certificates can be manipulated when in a .pem form. For more details, see Creating and Loading the Server Certificate in pem Files section of documentation for more information.
9.5. Presence Forwarding
Have you ever thought of displaying your users presence status on the website? Or, maybe, you wanted to integrate XMPP service with your own system and share not only users' accounts but also presence status?
Not only is it possible but also very simple. You have a new option in the domain control form.
Actually there are 2 new options:
-
Presence forward address
-
Message forward address - not fully implemented yet
Presence forward address can be any XMPP address. Usually you want it to be a bot address which can collect your users' presence information. Once this option is set to a valid XMPP address Tigase forwards user’s presence, every time the user changes his status. The presence is processed normally, of course, and distributed to all people from the contact list (roster), plus to this special address. It can be a component or a bot. If this is a bot connecting to a regular XMPP account, Make sure the presence forward address contains resource part and the bot is connecting with this resource. Otherwise the presence won’t be delivered to the bot.
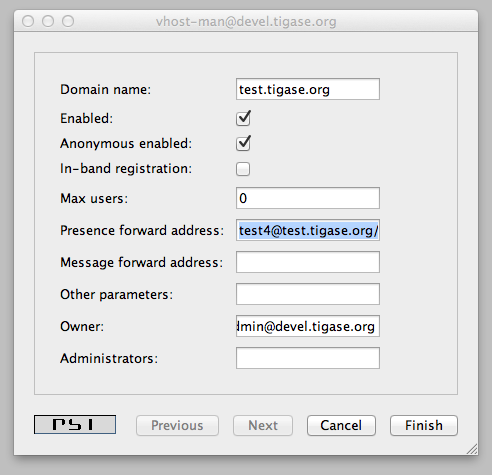
As the screenshot shows, there are new input lines with option for presence forwarding address and message forwarding address. As you can see this option can be specified separately for each domain, so you can have a different forward address for each domain.
If you have your own Tigase installation, the forwarding address can be also set globally and can be the same for all domains. However, for this website, we offer this feature to all our users who have own domains and this can be set on per-domain basis.
Now, the big question. How this can be used? I am attaching below an example code. With just a few lines of code you can connect a command line bot to the server as a client which would collect all presences from users. Code below is a simple Groovy script which receives presence packet and displays them on the console. However, it should be easy enough to store users' presence information in a database and then load it from a web application.
The bot/client uses our JaXMPP2 library which is available form our project management system.
You should be able to find a few more code examples on the wiki page.
package jaxmppexample
import tigase.jaxmpp.core.client.BareJID
import tigase.jaxmpp.core.client.SessionObject
import tigase.jaxmpp.core.client.exceptions.JaxmppException
import tigase.jaxmpp.core.client.observer.Listener
import tigase.jaxmpp.core.client.xmpp.modules.presence.PresenceModule
import tigase.jaxmpp.core.client.xmpp.modules.presence.PresenceModule.PresenceEvent
import tigase.jaxmpp.j2se.Jaxmpp
final Jaxmpp jaxmpp = new Jaxmpp()
jaxmpp.getProperties().setUserProperty( SessionObject.USER_BARE_JID,
BareJID.bareJIDInstance( "test4@test.tigase.org" ) )
jaxmpp.getProperties().setUserProperty(SessionObject.RESOURCE, "presence-collector")
jaxmpp.getProperties().setUserProperty( SessionObject.PASSWORD, "pass" )
jaxmpp.getModulesManager().getModule( PresenceModule.class ).addListener(
PresenceModule.ContactChangedPresence, new Listener() {
public void handleEvent( PresenceEvent be ) {
def msg = (be.getStatus() != null) ? be.getStatus() : "none"
println( "Presence received:\t" + be.getJid() + " is now " + be.getShow() +
" (" + msg + ")" )
}
}
)
println( "Loging in..." )
jaxmpp.login()
println( "Waiting for the presence for 10 minutes" )
Thread.sleep( 10 * 60 * 1000 )
disconnect()9.6. Register Your Own XMPP Domain
You can have XMPP service running in your own domain. The only condition right now is that this must be a DNS registered domain and DNS must point to the following DNS address: tigase.me. Please note, do not confuse it with tigase.im domain name.
We recommend to use SRV records as this is required by the XMPP specifications but as some DNS services do not allow for SRV records yet we do not require SRV records either. If you want to register: your-domain.tld on our XMPP service make sure that either the command:
$ host your-domain.tld
your-domain.tld has address 94.23.164.209displays 94.23.164.209 address or commands:
$ host -t SRV _xmpp-server._tcp.your-domain.tld
_xmpp-server._tcp.your-domain.tld has SRV record 10 0 5269 tigase.me.
$ host -t SRV _xmpp-client._tcp.your-domain.tld
_xmpp-client._tcp.your-domain.tld has SRV record 10 0 5222 tigase.me.display tigase.me DNS name. We strongly recommend not to use the IP address directly however, as if the service grows too much, it will be much easier for us to migrate and expand it using the DNS name rather then IP address.
If you want to have MUC and PubSub available under your domain, you have to setup DNS for your muc.your-domain.tld and pubsub.your-domain.tld domains too.
For MUC:
$ host -t SRV _xmpp-server._tcp.muc.your-domain.tld
_xmpp-server._tcp.muc.your-domain.tld has SRV record 10 0 5269 tigase.me.
$ host -t SRV _xmpp-client._tcp.muc.your-domain.tld
_xmpp-client._tcp.muc.your-domain.tld has SRV record 10 0 5222 tigase.me.For PubSub :
$ host -t SRV _xmpp-server._tcp.pubsub.your-domain.tld
_xmpp-server._tcp.pubsub.your-domain.tld has SRV record 10 0 5269 tigase.me.
$ host -t SRV _xmpp-client._tcp.pubsub.your-domain.tld
_xmpp-client._tcp.pubsub.your-domain.tld has SRV record 10 0 5222 tigase.me.Now, how do you register your domain with our service?
There are a few ways. We recommend checking with the Add and Manage Domains section of the documentation on setting that up. If you cannot or don’t want to do it on your own, the way described in the guide please send us a message, either via XMPP to admin@tigase.im or the contact form requesting new domain. User registration is available via in-band registration protocol. You can also specify whether you want to allow anonymous authentication to be available for your domain and you can specify maximum number of users for your domain.
Any comments or suggestions are very welcomed.
9.7. Tigase and PyMSN-t Transport
Any XMPP server and any transport can connect with each other through an external component protocol (XEP-0114). So all you need to do is to correctly prepare configuration for this protocol on both sides.
Continue reading to learn how to setup Tigase and PyMSN for working together…
There are a few basic parameters to set for this protocol:
-
PORT number - this is a standard thing for any TCP/IP connection. Usually the port number should be above 1024 and for PyMSN-t transport it is usually 5347.
-
IP address - again, a standard thing for any TCP/IP connection. If both applications - XMPP server and transport run on the same machine the IP address should be 127.0.0.1.
-
SECRET - this is kind of connection password. Transport connects to the XMPP server and authenticates itself using this password. So no other unauthorized transport can connect to the XMPP server. For now lets use the password secret.
-
Transport ID - is an ID in XMPP network. Let’s say we want to setup transport for MSN for the server tigase.org. Transport ID can be: msn.tigase.org. It could be also: anything.tigase.org but this name while still valid would be confusing for users and my suggestion is to avoid confusing names. Note! Transport ID should resolve to correct IP address. For your tests you can add the ID to /etc/hosts file.
Here is side by side configuration for both applications: PyMSN-t and Tigase to make them work together. Both services are setup with the hostname test-d. To make sure both test-d and msn.test-d resolve to correct IP address an entry to the /etc/hosts file is added:
## In your case the IP address should be probably different.
192.168.0.13 test-d msn.test-dTigase server connects to MySQL database (or built-in XMLBD for simpler configuration variant).
I am not going to setup PyMSN-t to run in background as a system service. This is specific to the system you use and is covered in transport documentation and your operating system. Most systems have their own scripts to start services so I would recommend to use them. Here howeevr, it is run in the foreground with full logging switched on to the console to make it easier track what happens.
9.7.1. PyMSN-t - /etc/jabber/pymsn-t.xml file
<pymsnt>
<!-- The JabberID of the transport -->
<jid>msn.test-d</jid>
<!-- The public IP or DNS name of the machine
the transport is running on -->
<host>test-d</host>
<!-- The location of the PID file, relative
to the PyMSNt directory -->
<pid>/var/run/jabber/pymsn-t.pid</pid>
<!-- If set, the transport will background
itself when run, we don't want to do this right
now. -->
<!-- <background/> -->
<!-- The IP address of the main XMPP server
to connect to -->
<mainServer>127.0.0.1</mainServer>
<!-- The TCP port to connect to the XMPP
server on (this is the default for Jabberd2) -->
<port>5347</port>
<!-- The authentication token to use when
connecting to the XMPP server -->
<secret>secret</secret>
<lang>en</lang>
<website>http://test-d/</website>
<allowRegister/>
<getAllAvatars/>
<!-- Please give the port to listen for XMPP
socks5 transfers on. Note the standard port number
set here is <strong>8010</strong>. This port
however is in use on my machine so this is why
I had to set it to different value.-->
<ftJabberPort>8014</ftJabberPort>
<admins>
<jid>tus@test-d</jid>
</admins>
<!-- The logging level
0 -> No logging
1 -> Log tracebacks
2 -> Log tracebacks, warnings and errors
3 -> Log everything -->
<debugLevel>3</debugLevel>
<!-- The file to log to. Leave this disabled
for stdout -->
<!-- <debugFile>debug.log</debugFile> -->
</pymsnt>9.7.2. PyMSN-t - run command
python /usr/lib/python2.4/site-packages/pymsn-t/pymsn-t.py \
-c /etc/jabber/pymsn-t.xmlNote! the full path to PyMSN-t config file is important.
9.7.3. PyMSN-t - expected output
A few last lines should look like:
[2007-05-07 13:00:39] Starting factory
<twisted.xish.xmlstream.XmlStreamFactory
instance at 0xb7ce80ac>
[2007-05-07 13:00:39] <twisted.internet.tcp.Connector
instance at 0xb7ceb24c> will retry in 2 seconds
[2007-05-07 13:00:39] Stopping factory
<twisted.xish.xmlstream.XmlStreamFactory
instance at 0xb7ce80ac>
[2007-05-07 13:00:41] Starting factory
<twisted.xish.xmlstream.XmlStreamFactory
instance at 0xb7ce80ac>
[2007-05-07 13:00:41] <twisted.internet.tcp.Connector
instance at 0xb7ceb24c> will retry in 5 seconds
[2007-05-07 13:00:41] Stopping factory
<twisted.xish.xmlstream.XmlStreamFactory
instance at 0xb7ce80ac>
[2007-05-07 13:00:46] Starting factory
<twisted.xish.xmlstream.XmlStreamFactory
instance at 0xb7ce80ac>
[2007-05-07 13:00:46] <twisted.internet.tcp.Connector
instance at 0xb7ceb24c> will retry in 15 seconds
[2007-05-07 13:00:46] Stopping factory
<twisted.xish.xmlstream.XmlStreamFactory
instance at 0xb7ce80ac>And PyMSN should continue to print lines until it successfully connects to the Tigase server. When that happens, the following lines should be printed:
[2007-05-07 13:29:04] Starting factory
<twisted.xish.xmlstream.XmlStreamFactory instance at 0xb7cf00ac>
[2007-05-07 13:29:04] INFO :: :: :: componentConnected
:: PyTransport :: {'xmlstream': <twisted.xish.xmlstream.XmlStream
instance at 0xb7d0feac>, 'self': 'instance'}9.7.4. Tigase - etc/tigase.conf file
You may consider removing the last 2 lines from TIGASE_OPTIONS variable to avoid using MySQL for now. Tigase will then use internal XMLDB which doesn’t need any special setup. (Just remember to leave closing double quotes…)
ENC="-Dfile.encoding=UTF-8 -Dsun.jnu.encoding=UTF-8"
DRV="-Djdbc.drivers=com.mysql.jdbc.Driver"
CLASSPATH="${CLASSPATH}:libs/jdbc-mysql.jar"
JAVA_OPTIONS="${ENC} ${DRV} -server -Xms100M -Xmx100M "
TIGASE_CONFIG="etc/tigase-mysql.xml"
## All TIGASE_OPTIONS settings must be in single line
## They are split to make them more readable
TIGASE_OPTIONS="--gen-config-all --admins \"tus@test-d\"
--virt-hosts test-d,localhost --debug server
--ext-comp \"test-d,msn.test-d,5347,secret,plain,accept\"
--user-db mysql --user-db-uri
\"jdbc:mysql://localhost/tigase?user=tigase&password=mypass\" "9.7.6. Tigase - expected output
To see the log output from Tigase server execute following command:
tail -f logs/tigase-console.logAfter transport connects to Tigase server you should see lines like:
2007-05-07 12:29:05
ComponentConnectionManager.processHandshake() FINE:
Connected to: msn.test-d
2007-05-07 12:29:05
ComponentConnectionManager.updateServiceDiscovery()
FINEST: Modifing service-discovery info:
<item name="XEP-0114 connected"
jid="msn.test-d"/>Note! There was a bug in the jabber:iq:register plugin which caused problems when registering account in transport. Please use build 432 or later.
9.8. Two or More SessionManagers
In the most cases just one SessionManager object is used for Tigase server installation. A single SM can handle multiple virtual domains with separate SSL certificates for each domain.
Sometimes, however you need a different configuration for each domain. For example, if you wish to use a separate database for a selected domain or you need a different set of plugins for each domain. For one domain you might want to allow user registration via XMPP and for another you might want to disable this feature. In this case you need to load more than one session manager.
For Tigase, this is not a problem. You just need to add another component in the configuration and adjust default settings.
The question is now how does Tigase server know which session manager it has to forward packets received from the network? Keep in mind, there is only one component responsible for handling client connections. So it needs to know which session manager is the receiver for certain packets. Of course you can set domain names in session manager too, but that may not be enough. Tigase server supports cluster mode configuration where session manager can be run on a separate machine. So packet routings rules cannot be controlled by just the domain name. Therefore client connection manager (c2s) must know which session manager is responsible for handling the packet received from the network.
To solve the problem a routing concept has been introduced. You can define packet routings based on the domain name set during XMPP stream initialization. Each time the c2s component receives packet from the network it tries to resolve destination component for the packet based on the current routings table. If you look in you server XML configuration file and search for c2s configuration section you can find routing node. Default configuration for the routing table is quite simple, just a single regular expression:
<node name="routings">
<map>
<entry key=".+" type="String" value="sess-man%40tigase.org"/>
<entry key="multi-mode" type="Boolean" value="true"/>
</map>
</node>As you can see this routing table forwards all packets to a single destination - the session manager located on the tigase.org server.
Now let’s say we have two session managers, each of them is responsible for a separate domain.sm1@tigase.org handling requests for tigase.org and sm2@tigase.net handling requests for domain tigase.net. The modifications to the configuration to properly spread the traffic between the two session managers would look like this:
<node name="routings">
<map>
<entry key="tigase.org" type="String" value="sm1%40tigase.org"/>
<entry key="tigase.net" type="String" value="sm2%40tigase.net"/>
<entry key="multi-mode" type="Boolean" value="true"/>
</map>
</node>Please remember that a key is a regular expression in Java style: Pattern.html. You can match more than a single domain with the key, for example: tigase.+ to match all domains starting with tigase. The expression, however won’t match domain: xmpp.tigase.org. To match this domain the expression would need to be: .+tigase.+.
9.9. Watchdog
Tigase’s Watchdog was implemented to help Tigase close connections that have become stale or inactive. Sometimes the connection is delayed, maybe dropped packets, or a service interruption. After a time, if that connection is re-established, both server and client (or server and server) will continue on as if nothing happened. However, these gaps in connection can last longer, and some installations will rely on the operating system to detect and close stale connections. Some operating systems or environments can take up to 2 hours or more to determine whether a connection is bad and wait for a response from a foreign entity and may not be configured. This can not only slow down performance, but can lead to security issues as well. To solve this problem, we have introduced Watchdog to monitor connections independent of operating system and environments to keep those broken connections from becoming a problem.
9.9.1. Setup
No extra setup is necessary, Watchdog is already included with your build of Tigase (as long as it’s 7.1.0 or newer). Follow the steps in the configuration section.
9.9.2. Watchdog Configuration
To configure watchdog, the following lines need to be present or edited in init.properties file:
--watchdog_timeout=70000
--watchdog_delay=60000
--watchdog_ping_type=xmppThe three settings are as follows: - --watchdog_timeout=70000 This setting sets the amount of time that watchdog will consider before it determines a connection may be stale. This setting sets the timeout at 70000ms or 70 seconds. - --watchdog_delay=60000 This setting sets how often the watchdog should conduct the check, current setting sets the delay at 60000ms or 60 seconds. - --watchdog_ping_type=whitespace This setting determines the type of ping sent to components when watchdog is testing for activity.
You may, if you choose, to specify individual watchdog settings for specific components by adding them to the component settings, for example if we wanted to change the Client2Server settings to include watchdog, use the following lines in init.properties:
c2s/watchdog_timeout=3000
c2s/watchdog_delay=1500If any settings are not set, the global or settings will be used. watchdog_delay default is set to 10 min watchdog_ping_type default is set to xmpp
9.9.3. Logic
Watchdog compares it’s own pings, and records the time it takes for a round trip to different components, clustered connections, and if one variable is larger than the other, watchdog will commence closing that stale connection. Here is a breakdown:
-
A check is performed of a connection(s) on every watchdog_delay interval.
-
During this check two things occur
-
If the last transfer time exceeds max-inactivity-time a stop service command is given to terminate and broadcast unavailable presence.
-
If the last transfer time is lower than max-inactivity-time but exceeds watchdog_timeout watchdog will try to send a ping (of watchdog_ping_type). This ping may be one of two varieties (set in init.properties)
-
whitespace ping which will yield the time of the last data transfer in any direction.
-
xmpp ping which will yield the time of the last received xmpp stanza.
-
-
-
If the 2nd option is true, the connection will remain open, and another check will begin after the watchdog_delay time has expired.
For example, lets draw this out and get a visual representation
This line represents how often the check is performed. Each - is 10 seconds, so the check is done every 60 seconds (watchdog_delay=60000)
-----+-----+-----+-----+-----+-----+-----+-----+-----+-----+-----+------
| | | | | | | | | | |
This line is client activity, here the client has sent a message at 20 seconds and has gone idle.
-+------------------------------------------------------------------
The following line represents the logic, with settings set at: watchdog_timeout=120000 | +c2s/max-inactivity-time[L]=180000 (timeout at 120 seconds and max inactivity timeout at 180 seconds)
1 2 3 4 5 6 -*---*-----*-----*-----*-----*
1 - 20 seconds - at this point "last transfer" or "last received" time is updated.
2 - 60 seconds - watchdog runs - it check the connection and says "ok, last client transfer was 20s ago - but it’s lower than both inactivity (so don’t disconnect) and timeout (so don’t send ping).
3 - 120 seconds - 2nd check - last transfer was 100s ago - still lower than both values - do nothing.
4 - 180 seconds - 3rd check - last transfer was 160s ago - lower than inactivity but greater than delay - ping it sent.
5 - 240 seconds - 4th check - last transfer was 220s ago - client still has not responded, watchdog compares idle time to max-inactivity-timeout and finds that it is greater, connection is terminated.
It is possible that the connection is broken, and could be detected during the sending of a ping and the connection would be severed at step 4 instead of waiting for step 5. NOTE This MAY cause JVM to throw an exception.
NOTE: Global settings may not be ideal for every setup. Since each component has its own settings for max-inactivity-time you may find it necessary to design custom watchdog settings, or edit the inactivity times to better suit your needs. Below is a short list of components with thier default settings:
bosh/max-inactivity-time[L]=600 c2s/max-inactivity-time[L]=86400 cl-comp/max-inactivity-time[L]=180 s2s/max-inactivity-time[L]=900 ws2s/max-inactivity-time[L]=86400
Again remember, for Watchdog to properly work, the max-inactivity-time MUST be longer than the watchdog_timeout setting
9.9.4. Testing
The tigase.log.0 file can reveal some information about watchdog and how it is working (or how it might be fighting your settings). To do so, enter the following line into your init.properties file:
--debug=server,xmpp.init
This will set debug mode for your log, and enable some more information about what Tigase is doing. These logs are truncated for simplicity. Lets look at the above scenario in terms of the logs:
Stage Two
2015-10-16 08:00:00.000 [Watchdog - c2s] ConnectionManager$Watchdog$1.check() FINEST: Testing service: c2s@xmpp.domain.com/192.168.0.150_5222_192.168.0.201_50368, type: accept, Socket: TLS: c2s@xmpp.domain.com/192.168.0.150_5222_192.168.0.201_50368 Socket[addr=/192.168.0.201,port=50368,localport=5222], jid: user@xmpp.domain.org/mobile, sinceLastTransfer: 20,000, maxInactivityTime: 180,000, watchdogTimeout: 120,000, watchdogDelay: 60,000, watchdogPingType: XMPP
Stage Three
2015-10-16 08:01:00.000 [Watchdog - c2s] ConnectionManager$Watchdog$1.check() FINEST: Testing service: c2s@xmpp.domain.com/192.168.0.150_5222_192.168.0.201_50368, type: accept, Socket: TLS: c2s@xmpp.domain.com/192.168.0.150_5222_192.168.0.201_50368 Socket[addr=/192.168.0.201,port=50368,localport=5222], jid: user@xmpp.domain.org/mobile, sinceLastTransfer: 100,000, maxInactivityTime: 180,000, watchdogTimeout: 120,000, watchdogDelay: 60,000, watchdogPingType: XMPP
Stage Four
2015-10-16 08:02:00.000 [Watchdog - c2s] ConnectionManager$Watchdog$1.check() FINEST: Testing service: c2s@xmpp.domain.com/192.168.0.150_5222_192.168.0.201_50368, type: accept, Socket: TLS: c2s@xmpp.domain.com/192.168.0.150_5222_192.168.0.201_50368 Socket[addr=/192.168.0.201,port=50368,localport=5222], jid: user@xmpp.domain.org/mobile, sinceLastTransfer: 160,000, maxInactivityTime: 180,000, watchdogTimeout: 120,000, watchdogDelay: 60,000, watchdogPingType: XMPP
2015-10-16 08:02:00.697 [Watchdog - c2s] ConnectionManager$Watchdog$1.check() FINEST: c2s@xmpp.domain.com/192.168.0.150_5222_192.168.0.201_50368, type: accept, Socket: TLS: c2s@xmpp.domain.com/192.168.0.150_5222_192.168.0.201_50368 Socket[addr=/192.168.0.201,port=50368,localport=5222], jid: user@xmpp.domain.org/mobile, sending XMPP ping from=null, to=null, DATA=<iq from="xmpp.domain.com" id="tigase-ping" to="user@xmpp.domain.com/mobile" type="get"><ping xmlns="urn:xmpp:ping"/></iq>, SIZE=134, XMLNS=null, PRIORITY=NORMAL, PERMISSION=NONE, TYPE=get
Stage Five
2015-10-16 08:03:00.000 [Watchdog - c2s] ConnectionManager$Watchdog$1.check() FINEST: Testing service: c2s@xmpp.domain.com/192.168.0.150_5222_192.168.0.201_50368, type: accept, Socket: TLS: c2s@xmpp.domain.com/192.168.0.150_5222_192.168.0.201_50368 Socket[addr=/192.168.0.201,port=50368,localport=5222], jid: user@xmpp.domain.org/mobile, sinceLastTransfer: 100,000, maxInactivityTime: 180,000, watchdogTimeout: 120,000, watchdogDelay: 60,000, watchdogPingType: XMPP
2015-10-16 08:03:00.248 [pool-20-thread-6] ConnectionManager.serviceStopped() FINER: Connection stopped: c2s@xmpp./domain.com/192.168.0.150_5222_192.168.0.201_50368, type: accept, Socket: TLS: c2s@lenovo-z585/192.168.0.150_5222_192.168.0.201_50368 Socket[unconnected], jid: user@xmpp.domain.com
2015-10-16 08:03:00.248 [pool-20-thread-6] ClientConnectionManager.xmppStreamClosed() FINER: Stream closed: c2s@xmpp.domain.com/192.168.0.150_5222_192.168.0.201_50368
9.10. Tips and Tricks
The section contains some short tricks and tips helping in different kinds of issues related to the server administration and maintenance.
9.10.1. Tigase Tip: Checking the Runtime Environment
It has happened recently that we have tried very hard to fix a few annoying problems on one of the Tigase installations. Whatever we did, the problem still existed after uploading a new version and restarting the server. It worked fine in our development environment and it just didn’t on the target system.
It turned out that due to specific environment settings on the target system, an old version of Tigase server was always started regardless of what updates uploaded. We finally located the problem by noticing that the logs were not being generated in the proper locations. This led us to finding the issue: improper environment settings.
The best way to check all the environment settings used to start the Tigase server is to use….. check command line parameter:
./scripts/tigase.sh check etc/tigase.conf
Checking arguments to Tigase
TIGASE_HOME = .
TIGASE_JAR = jars/tigase-server.jar
TIGASE_PARAMS = etc/tigase.conf
TIGASE_CONFIG = etc/tigase.xml
TIGASE_RUN = tigase.server.XMPPServer -c etc/tigase.xml --property-file etc/init.properties
TIGASE_PID = ./logs/tigase.pid
TIGASE_OPTIONS = --property-file etc/init.properties
JAVA_OPTIONS = -Dfile.encoding=UTF-8 -Dsun.jnu.encoding=UTF-8 \
-Djdbc.drivers=com.mysql.jdbc.Driver:org.postgresql.Driver \
-server -Xms100M -Xmx200M -XX:PermSize=32m -XX:MaxPermSize=256m
JAVA = /System/Library/Frameworks/JavaVM.framework/Versions/1.6/Home/bin/java
JAVA_CMD =
CLASSPATH = ./jars/tigase-server.jar:./libs/jdbc-mysql.jar:./libs/jdbc-postgresql.jar:\
./libs/tigase-extras.jar:./libs/tigase-muc.jar:./libs/tigase-pubsub.jar:\
./libs/tigase-utils.jar:./libs/tigase-xmltools.jar
TIGASE_CMD = /System/Library/Frameworks/JavaVM.framework/Versions/1.6/Home/bin/java \
-Dfile.encoding=UTF-8 -Dsun.jnu.encoding=UTF-8 \
-Djdbc.drivers=com.mysql.jdbc.Driver:org.postgresql.Driver \
-server -Xms100M -Xmx200M -XX:PermSize=32m -XX:MaxPermSize=256m \
-cp ./jars/tigase-server.jar:./libs/jdbc-mysql.jar:./libs/jdbc-postgresql.jar:\
./libs/tigase-extras.jar:./libs/tigase-muc.jar:./libs/tigase-pubsub.jar:\
./libs/tigase-utils.jar:./libs/tigase-xmltools.jar tigase.server.XMPPServer \
-c etc/tigase.xml --property-file etc/init.properties
TIGASE_CONSOLE_LOG = ./logs/tigase-console.logIn our case TIGASE_HOME was set to a fixed location pointing to an old version of the server files. The quick check command may be a real time saver.
Best Practices for Connecting to Tigase XMPP server From Web Browser
Currently we have 2 ways to connect to Tigase XMPP Server from web browsers:
-
BOSH (Bidirectional-streams Over Synchronous HTTP)
-
WebSocket (XMPP over WebSocket)
You will find more informations about these ways for connecting to Tigase XMPP Server with some useful tips below.
BOSH
BOSH protocol specified in XEP-0124 is one of first protocols defined to allow to establish XMPP connection to XMPP servers from web browsers due to this protocol being widely supported and used. It is also easy to use in single server mode. It’s enabled by default in Tigase XMPP Server and available at port 5280.
In clustered mode we can deploy it with load balancer deployed with guarantees that each BOSH connection from web browser will be forwarded to same Tigase XMPP Server instance. So in clustered mode if we have two XMPP server t1 and t2 which are hosting domain example.com we would need to have load balancer which will respond for HTTP request to domain example.com and forward all requests from same IP address to same node of a cluster (i.e. all request from 192.168.122.32 should be forwarded always to node t1.
Tip #1 - BOSH in Cluster Mode Without Load Balancer
There is also a way to use BOSH without load balancer enabled. In this case the XMPP client needs to have more logic and knowledge about all available cluster nodes (with names of nodes which will identify particular cluster nodes from internet). Using this knowledge XMPP client should select one random node from list of available nodes and always establish BOSH connections to this particular node. In case if BOSH connection fails due to network connection issues, the XMPP client should randomly pick other node from list of rest of available nodes.
Solution:
Tigase XMPP Server by default provides server side solution for this issue by sending additional host attribute in body element of BOSH response. As value of this attribute Tigase XMPP Server sends domain name of server cluster node to which client connected and to which next connections of this session should be opened. It is possible to disable this custom feature by addition of of following line to etc/init.properties config file:
bosh/send-node-hostname[B]=false
Example:
We have servers t1.example.com and t2.example.com which are nodes of a cluster hosting domain example.com. Web client retrieves list of cluster nodes from web server and then when it needs to connect to the XMPP server it picks random host from list of retrieved cluster nodes (i.e. t2.example.com) and tries to connect using BOSH protocol to host t2.example.com but it should send example.com as name of the server it tries to connect to (example.com should be value of to attribute of XMPP stream).
WebSocket
WebSocket protocol is newly standardized protocol which is supported by many of current versions of browsers. Currently there is a draft of protocol draft-ietf-xmpp-websocket-00 which describes usage of WebSocket to connect to XMPP servers. Tigase XMPP Server implementation of WebSocket protocol to connect to XMPP server is very close to this draft of this specification. By default Tigase XMPP Server has XMPP-over-WebSocket protocol enabled without encryption on port 5290. To use this protocol you need to use library which supports XMPP-ober-WebSocket protocol.
Tip #1 - Encrypted WebSocket Connection
It is possible to enable encrypted WebSocket connection in Tigase XMPP Server. To do this you need to add following lines to etc/init.properties config file:
ws2s/connections/ports[i]=5290,5291
ws2s/connections/5291/socket=plain
ws2s/connections/5291/type=accept
ws2s/connections/5290/socket=ssl
ws2s/connections/5290/type=acceptIn this example we enabled WebSocket endpoint on port 5290 allowing unencrypted connections, and encrypted WebSocket endpoint on port 5291. As this is TLS/SSL connection (no STARTTLS) it uses default certificate installed in Tigase XMPP Server instance. This certificate is located in certs/default.pem.
NOTE There is no default configuration for non-default ports. All ports outside 443 MUST be configured.
Tip #2 - Encrypted WebSocket Connection - Dealing With Multiple VHosts
As mentioned in Tip #1 WebSocket endpoint is plain TLS/SSL port, so it always serves default certificate for Tigase XMPP Server instance. That is ok if we are hosting single domain and if default certificate matches matches our domain. But If we host multiple domain we cannot use wss://example1.com:5291/ connection URL, if our default certificate is for domain example2.com. In this situation it is recommended to use the default certificate for the domain under which the server is accessible from the internet. This domain should identify this server, so this domain would not point to two nodes of a cluster. After we deploy separate certificate for each of cluster nodes, we should follow same tip as Tip #1 for BOSH. Our web-based XMPP client should have knowledge about each node of a cluster and when it needs to connect it should randomly select one node from list of available cluster nodes and try to connect using connection URL that would contain name of server under which it can be identified from internet.
Example:
We have servers t1.example1.com and t2.example1.com which are nodes of a cluster in hosting domain example2.com. Each of our nodes contains default SSL certificate with domain names matching the cluster node. Web client retrieves list of cluster nodes from web server and then when it needs to connect to XMPP server it picks random host from list of retrieved cluster nodes (i.e. t2.example1.com) and tries to connect using WebSocket encrypted protocol to host t2.example1.com using the following URL: wss://t2.example1.com:5291/. Upon connection the client should still send example2.com as name of server to which it tries to connect (example2.com should be value of to attribute of XMPP stream). This will allow browser to validate certificate as it will be for the same domain to which browser connects, and it will allow XMPP client to connect to domain example2.com, which is one of hosted vhosts.
9.11. Command Line Admin Tools
Two command line tools have been created to make it easier to manage server configurations and user repositories.
Configuration tool allows to look at configuration settings and modify parameters. It takes care of proper parameters types and encoding.
Repository management tool allows to print repository content for all or for selected users. Modify repository data, add, delete users and copy data from one repository to another.
This guide describe how to efficiently use command line tools which are available for user repository and configuration management.
These 2 command line tools for managing configuration and repository are:
Both scripts call class from Tigase package. If you run any of those script with -h parameter you will get help screen describing all available parameters.
I will not concentrate on that help information which is easily accessible anyway. This guide will focus on particular use cases. So it will answer the question: "How to do use the tool?".
9.11.1. Configuration Management Tool
The configuration tool allows a user to look at configuration settings and modify parameters.
First, an answer to the question: "Why use this configuration tool instead of directly, manually editing the config file?"
There are a couple of reasons why you should NOT manually edit configuration file and use the tool instead to modify settings:
-
Configuration is kept in XML file which can be easily broken if not edited carefully. The tool takes care of creating valid XML configuration file for you. So you can focus on your task - setting proper parameters for your server.
-
Configuration values are kept UUEncoded in the config file. If you edit file manually you have to take care of proper encoding of special characters. The tool presents parameters to you in decoded form which is easy to read and can accept all settings also in decoded form which is easier for you to write. Then when writing your parameters to configuration file settings are automatically encoded to correct form.
-
Data in configuration file have TYPES. That is some parameters are expected to be Strings other are expected to be Integers, Booleans or arrays keeping data in any of that type. If data type is set incorrectly then Tigase may have problems with reading configuration data. The configuration tool takes care of proper data types in configuration file.
Configuration management tool is a Java class - tigase.conf.Configurator. To make it easier to use this class there is also shell script available - config.sh.
First thing you can do is running the script with -h parameter:
./scripts/config.sh -hIn response you get description of all available parameters:
Parameters:
-h this help message
-c file configuration file
-key key node/key for the value to set
-value value value to set in configuration file
-set set given value for given key
-add add given value to the values list for given key
-print print content of all configuration settings or of given node/key
-f force creation of the new property - dangerous option...
Samples:
Setting admin account - overwriting any previous value(s)
$ ./scripts/config.sh -c tigase-config.xml -print -set -key session_1/admins -value admin1@localhost
Adding next admin account leaving old value(s)
$ ./scripts/config.sh -c tigase-config.xml -print -add -key session_1/admins -value admin2@localhost
Note: adding -print option is useful always, even with -set or -add
option as it prints set value afterwards.Let’s assume configuration for your server is located in tigase-config.xml file. So the first thing you need to set when calling the tool is location of the configuration file.
9.12. Scripting support in Tigase
Tigase server supports scripting languages in versions 4.3.1 and higher. These pages describe this feature in details how to create new scripts, upload them to the server, and execute them. The guide also contains API description with code examples.
PLEASE NOTE Tigase server is known for it very low memory consumption and successfully runs with less then 10MB of RAM memory. However adding scripting support for any non-standard (default) language to Tigase server significantly increases memory requirements for the installation. You cannot expect Tigase server to run on 10MB RAM system if you enabled Python, Scala or any other non-standard language.
9.12.1. Scripting Introduction - Hello World!

This document is the first in a series describing scripting support in the Tigase server showing how to load, install, update and call a script. It contains also an introduction to the scripting API with the first "Hello world!" example.
Since Tigase version 4.3.1 the server supports scripting for administrator commands as well as standard commands.
In theory many different languages can be used to write scripts and the only requirement is that support JSR-223 for the language is installed. More details can be found on the Java scripting project site.
In practice some languages are better supported than others, at the moment we recommend Groovy. However the following languages are also confirmed to be working: Scala, Python and Ruby. The Tigase SVN contains a few examples for these languages.
Please note, the default Tigase installation contains only libraries for Groovy. Adding support for a different language is as simple as copying a few JAR files to the Tigase libs/ directory.
All the examples presented in this guide are also available as ready to use scripts in the Tigase SVN repository in directory: src/main/groovy/tigase/admin.
The scripting utilizes only standard XMPP extensions and is by no means specific to any particular solution. We use and prefer Psi client. The whole guide and all the screen-shots are created using Psi client. You can, however, use any other client which supports these extensions as well. As the whole thing is based on the service discovery and ad-hoc commands you need a XMPP client with a good support for both features.
To follow the guide and run all the examples you need will need to have installed Tigase server version 4.3.1 or newer and you have to connect to the server as administrator.
Loading Script at Run Time
All the scripting stuff is usually based on the service discovery and ad-hoc commands in the Tigase server.
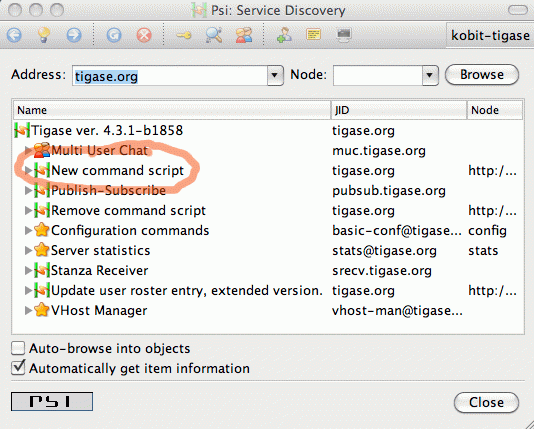
The first thing to do, therefore, is to browse service discovery on the running server. The result you receive will depend on your installation and installed components.
The most interesting things right now are all items with "http://jabber.org/protocol/admin" in their node part. You may have a few scripts loaded already but there are two commands used for scripting management. Their names are descriptive enough: "New command script" and "Remove command script".
The first is for adding a new script or updating existing and the second is for removing script from the server.
To add a new script you have just to execute "New command script". In Psi this is done by double clicking on the element in service discovery list.
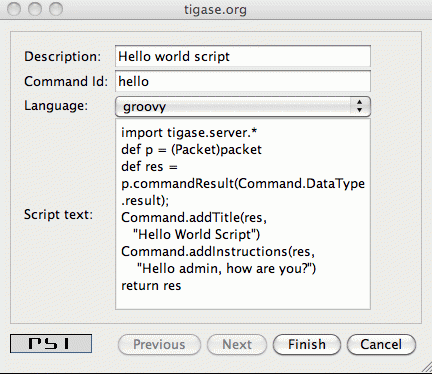
The screenshot above shows a couple of options to set for the loaded script:
-
Description - is what shows as the script name in the service discovery window. There are no special restrictions on what to put there.
-
Command id - is a unique ID of the script (admin command). This is what shows after the "http://jabber.org/protocol/admin" in node part. This needs to be unique or existing script is overwritten.
-
Language - a drop down list of all supported scripting languages for your installation. Tigase automatically detects all libraries for scripting languages and lists them here. So all you need is to select the correct language for your script.
-
Script text - is just your script content.
When your script is ready and all fields are correctly set, simply press "Finish" button and you should receive a message confirming that the script has been loaded successfully.
In this guide we are creating a simple "Hello world" script written in Groovy. What it does is displays a window (ad-hoc command result) with a message: "Hello admin, how are you?".
It uses a basic scripting API which is described line by line below:
-
It imports basic Tigase classes.
-
Set’s a local variable \'p' which points to a \'packet' variable with data received from the client.
-
Creates a \'res' variable which is response sent back to the client (administrator). The response to the client is of type \'result'. Other possible types will be introduced later.
-
We operate on ad-hoc commands here so the script uses Tigase utility class to set/retrieve command parameters. It sets the window title and a simple message displayed to the user (administrator).
-
The last line returns new packet as a script execution result.
The first, very simple version looks like this:
import tigase.server.*
def p = (Packet)packet
def res = p.commandResult(Command.DataType.result)
Command.addTitle(res, "Hello World Script")
Command.addInstructions(res, "Hello admin, how are you?")
return resExecuting Script
Once the script is successfully loaded you will have to reload/refresh the service discovery window which now should display one more element on the list.
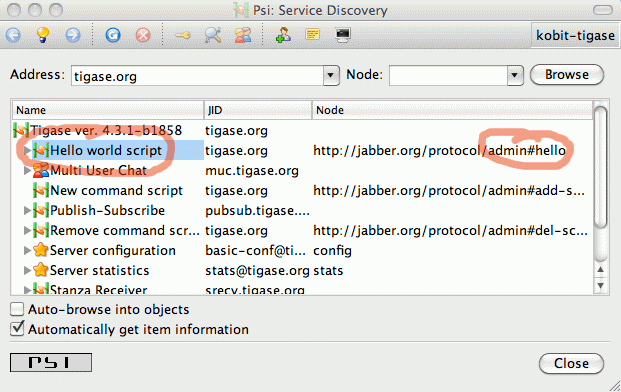
As you can see script name is set to what you have entered as "Description" in script loading window - "Hello world script". The command node is set to: "http://jabber.org/protocol/admin#hello" if "hello" is what is set as the script ID.
To execute the script you just have to double click on the script name (or click execute command if you use any other client).
As a result you should see a simple window similar to the screenshot below displaying our message.
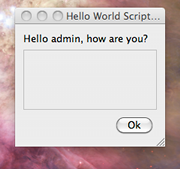
Interaction in Scripts
Displaying just a message is very nice but is not very useful in most cases. Normally you need to ask the user for some more data or parameters before you can perform any real processing.
Therefore in most cases the administrator script has to display a new window with input fields asking the user for some more data. In this document we present very simple examples, just an introduction so let’s ask about the administrator name before displaying a greeting.
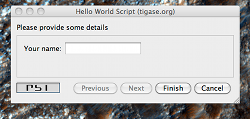
To ask the user for some more information we have to extend example above with some more code:
import tigase.server.*
def p = (Packet)packet
def name = Command.getFieldValue(packet, "name")
if (name == null) {
def res = p.commandResult(Command.DataType.form);
Command.addTitle(res, "Hello World Script")
Command.addInstructions(res, "Please provide some details")
Command.addFieldValue(res, "name", name ?: "", "text-single",
"Your name")
return res
}
def res = p.commandResult(Command.DataType.result)
Command.addTitle(res, "Hello World Script")
Command.addInstructions(res, "Hello ${name}, how are you?")
return resIf you compare both scripts you see that they are quite similar. Before displaying greeting, however, the script tries to retrieve data from the \'name' input field. If the name had been provided the greeting is displayed, otherwise the script asks for the user name.
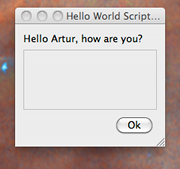
Please note, in this case the packet sent back to the user is of type form instead of result. The practical difference is that the type result displays only OK button which when pressed doesn’t send any data to the server. The form packet displays more buttons - Finish and Cancel. Whichever you press some data is sent back to the server.
This script demonstrates use of two new methods from the utility class "Command": getFieldValue and addFieldValue.
-
The first argument to all Command methods is the packet with ad-hoc command.
-
The second argument is usually the input field name
These two method parameters are actually enough to read the ad-hoc command data. Methods creating input fields in the ad-hoc command need a few arguments more:
-
Next arguments sets a default value displayed to the user. The way to it is set in the example above is specific to Groovy language and is quite useful what will be apparent in later examples.
-
After that we have to specify the field type. All field types are defined in the XEP-0004 article.
-
The last argument specifies the field label which is displayed to the user.
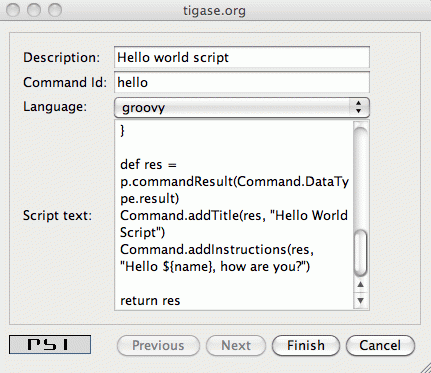
There are a few other different utility methods in the Command class to set different types of input fields and they will be described in details later on.
To reload the script simply call "New command script" again, enter the script text and make sure you entered exactly the same command ID to replace the old script with the new one.
Or of course, you can enter a new command id to create a new command and make it available on your server.
When the script is loaded on the server, try to execute it. You should get a new dialog window asking for your name as in the screenshot at the beginning of this section. When you have entered your name and clicked the "Finish" button you will see another window with a greeting message along with your name.
Automatic Scripts Loading at Startup Time
The last thing described in this guide is how to automatically load your scripts when the Tigase server starts. The ability to load scripts at run time, update and remove remove them is very useful, especially in emergency cases if something wrong is going on and you want to act without affecting the service.
If you, however have a few dozens scripts you don’t want to manually load them every time the server restarts.
Tigase server automatically loads all scripts at the startup time which are located in the admin scripts directory. Unless you set it differently in the configuration it is: YourTigaseInstallationDir/scripts/admin/. All you have to do is to copy all your scripts to this directory and they will be loaded next time the server starts.
But hold on. What about the script parameters: language, description, command id? How are you supposed to set them?
Language is simple. It is detected automatically by the script file extension. So just make sure file extensions are correct and the language is sorted.
The script description and command id needs a little bit more work. You have to include in your script following lines:
AS:Description: The command description
AS:CommandId: command-id
AS:Component: comp_namePlease note, there must be at least a single space after the "AS:Description:" or "AS:CommandId:" string. Everything rest after that, until the end of the line, is treated as either the script description or command id. Put these in your script file and the loader will detect them and set correctly for your script.
9.12.2. Tigase Scripting Version 4.4.x Update for Administrators

Scripting functionality is quite useful in Tigase server for all sorts of administrator tasks. The possibility to load new scripts or replace old ones at the server runtime opens quite new area for the service maintenance.
In earlier versions of the Tigase server scripting capabilities was available only in the session manager component while it might be very useful in many other places - connection managers, MUC, PubSub, VHostManager and what even more important in completely new, custom components created for specific needs. It would be quite wasteful to reinvent the wheel every time and implementing scripting capabilities for each component separately.
Therefore the scripting capabilities has been implemented in the core of the Tigase server. It is now part of the API and is automatically available to all components without any additional coding. A detailed developer guide will be published separately.
This document describes changes from the user/administrator perspective because there are some usability changes related to the new implementation.
Please note. The description and screenshots are taken from the Psi client and most likely interface for ad-hoc commands and service discovery on other client looks different. I recommend to do some initial testing and experiments using Psi client and then switch to your preferred application for your day-to-day use.
As it always was in the Tigase you can access all the functions via XMPP service discovery on the server. However, as soon as you connect to the server you can see some changes there.

There are no command on the list. They are hidden from the main service discovery list. You can see on the list only the server main components.
This had to be done for many reasons. One of them is, obviously, the cleaner access to the main server stuff. Another, probably more important, is to avoid a long list of commands for different components mixed together. Commands for different components can have the same name/description and they can even do similar things but they are executed on a different server component. To avoid any confusion and minimise opportunities for mistake the commands are now closely tight to their components. To access a list of commands for a particular component you have to double click on the component name on the list or click 'Execute command" icon on top of the window when your component is selected.
A new window should show up with drop-down list of available commands. All the commands are related to the selected component and are executed kind of "inside the component environment". You can of course add new command or delete existing one and of course execute any of the commands showing on the list.
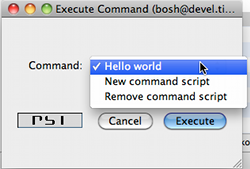
As a reminder, in the window title you can see the component ID and you should check it before running any command to make sure you accidentally don’t break your system.
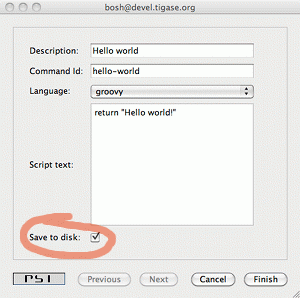
There has been also a small change made to the script adding window. As you can see on the screenshot there is one additional option added - "Save to disk". This means that once you submitted the script to the server it is written to the hard drive and will be automatically loaded at next startup time.
This option is enabled by default as this seems to be a logical choice that the administrator wants to save his new script for later reuse. This, however requires proper configuration of the server and give writing permission to the directory where all scripts are stored. Otherwise the server won’t be able to write script files on the hard drive.
As in previous version only users with administrator permissions can execute commands and access all the critical elements on the server. There has been, however, another change made, long time requested by users. In the new version all the administrator specific elements are hidden for the rest of users.
Server components don’t show up on the service discovery, the user can’t see administrator commands nor he can execute them. This hasn’t been implemented to improve the server security but to reduce confusion for general users who would otherwise see a lot of stuff which can’t be used by them anyway.
9.12.3. Tigase and Python
As I mentioned in one of previous articles, Tigase supports virtually any scripting language as long as there is JSR-223 support for that language.
This article describes how to get Python working as a scripting language for ad-hoc commands in Tigase server. The first part is installation, and the second shows a few code examples with explanation of the differences between Python usage and some other languages.
Please note, we are not a Python developer, and by no means this is Python development guide. All the code examples are used only to present the API available and there are certainly better ways to do it in the proper Python style. If you have any suggestions or have a better code examples I am happy to include them in the guide.
Installation
In short, installation is extremely simple: just copy the file attached to this article to your Tigase installation, to the libs/ directory. Restart the server and you are ready to start scripting and executing Python.
In theory the Tigase offers scripting support defined in JSR-223. You can use any language for which there is such support for JVM. This includes also stand-alone python implementations and the JSR-223 plugins acts just as a bridge. This, however, does not make much sense as you are not able to interact with JVM code (Tigase API). Therefore you need a language which is executed within JVM and can easily exchange data between the main application (Tigase server) and the script.
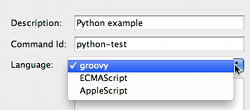
The best way to go is to use Jython implementation. It works very well within JVM and more importantly, perfectly integrates with Tigase server. Tigase server is tested with Jython-2.2.1 and is confirmed to work fine. Version Jython-2.5.1 is recommended however, and all the examples are executed with this version installed. Please note, Jython-2.5.0 does not work at all. Both supported versions can be downloaded from the Jython website.
Version 2.5.1 is a bit simpler to install. When you download and run the Jython installer, find jython.jar file in the directory where you installed Jython. Copy the file to the Tigase’s libs/ directory and all is ready to go. Please note, this is the same file as the one attached to this article for your convenience.
Version 2.2.1 needs a little bit more work. The first part is the same. It is not, however enough to copy the jython.jar file. One more file is necessary for the Jython to work with the Tigase server. You have to install JSR-223 engine separately which can be downloaded from the Java scripting project website. The binary file has to be unpacked and jython-engine.jar file needs to be copied to the Tigase libs/ directory.
The best way to check if the Jython is installed correctly and support for Python is enabled, is by trying to submit a new script to the Tigase server. Browser the server service discovery, select "Session manager" component and run "Execute command" function. A new window should show with a list of all available ad-hoc commands. Select "New command script" item and click "Execute". Ad-hoc command dialog windows should show up. One of the field is "Language" with pull down list of available scripting languages. If "python" is on the list it means everything is ok and support for Python is enabled.
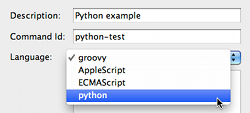
Writing Python Scripts
Python scripts work in a similar way to Groovy or other languages scripts, except one significant difference. You cannot call "return" from the script itself. Hence you cannot simply pass script results by calling "return" statement directly from the script.
To overcome the problem, Tigase offers another way to pass script execution results. It checks the value of a special variables on the script completion: "result" and "packet". By assigning value to one of these variables the Python (or any other language) can pass execution results back to the Tigase server.
-
"result" allows to return simple text (or characters String) from the script.
-
"packet" allows to return Packet instance which is send back to the user.
The simplest possible Python script may look like this one:
result = "Hello world!"
For instructions how to load and execute the script, please refer to the introductory article for scripting in Tigase server. There were some minor changes in Tigase 4.4.0 and later versions, so please have a look at the article describing new elements as well.
An example of a more advanced script asks the user for providing required parameters for the actual script execution:
from java.lang import *
from tigase.server import *
num1 = Command.getFieldValue(packet, "num1")
num2 = Command.getFieldValue(packet, "num2")
if num1 is None or num2 is None:
res = Iq.commandResultForm(packet)
Command.addTextField(res, "Note", "This is a Python script!")
Command.addFieldValue(res, "num1", "")
Command.addFieldValue(res, "num2", "")
packet = res
else:
result = num1 + num2Except this minor difference, the rest part of scripting in Python for the Tigase administrator commands is the same as all other languages. As all languages can return execution results via these special variables, it could be argued there is no difference at all.
In another article, I am going to present the Tigase server API available for scripting framework. My main language is Groovy as it offers the best integration with JVM and Tigase API, however I will try to include Python example code as well.
I hope this article encourages you to try the scripting support in the Tigase server. If you have any suggestions or questions please do not hesitate to send me your comments. I have also created a new tigase scripts forum on the website. If you have an interesting script to share or want to discuss some aspects of this functionality do not hesitate to add your post.
-
jython-2.5.1.jar 6.44 MB
9.13. Configuration Wizards
From build #247 you can use configuration generators to easily and quickly create configuration files for every complex case.
Configuring Tigase is not too easy to understand and maintain. Even with current command line tools you still have to know what the all options are for.
To make it easier for average administrators or people who run the server for the first time or even for those who want to quickly test Tigase server in different scenarios configuration generators have been created. For each generator you can have also a few extra options which allows you to create configuration which you don’t need to change for some time.
A few definitions first to make it easier to read the rest:
-
sm - session manager component.
-
c2s - client connection manager component
-
s2s - server connection manager component
-
ext2s - external component connection manager
-
ssender - StanzaSender component
The are 4 generators currently available:
-
--gen-config-all - creating configuration file with all available components. That is: sm, c2s, s2s, ext2s, ssender.
-
--gen-config-default - creating default configuration file. That is configuration which is most likely needed for basic installation. Components included in configuration are: sm, c2s, s2s.
-
--gen-config-sm - creating configuration for instance with session manager and external component only. This is useful for distributed installation where you want to have session manager installed on separate machine and components managing network connections on different machines (one or more). Components included in configuration are: sm and ext2s.
-
--gen-config-cs - creating configuration for instance with components managing network connections. This is useful for distributed installation where you want to have session manager installed on separate machine and components managing network connections on different machines (one or more). Components included in configuration are: c2s, s2s, ext2s.
For each of above generators you can use additional parameters specifying other configuration details like database type you want to connect to, virtual hosts you want to support, administrator accounts and details for external component connection:
-
--user-db db-type - where 'db-type' can be one of possible values: mysql, pgsql, xml
-
--user-db-uri connection-uri - where 'connection-uri' is a full resource uri for user repository data source. If you skip this parameter default value is used depending on database type you selected:
-- jdbc:mysql://localhost/tigase?user=root&password=mypass -- jdbc:postgresql://localhost/tigase?user=tigase -- user-repository.xml
-
--auth-db db-type - where 'db-type' can be one of possible values: mysql, pgsql, xml, drupal, libresource (If omitted 'user-db' settings are used.)
-
--auth-db-uri connection-uri - where 'connection-uri' is a full resource uri for user repository data source. (If omitted 'user-db-uri' settings are used.)
-
--ext-comp connection-string - possible values: connection string 'localdomain,remotedomain,port,passwd,plain/ssl,accept/connect,routing'
Note: It is also possible to generate configuration for many external components. To do so place --ext-comp_1 'parameters' --ext-comp_2 'parameters' and so on…
-
--virt-hosts virtual-hosts-list - possible values: list of virtual domains to support 'domain1,domain2'. This option causes to use virtual hosts given here instead of default/automatically detected host names.
-
--admins admin-accounts-list - possible values: list of admin accounts: 'user1@domain,user2@domain2'
-
--test - this parameter informs that config is generated for test instance, which means that all loggings are turned off
-
--debug tigase-package - you can turn on debugs log for thwe selected tigase package. For example if you want to turn debug logs on for package: tigase.server then you have to put parameter: --debug server. If you have any problems with your server the best way to get help from me is to generate configuration with --debug server and run the server. Then from the logs/tigase-console.log log file I can get all information I need to give you a help.
Note! If configuration file already exists none of existing settings are overwritten. Configuration generator is activated only if config file does not exist at program startup or for config entries which are missing at startup time. So you can as well leave these settings in the file.
Note! tigase.conf property file is NOT read by the tigase server. These properties are read by the bash shell to create a proper Tigase server startup command. It will not work on MS Windows unless you run it in bash (using CygWin for example). On windows however you can use configuration wizards too by preparing proper server startup command manually. For example command for the first below presented conf file would look like (all in single line):
java -Djdbc.drivers=org.postgresql.Driver
-Dfile.encoding=UTF-8 -Dsun.jnu.encoding=UTF-8
-server -Xms100M -Xmx100M
-cp "libs/pg73jdbc3.jar;jars/tigase-server.jar;libs/tigase-xmltools.jar;libs/tigase-utils.jar"
tigase.server.XMPPServer
-c "etc/tigase.xml"
--gen-config-def --user-db pgsql
--user-db-uri "jdbc:postgresql://localhost/tigase?user=tigase"So for example to take advantage of these options you can create tigase.conf and start Tigase server with usual command to generate ''tigase-config.xml'' configuration file:
./bin/tigase.sh run tigase.confA few sample files are included below for your convenience:
-
tigase-def-pgsql.conf - default installation with PostgreSQL database support:
ENC="-Dfile.encoding=UTF-8 -Dsun.jnu.encoding=UTF-8" DRV="-Djdbc.drivers=org.postgresql.Driver" JAVA_OPTIONS="${ENC} ${DRV} -server -Xms100M -Xmx100M " TIGASE_CONFIG="tigase-pgsql.xml" TIGASE_OPTIONS="--gen-config-def --user-db pgsql --user-db-uri jdbc:postgresql://localhost/tigase?user=tigase "ENC="-Dfile.encoding=UTF-8 -Dsun.jnu.encoding=UTF-8" DRV="-Djdbc.drivers=org.postgresql.Driver" JAVA_OPTIONS="${ENC} ${DRV} -server -Xms100M -Xmx100M " TIGASE_CONFIG="tigase-pgsql.xml" TIGASE_OPTIONS="--gen-config-def --user-db pgsql " -
tigase-cs.conf - installation of network connections management components (no DB is used by this instance):
ENC="-Dfile.encoding=UTF-8 -Dsun.jnu.encoding=UTF-8" JAVA_OPTIONS="${ENC} -server -Xms100M -Xmx100M " TIGASE_CONFIG="etc/tigase-cs.xml" TIGASE_OPTIONS="--gen-config-cs --virt-hosts cs.tigase.org,tigase.org,sm.tigase.org \ --ext-comp cs.tigase.org,sm.tigase.org,5678,very-secret,plain,connect" -
tigase-sm-mysql.conf - installation of session manager instance and resource connection string is the same as default so we can skip '--user-db-uri' parameter:
ENC="-Dfile.encoding=UTF-8 -Dsun.jnu.encoding=UTF-8" DRV="-Djdbc.drivers=com.mysql.jdbc.Driver" JAVA_OPTIONS="${ENC} ${DRV} -server -Xms100M -Xmx100M " TIGASE_CONFIG="etc/tigase-sm-mysql.xml" TIGASE_OPTIONS="--gen-config-sm --user-db mysql --auth-db mysql --virt-hosts tigase.org,sm.tigase.org \ --ext-comp sm.tigase.org,cs.tigase.org,5678,very-secret,plain,accept"
9.14. Offline Messages
Tigase like any XMPP server supports storing of messages for users who are offline so that they may receive messages sent to them while they were not logged in.
By default, Tigase MessageAmp processor is responsible for storing offline messages, and will automatically store offline messages. This guide has multiple sections for setting limits globally, per user, and others.
Many of the features listed here require the use of the Advanced Message Processor Plugin which is turned on by default. To ensure AMP is turned on your system, view your init.properties file and be sure the following is there in your plugins line:
--sm-plugins=+ampMessages will be delivered to intended recipients when they first login after roster exchange.
9.14.1. Offline Message Limits
Support for limiting number of stored offline messages on a per-user basis has now been added to Tigase as of v7.1.0. By default, Tigase comes with a limit of stored offline messages which is set for every user. This limit by default is 100 offline messages for barejid-barejid pair. This value can be changed by the store-limit property. To change to 200 messages on barejid-barejid paid, add the following entries to the init.properties file:
sess-man/plugins-conf/amp/store-limit[L]=200
amp/store-limit[L]=200This setting applies to every user.
User Limit
Each user is able to configure the number of offline messages which should be stored for him. To enable this feature, the following lines need to be entered into the init.properties file:
sess-man/plugins-conf/amp/user-store-limit-enable[B]=true
amp/user-store-limit-enable[B]=trueValues of user-specific limits will be stored in UserRepository under subnode of offline-msgs and key store-limit. Data storage will be stored in tig_pairs key with the value and a proper record from tig_nodes points to this record.
Handling of Offline Messages Exceeding Limits
There are two possible ways to handle offline messages that exceed the limitations: . error sending message with error type back to sender. . drop drop of message without notifications to sender.
By default, Tigase sends a message back to the original sender with an error type of service-unavailable with a proper description of error according to XEP-0160. However, it is possible to change this behavior to better suit your needs. This is done by adding the following line to your init.properties file.
sess-man/plugins-conf/amp/quota-exceeded=dropThis will force Tigase to drop packets that exceed the offline message limit.
Setting of Limits by User
Users wishing to set a custom limit of stored offline messages for barejid-barejid pairs needs to send the following XMPP stanza to the server:
<iq type="set" id="${random-id}">
<msgoffline xmlns="msgoffline" limit="${limit}"/>
</iq>Where: . ${random-id} is a random ID of the stanza (can be any string). . ${limit} is the integer value of the offline message limit. This can be set to false to disable offline message limits.
In response, the server will send back an iq stanza with a result type:
<iq type="result" id="${random-id}">
<msgoffline xmlns="msgoffline" limit="${limit}"/>
</iq>9.14.2. Storing offline messages without body content
Tigase can now store offline messages without <body/> content.
See XEP-0334 for protocol details.
This can include message receipts, and messages with specific do-not-store tags.
Support has been added to set a list of paths and xmlns to trigger and place storage of offline messages using the following settings in init.properties:
sess-man/plugins-conf/amp/msg-store-offline-paths[s]=/message/received[urn:xmpp:receipts],/message/store-offline
This example results in two settings:
/message/received[urn:xmpp:receipts]
Results in storage of messages with a recieved subelement and with the xlmns set to urn:xmpp:receipts
/message/store-offline
Results in storing messages with a store-offline subelement without checking xmlns.
Filtering of offline storage
It is possible to set storage of other types to save:
sess-man/plugins-conf/amp/msg-store-offline-paths[s]=/message/store-offline,-/message/do-not-storeThe above setting in the init.properties file will do three things: - Messages with <store-offline> subelement will be stored without checking for associated xmlns. - Messages with <do-not-store> element will not be saved.
Any of these can be adjusted for your installation, remember that a '-' will stop storage of messages with the indicated property. Messages will be checked by these matchers and if any of them result in a positive they will override default settings.
For example, if you wanted to store messages with <received> element, but not ones with <plain> element, your filter will look like this:
sess-man/plugins-conf/amp/msg-store-offline-paths[s]=/message/received,-/message/plainHowever….
|
Note
|
THE ABOVE STATEMENT WILL NOT WORK As it will just store all messages with <receieved> subelement. |
The below statement will properly filter your results.
sess-man/plugins-conf/amp/msg-store-offline-paths[s]=-/message/plain,/message/receivedFiltering logic is done in order from left to right. Matches on the first statement will ignore or override matches listed afterwards.
9.15. Licensing
With the release of v7.1.0, users and commercial clients alike may now be able to register and request a license file from our servers on their own. This process makes it easier for everyone to obtain valid licence file when needed. Users who do not wish to register will not be required to register. However, If you are using Tigase ACS or other commercial pieces of software, you will be required to register.
|
Warning
|
Tigase XMPP Server will shut down during license check if no installation-id or licence is received within a given period of time. |
Again, Tigase XMPP Server will still be available free under AGPLv3, and free users will not need to register.
|
Note
|
COMMERCIAL COMPONENTS REQUIRE THE USE OF A LICENSE. |
9.15.1. Registering for a License
There are currently two ways for registering for a license with Tigase commercial products. The easiest and recommended method is using the built in automatic registration function. However, you may also register via a web portal if your installation has limitations on network connectivity.
Automatic Registration
Once a commercial component is activated on Tigase XMPP Server, the program will then retrieve an Installation ID from our servers, and make a file called installation-id in your etc/ directory including the Installation ID for your instance. An installation ID is generated using the complete cluster map and all machines within the same cluster should have the same Installation ID.
This Installation ID will then be sent along with server details to a license server, and appropriate licence files will be made in your tigasedir/etc directory. When the licence is due to be expired, this mechanism will update your licence file automatically.
Web Portal
If you do not wish to use the automatic method, you may decide to generate a licence file using our web portal. Offline installation may obtain Installation IDs from our web portal in a three-step process: registration, generating hash, and obtaining licence file.
Generating Installation ID
For offline installations, you may obtain an Installation ID from this address: https://license.tigase.software/register.
Data Fields:
-
Customer name: Company or user name used to identify machines. Multiple clusters or servers can have the same customer name. -
VHosts: Comma separated list of VHosts you will be using on this node. NOTE: these fields are case sensitive! -
Legacy license hashes: Copy the digest hash generated for all legacy licences - it’s available in theetc/tigase-console.logafter startup (if such licences are present). -
Captcha question: Enter the basic math answer for this form to prove you are not a robot.
The next page will provide you with an installation ID like the following:
1TCICGG7K8AS2JSSEVMDA9QOLR4NVLJSR
Edit your init.properties file and add your installation-id
--installation-id=1TCICGG7K8AS2JSSEVMDA9QOLR4NVLJSRNote that the installation-id file will be made automatically once the license file is installed and verified by the server.
Obtaining a Server Code
Once you have the Installation ID, you will need to generate a server code. This can be done by accessing the admin UI page and navigating to the Licence section. Once there, click on Retrieve code for licence. Select the component you wish to generate a code for and click Submit. You will see a fields with installation-id, module, VHosts filled out based on your server’s configuration. Copy the contents of the Code field and proceed to the next section.
Obtaining license file
Open a new browser and navigate to this address: https://license.tigase.software/retrieve once there, paste the generated code from the last step in the field and click submit. Afterwards you will be prompted to download a license file, place this file in your etc/ folder and restart your server, your license is now activated and installed on your server.
If you are provided a manually produced license, you will need to place it in the same etc/ directory with the name license.acs
9.15.2. What happens if I do not use a license file or it is expired?
Tigase permits commercial products to be used without a license, but a validation process must complete otherwise the server will shutdown. Within the first hour of runtime, Tigase will check for the presence and validity of the license file. If none is found, or it is invalid or expired the server will then contact Tigase master server in order to obtain a valid one.
Communications will be made to license.tigase.software over https (port 443) to verify the license or download a new one.
9.15.3. Demo mode
If no valid license can be found, Tigase will revert to a demonstration mode. Most functions will be available and usable, but with a caveat. Statistics from that server will be sent to stats.tigase.software over port 8080 about your server and it’s usage. Details are in the next section. If this information cannot be sent, the server will assume unathorized use and will shut down.
Statistics Sent
Statistics of your server may be sent to Tigase server’s if the all of following happens:
-
You are using commercial Tigase components.
-
You have registered an installation-id.
-
You do not have a current license to run Tigase commercial components.
If these conditions exist, statistics will be sent to our servers and a warning will be posted in your logs. The following is an example of what information will be sent.
|
Note
|
The text below has been better formatted for readability, but does not reflect the actual text being sent to Tigase. |
<statistics version="1">
<domain>xmppserver</domain>
<timestamp>2016-06-23T17:16:24.777-0700</timestamp>
<vhosts>
<item>vhost1.xmppserver.com</item>
</vhosts>
<uptime>308833</uptime>
<heap>
<used>30924376</used>
<max>1426063360</max>
</heap>
<cluster>
<nodes_count>1</nodes_count>
</cluster>
<users>
<online>0</online>
<active>0</active>
<max_today>1</max_today>
<max_yesterday>0</max_yesterday>
</users>
<additional_data>
<components>
<cmpInfo>
<name>amp</name>
<title>Tigase XMPP Server</title>
<version>7.1.0-SNAPSHOT-b4226/5e7210f6 (2016-06-01/23:15:52)</version>
<class>tigase.cluster.AmpComponentClustered</class>
</cmpInfo>
<cmpInfo>
<name>bosh</name>
<title>Tigase XMPP Server</title>
<version>7.1.0-SNAPSHOT-b4226/5e7210f6 (2016-06-01/23:15:52)</version>
<class>tigase.cluster.BoshConnectionClustered</class>
</cmpInfo>
<cmpInfo>
<name>c2s</name>
<title>Tigase XMPP Server</title>
<version>7.1.0-SNAPSHOT-b4226/5e7210f6 (2016-06-01/23:15:52)</version>
<class>tigase.cluster.ClientConnectionClustered</class>
</cmpInfo>
<cmpInfo>
<name>cl-comp</name>
<title>Tigase XMPP Server</title>
<version>7.1.0-SNAPSHOT-b4226/5e7210f6 (2016-06-01/23:15:52)</version>
<class>tigase.cluster.ClusterConnectionManager</class>
</cmpInfo>
<cmpInfo>
<name>eventbus</name>
<title>Tigase XMPP Server</title>
<version>7.1.0-SNAPSHOT-b4226/5e7210f6 (2016-06-01/23:15:52)</version>
<class>tigase.disteventbus.component.EventBusComponent</class>
</cmpInfo>
<cmpInfo>
<name>http</name>
<title>Tigase HTTP API component: Tigase HTTP API component</title>
<version>1.2.0-SNAPSHOT-b135/27310f9b-7.1.0-SNAPSHOT-b4226/5e7210f6 (2016-06-01/23:15:52)</version>
<class>tigase.http.HttpMessageReceiver</class>
</cmpInfo>
<cmpInfo>
<name>monitor</name>
<title>Tigase XMPP Server</title>
<version>7.1.0-SNAPSHOT-b4226/5e7210f6 (2016-06-01/23:15:52)</version>
<class>tigase.monitor.MonitorComponent</class>
</cmpInfo>
<cmpInfo>
<name>muc</name>
<title>Tigase ACS - MUC Component</title>
<version>1.2.0-SNAPSHOT-b62/74afbb91-2.4.0-SNAPSHOT-b425/d2e26014</version>
<class>tigase.muc.cluster.MUCComponentClustered</class>
<cmpData>
<MUCClusteringStrategy>class tigase.muc.cluster.ShardingStrategy</MUCClusteringStrategy>
</cmpData>
</cmpInfo>
<cmpInfo>
<name>pubsub</name>
<title>Tigase ACS - PubSub Component</title>
<version>1.2.0-SNAPSHOT-b65/1c802a4c-3.2.0-SNAPSHOT-b524/892f867f</version>
<class>tigase.pubsub.cluster.PubSubComponentClustered</class>
<cmpData>
<PubSubClusteringStrategy>class tigase.pubsub.cluster.PartitionedStrategy</PubSubClusteringStrategy>
</cmpData>
</cmpInfo>
<cmpInfo>
<name>s2s</name>
<title>Tigase XMPP Server</title>
<version>7.1.0-SNAPSHOT-b4226/5e7210f6 (2016-06-01/23:15:52)</version>
<class>tigase.server.xmppserver.S2SConnectionManager</class>
</cmpInfo>
<cmpInfo>
<name>sess-man</name>
<title>Tigase XMPP Server</title>
<version>7.1.0-SNAPSHOT-b4226/5e7210f6 (2016-06-01/23:15:52)</version>
<class>tigase.cluster.SessionManagerClustered</class>
<cmpData>
<ClusteringStrategy>class tigase.server.cluster.strategy.OnlineUsersCachingStrategy</ClusteringStrategy>
</cmpData>
</cmpInfo>
<cmpInfo>
<name>ws2s</name>
<title>Tigase XMPP Server</title>
<version>7.1.0-SNAPSHOT-b4226/5e7210f6 (2016-06-01/23:15:52)</version>
<class>tigase.cluster.WebSocketClientConnectionClustered</class>
</cmpInfo>
<cmpInfo>
<name>vhost-man</name>
<title>Tigase XMPP Server</title>
<version>7.1.0-SNAPSHOT-b4226/5e7210f6 (2016-06-01/23:15:52)</version>
<class>tigase.vhosts.VHostManager</class>
</cmpInfo>
<cmpInfo>
<name>stats</name>
<title>Tigase XMPP Server</title>
<version>7.1.0-SNAPSHOT-b4226/5e7210f6 (2016-06-01/23:15:52)</version>
<class>tigase.stats.StatisticsCollector</class>
</cmpInfo>
<cmpInfo>
<name>cluster-contr</name>
<title>Tigase XMPP Server</title>
<version>7.1.0-SNAPSHOT-b4226/5e7210f6 (2016-06-01/23:15:52)</version>
<class>tigase.cluster.ClusterController</class>
</cmpInfo>
</components>
<unlicencedComponenents>
<ComponentAdditionalInfo name="acs"/>
</unlicencedComponenents>
</additional_data>
</statistics>9.15.4. Unauthorized use
If Tigase XMPP server does not have a valid license file, cannot contact the licensing server to obtain installation id and attached licences, or is unable to sent statistics the server will initiate retries. If these retries are not successful after a random amount of time and 10 tries, the server will then shutdown.
If you are experiencing this in error, please contact Tigase.
9.15.5. Manual mode
If you cannot open communication to stats.tigase.software or license.tigase.software over the required ports, you may request to use manual mode. Manual mode requires Tigase to create a license file to be used on your machine locally. This must be placed in the same folder as the above information, and the license check system will not seek communication unless the license is invalid or expired.
9.16. Tigase Advanced Options
This section is designed to include a number of advanced configuration options available within Tigase, but may not have a relevant section yet to house them.
9.16.1. Enabling Support for storing offline messages without body content
Tigase now supports the full implementation or XEP-0334, See XEP-0334 for protocol details.
This can be customized by setting a list of paths and xmlns to trigger and place storage of offline messages using the following settings in init.properties:
sess-man/plugins-conf/amp/msg-store-offline-paths[s]=/message/received[urn:xmpp:receipts],/message/store-offline
This will require the enabling of AMP plugin, so be sure --sm-plugins=+amp is enabled.
9.16.2. Enabling Empty Nicknames
Tigase can now support users with empty nicknames. This can be enabled by adding the following code is in init.properties.
sess-man/plugins-conf/jabber\:iq\:roster/empty_name_enabled=true
9.16.3. Account Registration Limits
In order to protect Tigase servers from DOS attacks, a limit on number of account registrations per second has been implemented. This may be configured by adding the following line in the init.properties file:
sess-man/plugins-conf/jabber\:iq\:register/registrations-per-second=10
This setting allows for 10 registrations from a single IP per second. If the limit is exceeded, a NOT_ALLOWED error will be returned.
9.16.4. Enable Silent Ignore on Packets Delivered to Unavailable Resources
You can now have Tigase ignore packets delivered to unavailable resources to avoid having a packet bounce around and create unnecessary traffic. You may set this globally, within standard message handling only, or within the AMP component using the following settings:
Globally:
sess-man/plugins-conf/silently-ignore-message=trueMessage Processing Only:
sess-man/plugins-conf/message/silently-ignore-message=trueAMP Component:
sess-man/plugins-conf/amp/silently-ignore-message=true9.16.5. Mechanism to count errors within Tigase
A new processor within statistics has been added to count the number of errors that Tigase returns. This processor, named error-counter, will count all errors returned by Tigase, however by default the number is always zero if it is not enabled. It can be found as an MBean object in JMX under ErrorStatistics and contains values for packets with ERROR and grouped by type. To enable counting of these errors, you must ensure the processor is included in your --sm-plugins:
--sm-plugins=error-counterIncluding stream errors
Stream ERROR packets are not included in the above counter by default as they are processed separately. To enable this to be added to the counter, the following line must be in your init.properties file.
c2s/processors[s]=stream-error-counterStream resumption default & max-timeout
SteamManagementIOProcessor now has a setting that can be used to change the maximum timeout time it will wait for reconnection if a client does not send a time to wait. Two settings are now available:
c2s/processors/urn\:xmpp\:sm\:3/resumption-timeout[I]=90The above setting in init.properties file will change the default timeout period to 90 seconds.
c2s/processors/urn\:xmpp\:sm\:3/max-resumption-timeout[I]=900This setting will set the maximum time allowed for stream resumption to 900 seconds. This can be handy if you expect a number of mobile phones to connect to your server and want to avoid duplicate messages being sent back and forth.
You may setup a server to automatically approve presence subscriptions or roster authorizations for all users. Say you were hosting bots and wanted to automate the process. This can be done with the following settings:
sess-man/plugins-conf/jabber\:iq\:roster/auto-authorize=true
sess-man/plugins-conf/presence/auto-authorize=trueBoth of these settings are false by default, and you may use them together or separately. The following behavior is followed when they are both activated:
-
Upon sending a subscription request - Both contacts will each others' subscription and be added to each others' roster. Presence information will immediately be exchanged between both parties.
-
Upon sending presence with type either unsubscribe or unsubscribed follows the rules defined in RFC regarding processing of these stanzas (i.e. adjusting subscription type of user/contact), but without forwarding those stanzas to the receiving entity to avoid any notifications to the client. However, a roster push is generated to reflect changes to presence in user roster in a seamless manner.
-
Simply adding an item to the roster (i.e. with <iq/> stanza with correct semantics) will also cause an automatic subscription between the user and the contact in a matter explained above.
9.17. Tigase Clustering
Tigase Clustering allows the use of a number of servers to be unified in delivering, from what a client or user sees, a single unified platform. There are two typical reasons why clustering should be employed:
-
High Availability
By using clustering, services can be provided with a high reliability and redundancy. By using a network of multiple servers, content or services can be served on any of the clustered servers maintaining a consistent uptime without relying on one machine.
-
Load Balancing
This type of cluster helps to distribute a workload over a number of servers to reduce bottlenecking from heavy resource loads on a particular server.
With Tigase, you don’t have to choose between either/or!
Tigase Clustering offers Full Redundancy and Automatic Load Balancing allowing addition of new nodes at runtime with a simple configuration. All without a severe tax on resource consumption.
All basic components support clustering configuration, and some may be turned on or off.
9.17.1. Configuration
To enable Clustering on Tigase servers, use the following line in your init.properties file:
--cluster-mode=trueThat’s it!
Custom Ports
You can customize ports for the cluster component, just be sure that each clustered server also has the same settings so they can communicate.
--cl-comp-ports=4250,3540You can fine tune each port configuration, however this is not typically needed.
Custom Port Configuration
Each port has it’s own details that can be manipulated VIA the following ports. Again THIS IS OPTIONAL
cl-comp/connections/4250/type[S]=accept
cl-comp/connections/4250/socket[S]=plain
cl-comp/connections/4250/ifc[s]=*
cl-comp/connections/4250/remote-host[S]=localhost
cl-comp/connections/4250/connections/tls/required[B]=falseMulti-node configuration
Each node should have --cluster-mode=true enabled that you wish to connect to the cluster. They will automatically discover other nodes to connect to VIA Server to Server traffic. Nodes that are added or removed will be periodically updated.
Traffic Control
You can customize the traffic going between clustered servers with a few options.
cm-ht-traffic-throttling
This setting will control the number of bytes sent over non-user connections. Namely, Server to Server or S2S connections.
--cm-ht-traffic-throttling=xmpp:25k:0:disc,bin:200m:0:discThe format is as follows: {traffic-type}:{maximum-traffic}:{max-lifespan-traffic}:{action} - traffic-type Specifies the type of traffic controlled. This can either be XMPP or bin. XMPP limits the number of packets transferred, whereas bin limits the number of bytes transferred. - maximum-traffic Specifies how many bytes or packets may be sent within one minute. - max-lifespan-traffic Specifies how many bytes or packets may be sent within the lifetime of the connection. 0 means unlimited. - action Specifies the action to be taken which can be disc which disconnects the connection, or drop which will drop any data exceeding the thresholds.
cm-see-other-host
This allows the specific use of a load balancing mechanism by selecting SeeOtherHostIfc implementation. For more details, see Tigase Load Balancing documentation.
9.17.2. Old configuration method
While these options are still available these settings CAN be less reliable. Use ONLY if you need specific setups that cannot be accommodated by the automatic cluster mode.
9.17.3. Checking Cluster Connections
After setting up clustering you may want to verify that the clusters are operational. Right now it can be done in two manners - first by checking that there are actual network connections established between cluster nodes. The other is to check internal status of the server.
Established connections
There are number of ways to check for opened connections, simplest one use command line. (Tigase uses port 5277 for cluster connections)
-
Linux
$ lsof -iTCP:5277 -sTCP:ESTABLISHED -P -n
-
Windows
C:\WINNT>netstat -anp tcp | find ":5277 "
Cluster nodes connected (using XMPP)
Verifying clustering connectivity over XMPP protocol requires any XMPP client capable of XEP-0030: Service Discovery. It’s essential to remember that only an administrator (a user whose JID is configured as administrative) has access.
Psi XMPP Client
For the purpose of this guide a Psi client will be used. After successfully configuring and connecting to account with administrative privileges we need to access Service Discovery, either from application menu or from context menu of the particular account account:
In the Service Discovery window we need to find Cluster Connection Manager component. After expanding the tree node for the component a list of all cluster nodes will be presented with the current status (either connected or disconnected). Node column will contain actual hostname of the cluster node:

9.18. Anonymous Users & Authentication
To support anonymous users, you must first enable anonymous authentication on your server.
9.18.1. Anonymous Authentication
Tigase Sevrer can support anonymous logins VIA SASL-ANONYMOUS in certain scenarios. This can be enabled by using the following setting in init.properties file: --vhost-anonymous-enabled=true This setting is false by default as SASL-ANONYMOUS may not be totally secure as users can connect without prior permission (username and password). This is a global setting and will affect all vhosts unless they are set individually. If you wish to allow only certain hosts to allow anonymous login, then use the --virt-hosts configuration like below:
--virt-hosts=domain1:-anon, domain2:c2s-ports-allowed=5032:-tls-requiredWhere domain1 now has anonymous access allowed, and domain2 does not.
9.18.2. Anonymous User Features
To connect to your server anonymously, you must use a client that supports anonymous authentication and users. Connect to the server with the name of the server as the username, and no password. For example, to connect anonymously to xmpp.example.com use the following credentials,
Username: xmpp.example.com Password:
In this mode all login information is stored in memory, and cannot be retrieved at a later date.
Other features of Anonymous Authentication - Temporary Jid is assigned and destroyed the moment of login/logout. - Anonymous users cannot access the database - Anonymous users cannot communicate outside the server (use s2s connections) - Anonymous users have a default limit on traffic generated per user.
Reconnection on Anonymous
On products such as our JaXMPP Server, users connected using SASL-ANONYMOUS can reconnect to existing sessions using cookie management. However, reconnection can be improved and extended using Bosh Session Cache which allows for session storage in memory rather than using client-side data for reconnection.