A component in the Tigase is an entity with its own JID address. It can receive packets, process them, and can also generate packets.
An example of the best known components is MUC or PubSub. In Tigase however, almost everything is actually a component: Session Manager, s2s connections manager, Message Router, etc… Components are loaded based on the server configuration, new components can be loaded and activated at run-time. You can easily replace a component implementation and the only change to make is a class name in the configuration entry.
Creating components for Tigase server is an essential part of the server development hence there is a lot of useful API and ready to use code available. This guide should help you to get familiar with the API and how to quickly and efficiently create your own component implementations.
- Component implementation - Lesson 1 - Basics
- Component implementation - Lesson 2 - Configuration
- Component implementation - Lesson 3 - Multi-Threading
- Component implementation - Lesson 4 - Service Discovery
- Component implementation - Lesson 5 - Statistics
- Component implementation - Lesson 6 - Scripting Support
- Component implementation - Lesson 7 - Data Repository
- Component implementation - Lesson 8 - Startup Time
- Configuration API
- Packet Filtering in Component
Creating a Tigase component is actually very simple and with broad API available you can create a powerful component with just a few lines of code. You can find detailed API description elsewhere. This series presents hands on lessons with code examples, teaching how to get desired results in the simplest possible code using existing Tigase API.
Even though all Tigase components are just implementations of the ServerComponent interface I will keep such a low level information to necessary minimum. Creating a new component based on just interfaces, while very possible, is not very effective. This guide intends to teach you how to make use of what is already there, ready to use with a minimal coding effort.
This is just the first lesson of the series where I cover basics of the component implementation.
Let’s get started and create the Tigase component:
import java.util.logging.Logger;
import tigase.component.AbstractKernelBasedComponent;
import tigase.server.Packet;

public class TestComponent extends AbstractKernelBasedComponent {

  private static final Logger log = Logger.getLogger(TestComponent.class.getName());

  @Override
  public String getComponentVersion() {
    String version = this.getClass().getPackage().getImplementationVersion();
    return version == null ? "0.0.0" : version;
  }

  @Override
  public boolean isDiscoNonAdmin() {
    return false;
  }

  @Override
  protected void registerModules(Kernel kernel) {
    // here we need to register modules responsible for processing packets
  }

}
As you can see we have 3 mandatory methods when we extends AbstractKernelBasedComponent:
- String getComponentVersion() which returns version of a component for logging purposes
- boolean isDiscoNonAdmin() which decides if component will be visible for users other that server administrators
- void registerModules(Kernel kernel) which allows you to register component modules responsible for actual processing of packets
Tip
If you decide you do not want to use modules for processing packets (even though we strongly suggest to use them, as thanks to modules components are easily extendible) you can implement one more method void processPacket(Packet packet) which will be called for every packet sent to a component. This method is actually logical as the main task for your component is processing packets.
Class name for our new component is TestComponent and we have also initialized a separated logger for this class. Doing This is very useful as it allows us to easily find log entries created by our class.
With these a few lines of code you have a fully functional Tigase component which can be loaded to the Tigase server; it can receive and process packets, shows as an element on service discovery list (for administrators only), responds to administrator ad-hoc commands, supports scripting, generates statistics, can be deployed as an external component, and a few other things.
Next important step is to create modules responsible for processing packets. For now let’s create module responsible for handling messages by appending them to log file:
@Bean(name = "test-module", parent = TestComponent.class, active = true)
public static class TestModule extends AbstractModule {

  private static final Logger log = Logger.getLogger(TestModule.class.getCanonicalName());

  private static final Criteria CRITERIA = ElementCriteria.name("message");

  @Override
  public Criteria getModuleCriteria() {
    return CRITERIA;
  }

  @Override
  public void process(Packet packet) throws ComponentException, TigaseStringprepException {
    log.finest("My packet: " + packet.toString());
  }
}
Instance of Criteria class returned by Criteria getModuleCriteria() is used by component class to decide if packet should be processed by this module or not.
In this case we returned instance which matches any packet which is a message.
And finally we have a very important method void process(Packet packet) which is main processing method of a component. If component will receive packet that matches criteria returned by module - this method will be called.
But how we can send packet from a module? AbstractModule contains method void write(Packet packet) which you can use to send packets from a component.
Before we go any further with the implementation let’s configure the component in Tigase server so it is loaded next time the server starts. Assuming our init.tdsl file looks like this one:
'config-type' = 'default'
'debug' = ['server']
'virtual-hosts' = [ 'devel.tigase.org' ]
admins = [ 'admin@devel.tigase.org' ]
dataSource {
  default () {
    uri = 'jdbc:derby:/Tigase/tigasedb'
  }
}
muc() {}
pubsub() {}
We can see that it already is configured to load two other components: MUC and PubSub. Let’s add a third - our new component to the configuration file by appending the following line in the properties file:
test(class: TestComponent) {}Now we have to restart the server.
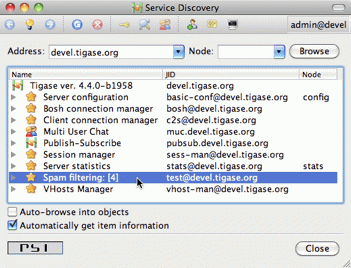
There are a few ways to check whether our component has been loaded to the server. Probably the easiest is to connect to the server from an administrator account and look at the service discovery list.
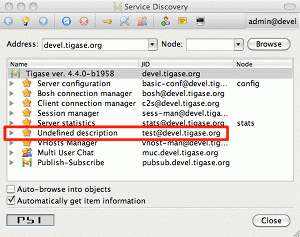
If everything goes well you should see an entry on the list similar to the highlighted one on the screenshot. The component description is "Undefined description" which is a default description and we can change it later on, the component default JID is: test@devel.tigase.org, where devel.tigase.org is the server domain and test is the component name.
Another way to find out if the component has been loaded is by looking at the log files. Getting yourself familiar with Tigase log files will be very useful thing if you plan on developing Tigase components. So let’s look at the log file logs/tigase.log.0, if the component has been loaded you should find following lines in the log:
MessageRouter.setProperties() FINER: Loading and registering message receiver: test
MessageRouter.addRouter() INFO: Adding receiver: TestComponent
MessageRouter.addComponent() INFO: Adding component: TestComponent
If your component did not load you should first check configuration files. Maybe the Tigase could not find your class at startup time. Make sure your class is in CLASSPATH or copy a JAR file with your class to Tigase jars/ directory.
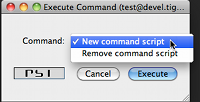
Assuming everything went well and your component is loaded by the sever and it shows on the service discovery list as on the screenshot above you can double click on it to get a window with a list of ad-hoc commands - administrator scripts. A window on the screenshot shows only two basic commands for adding and removing script which is a good start.
Moreover, you can browse the server statistics in the service discovery window to find your new test component on the list. If you click on the component it shows you a window with component statistics, very basic packets counters.
As we can see with just a few lines of code our new component is quite mighty and can do a lot of things without much effort from the developer side.
Now, the time has come to the most important question. Can our new component do something useful, that is can it receive and process XMPP packets?
Let’s try it out. Using you favorite client send a message to JID: test@devel.tigase.org (assuming your server is configured for devel.tigase.org domain). You can either use kind of XML console in your client or just send a plain message to the component JID. According to our code in process(…) method it should log our message. For this test I have sent a message with subject: "test message" and body: "this is a test". The log file should contain following entry:
TestModule.process() FINEST: My packet: to=null, from=null,
data=<message from="admin@devel.tigase.org/devel"
  to="test@devel.tigase.org" id="abcaa" xmlns="jabber:client">
  <subject>test message</subject>
  <body>this is a test</body>
</message>, XMLNS=jabber:client, priority=NORMAL
If this is a case we can be sure that everything works as expected and all we now have to do is to fill the process(…) method with some useful code.
It might be hard to tell what the first important thing you should do with your new component implementation. Different developers may have a different view on this. It seems to me however that it is always a good idea to give to your component a way to configure it and provide some runtime settings.
This guide describes how to add configuration handling to your component.
To demonstrate how to implement component configuration let’s say we want to configure which types of packets will be logged by the component. There are three possible packet types: message, presence and iq and we want to be able to configure logging of any combination of the three. Furthermore we also want to be able to configure the text which is prepended to the logged message and to optionally switch secure login. (Secure logging replaces all packet CData with text: CData size: NN to protect user privacy.)
Let’s create the following private variables in our component TestModule:
@ConfigField(desc = "Logged packet types", alias = "packet-types")
private String[] packetTypes = {"message", "presence", "iq"};
@ConfigField(desc = "Prefix", alias = "log-prepend")
private String prependText = "My packet: ";
@ConfigField(desc = "Secure logging", alias = "secure-logging")
private boolean secureLogging = false;
And this is it. Tigase Kernel will take care of this fields and will update them when configuration will change.
The syntax in config.tdsl file is very simple and is described in details in the Admin Guide. To set the configuration for your component in config.tdsl file you have to append following lines to the file inside test component configuration block:
test-module {
  log-prepend = 'My packet: '
  packet-types = [ 'message', 'presence', 'iq' ]
  secure-logging = true
}
The square brackets are used to mark that we set a list consisting of a few elements, have a look at the Admin Guide documentation for more details.
And this is the complete code of the new component module with a modified process(…) method taking advantage of configuration settings:
@Bean(name = "test-module", parent = TestComponent.class, active = true)
public static class TestModule extends AbstractModule {

  private static final Logger log = Logger.getLogger(TestModule.class.getCanonicalName());

  private Criteria CRITERIA = ElementCriteria.name("message");

  @ConfigField(desc = "Logged packet types", alias = "packet-types")
  private String[] packetTypes = {"message", "presence", "iq"};
  @ConfigField(desc = "Prefix", alias = "log-prepend")
  private String prependText = "My packet: ";
  @ConfigField(desc = "Secure logging", alias = "secure-logging")
  private boolean secureLogging = false;

  @Override
  public Criteria getModuleCriteria() {
    return CRITERIA;
  }

  public void setPacketTypes(String[] packetTypes) {
    this.packetTypes = packetTypes;
    Criteria crit = new Or();
    for (String packetType : packetTypes) {
      crit.add(ElementCriteria.name(packetType));
    }
    CRITERIA = crit;
  }

  @Override
  public void process(Packet packet) throws ComponentException, TigaseStringprepException {
    log.finest(prependText + packet.toString(secureLogging));
  }
}
Of course we can do much more useful packet processing in the process(…) method. This is just an example code.
Tip
Here we used a setter setPacketType(String[] packetTypes) which is a setter for field packetTypes. Tigase Kernel will use it instead of assigning value directly to a field which gives up opportunity to convert value to different type and update other field - in our case we updated CRITERIA field which will result in change of packet types which for which method void process(…) will be called.
Multi core and multi CPU machines are very common nowadays. Your new custom component however, processes all packets in a single thread.
This is especially important if the packet processing is CPU expensive like, for example, SPAM checking. In such a case you could experience single Core/CPU usage at 100% while other Cores/CPUs are idling. Ideally, you want your component to use all available CPUs.
Tigase API offers a very simple way to execute component’s processPacket(Packet packet) method in multiple threads. Methods int processingOutThreads() and int processingInThreads() returns number of threads assigned to the component. By default it returns just '1' as not all component implementations are prepared to process packets concurrently. By overwriting the method you can return any value you think is appropriate for the implementation. Please note, there are two methods, one is for a number of threads for incoming packets to the component and another for outgoing packets from the component. It used to be a single method but different components have different needs and the best performance can be achieved when the outgoing queues have a separate threads pool from incoming queues. Also some components only receive packets while other only send, therefore assigning an equal number of threads for both that could be a waste of resources.
Note
Due to how Kernel works you MUST avoid using variables in those methods. If you would like to have this configurable at startup time you could simply set processing-in-threads and processing-out-threads in your component’s bean configuration.
If the packet processing is CPU bound only, you normally want to have as many threads as there are CPUs available:
@Override
public int processingInThreads() {
  return Runtime.getRuntime().availableProcessors();
}
@Override
public int processingOutThreads() {
  return Runtime.getRuntime().availableProcessors();
}
If the processing is I/O bound (network or database) you probably want to have more threads to process requests. It is hard to guess the ideal number of threads right on the first try. Instead you should run a few tests to see how many threads is best for implementation of the component.
Now you have many threads for processing your packets, but there is one slight problem with this. In many cases packet order is essential. If our processPacket(…) method is executed concurrently by a few threads it is quite possible that a message sent to user can takeover the message sent earlier. Especially if the first message was large and the second was small. We can prevent this by adjusting the method responsible for packet distribution among threads.
The algorithm for packets distribution among threads is very simple:
int thread_idx = hashCodeForPacket(packet) % threads_total;
So the key here is using the hashCodeForPacket(…) method. By overwriting it we can make sure that all packets addressed to the same user will always be processed by the same thread:
@Override
public int hashCodeForPacket(Packet packet) {
  if (packet.getElemTo() != null) {
    return packet.getElemTo().hashCode();
  }
  // This should not happen, every packet must have a destination
  // address, but maybe our SPAM checker is used for checking
  // strange kind of packets too....
  if (packet.getElemFrom() != null) {
    return packet.getElemFrom().hashCode();
  }
  // If this really happens on your system you should look
  // carefully at packets arriving to your component and
  // find a better way to calculate hashCode
  return 1;
}
The above two methods give control over the number of threads assigned to the packets processing in your component and to the packet distribution among threads. This is not all Tigase API has to offer in terms of multi-threading.
Sometimes you want to perform some periodic actions. You can of course create Timer instance and load it with TimerTasks. As there might be a need for this, every level of the Class hierarchy could end-up with multiple Timer (threads in fact) objects doing similar job and using resources. There are a few methods which allow you to reuse common Timer object to perform all sorts of actions.
First, you have three methods allowing your to perform some periodic actions:
public synchronized void everySecond();
public synchronized void everyMinute();
public synchronized void everyHour();
An example implementation for periodic notifications sent to some address could look like this one:
@Override
public synchronized void everyMinute() {
  super.everyMinute();
  if ((++delayCounter) >= notificationFrequency) {
    addOutPacket(Packet.getMessage(abuseAddress, getComponentId(),
      StanzaType.chat, "Detected spam messages: " + spamCounter,
      "Spam counter", null, newPacketId("spam-")));
    delayCounter = 0;
    spamCounter = 0;
  }
}
This method sends every notificationFrequency minute a message to abuseAddress reporting how many spam messages have been detected during last period. Please note, you have to call super.everyMinute() to make sure other actions are executed as well and you have to also remember to keep processing in this method to minimum, especially if you overwrite everySecond() method.
There is also a method which allow you to schedule tasks executed at certain time, it is very similar to the java.util.Timer API. The only difference is that we are using ScheduledExecutorService as a backend which is being reused among all levels of Class hierarchy. There is a separate ScheduledExecutorService for each Class instance though, to avoid interferences between separate components:
addTimerTask(tigase.util.TimerTask task, long delay);
Here is a code of an example component and module which uses all the API discussed in this article:
Example component code.
public class TestComponent extends AbstractKernelBasedComponent {

  private static final Logger log = Logger.getLogger(TestComponent.class.getName());

  @Inject
  private TestModule testModule;

  @Override
  public synchronized void everyMinute() {
    super.everyMinute();
    testModule.everyMinute();
  }

  @Override
  public String getComponentVersion() {
  String version = this.getClass().getPackage().getImplementationVersion();
    return version == null ? "0.0.0" : version;
  }

  @Override
  public int hashCodeForPacket(Packet packet) {
    if (packet.getElemTo() != null) {
      return packet.getElemTo().hashCode();
    }
    // This should not happen, every packet must have a destination
    // address, but maybe our SPAM checker is used for checking
    // strange kind of packets too....
    if (packet.getElemFrom() != null) {
      return packet.getElemFrom().hashCode();
    }
    // If this really happens on your system you should look carefully
    // at packets arriving to your component and decide a better way
    // to calculate hashCode
    return 1;
  }

  @Override
  public boolean isDiscoNonAdmin() {
    return false;
  }

  @Override
  public int processingInThreads() {
    return Runtime.getRuntime().availableProcessors();
  }

  @Override
  public int processingOutThreads() {
    return Runtime.getRuntime().availableProcessors();
  }

  @Override
  protected void registerModules(Kernel kernel) {
    // here we need to register modules responsible for processing packets
  }

}
Example module code.
@Bean(name = "test-module", parent = TestComponent.class, active = true)
public static class TestModule extends AbstractModule {

  private static final Logger log = Logger.getLogger(TestModule.class.getCanonicalName());

  private Criteria CRITERIA = ElementCriteria.name("message");

  @ConfigField(desc = "Bad words", alias = "bad-words")
  private String[] badWords = {"word1", "word2", "word3"};
  @ConfigField(desc = "White listed addresses", alias = "white-list")
  private String[] whiteList = {"admin@localhost"};
  @ConfigField(desc = "Logged packet types", alias = "packet-types")
  private String[] packetTypes = {"message", "presence", "iq"};
  @ConfigField(desc = "Prefix", alias = "log-prepend")
  private String prependText = "Spam detected: ";
  @ConfigField(desc = "Secure logging", alias = "secure-logging")
  private boolean secureLogging = false;
  @ConfigField(desc = "Abuse notification address", alias = "abuse-address")
  private JID abuseAddress = JID.jidInstanceNS("abuse@locahost");
  @ConfigField(desc = "Frequency of notification", alias = "notification-frequency")
  private int notificationFrequency = 10;
  private int delayCounter = 0;
  private long spamCounter = 0;

  @Inject
  private TestComponent component;

  public void everyMinute() {
    if ((++delayCounter) >= notificationFrequency) {
      write(Message.getMessage(abuseAddress, component.getComponentId(), StanzaType.chat,
                               "Detected spam messages: " + spamCounter, "Spam counter", null,
                               component.newPacketId("spam-")));
      delayCounter = 0;
      spamCounter = 0;
    }
  }

  @Override
  public Criteria getModuleCriteria() {
    return CRITERIA;
  }

  public void setPacketTypes(String[] packetTypes) {
    this.packetTypes = packetTypes;
    Criteria crit = new Or();
    for (String packetType : packetTypes) {
      crit.add(ElementCriteria.name(packetType));
    }
    CRITERIA = crit;
  }

  @Override
  public void process(Packet packet) throws ComponentException, TigaseStringprepException {
    // Is this packet a message?
    if ("message" == packet.getElemName()) {
      String from = packet.getStanzaFrom().toString();
      // Is sender on the whitelist?
      if (Arrays.binarySearch(whiteList, from) < 0) {
        // The sender is not on whitelist so let's check the content
        String body = packet.getElemCDataStaticStr(Message.MESSAGE_BODY_PATH);
        if (body != null && !body.isEmpty()) {
          body = body.toLowerCase();
          for (String word : badWords) {
            if (body.contains(word)) {
              log.finest(prependText + packet.toString(secureLogging));
              ++spamCounter;
              return;
            }
          }
        }
      }
    }
    // Not a SPAM, return it for further processing
    Packet result = packet.swapFromTo();
    write(result);
  }
}
You component still shows in the service discovery list as an element with "Undefined description". It also doesn’t provide any interesting features or sub-nodes.
In this article I will show how to, in a simple way, change the basic component information presented on the service discovery list and how to add some service disco features. As a bit more advanced feature the guide will teach you about adding/removing service discovery nodes at run-time and about updating existing elements.
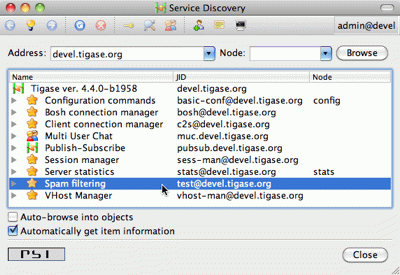
Component description and category type can be changed by overriding two following methods:
@Override
public String getDiscoDescription() {
  return "Spam filtering";
}

@Override
public String getDiscoCategoryType() {
  return "spam";
}
Please note, there is no such 'spam' category type defined in the Service Discovery Identities registry. It has been used here as a demonstration only. Please refer to the Service Discovery Identities registry document for a list of categories and types and pick the one most suitable for you.
After you have added the two above methods and restarted the server with updated code, have a look at the service discovery window. You should see something like on the screenshot.
Now let’s add method which will allow our module TestModule to return supported features. This way our component will automatically report features supported by all it’s modules.
To do so we need to implement a method String[] getFeatures() which returns array of String items. This items are used to generate a list of features supported by component.
List of features supported by all modules are retrieved during service discovery of a component by DiscoveryModule.
Although this was easy, this particular change doesn’t affect anything apart from just a visual appearance. Let’s get then to more advanced and more useful changes.
One of the limitations of methods above is that you can not update or change component information at run-time with these methods. They are called only once during initialization of a component when component service discovery information is created and prepared for later use. Sometimes, however it is useful to be able to change the service discovery during run-time.
In our simple spam filtering component let’s show how many messages have been checked out as part of the service discovery description string. Every time we receive a message we can to call:
updateServiceDiscoveryItem(getName(), null,
  getDiscoDescription() + ": [" +
  (++messagesCounter) + "]", true);
A small performance note, in some cases calling updateServiceDiscoveryItem(…) might be an expensive operation so probably a better idea would be to call the method not every time we receive a message but maybe every 100 times or so.
The first parameter is the component JID presented on the service discovery list. However, Tigase server may work for many virtual hosts so the hostname part is added by the lower level functions and we only provide the component name here. The second parameter is the service discovery node which is usually 'null' for top level disco elements. Third is the item description (which is actually called 'name' in the disco specification). The last parameter specifies if the element is visible to administrators only.
The complete method code is presented below and the screenshot above shows how the element of the service discovery for our component can change if we apply our code and send a few messages to the component.
Using the method we can also add submodes to our component element. The XMPP service discovery really is not for showing application counters, but this case it is good enough to demonstrate the API available in Tigase so we continue with presenting our counters via service discovery. This time, instead of using 'null' as a node we put some meaningful texts as in example below:
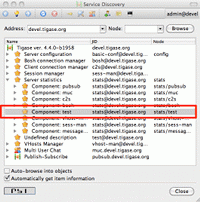
// This is called whenever a message arrives
// to the component
updateServiceDiscoveryItem(getName(), "messages",
  "Messages processed: [" + (++messagesCounter) + "]", true);
// This is called every time the component detects
// spam message
updateServiceDiscoveryItem(getName(), "spam", "Spam caught: [" +
  (++totalSpamCounter) + "]", true);
Again, have a look at the full method body below for a complete code example. Now if we send a few messages to the component and some of them are spam (contain words recognized as spam) we can browse the service discovery of the server. Your service discovery should show a list similar to the one presented on the screenshot on the left.
Of course depending on the implementation, initially there might be no sub-nodes under our component element if we call the updateServiceDiscoveryItem(…) method only when a message is processed. To make sure that sub-nodes of our component show from the very beginning you can call them in setProperties(…) for the first time to populate the service discovery with initial sub-nodes.
Please note, the updateServiceDiscoveryItem(…) method is used for adding a new item and updating existing one. There is a separate method though to remove the item:
void removeServiceDiscoveryItem(String jid,
  String node, String description)
Actually only two first parameters are important: the jid and the node which must correspond to the existing, previously created service discovery item.
There are two additional variants of the update method which give you more control over the service discovery item created. Items can be of different categories and types and can also present a set of features.
The simpler is a variant which sets a set of features for the updated service discovery item. There is a document describing existing, registered features. We are creating an example which is going to be a spam filter and there is no predefined feature for spam filtering but for purpose of this guide we can invent two feature identification strings and set it for our component. Let’s call update method with following parameters:
updateServiceDiscoveryItem(getName(), null, getDiscoDescription(),
  true, "tigase:x:spam-filter", "tigase:x:spam-reporting");
The best place to call this method is the setProperties(…) method so our component gets a proper service discovery settings at startup time. We have set two features for the component disco: tigase:x:spam-filter and tigase:x:spam-reporting. This method accepts a variable set of arguments so we can pass to it as many features as we need or following Java spec we can just pass an array of Strings.
Update your code with call presented above, and restart the server. Have a look at the service discovery for the component now.
The last functionality might be not very useful for our case of the spam filtering component, but it is for many other cases like MUC or PubSub for which it is setting proper category and type for the service discovery item. There is a document listing all currently registered service discovery identities (categories and types). Again there is entry for spam filtering. Let’s use the automation category and spam-filter type and set it for our component:
updateServiceDiscoveryItem(getName(), null, getDiscoDescription(),
  "automation", "spam-filtering", true,
  "tigase:x:spam-filter", "tigase:x:spam-reporting");
Of course all these setting can be applied to any service discovery create or update, including sub-nodes. And here is a complete code of the component:
Example component code.
public class TestComponent extends AbstractKernelBasedComponent {

  private static final Logger log = Logger.getLogger(TestComponent.class.getName());

  @Inject
  private TestModule testModule;

  @Override
  public synchronized void everyMinute() {
    super.everyMinute();
    testModule.everyMinute();
  }

  @Override
  public String getComponentVersion() {
  String version = this.getClass().getPackage().getImplementationVersion();
    return version == null ? "0.0.0" : version;
  }

  @Override
  public String getDiscoDescription() {
    return "Spam filtering";
  }

  @Override
  public String getDiscoCategoryType() {
      return "spam";
  }

  @Override
  public int hashCodeForPacket(Packet packet) {
    if (packet.getElemTo() != null) {
      return packet.getElemTo().hashCode();
    }
    // This should not happen, every packet must have a destination
    // address, but maybe our SPAM checker is used for checking
    // strange kind of packets too....
    if (packet.getElemFrom() != null) {
      return packet.getElemFrom().hashCode();
    }
    // If this really happens on your system you should look carefully
    // at packets arriving to your component and decide a better way
    // to calculate hashCode
    return 1;
  }

  @Override
  public boolean isDiscoNonAdmin() {
    return false;
  }

  @Override
  public int processingInThreads() {
    return Runtime.getRuntime().availableProcessors();
  }

  @Override
  public int processingOutThreads() {
    return Runtime.getRuntime().availableProcessors();
  }

  @Override
  protected void registerModules(Kernel kernel) {
    // here we need to register modules responsible for processing packets
    kernel.registerBean("disco").asClass(DiscoveryModule.class).exec();
  }

}
Example module code.
@Bean(name = "test-module", parent = TestComponent.class, active = true)
public static class TestModule extends AbstractModule {

  private static final Logger log = Logger.getLogger(TestModule.class.getCanonicalName());

  private Criteria CRITERIA = ElementCriteria.name("message");
  private String[] FEATURES = { "tigase:x:spam-filter", "tigase:x:spam-reporting" };

  @ConfigField(desc = "Bad words", alias = "bad-words")
  private String[] badWords = {"word1", "word2", "word3"};
  @ConfigField(desc = "White listed addresses", alias = "white-list")
  private String[] whiteList = {"admin@localhost"};
  @ConfigField(desc = "Logged packet types", alias = "packet-types")
  private String[] packetTypes = {"message", "presence", "iq"};
  @ConfigField(desc = "Prefix", alias = "log-prepend")
  private String prependText = "Spam detected: ";
  @ConfigField(desc = "Secure logging", alias = "secure-logging")
  private boolean secureLogging = false;
  @ConfigField(desc = "Abuse notification address", alias = "abuse-address")
  private JID abuseAddress = JID.jidInstanceNS("abuse@locahost");
  @ConfigField(desc = "Frequency of notification", alias = "notification-frequency")
  private int notificationFrequency = 10;
  private int delayCounter = 0;
  private long spamCounter = 0;
  private long totalSpamCounter = 0;
  private long messagesCounter = 0;


  @Inject
  private TestComponent component;

  public void everyMinute() {
    if ((++delayCounter) >= notificationFrequency) {
      write(Message.getMessage(abuseAddress, component.getComponentId(), StanzaType.chat,
                               "Detected spam messages: " + spamCounter, "Spam counter", null,
                               component.newPacketId("spam-")));
      delayCounter = 0;
      spamCounter = 0;
    }
  }

  @Override
  public String[] getFeatures() {
    return FEATURES;
  }

  @Override
  public Criteria getModuleCriteria() {
    return CRITERIA;
  }

  public void setPacketTypes(String[] packetTypes) {
    this.packetTypes = packetTypes;
    Criteria crit = new Or();
    for (String packetType : packetTypes) {
      crit.add(ElementCriteria.name(packetType));
    }
    CRITERIA = crit;
  }

  @Override
  public void process(Packet packet) throws ComponentException, TigaseStringprepException {
    // Is this packet a message?
    if ("message" == packet.getElemName()) {
      component.updateServiceDiscoveryItem(component.getName(), "messages",
                                           "Messages processed: [" + (++messagesCounter) + "]", true);
      String from = packet.getStanzaFrom().toString();
      // Is sender on the whitelist?
      if (Arrays.binarySearch(whiteList, from) < 0) {
        // The sender is not on whitelist so let's check the content
        String body = packet.getElemCDataStaticStr(Message.MESSAGE_BODY_PATH);
        if (body != null && !body.isEmpty()) {
          body = body.toLowerCase();
          for (String word : badWords) {
            if (body.contains(word)) {
              log.finest(prependText + packet.toString(secureLogging));
              ++spamCounter;
              component.updateServiceDiscoveryItem(component.getName(), "spam", "Spam caught: [" +
                                                   (++totalSpamCounter) + "]", true);
              return;
            }
          }
        }
      }
    }
    // Not a SPAM, return it for further processing
    Packet result = packet.swapFromTo();
    write(result);
  }
}
In most cases you’ll want to gather some run-time statistics from your component to see how it works, detect possible performance issues or congestion problems. All server statistics are exposed and are accessible via XMPP with ad-hoc commands, HTTP, JMX and some selected statistics are also available via SNMP. As a component developer you don’t have to do anything to expose your statistic via any of those protocols, you just have to provide your statistics and the admin will be able to access them any way he wants.
This lesson will teach you how to add your own statistics and how to make sure that the statistics generation doesn’t affect application performance.
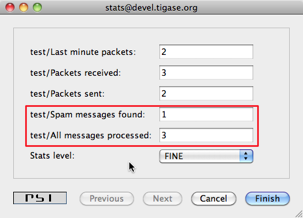
Your component from the very beginning generates some statistics by classes it inherits. Let’s add a few statistics to our spam filtering component:
@Override
public void getStatistics(StatisticsList list) {
  super.getStatistics(list);
  list.add(getName(), "Spam messages found", totalSpamCounter, Level.INFO);
  list.add(getName(), "All messages processed", messagesCounter, Level.FINER);
  if (list.checkLevel(Level.FINEST)) {
    // Some very expensive statistics generation code...
  }
}
The code should be pretty much self-explanatory.
You have to call super.getStatistics(…) to update stats of the parent class. StatisticsList is a collection which keeps all the statistics in a way which is easy to update, search, and retrieve them. You actually don’t need to know all the implementation details but if you are interested please refer to the source code and JavaDoc documentation.
The first parameter of the add(…) method is the component name. All the statistics are grouped by the component names to make it easier to look at particular component data. Next is a description of the element. The third parameter is the element value which can be any number or string.
The last parameter is probably the most interesting. The idea has been borrowed from the logging framework. Each statistic item has importance level. Levels are exactly the same as for logging methods with SEVERE the most critical and FINEST the least important. This parameter has been added to improve performance and statistics retrieval. When the StatisticsList object is created it gets assigned a level requested by the user. If the add(…) method is called with lower priority level then the element is not even added to the list. This saves network bandwidth, improves statistics retrieving speed and is also more clear to present to the end-user.
One thing which may be a bit confusing at first is that, if there is a numerical element added to statistics with 0 value then the Level is always forced to FINEST. The assumption is that the administrator is normally not interested zero-value statistics, therefore unless he intentionally request the lowest level statistics he won’t see elements with zeros.
The if statement requires some explanation too. Normally adding a new statistics element is not a very expensive operation so passing it with add(…) method at an appropriate level is enough. Sometimes, however preparing statistics data may be quite expensive, like reading/counting some records from database. Statistics can be collected quite frequently therefore it doesn’t make sense to collect the statistics at all if there not going to be used as the current level is higher then the item we pass anyway. In such a case it is recommended to test whether the element level will be accepted by the collection and if not skip the whole processing altogether.
As you can see, the API for generating and presenting component statistics is very simple and straightforward. Just one method to overwrite and a simple way to pass your own counters. Below is the whole code of the example component:
Example component code.
public class TestComponent extends AbstractKernelBasedComponent {

  private static final Logger log = Logger.getLogger(TestComponent.class.getName());

  @Inject
  private TestModule testModule;

  @Override
  public synchronized void everyMinute() {
    super.everyMinute();
    testModule.everyMinute();
  }

  @Override
  public String getComponentVersion() {
  String version = this.getClass().getPackage().getImplementationVersion();
    return version == null ? "0.0.0" : version;
  }

  @Override
  public String getDiscoDescription() {
    return "Spam filtering";
  }

  @Override
  public String getDiscoCategoryType() {
      return "spam";
  }

  @Override
  public int hashCodeForPacket(Packet packet) {
    if (packet.getElemTo() != null) {
      return packet.getElemTo().hashCode();
    }
    // This should not happen, every packet must have a destination
    // address, but maybe our SPAM checker is used for checking
    // strange kind of packets too....
    if (packet.getElemFrom() != null) {
      return packet.getElemFrom().hashCode();
    }
    // If this really happens on your system you should look carefully
    // at packets arriving to your component and decide a better way
    // to calculate hashCode
    return 1;
  }

  @Override
  public boolean isDiscoNonAdmin() {
    return false;
  }

  @Override
  public int processingInThreads() {
    return Runtime.getRuntime().availableProcessors();
  }

  @Override
  public int processingOutThreads() {
    return Runtime.getRuntime().availableProcessors();
  }

  @Override
  protected void registerModules(Kernel kernel) {
    // here we need to register modules responsible for processing packets
  }

  @Override
  public void getStatistics(StatisticsList list) {
    super.getStatistics(list);
    list.add(getName(), "Spam messages found", testModule.getTotalSpamCounter(), Level.INFO);
    list.add(getName(), "All messages processed", testModule.getMessagesCounter(), Level.FINE);
    if (list.checkLevel(Level.FINEST)) {
      // Some very expensive statistics generation code...
    }
  }

}
Example module code.
@Bean(name = "test-module", parent = TestComponent.class, active = true)
public static class TestModule extends AbstractModule {

  private static final Logger log = Logger.getLogger(TestModule.class.getCanonicalName());

  private Criteria CRITERIA = ElementCriteria.name("message");
  private String[] FEATURES = { "tigase:x:spam-filter", "tigase:x:spam-reporting" };

  @ConfigField(desc = "Bad words", alias = "bad-words")
  private String[] badWords = {"word1", "word2", "word3"};
  @ConfigField(desc = "White listed addresses", alias = "white-list")
  private String[] whiteList = {"admin@localhost"};
  @ConfigField(desc = "Logged packet types", alias = "packet-types")
  private String[] packetTypes = {"message", "presence", "iq"};
  @ConfigField(desc = "Prefix", alias = "log-prepend")
  private String prependText = "Spam detected: ";
  @ConfigField(desc = "Secure logging", alias = "secure-logging")
  private boolean secureLogging = false;
  @ConfigField(desc = "Abuse notification address", alias = "abuse-address")
  private JID abuseAddress = JID.jidInstanceNS("abuse@locahost");
  @ConfigField(desc = "Frequency of notification", alias = "notification-frequency")
  private int notificationFrequency = 10;
  private int delayCounter = 0;
  private long spamCounter = 0;
  private long totalSpamCounter = 0;
  private long messagesCounter = 0;


  @Inject
  private TestComponent component;

  public void everyMinute() {
    if ((++delayCounter) >= notificationFrequency) {
      write(Message.getMessage(abuseAddress, component.getComponentId(), StanzaType.chat,
                               "Detected spam messages: " + spamCounter, "Spam counter", null,
                               component.newPacketId("spam-")));
      delayCounter = 0;
      spamCounter = 0;
    }
  }

  @Override
  public String[] getFeatures() {
    return FEATURES;
  }

  @Override
  public Criteria getModuleCriteria() {
    return CRITERIA;
  }

  public long getMessagesCounter() {
    return messagesCounter;
  }

  public long getTotalSpamCounter() {
    return totalSpamCounter;
  }

  public void setPacketTypes(String[] packetTypes) {
    this.packetTypes = packetTypes;
    Criteria crit = new Or();
    for (String packetType : packetTypes) {
      crit.add(ElementCriteria.name(packetType));
    }
    CRITERIA = crit;
  }

  @Override
  public void process(Packet packet) throws ComponentException, TigaseStringprepException {
    // Is this packet a message?
    if ("message" == packet.getElemName()) {
      component.updateServiceDiscoveryItem(component.getName(), "messages",
                                           "Messages processed: [" + (++messagesCounter) + "]", true);
      String from = packet.getStanzaFrom().toString();
      // Is sender on the whitelist?
      if (Arrays.binarySearch(whiteList, from) < 0) {
        // The sender is not on whitelist so let's check the content
        String body = packet.getElemCDataStaticStr(Message.MESSAGE_BODY_PATH);
        if (body != null && !body.isEmpty()) {
          body = body.toLowerCase();
          for (String word : badWords) {
            if (body.contains(word)) {
              log.finest(prependText + packet.toString(secureLogging));
              ++spamCounter;
              component.updateServiceDiscoveryItem(component.getName(), "spam", "Spam caught: [" +
                                                   (++totalSpamCounter) + "]", true);
              return;
            }
          }
        }
      }
    }
    // Not a SPAM, return it for further processing
    Packet result = packet.swapFromTo();
    write(result);
  }
}
Scripting support is a basic API built-in to Tigase server and automatically available to any component at no extra resource cost. This framework, however, can only access existing component variables which are inherited by your code from parent classes. It can not access any data or any structures you added in your component. A little effort is needed to expose some of your data to the scripting API.
This guide shows how to extend existing scripting API with your component specific data structures.
Integrating your component implementation with the scripting API is as simple as the code below:
private static final String BAD_WORDS_VAR = "badWords";
private static final String WHITE_LIST_VAR = "whiteList";

@Override
public void initBindings(Bindings binds) {
  super.initBindings(binds);
  binds.put(BAD_WORDS_VAR, testModule.badWords);
  binds.put(WHITE_LIST_VAR, testModule.whiteList);
}
This way you expose two the component variables: badWords and whiteList to scripts under names the same names - two defined constants. You could use different names of course but it is always a good idea to keep things straightforward, hence we use the same variable names in the component and in the script.
Almost done, almost… In our old implementation these two variables are Java arrays of String. Therefore we can only change their elements but we can not add or remove elements from these structures inside the script. This is not very practical and it puts some serious limits on the script’s code. To overcome this problem I have changed the test component code to keep bad words and whitelist in java.util.Set collection. This gives us enough flexibility to manipulate data.
As our component is now ready to cooperate with the scripting API, I will demonstrate now how to add remove or change elements of these collections using a script and ad-hoc commands.
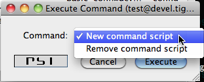
First, browse the server service discovery and double click on the test component. If you use Psi client this should bring to you a new window with ad-hoc commands list. Other clients may present available ad-hoc commands differently.
The screenshot below shows how this may look. You have to provide some description for the script and an ID string. We use Groovy in this guide but you can as well use any different scripting language.
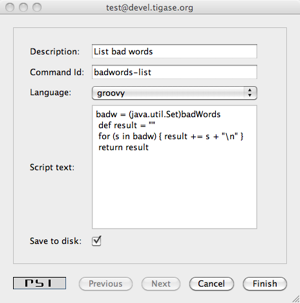
Please refer to the Tigase scripting documentation for all the details how to add support for more languages. From the Tigase API point of view it all looks the same. You have to select a proper language from the pull-down list on windows shown on the right. If your preferred language is not on the list, it means it is not installed properly and Tigase is unable to detect it.
The script to pull a list of current bad words can be as simple as the following Groovy code:
def badw = (java.util.Set)badWords
def result = ""
for (s in badw) { result += s + "\n" }
return result
As you see from the code, you have to reference your component variables to a variables in your script to make sure a correct type is used. The rest is very simple and is a pure scripting language stuff.
Load the script on to the server and execute it. You should receive a new window with a list of all bad words currently used by the spam filter.
Below is another simple script which allows updating (adding/removing) bad words from the list.
import tigase.server.Command
import tigase.server.Packet

def WORDS_LIST_KEY = "words-list"
def OPERATION_KEY = "operation"
def REMOVE = "Remove"
def ADD = "Add"
def OPERATIONS = [ADD, REMOVE]

def badw = (java.util.Set)badWords
def Packet p = (Packet)packet
def words = Command.getFieldValue(p, WORDS_LIST_KEY)
def operation = Command.getFieldValue(p, OPERATION_KEY)

if (words == null) {
  // No data to process, let's ask user to provide
  // a list of words
  def res = (Packet)p.commandResult(Command.DataType.form)
  Command.addFieldValue(res, WORDS_LIST_KEY, "", "Bad words list")
  Command.addFieldValue(res, OPERATION_KEY, ADD, "Operation",
    (String[])OPERATIONS, (String[])OPERATIONS)
  return res
}

def words_list = words.tokenize(",")

if (operation == ADD) {
  words_list.each { badw.add(it.trim()) }
  return "Words have been added."
}

if (operation == REMOVE) {
  words_list.each { badw.remove(it.trim()) }
  return "Words have been removed."
}

return "Unknown operation: " + operation
These two scripts are just the beginning. The possibilities are endless and with the simple a few lines of code in your test component you can then extend your application at runtime with scripts doing various things; you can reload scripts, add and remove them, extending and modifying functionality as you need. No need to restart the server, no need to recompile the code and you can use whatever scripting language you like.
Of course, scripts for whitelist modifications would look exactly the same and it doesn’t make sense to attach them here.
Here is a complete code of the test component with the new method described at the beginning and data structures changed from array of String*s to Java *Set:
Example component code.
public class TestComponent extends AbstractKernelBasedComponent {

  private static final Logger log = Logger.getLogger(TestComponent.class.getName());

  private static final String BAD_WORDS_KEY = "bad-words";
  private static final String WHITELIST_KEY = "white-list";

  @Inject
  private TestModule testModule;

  @Override
  public synchronized void everyMinute() {
    super.everyMinute();
    testModule.everyMinute();
  }

  @Override
  public String getComponentVersion() {
  String version = this.getClass().getPackage().getImplementationVersion();
    return version == null ? "0.0.0" : version;
  }

  @Override
  public String getDiscoDescription() {
    return "Spam filtering";
  }

  @Override
  public String getDiscoCategoryType() {
      return "spam";
  }

  @Override
  public int hashCodeForPacket(Packet packet) {
    if (packet.getElemTo() != null) {
      return packet.getElemTo().hashCode();
    }
    // This should not happen, every packet must have a destination
    // address, but maybe our SPAM checker is used for checking
    // strange kind of packets too....
    if (packet.getElemFrom() != null) {
      return packet.getElemFrom().hashCode();
    }
    // If this really happens on your system you should look carefully
    // at packets arriving to your component and decide a better way
    // to calculate hashCode
    return 1;
  }

  @Override
  public boolean isDiscoNonAdmin() {
    return false;
  }

  @Override
  public int processingInThreads() {
    return Runtime.getRuntime().availableProcessors();
  }

  @Override
  public int processingOutThreads() {
    return Runtime.getRuntime().availableProcessors();
  }

  @Override
  protected void registerModules(Kernel kernel) {
    // here we need to register modules responsible for processing packets
  }

  @Override
  public void getStatistics(StatisticsList list) {
    super.getStatistics(list);
    list.add(getName(), "Spam messages found", testModule.getTotalSpamCounter(), Level.INFO);
    list.add(getName(), "All messages processed", testModule.getMessagesCounter(), Level.FINE);
    if (list.checkLevel(Level.FINEST)) {
      // Some very expensive statistics generation code...
    }
  }

    @Override
    public void initBindings(Bindings binds) {
        super.initBindings(binds);
        binds.put(BAD_WORDS_KEY, testModule.badWords);
        binds.put(WHITELIST_KEY, testModule.whiteList);
    }

}
Example module code.
@Bean(name = "test-module", parent = TestComponent.class, active = true)
public static class TestModule extends AbstractModule {

  private static final Logger log = Logger.getLogger(TestModule.class.getCanonicalName());

  private Criteria CRITERIA = ElementCriteria.name("message");
  private String[] FEATURES = { "tigase:x:spam-filter", "tigase:x:spam-reporting" };

  @ConfigField(desc = "Bad words", alias = "bad-words")
  protected CopyOnWriteArraySet<String> badWords = new CopyOnWriteArraySet<>(Arrays.asList(new String[] {"word1", "word2", "word3"}));
  @ConfigField(desc = "White listed addresses", alias = "white-list")
  protected CopyOnWriteArraySet<String> whiteList = new CopyOnWriteArraySet<>(Arrays.asList(new String[] {"admin@localhost"}));
  @ConfigField(desc = "Logged packet types", alias = "packet-types")
  private String[] packetTypes = {"message", "presence", "iq"};
  @ConfigField(desc = "Prefix", alias = "log-prepend")
  private String prependText = "Spam detected: ";
  @ConfigField(desc = "Secure logging", alias = "secure-logging")
  private boolean secureLogging = false;
  @ConfigField(desc = "Abuse notification address", alias = "abuse-address")
  private JID abuseAddress = JID.jidInstanceNS("abuse@locahost");
  @ConfigField(desc = "Frequency of notification", alias = "notification-frequency")
  private int notificationFrequency = 10;
  private int delayCounter = 0;
  private long spamCounter = 0;
  private long totalSpamCounter = 0;
  private long messagesCounter = 0;


  @Inject
  private TestComponent component;

  public void everyMinute() {
    if ((++delayCounter) >= notificationFrequency) {
      write(Message.getMessage(abuseAddress, component.getComponentId(), StanzaType.chat,
                               "Detected spam messages: " + spamCounter, "Spam counter", null,
                               component.newPacketId("spam-")));
      delayCounter = 0;
      spamCounter = 0;
    }
  }

  @Override
  public String[] getFeatures() {
    return FEATURES;
  }

  @Override
  public Criteria getModuleCriteria() {
    return CRITERIA;
  }

  public int getMessagesCounter() {
    return messagesCounter;
  }

  public int getTotalSpamCounter() {
    return totalSpamCounter;
  }

  public void setPacketTypes(String[] packetTypes) {
    this.packetTypes = packetTypes;
    Criteria crit = new Or();
    for (String packetType : packetTypes) {
      crit.add(ElementCriteria.name(packetType));
    }
    CRITERIA = crit;
  }

  @Override
  public void process(Packet packet) throws ComponentException, TigaseStringprepException {
    // Is this packet a message?
    if ("message" == packet.getElemName()) {
      component.updateServiceDiscoveryItem(component.getName(), "messages",
                                           "Messages processed: [" + (++messagesCounter) + "]", true);
      String from = packet.getStanzaFrom().toString();
      // Is sender on the whitelist?
      if (!whiteList.contains(from)) {
        // The sender is not on whitelist so let's check the content
        String body = packet.getElemCDataStaticStr(Message.MESSAGE_BODY_PATH);
        if (body != null && !body.isEmpty()) {
          body = body.toLowerCase();
          for (String word : badWords) {
            if (body.contains(word)) {
              log.finest(prependText + packet.toString(secureLogging));
              ++spamCounter;
              component.updateServiceDiscoveryItem(component.getName(), "spam", "Spam caught: [" +
                                                   (++totalSpamCounter) + "]", true);
              return;
            }
          }
        }
      }
    }
    // Not a SPAM, return it for further processing
    Packet result = packet.swapFromTo();
    write(result);
  }
}
There are cases when you want to store some data permanently by your component. You can of course use the component configuration to provide some database connection settings, implement your own database connector and store records you need. There is, however, a very simple and useful framework which allows you to read and store some data transparently in either a database or a disk file. The framework also supports ad-hoc command interface straight away so you can manipulate your component data using an XMPP client.
In order to use it one needs to extend tigase.db.comp.ConfigRepository abstract class.
To use AuthRepository or UserRepository you need only to declare fields properly and annotated them with @Inject. This fields must be part of a class managed by Tigase Kernel - class of a component or any class annotated with @Bean annotation. For that classes proper instances of repositories will be injected by dependency injection.
Example usage of AuthRepository and UserRepository.
@Inject
private AuthRepository authRepository;
@Inject
private UserRepository userRepository;
In order to have more freedom while accessing repositories it’s possible to create and use custom repository implementation which implements DataSourceAware interface.
For our example let’s assume it will be class implementing TestRepositoryIfc and our implementation will be using JDBC.
To make it work, we need to define TestRepositoryIfc as a generic interface extending DataSourceAware interface.
DataSourceAware interface will provide definition for methods required by Tigase XMPP Server internals to initialize custom repository classes based on TestRepositoryIfc.
TestRepositoryIfc.
public interface TestRepositoryIfc<DS extends DataSource> extends DataSourceAware<DS> {
  // Example method
  void addItem(BareJID userJid, String item) throws RepositoryException;
}
Next we need to prepare our actual implementation of repository - class responsible for execution of SQL statements. In this class we need to implement all of methods from our interface
and method void setDataSource(DataSource dataSource) which comes from DataSourceAware interface. In this method we need to initialize data source, ie. create prepared statements.
We should annotate our new class with @Repository.Meta annotation which will allow Tigase XMPP Server to find this class whenever class implementing TestRepositoryIfc and with support for data source with jdbc URI.
@Repository.Meta(supportedUris = "jdbc:.*")
public static class JDBCTestRepository implements TestRepositoryIfc<DataRepository> {

  private static final String SOME_STATEMENT = "select * from tig_users";

  private DataRepository repository;

  @Override
  public void setDataSource(DataRepository repository) {
    // here we need to initialize required prepared statements
    try {
      repository.initPreparedStatement(SOME_STATEMENT, SOME_STATEMENT);
    } catch (SQLException ex) {
      throw new RuntimeException("Could not initialize repository", ex);
    }
    this.repository = repository;
  }

  @Override
  public void addItem(BareJID userJid, String item) throws RepositoryException {
    try {
      PreparedStatement stmt = repository.getPreparedStatement(userJid, SOME_STATEMENT);
      synchronized (stmt) {
        // do what needs to be done
      }
    } catch (SQLException ex) {
      throw new RepositoryException(ex);
    }
  }
}
As you can see we defined type of a data source generic parameter for interface TestRepositoryIfc. With that we make sure that only instance implementing DataRepository interface will be provided and thanks to that we do not need to cast provided instance of DataSource to this interface before any access to data source.
With that in place we need to create class which will take care of adding support for multi-database setup. In our case it will be TestRepositoryMDBean, which will take care of discovery of repository class, initialization and re-injection of data source.
It is required to do so, as it was just mentioned our TestRepositoryMDBean will be responsible for initialization of JDBCTestRepository (actually this will be done by MDRepositoryBean which is extended by TestRepositoryMDBean.
@Bean(name = "repository", parent = TestComponent.class, active = true)
public static class TestRepositoryMDBean extends MDRepositoryBeanWithStatistics<TestRepositoryIfc>
    implements TestRepositoryIfc {

  public TestRepositoryMDBean() {
    super(TestRepositoryIfc.class);
  }

  @Override
  public Class<?> getDefaultBeanClass() {
    return TestRepositoryConfigBean.class;
  }

  @Override
  public void setDataSource(DataSource dataSource) {
    // nothing to do here
  }

  @Override
  public void addItem(BareJID userJid, String item) throws RepositoryException {
    getRepository(userJid.getDomain()).addItem(userJid, item);
  }

  @Override
  protected Class<? extends TestRepositoryIfc> findClassForDataSource(DataSource dataSource)
				throws DBInitException {
    return DataSourceHelper.getDefaultClass(TestRepositoryIfc.class, dataSource.getResourceUri());
  }

  public static class TestRepositoryConfigBean extends MDRepositoryConfigBean<TestRepositoryIfc> {
  }
}
Most of this code will be the same in all implementations based on MDRepositoryBeanWithStatistics. In our case only custom method is void addItem(…) which uses getRepository(String domain) method to retrieve correct repository for a domain.
This retrieval of actual repository instance for a domain will need to be done for every custom method of TestRepositoryIfc.
Tip
It is also possible to extend MDRepositoryBean or SDRepositoryBean instead of MDRepositoryBeanWithStatistics. However, if you decide to extend abstract repository bean classes without withStatistics suffix, then no statistics data related to usage of this repository will be gathered. The only change, will be that you will not need to pass interface class to constructor of a superclass as it is not needed.
Note
As mentioned above, it is also possible to extend SDRepostioryBean and SDRepositoryBeanWithStatistics. Methods which you would need to implement are the same is in case of extending MDRepositoryBeanWithStatistics, however internally SDRepositoryBean will not have support for using different repository for different domain. In fact SDRepositoryBeanWithStatistics has only one repository instance and uses only one data source for all domains.
The same behavior is presented by MDRepositoryBeanWithStatistics if only single default instance of repository is configured. However, MDRepositoryBeanWithStatistics gives better flexibility and due to that usage of SDRepositoryBean and SDRepositoryBeanWithStatistics is discouraged.
While this is more difficult to implement than in previous version, it gives you support for multi database setup and provides you with statistics of database query times which may be used for diagnosis.
As you can also see, we’ve annotated TestRepositoryMDBean with @Bean annotation which will force Tigase Kernel to load it every time TestComponent will be loaded. This way it is possible to inject instance of this class as a dependency to any bean used by this component (ie. component, module, etc.) by just creating a field and annotating it:
@Inject
private TestRepositoryIfc testRepository;
Tip
In testRepository field instance of TestRepositoryMDBean will be injected.
Note
If the class in which we intend to use our repository is deeply nested within Kernel dependencies and we want to leverage automatic schema versioning we have to implement tigase.kernel.beans.RegistrarBean in our class!
Our class TestRepositoryMDBean is annotated with @Bean which sets its name as repository and sets parent as TestComponent. Instance of this component was configured by use under name of test in Tigase XMPP Server configuration file.
As a result, all configuration related to our repositories should be placed in repository section placed inside test section.
Example.
test(class: TestComponent) {
    repository () {
        // repository related configuration
    }
}
As mentioned above, if we use MDRepositoryBeanWithStatistics as our base class for TestRepositoryMDBean, then we may have different data sources used for different domains.
By default, if we will not configure it otherwise, MDRepositoryBeanWithStatistics will create only single repository instance named default.
It will be used for all domains and it will, by default, use data source named the same as repository instance - it will use data source named default.
This defaults are equal to following configuration entered in the config file:
test(class: TestComponent) {
    repository () {
        default () {
            dataSourceName = 'default'
        }
    }
}It is possible to make any repository use different data source than data source configured under the same name as repository instance.
To do so, you need to set dataSourceName property of repository instance to the name of data source which it should use.
Example setting repository default to use data source named test.
test(class: TestComponent) {
    repository () {
        default () {
            dataSourceName = 'test'
        }
    }
}
To configure repository instance to be used for particular domain, you need to define repository with the same name as domain for which it should be used. It will, by default, use data source with name equal domain name.
Separate repository for example.com using data source named example.com.
dataSource () {
    // configuration of data sources here is not complete
    default () {
        uri = "jdbc:derby:/database"
    }
    'example.com' () {
        uri = "jdbc:derby/example"
    }
}

test(class: TestComponent) {
    repository () {
        default () {
        }
        'example.com' () {
        }
    }
}
Separate repository for example.com using data source named test.
dataSource () {
    // configuration of data sources here is not complete
    default () {
        uri = "jdbc:derby:/database"
    }
    'test' () {
        uri = "jdbc:derby/example"
    }
}

test(class: TestComponent) {
    repository () {
        default () {
        }
        'example.com' () {
            dataSourceName = 'test'
        }
    }
}
Note
In both examples presented above, for domains other than example.com, repository instance named default will be used and it will use data source named default.
It’s also possible to enable repository versioning capabilities when creating custom implementation. There are a couple of parts/steps to fully take advantage of this mechanism.
Each DataSource has a table tig_schema_versions which contains information about component schema version installed in the database associated with particular DataSource.
First of all, repository implementation should implement tigase.db.util.RepositoryVersionAware interface (all it’s methods are defined by default) and annotate it with tigase.db.Repository.SchemaId. For example
.Repository annoted with SchemaId and implementing RepositoryVersionAware
@Repository.SchemaId(id = "test-component", name = "Test Component")
public static class TestRepositoryMDBean extends MDRepositoryBeanWithStatistics<TestRepositoryIfc>
    implements TestRepositoryIfc {
…
}
This action alone will result in performing the check during Tigase XMPP Server startup and initialisation of repository whether tables, indexes, stored procedures and other elements are present in the configured data source in the required version.
By default, required version matches the implementation version (obtained via call to java.lang.Package.getImplementationVersion()), however it’s possible to specify required version manually, either:
- by utilizing
tigase.db.util.RepositoryVersionAware.SchemaVersionannotation:
@Repository.SchemaId(id = "test_component", name = "Test Component")
@RepositoryVersionAware.SchemaVersion(version = "0.0.1")
public static class TestRepositoryMDBean extends MDRepositoryBeanWithStatistics<TestRepositoryIfc>
    implements TestRepositoryIfc {
…
}- or by overriding
tigase.db.util.RepositoryVersionAware.getVersionmethod:
	@Override
	public Version getVersion() {
		return "0.0.1";
}To detect that version information in database is inadequate following logic will take place:
- if there is no version information in the database the service will be stopped completely prompting to install the schema (either via
update-schemaorinstall-schemadepending on user preference); if there is an information about loaded component schema version in the repository and the base part of the required schema version (i.e. taking into account only major.minor.bugfix part) is different from the one present in the repository then:
- if the required version of the component schema is final (i.e. non
SNAPSHOT) the server will shutdown and print in the log file (namelylogs/tigase-console.log) terminal error forcing the user to upgrade the schema; - if the required version of the component schema is non-final (i.e. having
SNAPSHOTpart) then there will be a warning printed in the log file (namelylogs/tigase-console.log) prompting user to run the upgrade procedure due to possible changes in the schema but the server will not stop;
- if the required version of the component schema is final (i.e. non
Upgrade of the loaded schema in the database will be performed by executing:
./scripts/tigase.sh upgrade-schema etc/tigase.conf
The above command will load current configuration, information about all configured data sources and enabled components, and then perform upgrade of the schema of each configured component in the appropriate data source.
Depending on the type of the database (or specified annotation), how the upgrade procedure is handled internally is slightly different.
For all relational databases (MySQL, PostgreSQL, MS SQL Server, etc…) we highly recommend storing complete database schema in external files with following naming convention: <database_type>-<component_name>-<version>.sql, for example complete schema for our Test component version 0.0.5 intended for MySQL would be stored in file named mysql-test-0.0.5.sql. What’s more - schema files must be stored under database/ subdirectory in Tigase XMPP Server installation directory.
Note
this can be controlled with external property of Repository.SchemaId annotation, which defaults to "true", if set to false then handling will be done as described in ???
For example:
database/mysql-test-0.0.1.sqldatabase/mysql-test-0.0.2.sqldatabase/mysql-test-0.0.3.sqldatabase/mysql-test-0.0.4.sqldatabase/mysql-test-0.0.5.sql
During the upgrade process all required schema files will be loaded in the ascending version order. Version range will depend on the conditions and will follow simple rules:
- Start of the range will start at the next version to the one currently loaded in the database (e.g. if the current version loaded to the database is
0.0.3and we are deploying component version0.0.5then SchemaLoader will try to load schema from files:database/mysql-test-0.0.4.sqlanddatabase/mysql-test-0.0.5.sql) - If we are trying to deploy a SNAPSTHOT version of the component then schema file matching that version will always be included in the list of files to be loaded (e.g. if we are trying to deploy a nightly build with component version
0.0.5-SNAPSHOTand currently loaded schema version in the database is0.0.5then SchemaLoader will includedatabase/mysql-test-0.0.5.sqlin the list of files to be loaded)
It’s also possible to skip above filtering logic and force loading all schema files for particular component/database from database/ directory by appending --forceReloadAllSchemaFiles=true parameter to the upgrade-schema/install-schema command.
If there is a need to handle database schema internally (for example for cases like NoSQL databases or simply there is such preference) then it’s possible to do so by setting external attribute of Repository.SchemaId annotation to false:
@Repository.SchemaId(id = "test_component", name = "Test Component", external = false)
In such case, updateSchema method from tigase.db.util.RepositoryVersionAware interface should be implemented to handle installation/updating of the schema. It takes two arguments:
Optional<Version> oldVersion- indicating current version of the schema loaded to the database (if it’s present)Version newVersion- indicating required version (either version of component or specific version of the repository)
Each versioned schema file should consist at the end code responsible for setting appropriate version of the loaded schema in the form of Stored Procedure call with the name of the component and the version as parameters:
- Postgresql
-- QUERY START:
select TigSetComponentVersion('test_component', '0.0.5');
-- QUERY END:- MsSQL Server
-- QUERY START:
exec TigSetComponentVersion 'test_component', '0.0.5';
-- QUERY END:
GO
- MySQL
-- QUERY START:
call TigSetComponentVersion('test_component', '0.0.5');
-- QUERY END:- Derby
-- QUERY START:
call TigSetComponentVersion('test_component', '0.0.5');
-- QUERY END:
In case of schema handled internally, after successful load (i.e. execution of the implemented tigase.db.util.RepositoryVersionAware.updateSchema method returning tigase.db.util.SchemaLoader.Result.ok) the version in the database will be set to the current version of the component.
This allows (in case of schema handled externally) to load it by hand by directly importing .sql files into database.
A startup hook in the Tigase is different from the shutdown hook.
This is because you cannot really tell when exactly the startup time is. Is it when the application started, is it when configuration is loaded, is it when all objects are initialized. And this might be even different for each component. Therefore, in fact, there is no startup hook in Tigase in the same sense as the shutdown hook.
There are a few methods which are called at startup time of a component in the following order:
- Constructor - there is of course constructor which has no parameters. However it does not guarantee that this instance of the component will be used at all. The object could be created just to get default values of a config fields and may be destroyed afterwards.
- Getters/Setters - at second step of initialization of a component, Kernel configures component by reading and setting values of fields annotated with
@ConfigField()annotation. If there is a public getter or setter for the same name as an annotated field - it will be used. - void beanConfigurationChanged(Collection<String> changedFields) (optional) - if component implements
ConfigurationChangedAwareinterface, this method will be called to notify component about fields which values were changed. It is useful if case in which component internals depends on configuration stored in more than one field, as it allows you to reconfigure component internals only once. - void register(Kernel kernel) (optional) - if component implements
RegistrarBeaninterface this method is called to allow registration of component private beans. - Dependency Injection - during this time Kernel injects beans to component fields annotated with
@Inject. If public getters or setters for this fields exist - kernel will use them. - void initialized() (optional) - called if component implements
Initializableinterface to notify it that configuration is set and dependencies are injected. - void start() - during this call component starts it’s internal jobs or worker threads or whatever it needs for future activity. Component’s queues and threads are initialized at this point. (after this method returns the component is ready)
Therefore, the start() hook is the best point if you want to be sure that component is fully loaded, initialized and functional.
Tip
Component instance may be started and stopped only once, however new instances of the same component with the same name may be created during Tigase XMPP Server uptime, ie. as a result of a server reconfiguration.
During lifecycle of a component instance it may happen that Tigase XMPP Server will be reconfigured. If change in configuration of this component will not be related to it’s activity, then Kernel will set values of changes fields annotated with @ConfigField(). In this case public field setters may be used.
Tip
If component implements ConfigurationChangedAware interface, then method void beanConfigurationChanged(Collection<String> changedFields) will be called to notify component about fields which values were changed. It is useful if same component internal depends on configuration stored in more than one field, as it allows you to reconfigure this internal once.
During lifecycle of a component instance it may happen that due to reconfiguration of a server other bean needs to be injected as a dependency to a component. In this case Tigase Kernel will inject dependencies to fields annotated with @Inject which value needs to be updated.
Component instance may be stopped at any point of Tigase XMPP Server runtime, ie. due to reconfiguration, or due to server graceful shutdown.
In both cases following methods of a component will be called:
- void stop() - first method stops component internal processing queues.
- void beforeUnregister() (optional) - if component implements @UnregisterAware@ interface this method is called to notify instance of a component that it is being unloaded.
- void unregister(Kernel kernel) (optional) - if component implements
RegistrarBeancalled to give component a way to unregister beans (if needed).