Before you begin installing Tigase server onto your system, please make sure the minimum requirements are met first:
- Java Development Kit (JDK) 11 (LTS) - We recommend OpenJDK
- Administrator access - We recommend that you install Tigase Server from a user login with administrator access.
Important
You should always run the latest point/bugfix release of the recommended JDK.
Note
While it should be possible to use newer versions of the JDK, we don’t guarantee it and we recommend using the one mentioned above.
This is a set of documents allowing you to quickly start with our software. Every document provides an introduction to a single topic allowing you to start using/developing or just working on the subject. Please have a look at the documents list below to find a topic you are looking for. If you don’t find a document for the topic you need please let us know.
When Tigase XMPP Server starts up, it looks for the default configuration file: etc/config.tdsl. If this file has not been modified you can run the web installer. Which will step you through the process of configuring Tigase.
If you are installing Tigase in a Windows environment, please see the Windows Installation section.
First download Tigase XMPP Server and extract it. You can download the official binaries, or the latest and greatest nightly builds. Once you have the distribution binary extract it and navigate to the directory:
$ tar -xf tigase-server-<version>-dist-max.tar.gz
$ cd tigase-server-<version>
Tip
Do not run as root user!
Note
Please make sure JAVA_HOME is set and points to your JVM installation
scripts/tigase.sh start etc/tigase.conf
Tigase should start listening on port 8080 - you can check it using lsof command:
$ lsof -i -P
COMMAND   PID   USER   FD   TYPE   DEVICE SIZE/OFF NODE NAME
java    18387 tigase  141u  IPv6 22185825      0t0  TCP *:8080 (LISTEN)
You can also check console log under logs/tigase-console.log, which should point you directly to the installer.
Some points before you can connect:
This setup page is restricted access, however for first setup there is a default account set to setup Tigase:
Username: admin
Password: tigase
This combination will only be valid once as it will be removed from config.tdsl file on completion of setup process. After this point the setup page will only be accessible using the following:
- JID accounts listed as administrators in admins line in
config.tdslfile. - Username and password combinations added to
config.tdslfile manually, or at the last page in this process.
Point your browser to http://localhost:8080/setup/ unless you are working remotely. You can also use the domain name, or IP address.
Enter the username and password above to gain access.
You will be greeted by the following "About software" page.
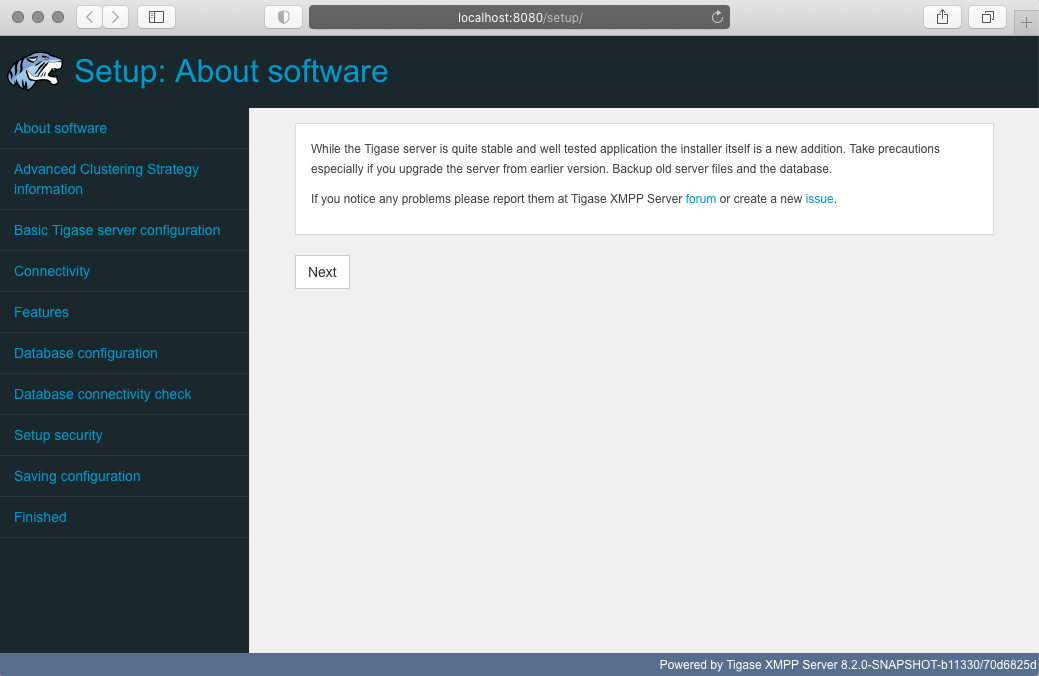
Read it and then click "Next"
The setup consists of several steps that help you configure your installation: selecting features and providing database configuration.
Note
Order and design of the steps may slightly differ thus we only provide a broad overview of how to proceed:
Advanced Clustering Strategy information
You will see some information about our commercial products and licensing. Please read though the agreement, and as a confirmation of agreement type in your name or company and click "Next" to go to the next page.
Basic Tigase server configuration
This page will look over your basic configuration settings, those include the server type, domain you wish to use, and gives you a chance to specify an administrator for the domain. Also, you will be selecting what type of database Tigase server will be using (configuration comes later).
If you do not specify an administrator and password, one is made for you, which will be admin@yourdomain and password is tigase.
Connectivity
At this page you will be presented with a list of possible connectivity options supported by Tigase XMPP Server and a way to enable/disable each of them (desktop, mobile, http, websocket, federation, etc.). After making this decisions, click "Next".
Features
Now you will be able to select which features of Tigase XMPP Server (such as MUC, PubSub, MIX, MAM, Push Notifications) should be enabled or disabled.
At this step will also be able to enable clustering on your installation
When you will be ready, click "Next".
Database configuration
This is where the database is configured. The type of database selected in step 3 will influence available options. BE SURE TO SPECIFY DATABASE ROOT USER ACCOUNT AND PASSWORD
Database connectivity check
After database setup, you should see a page with executed actions and their results. All presented items should be "green", meaning that everything went well. If anything is presented in "red" or "yellow", please read description presented below this header to learn more about this issue. If setup is completed, click "Next".
Setup security
The Setup Access Page will be locked from the admin/tigase user as specified above. This is your chance to have the setup pages add a specific user in addition to admin accounts to re-access this setup process later. If left blank, only JIDs listed in admin will be allowed to access.
Saving configuration
The installation is almost complete and you will be presented with a page showing what the resulting configuration (stored in
config.tdslfile) will look like.If you have a custom setup, or would like to put your own settings in, you may copy and past the contents here to edit the current
config.tdslfile.Click "Save" to write the file to disk.
Finished
You have now finished the installation, proceed to the next step to restart the server.
It is recommended at this point to stop the server manually and restart it using the proper script for your OS. From the Tigase base directory enter
./scripts/tigase.sh stop

./scripts/tigase.sh start etc/tigase.conf
Note
In order to make Tigase XMPP Server start automatically during system startup you should setup startup scripts as described in the section called “Tigase Script Selection”
To further fine tune the server you should edit etc/tigase.conf. Ensure JAVA_HOME path is correct, and increase memory if needed using JAVA_OPTIONS -Xmx (max), and -Xms (initial). You will need to direct Tigase to read settings from this file on startup as follows.
Everything should be running smooth at this point. Check the logfiles in logs/ if you experience any problems.
You should see a list of listening ports.
$ lsof -i -P
COMMAND   PID   USER   FD   TYPE   DEVICE SIZE/OFF NODE NAME
java    18387 tigase  141u  IPv6 22185825      0t0  TCP *:8080 (LISTEN)
java    18387 tigase  148u  IPv6 22185834      0t0  TCP *:5222 (LISTEN)
java    18387 tigase  149u  IPv6 22185835      0t0  TCP *:5223 (LISTEN)
java    18387 tigase  150u  IPv6 22185836      0t0  TCP *:5290 (LISTEN)
java    18387 tigase  151u  IPv6 22185837      0t0  TCP *:5280 (LISTEN)
java    18387 tigase  152u  IPv6 22185838      0t0  TCP *:5269 (LISTEN)
There are a few steps involved with setting up Tigase with the web installer in a Windows environment. Please follow this guide.
First step is to extract the distribution archive in it’s entirety to the intended running directory. Once there, run the Setup.bat file inside the win-stuff folder. This will move the necessary files to the correct folders before Tigase begins operation.
From here, you have a few options how to run Tigase; run.bat will operate Tigase using a java command, or tigase.bat which will start Tigase using the wrapper. You may also install Tigase and run it as a service.
Once this setup is finished, web installer will continue the same from here.
Our preferred way to install the Tigase server is using Web installer and configuration program which comes with one of the binary packages. Please pick up the latest version of the distribution archive in our download section.
In many cases however it is not always possible to use the web installer. In many cases you have just an ssh access or even a direct access in console mode only. We are going to provide a text-only installer in one of the next releases but for the time being you can use our binary packages to install the server manually. Please continue reading to learn how to install and setup the server in a few easy steps…
If you have an old version of the Tigase server running and working and you intend to upgrade it please always backup the old version first.
Note
Please note that these instructions are for *nix operating systems, and some modifications may be required for other Operating Systems!
Have a look at our download area. Always pick the latest version of the package available. For manual installation either zip or tar.gz file is available. Pick one of files with filename looking like: tigase-server-<version>-b<build>-<type>.<archive>, where <version> is in the form of major.minor.bugfix, <type> can be either dist (basic package) or dist-max (extended set of components) and archive type can be eitehr tar.gz or zip.
Unpack the file using command for the tar.gz file:
$ tar -xzvf tigase-server-x.y.z-bv.tar.gz
or for the zip file:
$ unzip tigase-server-x.y.z-bv.zip
A new directory will be created: tigase-server-x.y.z-bv/.
Sometimes after unpacking package on unix system startup script doesn’t have execution permissions. To fix the problem you have to run following command:
$ chmod u+x ./scripts/tigase.sh
If you look inside the new directory, it should like this output:
 $ ls -l
total 88
drwxr-xr-x 2 tigase tigase  4096 Aug 15 18:17 certs
-rw-r--r-- 1 tigase tigase     0 Aug 15 18:26 ChangeLog
drwxr-xr-x 2 tigase tigase 12288 Aug 15 18:17 database
drwxrwxr-x 4 tigase tigase  4096 Oct 12 09:48 docs
drwxrwxr-x 2 tigase tigase  4096 Oct 12 09:48 etc
drwxrwxr-x 2 tigase tigase  4096 Oct 12 09:48 jars
-rw-r--r-- 1 tigase tigase 34203 Aug 15 18:26 License.html
drwxr-xr-- 2 tigase tigase  4096 Aug 15 18:26 logs
-rw-r--r-- 1 tigase tigase  3614 Aug 15 18:26 package.html
-rw-r--r-- 1 tigase tigase  2675 Aug 15 18:26 README
drwxr-xr-x 9 tigase tigase  4096 Aug 15 18:17 scripts
drwxr-xr-x 5 tigase tigase  4096 Aug 15 18:17 tigase
drwxrwxr-x 4 tigase tigase  4096 Oct 12 09:48 win-stuff
At the moment the most important is the etc/ directory with these files:
 $ ls -l etc/
total 36
-rw-r--r-- 1 tigase tigase  153 Aug 15 18:11 bosh-extra-headers.txt
-rw-r--r-- 1 tigase tigase  325 Aug 15 18:11 client-access-policy.xml
-rw-r--r-- 1 tigase tigase  124 Aug 15 18:11 config.tdsl
-rw-r--r-- 1 tigase tigase  263 Aug 15 18:11 cross-domain-policy.xml
-rw-r--r-- 1 tigase tigase 2337 Aug 15 18:11 jmx.access
-rw-r--r-- 1 tigase tigase 2893 Aug 15 18:11 jmx.password
-rw-r--r-- 1 tigase tigase  735 Aug 15 18:11 logback.xml
-rw-r--r-- 1 tigase tigase 3386 Aug 15 18:11 snmp.acl
-rw-r--r-- 1 tigase tigase 1346 Aug 15 18:11 tigase.conf
Tigase.conf is a file that contains general program operating parameters, and java settings for Tigase to run. For now, the only setting we need to set is the JAVA_HOME directory.
JAVA_HOME="${JDKPath}"Replace ${JDKPath} with a path to Java JDK installation on your system.
You need also to edit the config.tdsl file. It contains initial parameters normally set by the configuration program. As this is a manual installation, you will have to edit this document yourself. It contains already a few lines:
'config-type' = 'setup'

http () {
    setup () {
        'admin-user' = 'admin'
        'admin-password' = 'tigase'
    }
}
You will need to set a few things in order to get Tigase up and running.
Refer to config-type property description for details, but for most operations, change setup to default.
Without a virtual host, your XMPP server has no domain with which to operate. To set a virtual host use the following configuration:
'default-virtual-host' = 'hostname'
You have to replace hostname with a domain name used for your XMPP installation. Let’s say this is jabber.your-great.net. Your setting should look like this:
'default-virtual-host' = 'jabber.your-great.net'
There are many other settings that can be configured visit this section for details.
At least one administrator is required, and once the database is setup will have the default password of tigase. Be sure to change this once you have finished setting up your server. To add admins, use the following line in the config.tdsl file:
admins = [ 'admin@jabber.your-great.net', 'user2jabber.your-great.net' ]
You will also need to configure connection to the database. First you have to decide what database you want to use: Derby, MySQL, PostgreSQL, MSSQL, or MondoDB.
Each database will have slightly different configurations. If we are using derby, in a directory called tigasedb, your configuration would look like this:
dataSource () {
    default () {
        uri = 'jdbc:derby:tigasedb;create=true'
    }
}
Consult dataSource property for more configuration info.
This is enough basic configuration to have your Tigase server installation running.
Creating the database is the next step. Previously, we had scripts to handle this process, but we now have the advantage of functions in the tigase.sh script that can be used. Setting up the database can now be done using a single command.
./scripts/tigase.sh install-schema etc/tigase.conf -T derby -D tigasedb -H localhost -U tigase_user -P tigase_pass -R root -A rootpass -J admin@jabber.your-great.net -N pass
This command will install tigase using a Derby database on one named tigasedb hosted on localhost. The username and password editing the database is tigase_pass and root. Note that -J explicitly adds the administrator, this is highly recommended with the -N passing the password.
You may customize this command as needed, refer to the install-schema section of the documentation for more information.
On a windows system, you need to call the program directly:
C:\tigase>java -cp "jars/*" tigase.db.util.SchemaManager "install-schema" -T derby -D tigasedb -H localhost -U tigase_user -P tigase_pass -R root -A rootpass -J admin@jabber.your-great.net -N pass
If this successfully passes, you should see some information printed out
LogLevel: CONFIG
2017-10-12 20:05:47.987 [main]             DBSchemaLoader.init()                   CONFIG:   Parameters: [ingoreMissingFiles: false, logLevel: CONFIG, adminPassword: pass, admins: [admin@jabber.your-great.net], dbRootPass: rootpass, dbRootUser: root, dbType: derby, dbName: tigasedbx, dbHostname: localhost, dbUser: tigase_user, dbPass: tigase_pass, useSSL: false, useLegacyDatetimeCode: false, serverTimezone: null, file: null, query: null]
Oct 12, 2017 8:05:48 PM tigase.util.DNSResolverDefault <init>
WARNING: Resolving default host name: ubuntu took: 7
Oct 12, 2017 8:05:49 PM tigase.db.util.SchemaManager loadSchemas
INFO: found 1 data sources to upgrade...
Oct 12, 2017 8:05:49 PM tigase.db.util.SchemaManager loadSchemas
INFO: begining upgrade...
LogLevel: CONFIG
2017-10-12 20:05:49.877 [main]             DBSchemaLoader.init()                   CONFIG:   Parameters: [ingoreMissingFiles: false, logLevel: CONFIG, adminPassword: pass, admins: [admin@jabber.your-great.net], dbRootPass: rootpass, dbRootUser: root, dbType: derby, dbName: tigasedbx, dbHostname: null, dbUser: null, dbPass: null, useSSL: null, useLegacyDatetimeCode: false, serverTimezone: null, file: null, query: null]
2017-10-12 20:05:49.877 [main]             DBSchemaLoader.validateDBConnection()   INFO:     Validating DBConnection, URI: jdbc:derby:tigasedbx;create=true
2017-10-12 20:05:50.932 [main]             DBSchemaLoader.validateDBConnection()   CONFIG:   DriverManager (available drivers): [org.apache.derby.jdbc.AutoloadedDriver@65262308, jTDS 1.3.1, com.mysql.jdbc.Driver@54997f67, com.mysql.fabric.jdbc.FabricMySQLDriver@189633f2, org.postgresql.Driver@76fc5687]
2017-10-12 20:05:50.932 [main]             DBSchemaLoader.validateDBConnection()   INFO:     Connection OK
2017-10-12 20:05:50.933 [main]             DBSchemaLoader.validateDBExists()       INFO:     Validating whether DB Exists, URI: jdbc:derby:tigasedbx;create=true
2017-10-12 20:05:50.936 [main]             DBSchemaLoader.withConnection()         CONFIG:   DriverManager (available drivers): [org.apache.derby.jdbc.AutoloadedDriver@65262308, jTDS 1.3.1, com.mysql.jdbc.Driver@54997f67, com.mysql.fabric.jdbc.FabricMySQLDriver@189633f2, org.postgresql.Driver@76fc5687]
2017-10-12 20:05:50.937 [main]             DBSchemaLoader.lambda$validateDBExists$283()  INFO: Exists OK
2017-10-12 20:05:50.939 [main]             DBSchemaLoader.loadSchemaFile()         INFO:     Loading schema from file(s): database/derby-schema-7-2.sql, URI: jdbc:derby:tigasedbx;create=true
2017-10-12 20:05:50.941 [main]             DBSchemaLoader.withConnection()         CONFIG:   DriverManager (available drivers): [org.apache.derby.jdbc.AutoloadedDriver@65262308, jTDS 1.3.1, com.mysql.jdbc.Driver@54997f67, com.mysql.fabric.jdbc.FabricMySQLDriver@189633f2, org.postgresql.Driver@76fc5687]
2017-10-12 20:05:51.923 [main]             DBSchemaLoader.lambda$loadSchemaFile$287()  INFO:  completed OK
2017-10-12 20:05:51.925 [main]             DBSchemaLoader.loadSchemaFile()         INFO:     Loading schema from file(s): database/derby-message-archiving-schema-1.3.0.sql, URI: jdbc:derby:tigasedbx;create=true
2017-10-12 20:05:51.926 [main]             DBSchemaLoader.withConnection()         CONFIG:   DriverManager (available drivers): [org.apache.derby.jdbc.AutoloadedDriver@65262308, jTDS 1.3.1, com.mysql.jdbc.Driver@54997f67, com.mysql.fabric.jdbc.FabricMySQLDriver@189633f2, org.postgresql.Driver@76fc5687]
2017-10-12 20:05:52.209 [main]             DBSchemaLoader.lambda$loadSchemaFile$287()  INFO:  completed OK
2017-10-12 20:05:52.210 [main]             DBSchemaLoader.loadSchemaFile()         INFO:     Loading schema from file(s): database/derby-muc-schema-2.5.0.sql, URI: jdbc:derby:tigasedbx;create=true
2017-10-12 20:05:52.211 [main]             DBSchemaLoader.withConnection()         CONFIG:   DriverManager (available drivers): [org.apache.derby.jdbc.AutoloadedDriver@65262308, jTDS 1.3.1, com.mysql.jdbc.Driver@54997f67, com.mysql.fabric.jdbc.FabricMySQLDriver@189633f2, org.postgresql.Driver@76fc5687]
2017-10-12 20:05:52.305 [main]             DBSchemaLoader.lambda$loadSchemaFile$287()  INFO:  completed OK
2017-10-12 20:05:52.306 [main]             DBSchemaLoader.loadSchemaFile()         INFO:     Loading schema from file(s): database/derby-pubsub-schema-3.3.0.sql, URI: jdbc:derby:tigasedbx;create=true
2017-10-12 20:05:52.307 [main]             DBSchemaLoader.withConnection()         CONFIG:   DriverManager (available drivers): [org.apache.derby.jdbc.AutoloadedDriver@65262308, jTDS 1.3.1, com.mysql.jdbc.Driver@54997f67, com.mysql.fabric.jdbc.FabricMySQLDriver@189633f2, org.postgresql.Driver@76fc5687]
2017-10-12 20:05:52.731 [main]             DBSchemaLoader.lambda$loadSchemaFile$287()  INFO:  completed OK
2017-10-12 20:05:52.732 [main]             DBSchemaLoader.addXmppAdminAccount()    INFO:     Adding XMPP Admin Account, URI: jdbc:derby:tigasedbx;create=true
2017-10-12 20:05:52.732 [main]             DBSchemaLoader.addXmppAdminAccount()    CONFIG:   RepositoryFactory.getAuthRepository(null, jdbc:derby:tigasedbx;create=true,{data-repo-pool-size=1})
Oct 12, 2017 8:05:52 PM tigase.db.jdbc.DataRepositoryImpl initialize
INFO: Table schema found: jdbc:derby:tigasedbx;create=true, database type: derby, database driver: org.apache.derby.jdbc.EmbeddedDriver
Oct 12, 2017 8:05:52 PM tigase.db.jdbc.DataRepositoryImpl initialize
INFO: Initialized database connection: jdbc:derby:tigasedbx;create=true
2017-10-12 20:05:52.884 [main]             DBSchemaLoader.addXmppAdminAccount()    INFO:     All users added
2017-10-12 20:05:52.884 [main]             DBSchemaLoader.postInstallation()       INFO:     Post Installation, URI: jdbc:derby:tigasedbx;create=true
2017-10-12 20:05:52.891 [main]             DBSchemaLoader.withConnection()         CONFIG:   DriverManager (available drivers): [org.apache.derby.jdbc.AutoloadedDriver@65262308, jTDS 1.3.1, com.mysql.jdbc.Driver@54997f67, com.mysql.fabric.jdbc.FabricMySQLDriver@189633f2, org.postgresql.Driver@76fc5687]
2017-10-12 20:05:52.892 [main]             DBSchemaLoader.lambda$postInstallation$286()  INFO: Finalizing...
2017-10-12 20:05:52.893 [main]             DBSchemaLoader.lambda$postInstallation$286()  INFO:  completed OK
2017-10-12 20:05:52.895 [main]             DBSchemaLoader.shutdownDerby()          INFO:     Validating DBConnection, URI: jdbc:derby:tigasedbx;create=true
2017-10-12 20:05:53.129 [main]             DBSchemaLoader.withConnection()         SEVERE:


=====
Failure: Database 'tigasedbx' shutdown.
=====


Oct 12, 2017 8:05:53 PM tigase.db.util.SchemaManager loadSchemas
INFO: schema upgrade finished!


  =============================================================================
  	Schema installation finished

  Data source: default with uri jdbc:derby:tigasedbx;create=true
  	Checking connection to database	ok
  	Checking if database exists	ok
  	Loading schema: Tigase XMPP Server (Core), version: 8.0.0	ok
  	Loading schema: Tigase Message Archiving Component, version: 1.3.0	ok
  	Loading schema: Tigase MUC Component, version: 2.5.0	ok
  	Loading schema: Tigase PubSub Component, version: 3.3.0	ok
  	Adding XMPP admin accounts	ok
  	Post installation action	ok

  Example etc/config.tdsl configuration file:

  'config-type' = 'default'
  debug = [ 'server' ]
  'default-virtual-host' = [ 'ubuntu' ]
  dataSource () {
      default () {
          uri = 'jdbc:derby:tigasedbx;create=true'
      }
  }
  amp () {}
  bosh () {}
  c2s () {}
  eventbus () {}
  http () {}
  'message-archive' () {}
  monitor () {}
  muc () {}
  pubsub () {}
  s2s () {}
  ws2s () {}
  =============================================================================
Note at the end, the script will output a recommended example file. You may use this in conjunction with your written config file, but some settings may not be set using this configuration. Again, it is only an EXAMPLE.
You can start the server using the tigase file found in the scripts sub-directory of Tigase server base directory. There, select the type of linux you have, debian, gentoo, mendriva or redhat. In the root server directory type the following command:
./scripts/{OS}/init.d/tigase start etc/tigase.confWhere {OS} is your *nix operating system.
and you should get the output like this:
Starting Tigase:
nohup: redirecting stderr to stdout
Tigase running pid=18103
The server is started already but how do you know if it is really working and there were no problems. Have a look in the logs/ directory. There should be a few files in there:
 $ ls -l logs/
total 40K
-rw-r--r-- 1 20K 2009-02-03 21:48 tigase-console.log
-rw-r--r-- 1 16K 2009-02-03 21:48 tigase.log.0
-rw-r--r-- 1   0 2009-02-03 21:48 tigase.log.0.lck
-rw-r--r-- 1   6 2009-02-03 21:48 tigase.pid
The first 2 files are the most interesting for us: tigase-console.log and tigase.log.0. The first one contains very limited information and only the most important entries. Have a look inside and check if there are any WARNING or SEVERE entries. If not everything should be fine.
Now you can connect with an XMPP client of your choice with the administrator account you setup earlier.
Tigase XMPP Server can also work on Microsoft Windows systems and servers, although some slight modifications may be necessary to get things ready to run.
Although you may wish to use command line, take note that commands entered in shell may require quotations in some cases.
Make sure that you have Java JDK v8 installed on your system prior to installing Tigase. It will also help to fully setup whatever database software you will be using as well.
Download the Tigase XMPP Server archive from our repository and extract it to a directory of your choice.
Once that is completed, enter the directory win-stuff and run the setup.bat program. This program when run, will extract the necessary files to appropriate places on your computer. The bat file should look like the following:
copy "tigase.ico" "..\"
copy "wrapper\wrapper.jar" "..\jars"
copy "wrapper\wrapper.dll" "..\jars"
copy "wrapper\wrapper.exe" "..\"
copy "wrapper\wrapper.conf" "..\"
copy "wrapper\wrapper-community-license-1.2.txt" "..\"
copy "scripts\*.*" "..\"
To start the server you may use a command prompt from the installation directory
java -cp "jars/*" tigase.server.XMPPServer
Note
this may freeze the command window, and will only display output from Tigase.
Or you may run wrapper.exe or tigase.bat from the GUI.
The cleanest way to operate Tigase in a Windows environment is to install Tigase as a Service by running the InstallTigaseService.bat program. This will install Tigase as a system service, and now the server can be controlled from the services.msc panel. This allows for stopping, starting, and pausing of Tigase XMPP Server and allowing for graceful shutdowns.
For a basic installation, MySQL is recommended over Derby DB. For that purpose, we have included a basic installation guide for MySQL on Windows systems here:
The section describes installation and configuration of the MySQL database to work with Tigase server.
Download the binary package from MySQL download area at mysql.com. Make sure you select executable proper for your operating system.
Run the installation program and follow default installation steps. When the installation is complete find the MySQL elements in the Windows Start menu and run the MySQL Configuration Wizard. Follow the wizard and make sure to check settings against the screenshots in the guide below.
In Welcome window just press 'Next'.(pic.1)

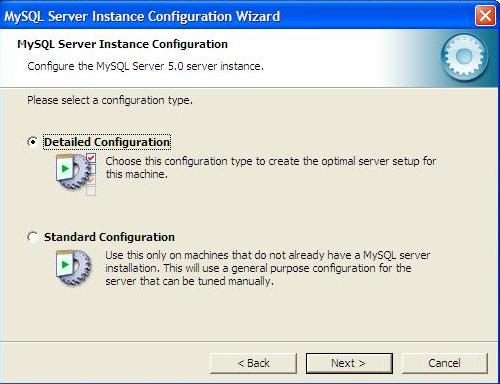
In the next window select option: 'Detailed Configuration' and press 'Next' (pic. 2)
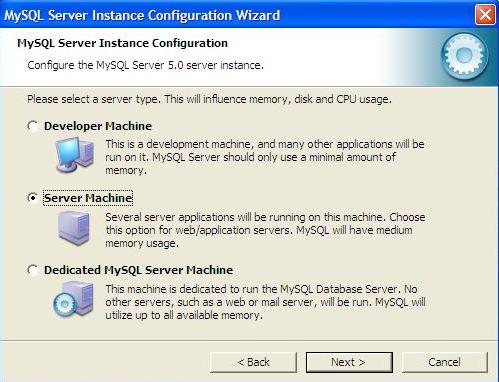
On the next screen select option: 'Server Machine' and press 'Next' (pic. 3)
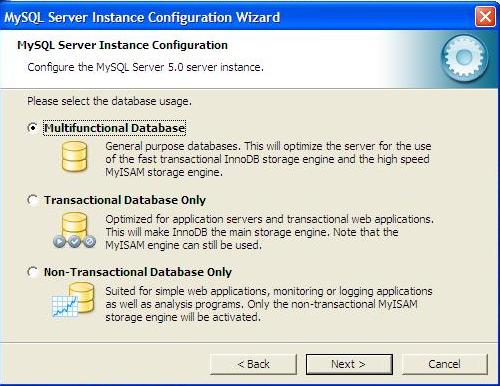
On the forth windows leave the default" 'Multi-functional Database' and press 'Next' (pic. 4)
On the step number five just press 'Next' using defaults. (pic. 5)

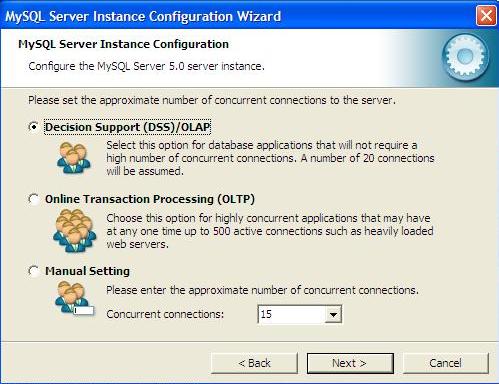
Again, on window 6 select the default - 'Decision Support (DSS)/OLAP' and press 'Next' (pic.6)
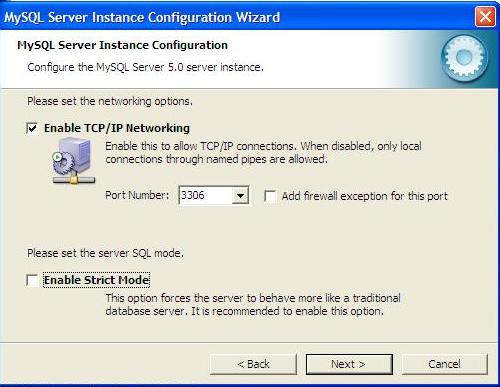
Make sure you switch OFF the 'Strict mode' and and press 'Next' (pic. 7)
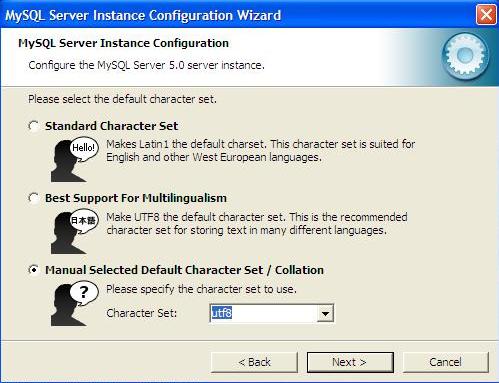
On the character encoding page select: 'Manual Selected Default Character set/ Collation' and 'utf8', press 'Next' (pic.8)
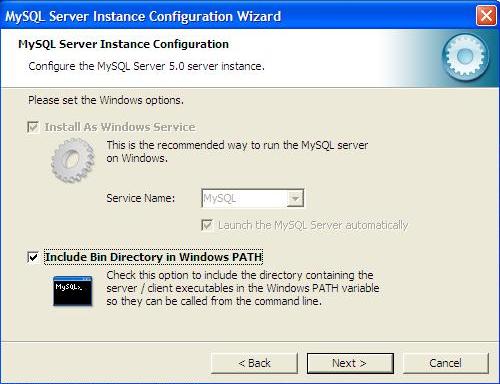
On next window select 'Include Bin Directory in Windows PATH' and press 'Next' (pic.9)
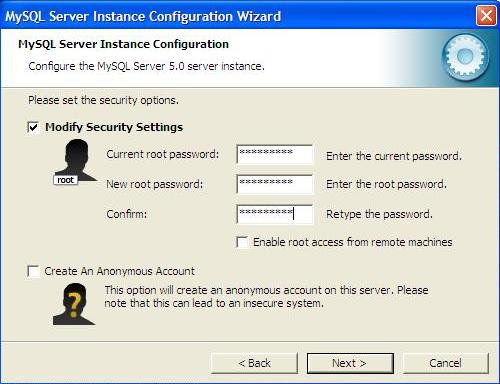
On this window just enter the database super user password and make sure you remember it. When ready press 'Next' (pic. 10)
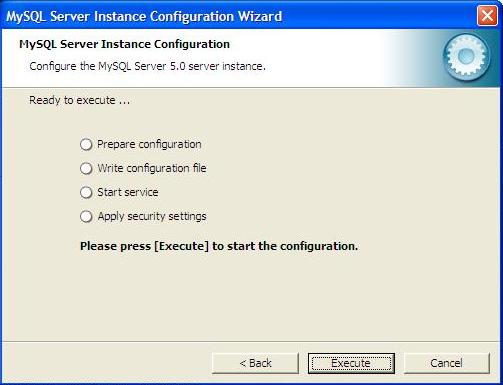
This is the last screen. Press 'Execute' to save the configuration parameters. (pic. 11)
When the configuration is saved you can repeat all the steps and change settings at any time by running: START ⇒ Programs ⇒ MYSQL⇒ MYSQL serwer machine⇒ MySQL Server Instance Config Wizard
Now we have to setup Tigase database. From the Start menu run the MySQL console and enter all commands below finishing them with <ENTER>:
Create the database:
mysql>create database tigasedb;
Add database user:
mysql> GRANT ALL ON tigasedb.* TO tigase_user@'%' IDENTIFIED BY 'tigase_passwd';
mysql> GRANT ALL ON tigasedb.* TO tigase_user@'localhost' IDENTIFIED BY 'tigase_passwd';
mysql> GRANT ALL ON tigasedb.* TO tigase_user IDENTIFIED BY 'tigase_passwd';
mysql> FLUSH PRIVILEGES;
Load Tigase database schema:
mysql> use tigasedb;
mysql> source c:/Program Files/Tigase/database/mysql-schema.sql;
When the system is up and running you can connect with any XMPP client (Psi for example) to your server to see if it is working.
One you have installed Tigase XMPP Server on a machine, you’re going to want to use it. If you are just using for local communications on a network behind a router, you’re all set. Enjoy and use!
However, if you want to have people from other computers outside your network connect to your server, you’re going to have to go through a few more steps to show your server out to the public.
Note
This guide is merely a recommendation of how to get a local server to be open to incoming communications. Any time you open ports, or take other security measures you risk compromising your network security. These are only recommendations, and may not be appropriate for all installations. Please consult your IT Security expert for securing your own installation.
XMPP, being a decentralized communication method, relies on proper DNS records to figure out where and how an XMPP server is setup. Operating an XMPP Server will require you to properly setup DNS routing so not only can clients connect to you, but if you decide to run a federated server and enable server to server communication, you will need to do the same. If you already have a DNS server already, you should have little issue adding these records. If you do not have a DNS setup pointing to your server, you may use a free dynamic name service such as dynu.com.
You will not be able to use an IP Address or a CNAME record to setup an XMPP Server. While it’s not required, an A record can provide some other benefits such serving as a backup in case the SRV record is not configured right.
You will need to set SRV records both for client-to-server (c2s) communication and, if you plan to use it, server to server (s2s) communication. We recommend both records are entered for every server as some resources or clients will check for both records. For this example we will use tigase.org is our domain, and xmpp as the xmpp server subdomain.
SRV records have the following form:
_service._protocol.name. TTL class SRV Priority weight port target.
The key is as follows:
service: is the symbolic name of the desired service, in this case it would be xmpp-client or xmpp-server.protocol: is the transport protocol, either TCP or UDP, XMPP traffic will take place over TCP.name: the domain name where the server resides, in this case tigase.org.TTL: a numeric value for DNS time to live in milliseconds, by default use 86400.class: DNS class field, this is always IN.priority: the priority of the target host with lower numbers being higher priority. Since we are not setting up multiple SRV records, we can use 0.weight: the relative weight for records with the same priority. We can use 5.port: the specific TCP or UDP port where the service can be found. In this case it will be 5222 or 5269.target: the hostname of the machine providing the service, here we will use xmpp.tigase.org.
For our example server, the SRV records will then look like this:
_xmpp-client._TCP.tigase.org 86400 IN SRV 0 5 5222 xmpp.tigase.org
_xmpp-server._TCP.tigase.org 86400 IN SRV 0 5 5269 xmpp.tigase.org
If you don’t want to do all the hosting yourself, you can still have an XMPP service running in your own domain. The only condition right now is proper DNS service record (SRV) configuration that point to the following DNS address: tigase.me.
We highly encourage using SRV records. If you want to register: your-domain.tld on our XMPP service make sure that it resolves correctly:
Service | DNS Type | DNS record | Comment |
| SRV |
| Basic XMPP |
| SRV |
| DirectTLS |
| SRV |
| Federation / s2s connection |
| SRV |
| Federation / s2s connection (MUC) |
| SRV |
| Federation / s2s connection (MIX) |
| SRV |
| Federation / s2s connection (PubSub) |
Note
If you want to have MUC, MIX and PubSub available under your domain as subdomains, you have to setup DNS for your muc.your-domain.tld, mix.your-domain.tld and pubsub.your-domain.tld domains too but they are optional.
You can check if the configuration is correct by issuing following commands:
$ host -t SRV _xmpp-client._tcp.your-domain.tld
$ host -t SRV _xmpps-client._tcp.your-domain.tld
$ host -t SRV _xmpp-server._tcp.your-domain.tld
$ host -t SRV _xmpp-server._tcp.muc.your-domain.tld
$ host -t SRV _xmpp-server._tcp.pubsub.your-domain.tld
Now, how do you register your domain with our service?
There are a few ways. We recommend checking with the Add and Manage Domains section of the documentation on setting that up. If you cannot or don’t want to do it on your own, the way described in the guide please send us a message, either via XMPP to admin@tigase.im or the contact form requesting new domain. User registration is available via in-band registration protocol. You can also specify whether you want to allow anonymous authentication to be available for your domain and you can specify maximum number of users for your domain.
It’s also encouraged to provide dedicated SSL certificate - there are various ways to do it and they are described in the section called “Installing/Loading Certificate To the Tigase Server”. You may want to take advantage of free Let’s Encrypt certificates and automate whole upload and renewal process as described in the section called “Installing LetsEncrypt Certificates in Your Linux System”
If you have a cell phone on a separate network with an XMPP client, you can now try to login to test the server. If that is not handy, you can use an online tool to check proper DNS records such as kingant’s: https://kingant.net/check_xmpp_dns/ and it will tell you if anything is missing.
Once your server is setup, you may need to open at least two ports. By default XMPP communication happens on ports 5222/5269, to which point SRV records. Other ports used by the server are:
3478- TURN or STUN, plain socket, TCP and UDP5349- TURN or STUN, over TLS, TCP and UDP5222- incoming client to server XMPP connections5223- incoming client to server XMPP connections over TLS/SSL, including DirectTLS5269- default s2s port, i.e.: federation support5277- inter-cluster communication5280- default BOSH connections5290- default WebSocket connections5291- default WebSocket connections over TLS/SSL8080- for HTTP server (web-based setup, REST API, file upload extension, etc.)9050- JMX Monitoring
If for any reason you can’t use default ports and have to change them it’s possible to point SRV records those ports. Please keep in mind, that you have to open those ports for incoming connections in your firewall. In case you are using iptables you can use following command to include those ports in your rules:
iptables -A INPUT -p tcp -m tcp --dport 5222 -j ACCEPT
iptables -A INPUT -p tcp -m tcp --dport 5223 -j ACCEPT
iptables -A INPUT -p tcp -m tcp --dport 5269 -j ACCEPT
iptables -A INPUT -p tcp -m tcp --dport 5277 -j ACCEPT
iptables -A INPUT -p tcp -m tcp --dport 5280 -j ACCEPT
iptables -A INPUT -p tcp -m tcp --dport 5290 -j ACCEPT
iptables -A INPUT -p tcp -m tcp --dport 8080 -j ACCEPT
iptables -A INPUT -p tcp -m tcp --dport 9050 -j ACCEPT
Both ports should be setup to use TCP only. If for any reason you want to make service available for different ports you can:
- change ports in Tigase configuration and update DNS SRV records;
forward those ports to default Tigase ports (this is especially useful under *nix operating system if you want to utilize ports lower than
1024while running, as recommended, Tigase service from user account - there is a limitation and user accounts can bind to ports lower than1024), for example usingiptablesrules (in following example we are making available Tigase SSL websocket port available under port443, which is usually opened in corporate firewalls):iptables -t nat -A PREROUTING -p tcp --dport 443 -j REDIRECT --to-ports 5291
As mentioned in each of the quick start sections, each distribution of Tigase XMPP server comes with a number of scripts that are customized for different versions of Linux.
Table 2.8. init.d chart
| Operating system | init.d file path | Types of Operating Systems |
|---|---|---|
Systemd |
| Systemd-based distributions |
Debian |
| Knoppix, Ubuntu (before v15.04), Raspbian or Duvian |
Gentoo |
| CoreOS (before v94.0.0), Tin Hat Linux or other *too based systems |
Mandriva |
| Specific init.d file for Mandriva Linux |
Redhat |
| RedHat (before v7.0) and other RPM based linux derivatives like CentOS (before v.7.14), openSUSE (before v12.2) |
Note
If your operating system is a systemd-based linux distribution, we recommend to use systemd service scripts. It may be possible to use (in this case legacy) init.d startup files as before, but usage of systemd startup scripts will allow better control of the startup process and will even allow for automatic restart of the Tigase XMPP Server in the case of JVM crash.
To set up Tigase XMPP Server as a system service it is required to copy tigase-server.service file to /etc/systemd/system/ directory
sudo cp $SCRIPT_FILE_PATH/tigase-server.service /etc/systemd/system/
This file contains following parameters which may need to be adjusted:
User- Specifies the user that will run the program. This should be a user with SU permissions.WorkingDirectory- Specifies installation directory (default:/home/tigase/tigase-server)ExecStart- Specifies startup command (default: runsscripts/tigase.sh start etc/tigase.confin the Tigase installation directory)ExecStop- Specifies shutdown command (default: runsscripts/tigase.sh stop etc/tigase.confin the Tigase installation directory)PIDFile- Specifies location of the PID file (default:logs/tigase.pidfile in the Tigase installation directory)
It is also required to copy options file tigase-server to /etc/default/ directory
sudo cp $SCRIPT_FILE_PATH/tigase-server /etc/default/
With those files in place you need to reload systemctl daemon
sudo systemctl daemon-reload
Note
If you are upgrading from the previous version of the Tigase XMPP Server which was not running as the systemd system service it is required to uninstall old service and remove old service files.
Once you’ve located the appropriate distribution scripts (please take a look at the table above), copy it to your system’s init.d folder (usually it’s /etc/init.d/):
sudo cp $SCRIPT_FILE_PATH /etc/init.d/tigase
You may also need to make it executable:
sudo chmod +x /etc/init.d/tigase
It is recommended that you open the script files or configuration files as some have some parameters that you will need to specify.
The conf.d script must contain the following parameters:
TIGASE_HOME="/home/tigase/tigase-server"
TIGASE_USER=tigase
TIGASE_CONF="etc/tigase.conf"
The following should be configured:
TIGASE_HOME- Specifies the Tigase Server installation directory.TIGASE_USER- Specifies the user that will run the program. This should be a user with SU permissions.TIGASE_CONF- The location of tigase.conf file, relative to theTIGASE_HOMEdirectory.
Mandriva has a single init.d file, however it should be configured:
…
export JAVA_HOME=/usr/java/jdk1.8.0
export TIGASE_DIR=/opt/tigase/server/
tigase=$TIGASE_DIR/scripts/tigase.sh
prog=tigase
config=$TIGASE_DIR/etc/tigase.conf
…
The following should be configured:
JAVA_HOME- The location of your JDK Installation.TIGASE_DIR- Tigase Server installation directory.tigase- The location of your tigase.sh script. This should not need adjusting if you maintain the default file structure.config- The location of your tigase.conf file. This should not need adjusting if you maintain the default file structure.
pid file will be stored in /var/run/ser.pid
Similar to Mandriva, you will need to configure the init.d file:
…
JAVA_HOME=/usr/lib/jvm/java/

USERNAME=tigase
USERGROUP=tigase
NAME=tigase
DESC="Tigase XMPP server"

TIGASE_HOME=/home/tigase/tigase-server
TIGASE_LIB=${TIGASE_HOME}/jars
TIGASE_CONFIG=/etc/tigase.conf
TIGASE_OPTIONS=
TIGASE_PARAMS=

PIDFILE=
TIGASE_CONSOLE_LOG=
…USERNAME- Username running Tigase, should have su permissions.USERGROUP- The usergroup of the username.NAME- OS name for Tigase program.DESC- Optional description.TIGASE_HOME- The location of your Tigase Server installation directory.TIGASE_LIB- The location of your Tigase Jars folder, you should not need to adjust this if you setTIGASE_HOMEproperly, and maintain the default file structure.TIGASE_CONFIG- The location of your tigase.conf file relative toTIGASE_HOMETIGASE_OPTIONS- Legacy options for Tigase, most are now handled inconfig.tdslor tigase.conf.TIGASE_PARAMS- Parameters passed to command line when launching Tigase.PIDFILE- Location of Tigase PID file if you wish to use custom directory. Default will be located in /logs or /var/temp directory.TIGASE_CONSOLE_LOG- Location of Tigase Server console log file if you wish to use a custom directory. Default will be located in /logs directory, failing that /dev/null.
After you’ve copied the script, in order to install sysinit script you have to add it to the configuration:
/sbin/chkconfig --add tigase
Service can be enabled or disabled service with:
/sbin/chkconfig tigase <on|off|reset>
As with other distributions you should copy init.d script to the correct location. Afterwards it should be edited and correct values for variables need to be set:
…
USERNAME=tigase
USERGROUP=tigase
NAME=tigase
DESC="Tigase XMPP server"

TIGASE_HOME=/usr/share/tigase
TIGASE_CONFIG=/etc/tigase/tigase.config
TIGASE_OPTIONS=
TIGASE_PARAMS=

PIDFILE=
TIGASE_CONSOLE_LOG=
…
USERNAME- Username running Tigase, should have su permissions.USERGROUP- The usergroup of the username.NAME- OS name for Tigase program.DESC- Optional description.TIGASE_HOME- The location of your Tigase Server installation directory.TIGASE_CONFIG- The location of your tigase-server.xml file relative (old configuration format)TIGASE_OPTIONS- command line arguments passed to Tigase server (which may include path toinit.properies(if correcttigase.confconfiguration will be found then it will translate toTIGASE_OPTIONS=" --property-file etc/config.tdsl "TIGASE_PARAMS- Parameters passed to command line when launching Tigase.PIDFILE- Location of Tigase PID file if you wish to use custom directory. Default will be located in/var/run/tigase/tigase.pidor under (in this case relative to tigase home directory)logs/tigase.pid.TIGASE_CONSOLE_LOG- Location of Tigase Server console log file if you wish to use a custom directory. Default will be located in /logs directory, failing that /dev/null.
Afterwards we need to install service in the system with following command:
update-rc.d tigase defaults
There are a number of benefits to running Tigase as a service, one of which is to ensure that the program will run even in the event of a power outage or accidental server restart, Tigase will always be up and running.
Once installation is complete you may start Tigase as a typical systemd service using following command:
sudo systemctl start tigase-server
To stop it, you may run following command:
sudo systemctl stop tigase-server
It is also possible to enable service, to make it start during startup of the operating system:
sudo systemctl enable tigase-server
Once installation is complete, you should be able to start Tigase using the following command:
service tigase start
Tigase should begin running in the background. Since Tigase is now installed as a service, it can be controlled with any of the service commands, such as:
service tigase stopservice tigase restart
Although Tigase XMPP Server can be terminated by ending the process, it is preferred and recommended to use it’s own shutdown scripts instead. Not only does this allow for a proper purge of Tigase form the system, but allows for all shutdown functions to operate, such as amending logs and completing statistics. To trigger a shutdown of Tigase server, the following command can be used from the tigase directory:
./scripts/tigase.sh stop
You may specify the config file if you want, but it will make no differences
This will:
- Begin shutdown thread
- Stop accepting new connections
- Close all current connections
- Collect runtime statistics
- Write statistics to log
- Dump full stacktrace to a file
- Run GC and clear from memory
Upon shutdown, statistics for the server’s runtime will be appended to the log file. For a description of the statistics and what they mean, refer to the Statistics Description portion of the documentation.
To aid with troubleshooting purposes, the full stacktrace will be dumped to a seperate file located at $serverdir/logs/threads-dump.log.# Stacktrace logs will follow the same log file numbering scheme described in Log file description.
This feature is enabled by default, however you may disable this by adding the following to your config.tdsl file:
'shutdown-thread-dump' = false
Starting with v8.0.0 you can now shut down individual cluster nodes without shutting down the whole server. This command will use the SeeOtherHost strategy to direct traffic to other nodes and update the cluster map to gracefully shut down the single node
Shutting down individual nodes can be done VIA Ad-hoc command and fill out the response forms. The command is available from message-router as http://jabber.org/protocol/admin#shutdown.
There have been a number of changes to the user and auth databases since v7.1.0. As a result, if you are upgrading from older versions, you will need to follow this guide.
Note
We recommend installing Tigase XMPP Server 8.0.0 in a separate directory.
As with any migration it is highly recommended that you backup your repository before conducting any upgrade operations.
For MySQL databases:
mysqldump [dbname] --routines -u [username] -p [password] > [filename].sql
After downloading Tigase XMPP Server 8.0.0 from our website, or using wget, extract the files to a separate directory.
Copy the tigase.conf and init.properties files from the old directory to v8.0.0 directory.
cd tigase-server-8.0.0
cp ../tigase-server/etc/tigase.conf etc/
cp ../tigase-server/etc/init.properties etc/
Import the database.
mysql -h [host address] [dbname] -u [username] -p [password] < [filename].sql
mysql -h 198.27.120.213 tigase_tpub -u USERNAME -p <../tpub.2017-05-30.sql
Enter password:
Tigase XMPP Server has a utility that can be called using upgrade-config that will update your old init.properties file and create a new file using DSL.
./scripts/tigase.sh upgrade-config etc/tigase.conf
When everything is ready it will printout following information
=============================================================================
  Configuration file etc/init.properties was converted to DSL format.
  Previous version of a configuration file was saved at etc/init.properties.old
=============================================================================
Edit your new config.tdsl file to connect to the new database you created during the import step.
dataSource {
    default () {
        uri = 'jdbc:mysql://localhost/tigase_tpub?user=tigase_user&password=mypass'
    }
}
userRepository {
    default () {}
}
authRepository {
    default () {}
}Upgrading database schemas is now possible using the upgrade-schema option. Do this now.
./scripts/tigase.sh upgrade-schema etc/tigase.conf
Warning
Your database schema MUST be v8 or conversion will not occur properly!
You will be asked the following prompts:
Database root account username used to create tigase user and database at 198.27.120.213 :

Database root account password used to create tigase user and database at 198.27.120.213 :
Upon success, you should see the following:
=============================================================================
        Schema upgrade finished

  Data source: default with uri
jdbc:mysql://HOST/DATABASE?user=USERNAME&password=PASSWORD
        Checking connection to database ok
        Checking if database exists     ok
        Loading schema: Tigase XMPP Server (Core), version: 8.0.0       ok
        Loading schema: Tigase Message Archiving Component, version: 1.3.0      ok
        Loading schema: Tigase MUC Component, version: 2.5.0    ok
        Loading schema: Tigase PubSub Component, version: 3.3.0 ok
        Adding XMPP admin accounts      warning
                Message: Error: No admin users entered
        Post installation action        ok

=============================================================================
Start Tigase!
Both upgrade commands also have a build in help function, they can be called if needed from the command line.
You can also run these commands for help.
scripts/tigase.sh upgrade-config etc/tigase.conf --help
scripts/tigase.sh upgrade-schema etc/tigase.conf --help
To make upgrade process easier it’s possible to utilize tigase-upgrade.sh *nix shell script. It permits upgrading to new version (supports downloading version from provided URL).
It’s usage is as follows:
./tigase-upgrade.sh {upgrade|rollback} install_package install_directory [tar|dir]Where:
* {upgrade|rollback} - defines whether to perform upgrade or rollback to previous version
* install_package - package to which perform upgrade (can be URL) in case of upgrade or backed-up installation (from which we want to restore) in case of rollback
* install_directory - destination directory (both in upgrade and rollback); can be symlink in which case it will be preserved with upgraded/restored path as target
* [tar|dir] - (optional) type of backup (either simply copy directory or also archive it using tar command); by default dir is used.
To upgrade installation to version tigase-server-8.0.0-SNAPSHOT-b5285-dist-max.tar.gz execute the script as follows:
$ ./tigase-upgrade.sh upgrade tigase-server-8.0.0-SNAPSHOT-b5285-dist-max.tar.gz tigase-server
To rollback from tigase-server-8.0.0-SNAPSHOT-b5264_backup-18-11-05_1712 backup execute script as follows:
bash -x ./tigase-upgrade.sh rollback tigase-server-8.0.0-SNAPSHOT-b5264_backup-18-11-05_1712/ tigase-server