2. Account Management
Welcome to the Account Management section of the Tigase Messenger for Android documentation. All features in this section are accessible through the accounts section of Tigase Messenger for Android, or through Android’s Account Management in Settings.
Once you see the screen for accounts, tap on the account you wish to configure. Once there, you will be presented with this screen:
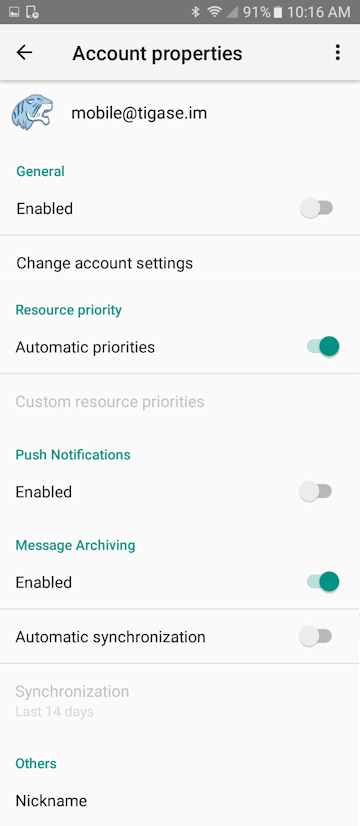
Below is a description of the settings.
Account Properties Lists the account for which you are adjusting settings.
Tapping the user icon will allow you to set vCard data which will allow you to fill in some personal information as well as set a user photo.

2.1. Enabled
This enables or disables the account you are adjusting. If an account is disabled, it will not update presence information, receive messages, or receive push notifications.
2.2. Change Account settings
This allows you to change some settings for the account:
2.2.1. Password
Allows you to change the password on the device. This is only if you need to change the password, it will not change the password to your XMPP account.
2.2.2. Hostname
By default the hostname will be the root of your username (server.com of user@server.com). However, you can specify a FQDN or an IP address if you wish to connect directly.
2.2.3. Resource
This will change the resource name of your JID. The resource is the part after a slash that can denote different devices of the same account. So user@server.com/stork shows TigaseMessenger is the resource (which is set by default).
2.3. Resource priority
2.4. Automatic Priorities
By default this is enabled, which lets Tigase Messenger for Android set appropriate levels the different statuses. Priorities will dictate which resource gets a message when it is sent to a user without a resource. A device with a higher priority will receive the message first before one of a lower priority. For most users, we recommend to keep this function enabled.
2.4.1. Custom Resource Priorities
If you wish to set your own priority for each status you may tap this section.
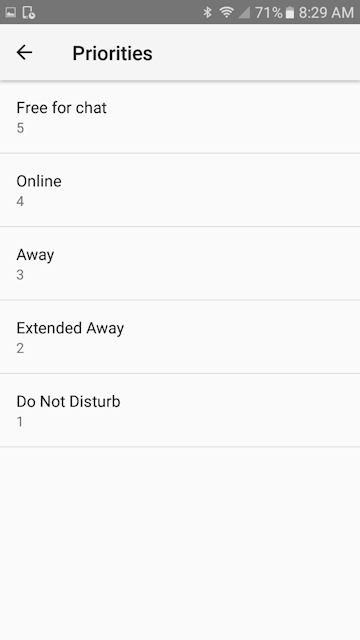
Warning
You should only set your own priorities if you wish to change normal message delivery behavior. Improper priority settings could drastically affect how the application behaves!
2.5. Push Notifications
Whether to enable or disable push notifications to the device. Push Notifications are described in a separate section of this guide. NOTE: Push notifications will only be delivered to a device that has an active & online account. Disabled or offline accounts will not receive push notifications.
2.6. Message Archiving
If the connected server supports it, you may use the Message Archive functionality to retrieve sent and received messages to the configured resource. When enabled, you may either download messages from Roster Contacts (only contacts in your roster) or all conversations to your resource. Disabled will rely on the local storage when available.
2.6.1. Automatic synchronization
This will turn on fetching messages from message archive on the server.
Synchronization
How far back will the application retrieve messages from message archive.
2.7. Others
2.7.1. Nickname
Changing this will change your displayed nickname to other users, for those without a custom name, this name will appear on their contact list.